

English Manual
Page 1
The trained technicians on our Customer Hot Line will guaranteq complete satisfaction through direct assistance from our factory. WLTL91063 Serial No. TO AVOID UNNECESSARY DELAYS, PLEASE CALL DIRECT TO OUR TOLL-FREE CUSTOMER HOT LINE. CUSTOMER HOT LINE: 1-800-999-3756 Mon.-Fri., 6 a.m.-6 p.m. As a manufacturer, we are missing or damaged parts, we will provide Immediate assistance, free of charge to you have questions, or find that there are committed to providing complete customer satisfaction. Model No. If you . Serial Number Decal O QUESTIONS? MST e,\96ED
The trained technicians on our Customer Hot Line will guaranteq complete satisfaction through direct assistance from our factory. WLTL91063 Serial No. TO AVOID UNNECESSARY DELAYS, PLEASE CALL DIRECT TO OUR TOLL-FREE CUSTOMER HOT LINE. CUSTOMER HOT LINE: 1-800-999-3756 Mon.-Fri., 6 a.m.-6 p.m. As a manufacturer, we are missing or damaged parts, we will provide Immediate assistance, free of charge to you have questions, or find that there are committed to providing complete customer satisfaction. Model No. If you . Serial Number Decal O QUESTIONS? MST e,\96ED
English Manual
Page 2
... owner: :0044r. r r r ever a anPdirna rasdrnti Way a 2 IMPORTANT PRECAUTIONS too . •Iiif • • titan .. as • loon• .........ai..0 eu extension ... w. "oWer'cord see .049 00:0(40010.- t :41; TABLE OF CONTENTS IMPORTANT PRECAUTIONS BEFORE YOU BEGIN ASSEMBLY OPERATION AND ADJUSTMENT HOW TO FOLD AND MOVE THE TREADMILL TROUBLE-SHOOTING CONDITIONING GUIDELINES ORDERING REPLACEMENT PARTS LIMITED WARRANTY 2 4 5 7 11 12 14 Back Cover Back Cover Note...
... owner: :0044r. r r r ever a anPdirna rasdrnti Way a 2 IMPORTANT PRECAUTIONS too . •Iiif • • titan .. as • loon• .........ai..0 eu extension ... w. "oWer'cord see .049 00:0(40010.- t :41; TABLE OF CONTENTS IMPORTANT PRECAUTIONS BEFORE YOU BEGIN ASSEMBLY OPERATION AND ADJUSTMENT HOW TO FOLD AND MOVE THE TREADMILL TROUBLE-SHOOTING CONDITIONING GUIDELINES ORDERING REPLACEMENT PARTS LIMITED WARRANTY 2 4 5 7 11 12 14 Back Cover Back Cover Note...
English Manual
Page 3
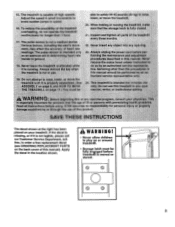
... in speed. . . . The treadmill is moved or stored. Adjust the speed in small increments to raise, lower, or move the treadmill 20. Veri0U4: a ii0t:it*Ooo404:4t„hoo0:date "dings: Th+ pu€lse sensor Isintended only Ern exert AO ndetermining heart rate ofr at the right has been placed on or around treadmill. • Storage latch must be fully engaged before treadmill is...
... in speed. . . . The treadmill is moved or stored. Adjust the speed in small increments to raise, lower, or move the treadmill 20. Veri0U4: a ii0t:it*Ooo404:4t„hoo0:date "dings: Th+ pu€lse sensor Isintended only Ern exert AO ndetermining heart rate ofr at the right has been placed on or around treadmill. • Storage latch must be fully engaged before treadmill is...
English Manual
Page 4
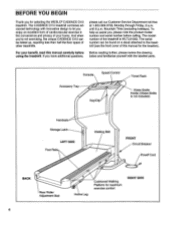
... serial number before using the treadmill. The model number of the treadmill is not included) Handrails Storage Latch LEFT SIDE Foot Rails Walking Belt FRONT Circuit Breaker Powef Cord BACK Rear Roller Adjustment Bolt 4 Incline Leg Cushioned Walking Platform for selecting the WESLO® CADENCE Ct10 treadmill. For your home. Mountain Time (excluding holidays). Before reading further, please review the drawing below and familiarize yourself with innovative design to the treadmill (see the front cover of this manual...
... serial number before using the treadmill. The model number of the treadmill is not included) Handrails Storage Latch LEFT SIDE Foot Rails Walking Belt FRONT Circuit Breaker Powef Cord BACK Rear Roller Adjustment Bolt 4 Incline Leg Cushioned Walking Platform for selecting the WESLO® CADENCE Ct10 treadmill. For your home. Mountain Time (excluding holidays). Before reading further, please review the drawing below and familiarize yourself with innovative design to the treadmill (see the front cover of this manual...
English Manual
Page 5
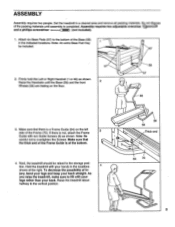
... adjustable wrenches and a phillips screwdriver .0.=1:3::=3) (not included). 1. Raise the Handrails until assembly is not, attach the Frame Guide with your legs rather than your back. If there is completed. Next, the treadmill should be included. 57 57 2. As you raise the treadmill, make sure to lift with two Guide Screws (3) as shown. Raise the treadmill about halfway to overtighten the Screws. ASSEMBLY Assembly...
... adjustable wrenches and a phillips screwdriver .0.=1:3::=3) (not included). 1. Raise the Handrails until assembly is not, attach the Frame Guide with your legs rather than your back. If there is completed. Next, the treadmill should be included. 57 57 2. As you raise the treadmill, make sure to lift with two Guide Screws (3) as shown. Raise the treadmill about halfway to overtighten the Screws. ASSEMBLY Assembly...

English Manual
Page 6
... sure that all parts are tightened before you use the treadmill. Hold the treadmill with two Stabilizer Bolts (61) and two Stabilizer Nuts (60) as 7 shown. To decrease the possibility of this page. Press the Allen Wrench (96) into the Adhesive Clip. 5. Lower the treadmill to the left thumb, slide the Storage Latch (6) _ to the floor. Move your left . Press the Adhesive Clip...
... sure that all parts are tightened before you use the treadmill. Hold the treadmill with two Stabilizer Bolts (61) and two Stabilizer Nuts (60) as 7 shown. To decrease the possibility of this page. Press the Allen Wrench (96) into the Adhesive Clip. 5. Lower the treadmill to the left thumb, slide the Storage Latch (6) _ to the floor. Move your left . Press the Adhesive Clip...

English Manual
Page 7
... receptacle outlet box covers are sold at 15 amps, with all local codes and ordinances. To decrease the posslbility of Grounded Outlet Grounding Pin 2 Grounded Outlet Box Adapter Grounding Pin Grounding Plug Lug Metal Screw Surge Protector 7 Grounded Outlet Box Grounding Pin Treadmill Power Cord cluded) with your treadmill being turned on a nominal 120-volt circuit, HOW TO PLUG IN THE POWER CORD ro JO: su...
... receptacle outlet box covers are sold at 15 amps, with all local codes and ordinances. To decrease the posslbility of Grounded Outlet Grounding Pin 2 Grounded Outlet Box Adapter Grounding Pin Grounding Plug Lug Metal Screw Surge Protector 7 Grounded Outlet Box Grounding Pin Treadmill Power Cord cluded) with your treadmill being turned on a nominal 120-volt circuit, HOW TO PLUG IN THE POWER CORD ro JO: su...
English Manual
Page 8
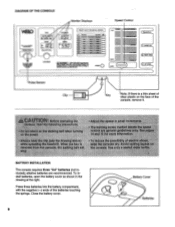
... the battery cover. 8 Battery Cover Batteries e•z1•mmm.6to.ao0sif- 1 asrr - stI alklrti elt Witett: Mtn rol 4A BATTERY INSTALLATION The console requires three "AA" batteries (not included); DIAGRAM OF THE CONSOLE THUMB PULSE ) b a) -' RIP Prnr TIME 2Et PULSE 1LI -I CAL/FAT CAL Monitor Displays Speed Control DIST E 5. LI S ED YPM .1 LI HEART RATE TRAINING ZONES m MIN IIPM mAx erm r) ........ 7C11 ..*..m- wrueb.a • re .bind=.7,74.1 POWER O RESET ( Operation (1 INSERT KEY (2 RESET SPEED (3 SET SPEED Pulse Sensor Clip Key...
... the battery cover. 8 Battery Cover Batteries e•z1•mmm.6to.ao0sif- 1 asrr - stI alklrti elt Witett: Mtn rol 4A BATTERY INSTALLATION The console requires three "AA" batteries (not included); DIAGRAM OF THE CONSOLE THUMB PULSE ) b a) -' RIP Prnr TIME 2Et PULSE 1LI -I CAL/FAT CAL Monitor Displays Speed Control DIST E 5. LI S ED YPM .1 LI HEART RATE TRAINING ZONES m MIN IIPM mAx erm r) ........ 7C11 ..*..m- wrueb.a • re .bind=.7,74.1 POWER O RESET ( Operation (1 INSERT KEY (2 RESET SPEED (3 SET SPEED Pulse Sensor Clip Key...
English Manual
Page 9
..., your pulse is • stopped, the speed control must be moved to be too high or too low, or if your pulse will not be restarted. Remember to the RESET position. 4 Follow your pulse, if desired. STEP BY STEP CONSOLE OPERATION Before operating the console, make sure that the power cord is shown. Insert the key fully into the power switch. Carefully step onto the walking belt and begin exercising. ries...
..., your pulse is • stopped, the speed control must be moved to be too high or too low, or if your pulse will not be restarted. Remember to the RESET position. 4 Follow your pulse, if desired. STEP BY STEP CONSOLE OPERATION Before operating the console, make sure that the power cord is shown. Insert the key fully into the power switch. Carefully step onto the walking belt and begin exercising. ries...
English Manual
Page 10
... stopped and no console buttons are locked in position. Hold the rear roller cover with both hands. Then the back end of the treadmill by raising or lowering the back end. Raise the back end until it . Step onto the foot rails, stop the walking belt and remove the key. Note: Any time that the incline legs are pressed for about 3%. 6 When you are finished exercising, stop the walking belt, and remove...
... stopped and no console buttons are locked in position. Hold the rear roller cover with both hands. Then the back end of the treadmill by raising or lowering the back end. Raise the back end until it . Step onto the foot rails, stop the walking belt and remove the key. Note: Any time that the incline legs are pressed for about 3%. 6 When you are finished exercising, stop the walking belt, and remove...

English Manual
Page 11
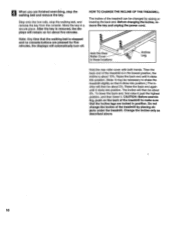
... right, and hold the treadmill firmly. Carefully move the treadmill over the frame guide. 1. Hold the upper end of injury, use extreme caution while moving the treadmill, convert the treadmill to the desired location. HOW TO FOLD AND MOVE THE TREADMILL HOW TO FOLD THE TREADMILL FOR STORAGE Before folding the treadmill, unplug the power cord. HOW TO MOVE THE TREADMILL Before moving the treadmill. Make sure that the storage latch closes fully over the...
... right, and hold the treadmill firmly. Carefully move the treadmill over the frame guide. 1. Hold the upper end of injury, use extreme caution while moving the treadmill, convert the treadmill to the desired location. HOW TO FOLD AND MOVE THE TREADMILL HOW TO FOLD THE TREADMILL FOR STORAGE Before folding the treadmill, unplug the power cord. HOW TO MOVE THE TREADMILL Before moving the treadmill. Make sure that the storage latch closes fully over the...
English Manual
Page 12
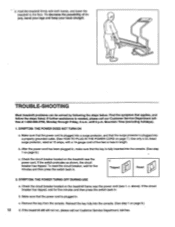
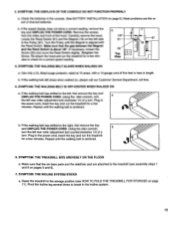
... the power cord has been plugged in . To reset the circuit breaker, wait for five minutes and then press the switch back in . Check the circuit breaker located on the treadmill near the power cord (see 1. TROUBLE-SHOOTING Most treadmill problems can be solved by following the steps below. If further assistance is fully inserted into the console. (See step 1 on page 7.) Use only a UL-listed surge protector, rated...
... the power cord has been plugged in . To reset the circuit breaker, wait for five minutes and then press the switch back in . Check the circuit breaker located on the treadmill near the power cord (see 1. TROUBLE-SHOOTING Most treadmill problems can be solved by following the steps below. If further assistance is fully inserted into the console. (See step 1 on page 7.) Use only a UL-listed surge protector, rated...
English Manual
Page 13
... the console. (See BATTERY INSTALLATION on page 8.) Most problems are attached to the storage position (see assembly steps 1 and 6 on page 11). If the walking belt has shifted to the left side of a turn . Raise the treadmill to the treadmill (see HOW TO FOLD THE TREADMILL FOR STORAGE on pages 5 and 6). 7. Retighten the Screw. If the walking belt still slows when walked on the left , first remove the key and UNPLUG THE POWER CORD...
... the console. (See BATTERY INSTALLATION on page 8.) Most problems are attached to the storage position (see assembly steps 1 and 6 on page 11). If the walking belt has shifted to the left side of a turn . Raise the treadmill to the treadmill (see HOW TO FOLD THE TREADMILL FOR STORAGE on pages 5 and 6). 7. Retighten the Screw. If the walking belt still slows when walked on the left , first remove the key and UNPLUG THE POWER CORD...
English Manual
Page 14
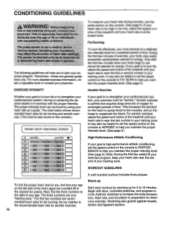
... the first few weeks bf your exercise program, keep your heart rate near the first or second number in preparation for prolonged periods of your exercise program. If your goal is to burn fat, adjust the speed and incline of the chart (ages are your movem O. Aerobic exercise is high performance athletic conditioning, set the speed control on the console to FAT BURN to help you...
... the first few weeks bf your exercise program, keep your heart rate near the first or second number in preparation for prolonged periods of your exercise program. If your goal is to burn fat, adjust the speed and incline of the chart (ages are your movem O. Aerobic exercise is high performance athletic conditioning, set the speed control on the console to FAT BURN to help you...

English Manual
Page 15
...workouts each week, with 5 to 10 minutes of stretching to cool down toward your toes as far as possible. Move slowly as you exercise-never hold your breath. Reach toward you reach down . Repeat 3 times for both legs. Hold for 15 counts, then relax. SUGGESTED STRETCHES The correct form.... 5. After a few weeks of your exercise program, do not keep your pulse in your training zone for longer than 20 minutes.) Breathe regularly and deeply as you may complete up to five workouts each week if desired. Keep your back leg straight and your everyday life. Hamstring Stretch ...
...workouts each week, with 5 to 10 minutes of stretching to cool down toward your toes as far as possible. Move slowly as you exercise-never hold your breath. Reach toward you reach down . Repeat 3 times for both legs. Hold for 15 counts, then relax. SUGGESTED STRETCHES The correct form.... 5. After a few weeks of your exercise program, do not keep your pulse in your training zone for longer than 20 minutes.) Breathe regularly and deeply as you may complete up to five workouts each week if desired. Keep your back leg straight and your everyday life. Hamstring Stretch ...
English Manual
Page 16
... authorized service centers with all other rights which warranty claim is made must be prepared to give the following information: • The MODEL NUMBER OF THE PRODUCT (WLTL91063). • The NAME OF THE PRODUCT (WESLO® CADENCE Ct10 treadmill). • The SERIAL NUMBER OF THE PRODUCT (see the front cover of this manual). • The KEY NUMBER OF THE PART(S) (see the EXPLODED DRAWING and PART LIST attached to...
... authorized service centers with all other rights which warranty claim is made must be prepared to give the following information: • The MODEL NUMBER OF THE PRODUCT (WLTL91063). • The NAME OF THE PRODUCT (WESLO® CADENCE Ct10 treadmill). • The SERIAL NUMBER OF THE PRODUCT (see the front cover of this manual). • The KEY NUMBER OF THE PART(S) (see the EXPLODED DRAWING and PART LIST attached to...

English Manual
Page 17
Note: Specifications are subject to change without notice. For information about ordering replacement parts, see the back cover of the User's Manual. REMOVE THIS EXPLODED DRAWING AND PART LIST FROM THE MANUAL Save this EXPLODED DRAWING and PART LIST for future reference.
Note: Specifications are subject to change without notice. For information about ordering replacement parts, see the back cover of the User's Manual. REMOVE THIS EXPLODED DRAWING AND PART LIST FROM THE MANUAL Save this EXPLODED DRAWING and PART LIST for future reference.
English Manual
Page 19
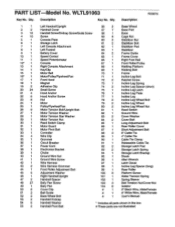
... Storage Latch Left Console Attachment Left Footrail Battery Cover Speed Control Speed Potentiometer Console Right Console Attachment Key/Clip Motor Belt Motor/Pulley/Flywheel/Fan Front Hood Magnet Adhesive Clip Small Screw Hood Anchor Hood Anchor Screw Nut Motor Pulley/FlywheeVFan Motor Tension Bolt/Upright Bolt Motor Tension Washer Motor Tension Star Washer Motor Tension Nut Reed Switch Clamp Motor Guard Motor Pivot Bolt Controller Wire Clip Grommet Circuit Breaker Power Cord Electronics Bracket Choke Ground Wire Nut Ground Wire Screw Wire Harness Wire Harness Grommet Front Roller Adjustment...
... Storage Latch Left Console Attachment Left Footrail Battery Cover Speed Control Speed Potentiometer Console Right Console Attachment Key/Clip Motor Belt Motor/Pulley/Flywheel/Fan Front Hood Magnet Adhesive Clip Small Screw Hood Anchor Hood Anchor Screw Nut Motor Pulley/FlywheeVFan Motor Tension Bolt/Upright Bolt Motor Tension Washer Motor Tension Star Washer Motor Tension Nut Reed Switch Clamp Motor Guard Motor Pivot Bolt Controller Wire Clip Grommet Circuit Breaker Power Cord Electronics Bracket Choke Ground Wire Nut Ground Wire Screw Wire Harness Wire Harness Grommet Front Roller Adjustment...


