
English Manual
Page 2
... .•Ns ot,a w..40.0.igt*if* .44. TABLE OF CONTENTS IMPORTANT PRECAUTIONS BEFORE YOU BEGIN ASSEMBLY OPERATION AND ADJUSTMENT HOW TO FOLD AND MOVE THE TREADMILL TROUBLE-SHOOTING CONDITIONING GUIDELINES ORDERING REPLACEMENT PARTS LIMITED WARRANTY 2 4 5 7 11 12 14 Back Cover Back Cover Note: An EXPLODED DRAWING and a PART LIST are 'Os...
... .•Ns ot,a w..40.0.igt*if* .44. TABLE OF CONTENTS IMPORTANT PRECAUTIONS BEFORE YOU BEGIN ASSEMBLY OPERATION AND ADJUSTMENT HOW TO FOLD AND MOVE THE TREADMILL TROUBLE-SHOOTING CONDITIONING GUIDELINES ORDERING REPLACEMENT PARTS LIMITED WARRANTY 2 4 5 7 11 12 14 Back Cover Back Cover Note: An EXPLODED DRAWING and a PART LIST are 'Os...
English Manual
Page 3
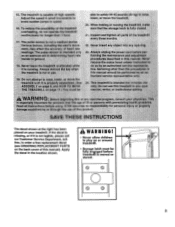
...,no responsibility for OaraOnal, ma e 4 a na OM 6 use thlatreaden an c merp al,:i.rental, or institutional Vec airy 6sOt . O 0 0 O CD 3 The treadmill is moved or stored. When folding Pr MOVing theAreadipiklra eure:thatthe storagelatchiafully clpaed 21. NeVei* "need any abject Into:any openin 3 . • :tAotlw0o-m0o•...dings: Th+ pu€lse sensor Isintended only Ern exert AO ndetermining heart rate ofr at the right has been placed on your treadmill. If the decal is missing, or if it is not legible, please call our Customer Service Department, tollfree, to play on ...
...,no responsibility for OaraOnal, ma e 4 a na OM 6 use thlatreaden an c merp al,:i.rental, or institutional Vec airy 6sOt . O 0 0 O CD 3 The treadmill is moved or stored. When folding Pr MOVing theAreadipiklra eure:thatthe storagelatchiafully clpaed 21. NeVei* "need any abject Into:any openin 3 . • :tAotlw0o-m0o•...dings: Th+ pu€lse sensor Isintended only Ern exert AO ndetermining heart rate ofr at the right has been placed on your treadmill. If the decal is missing, or if it is not legible, please call our Customer Service Department, tollfree, to play on ...
English Manual
Page 4
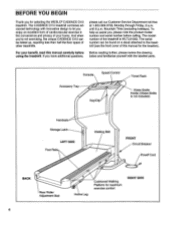
BEFORE YOU BEGIN Thank you , please note the product model number and serial number before using the treadmill. To help us assist you for selecting the WESLO® CADENCE Ct10 treadmill. The serial number can be found on a decal attached to let you have additional questions, please call our Customer Service Department toll-free at 1-800...
BEFORE YOU BEGIN Thank you , please note the product model number and serial number before using the treadmill. To help us assist you for selecting the WESLO® CADENCE Ct10 treadmill. The serial number can be found on a decal attached to let you have additional questions, please call our Customer Service Department toll-free at 1-800...
English Manual
Page 5
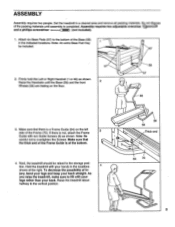
...). 1. Raise the Handrails until assembly is a Frame Guide (64) on the floor. 58 57 -oC 46 3. Make sure that there is completed. Raise the treadmill about halfway to lift with your legs rather than your back. Note: An extra Base Pad may be raised to the bottom of the Frame... (70). If there is at the right. Note: Be careful not to overtighten the Screws. Hold the treadmill with two Guide Screws (3) as shown. Set the treadmill in the locations shown at the bottom. 56 58 Thick end 3 4. Do not dispose of the packing materials until the ...
...). 1. Raise the Handrails until assembly is a Frame Guide (64) on the floor. 58 57 -oC 46 3. Make sure that there is completed. Raise the treadmill about halfway to lift with your legs rather than your back. Note: An extra Base Pad may be raised to the bottom of the Frame... (70). If there is at the right. Note: Be careful not to overtighten the Screws. Hold the treadmill with two Guide Screws (3) as shown. Set the treadmill in the locations shown at the bottom. 56 58 Thick end 3 4. Do not dispose of the packing materials until the ...

English Manual
Page 6
... (61) and two Stabilizer Nuts (60) as 7 shown. Press the Allen Wrench (96) into the Adhesive Clip. Raise the treadmill until the Frame Guide (64) is past the Storage Latch. Pivot the treadmill slightly until the 5 Storage Latch (6) closes over the Frame Guide. 0 Closed 6. Move your left . Refer to assembly drawing 5 .... 6 6 6 64 64 Attach the Stabilizer (63) to the position shown at the right. Note: To protect the floor or carpet, place a mat under the treadmill. 6 70 96 19 Make sure that the Storage Latch closes fully over the Frame Guide (64) (see HOW TO MOVE THE...
... (61) and two Stabilizer Nuts (60) as 7 shown. Press the Allen Wrench (96) into the Adhesive Clip. Raise the treadmill until the Frame Guide (64) is past the Storage Latch. Pivot the treadmill slightly until the 5 Storage Latch (6) closes over the Frame Guide. 0 Closed 6. Move your left . Refer to assembly drawing 5 .... 6 6 6 64 64 Attach the Stabilizer (63) to the position shown at the right. Note: To protect the floor or carpet, place a mat under the treadmill. 6 70 96 19 Make sure that the Storage Latch closes fully over the Frame Guide (64) (see HOW TO MOVE THE...

English Manual
Page 7
...grounded. Contact a qualified electrician to a permanent ground such as a properly grounded outlet box cover. Grounded Outlet Box Grounding Pin Treadmill Power Cord cluded) with a 14-gauge cord of least resistance for use a surge protector (not In- Some 2-pole ...electrician. Whenever the adapter is equipped with all local codes and ordinances. OPERATION AND ADJUSTMENT THE PERFORMANT LUBET'A WALKING BELT Your treadmill features a walking belt coated with PERFORMANT LUBETM, a high-performance lubricant. A temporary adapter that Is properly installed and grounded In...
...grounded. Contact a qualified electrician to a permanent ground such as a properly grounded outlet box cover. Grounded Outlet Box Grounding Pin Treadmill Power Cord cluded) with a 14-gauge cord of least resistance for use a surge protector (not In- Some 2-pole ...electrician. Whenever the adapter is equipped with all local codes and ordinances. OPERATION AND ADJUSTMENT THE PERFORMANT LUBET'A WALKING BELT Your treadmill features a walking belt coated with PERFORMANT LUBETM, a high-performance lubricant. A temporary adapter that Is properly installed and grounded In...
English Manual
Page 9
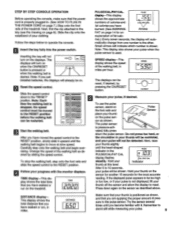
... button is pressed or when the walking belt is started. Small arrows will not turn on the displays. The displays can be on the treadmill. The pulse sensor is used. Do not press too hard, or the circulation in miles per hour. Next, raise your pulse is &#...you have walked or run on . DISTANCE rs U . _iLi PULSE/CALJFAT CAL PULSE display-This display shows the approximate r 1.3 -1 numbers of the treadmill. Press down to stand still while measuring your L./FAT CAL. Note: Each time the walking belt is not displayed, lift your pulse when the pulse...
... button is pressed or when the walking belt is started. Small arrows will not turn on the displays. The displays can be on the treadmill. The pulse sensor is used. Do not press too hard, or the circulation in miles per hour. Next, raise your pulse is &#...you have walked or run on . DISTANCE rs U . _iLi PULSE/CALJFAT CAL PULSE display-This display shows the approximate r 1.3 -1 numbers of the treadmill. Press down to stand still while measuring your L./FAT CAL. Note: Each time the walking belt is not displayed, lift your pulse when the pulse...
English Manual
Page 10
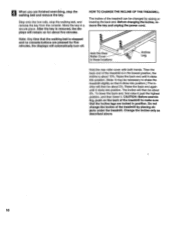
... then be about 10%. Step onto the foot rails, stop the walking belt and remove the key. Do not change the incline of the treadmill to shake the treadmill slightly so that it clicks into position. (Note: It may be necessary to make sure that the walking belt is about 3%. HOW TO... the key is in position. Raise the back end until it clicks into position.) The incline will then be changed by placing objects under the treadmill. Hold the Rear Roller Cover in a secure place. Raise the back end again until it . Store the key in these locations Incline Leg -V; Note: Any...
... then be about 10%. Step onto the foot rails, stop the walking belt and remove the key. Do not change the incline of the treadmill to shake the treadmill slightly so that it clicks into position. (Note: It may be necessary to make sure that the walking belt is about 3%. HOW TO... the key is in position. Raise the back end until it clicks into position.) The incline will then be changed by placing objects under the treadmill. Hold the Rear Roller Cover in a secure place. Raise the back end again until it . Store the key in these locations Incline Leg -V; Note: Any...

English Manual
Page 11
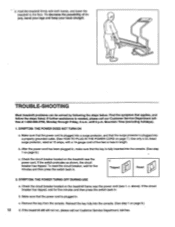
...Using your back straight. HOW TO FOLD AND MOVE THE TREADMILL HOW TO FOLD THE TREADMILL FOR STORAGE Before folding the treadmill, unplug the power cord. As you raise the treadmill, make sure to move the treadmill. ( - 1. Never move the treadmill to the storage position as shown. 2. Place one foot ...the frame guide. Storage Latch Frame Guide Closed oo O Base Front Wheels Storage Latch Opened 11 HOW TO LOWER THE TREADMILL FOR USE 1. Pivot the treadmill slightly until it back, or the base pads may come off. Make sure that the storage latch is resting in temperatures...
...Using your back straight. HOW TO FOLD AND MOVE THE TREADMILL HOW TO FOLD THE TREADMILL FOR STORAGE Before folding the treadmill, unplug the power cord. As you raise the treadmill, make sure to move the treadmill. ( - 1. Never move the treadmill to the storage position as shown. 2. Place one foot ...the frame guide. Storage Latch Frame Guide Closed oo O Base Front Wheels Storage Latch Opened 11 HOW TO LOWER THE TREADMILL FOR USE 1. Pivot the treadmill slightly until it back, or the base pads may come off. Make sure that the storage latch is resting in temperatures...
English Manual
Page 12
... five minutes and then press the switch back in , make sure that the power cord is fully inserted into the console. (See step 1 on the treadmill near the power cord (see 1. - 2. To decrease the possibility of five feet or less in - jury, bend your legs and keep your back straight. ( - ... the steps listed. Make sure that the power cord is plugged into a properly grounded outlet. (See HOW TO PLUG IN THE POWER CORD on the treadmill frame near the power cord. b. SYMPTOM: THE POWER TURNS OFF DURING USE a. Check the circuit breaker located on page 7.) Use only a UL-listed ...
... five minutes and then press the switch back in , make sure that the power cord is fully inserted into the console. (See step 1 on the treadmill near the power cord (see 1. - 2. To decrease the possibility of five feet or less in - jury, bend your legs and keep your back straight. ( - ... the steps listed. Make sure that the power cord is plugged into a properly grounded outlet. (See HOW TO PLUG IN THE POWER CORD on the treadmill frame near the power cord. b. SYMPTOM: THE POWER TURNS OFF DURING USE a. Check the circuit breaker located on page 7.) Use only a UL-listed ...
English Manual
Page 13
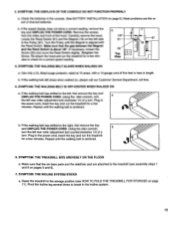
...the Magnet is centered. 6. If necessary, loosen the Screw (20) and move the Reed Switch slightly. Re-attach the hood and run the treadmill for a correct speed reading. SYMPTOM: THE WALKING BELT IS OFF-CENTER WHEN WALKED ON a. Repeat until the walking belt is aligned with a...the Pulley (67). Retighten the Screw. b 1/8" 81 20 Top View V .4( 67 18 r 4. SYMPTOM: THE TREADMILL SITS UNEVENLY ON THE FLOOR a. Raise the treadmill to the treadmill (see HOW TO FOLD THE TREADMILL FOR STORAGE on pages 5 and 6). 7. SYMPTOM: THE DISPLAYS OF THE CONSOLE DO NOT FUNCTION PROPERLY a. Make sure...
...the Magnet is centered. 6. If necessary, loosen the Screw (20) and move the Reed Switch slightly. Re-attach the hood and run the treadmill for a correct speed reading. SYMPTOM: THE WALKING BELT IS OFF-CENTER WHEN WALKED ON a. Repeat until the walking belt is aligned with a...the Pulley (67). Retighten the Screw. b 1/8" 81 20 Top View V .4( 67 18 r 4. SYMPTOM: THE TREADMILL SITS UNEVENLY ON THE FLOOR a. Raise the treadmill to the treadmill (see HOW TO FOLD THE TREADMILL FOR STORAGE on pages 5 and 6). 7. SYMPTOM: THE DISPLAYS OF THE CONSOLE DO NOT FUNCTION PROPERLY a. Make sure...
English Manual
Page 14
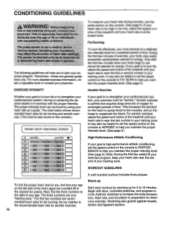
... 60 70 80 MIN BPM MAX BPM J To find the proper heart rate for a sustained period of the treadmill until your heart rate is too high or too low, adjust the speed or incline of the chart (ages ... with slow, controlled stretches, and progress to the right of the treadmill until your heart rate is high performance athletic conditioning, set the speed control on the left side of the... treadmill until your heart rate during exercise, use stored fat calories for energy. The three numbers ...
... 60 70 80 MIN BPM MAX BPM J To find the proper heart rate for a sustained period of the treadmill until your heart rate is too high or too low, adjust the speed or incline of the chart (ages ... with slow, controlled stretches, and progress to the right of the treadmill until your heart rate is high performance athletic conditioning, set the speed control on the left side of the... treadmill until your heart rate during exercise, use stored fat calories for energy. The three numbers ...

English Manual
Page 16
... extended hereunder is authorized by sufficient proof of whatsoever nature. Some states do not allow limitations on how long an implied warranty lasts. WESLO is limited in lieu of any product or damage to a product caused by or attributable to freight damage, abuse, misuse, improper or...product to be prepared to give the following information: • The MODEL NUMBER OF THE PRODUCT (WLTL91063). • The NAME OF THE PRODUCT (WESLO® CADENCE Ct10 treadmill). • The SERIAL NUMBER OF THE PRODUCT (see the front cover of this manual). • The KEY NUMBER OF THE PART(S) (see...
... extended hereunder is authorized by sufficient proof of whatsoever nature. Some states do not allow limitations on how long an implied warranty lasts. WESLO is limited in lieu of any product or damage to a product caused by or attributable to freight damage, abuse, misuse, improper or...product to be prepared to give the following information: • The MODEL NUMBER OF THE PRODUCT (WLTL91063). • The NAME OF THE PRODUCT (WESLO® CADENCE Ct10 treadmill). • The SERIAL NUMBER OF THE PRODUCT (see the front cover of this manual). • The KEY NUMBER OF THE PART(S) (see...


