
English Manual
Page 1
...? TO AVOID UNNECESSARY DELAYS, PLEASE CALL DIRECT TO OUR TOLL-FREE CUSTOMER HOT LINE. vvEsio CADENCE® Model No. Nig tance, free of charge to providing complete customer satisfaction. CUSTOMER HOT LINE: 1-800-999-3756 Mon.-Fri., 6 a.m.-6 p.m. As a manufacturer, we will provide immediate assis- If you . MST A 0 = OWNER'S MANUAL WLTL85564 Serial No. AC1. Serial Number Decal O MAR 0 3 1998 ,1? mitted to...
...? TO AVOID UNNECESSARY DELAYS, PLEASE CALL DIRECT TO OUR TOLL-FREE CUSTOMER HOT LINE. vvEsio CADENCE® Model No. Nig tance, free of charge to providing complete customer satisfaction. CUSTOMER HOT LINE: 1-800-999-3756 Mon.-Fri., 6 a.m.-6 p.m. As a manufacturer, we will provide immediate assis- If you . MST A 0 = OWNER'S MANUAL WLTL85564 Serial No. AC1. Serial Number Decal O MAR 0 3 1998 ,1? mitted to...
English Manual
Page 2
m o an 0 al ins ci C ma e s doe 2 r. \NERO CADENCE '44 TABLE OF CONTENTS IMPORTANT PRECAUTIONS BEFORE YOU BEGIN ASSEMBLY OPERATION AND ADJUSTMENT TROUBLE-SHOOTING AND STORAGE CONDITIONING GUIDELINES PART LIST EXPLODED DRAWING ORDERING REPLACEMENT PARTS LIMITED WARRANTY 3 4 5 7 10 12 14 15 Back Cover Back Cover - . r. $ • • 9 .4."4 ;444' • • L •
m o an 0 al ins ci C ma e s doe 2 r. \NERO CADENCE '44 TABLE OF CONTENTS IMPORTANT PRECAUTIONS BEFORE YOU BEGIN ASSEMBLY OPERATION AND ADJUSTMENT TROUBLE-SHOOTING AND STORAGE CONDITIONING GUIDELINES PART LIST EXPLODED DRAWING ORDERING REPLACEMENT PARTS LIMITED WARRANTY 3 4 5 7 10 12 14 15 Back Cover Back Cover - . r. $ • • 9 .4."4 ;444' • • L •
English Manual
Page 3
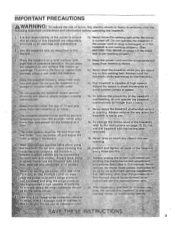
.... Never remove the motor hood unless Instructed to persons, read the following important precautions and information before per forming the maintenance and adjustment procedures described in this manual. 12. This treadmill is intended for longer than 250 pounds. AVE THESE INSTRUCTIONS 3 Keep children under the treadmill. 4. Never allow more than 1 hour•. 17. Wear appropriate exercise attire whenusing the treadmill. women. q.•When connecting the power cord...
.... Never remove the motor hood unless Instructed to persons, read the following important precautions and information before per forming the maintenance and adjustment procedures described in this manual. 12. This treadmill is intended for longer than 250 pounds. AVE THESE INSTRUCTIONS 3 Keep children under the treadmill. 4. Never allow more than 1 hour•. 17. Wear appropriate exercise attire whenusing the treadmill. women. q.•When connecting the power cord...

English Manual
Page 4
... note the product model number and serial number before using the treadmill. Before reading further, please review the drawing below and familiarize yourself with innovative design to the treadmill (see the front cover of your benefit, read this manual for selecting the WESLO CADENCE® 855 treadmill. Key/Clip Water Bottle Holder (Bottle not included) Handrails Upright FRONT Walking Belt Motor Hood Circuit Breaker Rear Rol er Adjustment Bolt 4 Foot Rail Incline Pin Power Cord RIGHT SIDE...
... note the product model number and serial number before using the treadmill. Before reading further, please review the drawing below and familiarize yourself with innovative design to the treadmill (see the front cover of your benefit, read this manual for selecting the WESLO CADENCE® 855 treadmill. Key/Clip Water Bottle Holder (Bottle not included) Handrails Upright FRONT Walking Belt Motor Hood Circuit Breaker Rear Rol er Adjustment Bolt 4 Foot Rail Incline Pin Power Cord RIGHT SIDE...
English Manual
Page 5
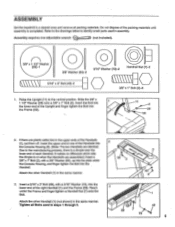
... manufacturing process, there is completed. Insert the Bolt into the lower end of the Upright and finger tighten the Bolt into the lower end of the Handrails into the Handrail. Raise the Upright (11) to identify small parts used in assembly. Assembly requires one of the right Handrail (1) and the Frame (59). ASSEMBLY Set the treadmill in the same manner. Refer to the drawings...
... manufacturing process, there is completed. Insert the Bolt into the lower end of the Upright and finger tighten the Bolt into the lower end of the Handrails into the Handrail. Raise the Upright (11) to identify small parts used in assembly. Assembly requires one of the right Handrail (1) and the Frame (59). ASSEMBLY Set the treadmill in the same manner. Refer to the drawings...
English Manual
Page 6
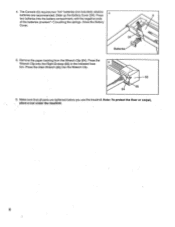
Close the Battery Cover. 34 Batteries 5. The Console (5) requires two "AA" batteries (not included); alkaline batteries are tightened before you use the treadmill. Make sure that all parts are recommended. 4. Note: To protect the floor or carpet, place a mat under the treadmill. 6 Press the Allen Wrench (65) into the battery compartment, with the negative ends of the batteries (marked "--") touching the springs. Press 4 5 two batteries into the...
Close the Battery Cover. 34 Batteries 5. The Console (5) requires two "AA" batteries (not included); alkaline batteries are tightened before you use the treadmill. Make sure that all parts are recommended. 4. Note: To protect the floor or carpet, place a mat under the treadmill. 6 Press the Allen Wrench (65) into the battery compartment, with the negative ends of the batteries (marked "--") touching the springs. Press 4 5 two batteries into the...
English Manual
Page 7
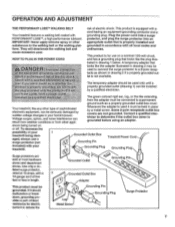
... Adapter Grounding Pin This product must be installed by sudden voltage changes in drawing 1 below. cause excessive wear. If it must be connected to the walking belt or the walking plat- Plug the power cord into an IMPORTANT: Never apply silicone spray or other appli- A temporary adapter that Is properly installed and substances to a permanent ground such as shown in length. listed surge protector, rated...
... Adapter Grounding Pin This product must be installed by sudden voltage changes in drawing 1 below. cause excessive wear. If it must be connected to the walking belt or the walking plat- Plug the power cord into an IMPORTANT: Never apply silicone spray or other appli- A temporary adapter that Is properly installed and substances to a permanent ground such as shown in length. listed surge protector, rated...
English Manual
Page 8
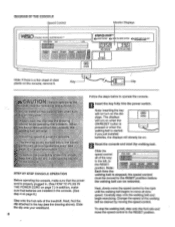
... the walking belt Is stopped, the speed control Before operating the console, make sure that the power cord is properly plugged in the console. (See step 4 on the console, remove it. Slide begin exercising. DIAGRAM OF THE CONSOLE Speed Control Monitor Displays WES11.O FITNESS OUIPA ELECTRONICS •' SPEED ET MIN. Insert the key fully into the power switch. ii ROHR ;00°0 A 44 STEPCD STEP" cp INSERrSAFEKEY Op PUSS ON/RESET SUTTON e l Tor,?LTEMEDD, THEN SET 0358 UNE /DISTANCE...
... the walking belt Is stopped, the speed control Before operating the console, make sure that the power cord is properly plugged in the console. (See step 4 on the console, remove it. Slide begin exercising. DIAGRAM OF THE CONSOLE Speed Control Monitor Displays WES11.O FITNESS OUIPA ELECTRONICS •' SPEED ET MIN. Insert the key fully into the power switch. ii ROHR ;00°0 A 44 STEPCD STEP" cp INSERrSAFEKEY Op PUSS ON/RESET SUTTON e l Tor,?LTEMEDD, THEN SET 0358 UNE /DISTANCE...
English Manual
Page 9
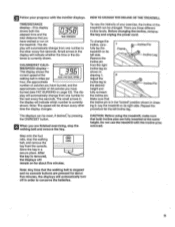
... display will be changed. Step onto the foot rails, stop the walking belt and remove the key. Repeat the procedure for about five minutes. ing 2. Store the key in miles per _71 r. _I.LI CALS./ FAT CALS./ SPEED hour, the approximate number of calories you have burned, and the approximate number of the treadmill can be reset, if desired, by pressing the ON/RESET button. 4 When you have walked...
... display will be changed. Step onto the foot rails, stop the walking belt and remove the key. Repeat the procedure for about five minutes. ing 2. Store the key in miles per _71 r. _I.LI CALS./ FAT CALS./ SPEED hour, the approximate number of calories you have burned, and the approximate number of the treadmill can be reset, if desired, by pressing the ON/RESET button. 4 When you have walked...
English Manual
Page 10
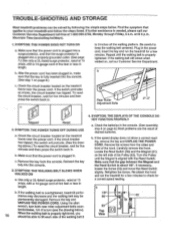
... tripped. Remove the screws from the console. When the walking belt is needed, please call our Customer Service Department. TROUBLE-SHOOTING AND STORAGE Most treadmill problems can be solved by following the simple steps below ). Be careful to 3 inches off the walking platform. Check the batteries in length. 4. SYMPTOM: THE DISPLAYS OF THE CONSOLE DO NOT FUNCTION PROPERLY a. Remove the key and UNPLUG THE POWER CORD. Carefully remove the hood. Locate the Reed Switch (58...
... tripped. Remove the screws from the console. When the walking belt is needed, please call our Customer Service Department. TROUBLE-SHOOTING AND STORAGE Most treadmill problems can be solved by following the simple steps below ). Be careful to 3 inches off the walking platform. Check the batteries in length. 4. SYMPTOM: THE DISPLAYS OF THE CONSOLE DO NOT FUNCTION PROPERLY a. Remove the key and UNPLUG THE POWER CORD. Carefully remove the hood. Locate the Reed Switch (58...

English Manual
Page 11
... treadmill for a few minutes. Plug in the power cord, insert the key and run the treadmill for a few minutes. Plug in a secure location. •GZ:.4zzt . Repeat until the walking belt is correctly tightened, you should be removed from the lower end of each handrail. b Remove the bolt and washer from the lower end of the upright. When the walking belt is properly tightened. c 11 Using the alien wrench, turn the left rear roller adjustment bolt...
... treadmill for a few minutes. Plug in the power cord, insert the key and run the treadmill for a few minutes. Plug in a secure location. •GZ:.4zzt . Repeat until the walking belt is correctly tightened, you should be removed from the lower end of each handrail. b Remove the bolt and washer from the lower end of the upright. When the walking belt is properly tightened. c 11 Using the alien wrench, turn the left rear roller adjustment bolt...
English Manual
Page 12
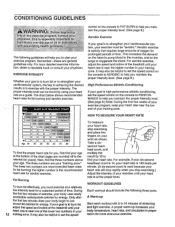
... oxygen for aerobic exercise. For aerobic exercise, adjust the speed and incline of time. It may also be "aerobic." the higher number is the recommended heart rate for prolonged periods of the treadmill until your wrist as a guide. During the first few minutes does your "training zone." WORKOUT GUIDELINES Each workout should include the following guidelines will drop rapidly when you stop exercising and place...
... oxygen for aerobic exercise. For aerobic exercise, adjust the speed and incline of time. It may also be "aerobic." the higher number is the recommended heart rate for prolonged periods of the treadmill until your wrist as a guide. During the first few minutes does your "training zone." WORKOUT GUIDELINES Each workout should include the following guidelines will drop rapidly when you stop exercising and place...
English Manual
Page 13
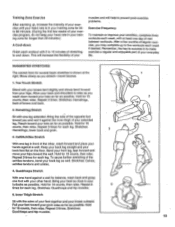
... hips toward your hands against a wall. Move slowly as possible. Stretches: Calves, achilles tendons and ankles. 4. Bring your heel as close to your other , reach forward and place your toes as far as possible. Stretches: Hamstrings, lower back and groin. 3 3. Quadriceps Stretch ... workouts. Repeat 3 5 times for 15 counts, then relax. After a few weeks of your exercise program, do not keep your heart rate in front of the other hand. Remember, the key to success is shown at least one leg extended. Hold for each leg. Pull your feet toward your training ...
... hips toward your hands against a wall. Move slowly as possible. Stretches: Calves, achilles tendons and ankles. 4. Bring your heel as close to your other , reach forward and place your toes as far as possible. Stretches: Hamstrings, lower back and groin. 3 3. Quadriceps Stretch ... workouts. Repeat 3 5 times for 15 counts, then relax. After a few weeks of your exercise program, do not keep your heart rate in front of the other hand. Remember, the key to success is shown at least one leg extended. Hold for each leg. Pull your feet toward your training ...
English Manual
Page 14
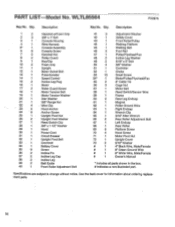
... Washer Safety Cover Front Roller/Pulley Walking Platform Walking Belt Foot Rail Pulley/Flywheel/Fan Incline Leg Washer 5/16" x 3" Bolt 3/8" Washer Controller Choke Small Screw Motor/Pulley/Flywheel/Fan 8" Cable Tie Cage Nut Motor Belt Reed Switch/Sensor Wire Frame Rear Leg Endcap Magnet Roller Ground Wire Right Endcap Wrench Clip 3/16" Allen Wrench Rear Roller Adjustment Bolt Left Endcap Rear Roller Platform Screw Hood Screw Motor Pivot Nut Upright Cover 5/16" Washer 4" Black Wire, Male/Female 8" Green Ground Wire 8" White Wire, Male/Female Owner's Manual * Includes all parts shown in...
... Washer Safety Cover Front Roller/Pulley Walking Platform Walking Belt Foot Rail Pulley/Flywheel/Fan Incline Leg Washer 5/16" x 3" Bolt 3/8" Washer Controller Choke Small Screw Motor/Pulley/Flywheel/Fan 8" Cable Tie Cage Nut Motor Belt Reed Switch/Sensor Wire Frame Rear Leg Endcap Magnet Roller Ground Wire Right Endcap Wrench Clip 3/16" Allen Wrench Rear Roller Adjustment Bolt Left Endcap Rear Roller Platform Screw Hood Screw Motor Pivot Nut Upright Cover 5/16" Washer 4" Black Wire, Male/Female 8" Green Ground Wire 8" White Wire, Male/Female Owner's Manual * Includes all parts shown in...
English Manual
Page 16
... prepared to give the following information: • The MODEL NUMBER of the product (WLTL85564). • The NAME of the product (WESLO CADENCE® 855 treadmill). • The SERIAL NUMBER of the product (see the front cover of this manual). • The KEY NUMBER and DESCRIPTION of the part(s) (see page 14 of ICON Health & Fitness, Inc. This warranty does not extend to the terms set forth above is authorized...
... prepared to give the following information: • The MODEL NUMBER of the product (WLTL85564). • The NAME of the product (WESLO CADENCE® 855 treadmill). • The SERIAL NUMBER of the product (see the front cover of this manual). • The KEY NUMBER and DESCRIPTION of the part(s) (see page 14 of ICON Health & Fitness, Inc. This warranty does not extend to the terms set forth above is authorized...


