
English Manual
Page 3
... cord and the surge protector away from moisture and dust. Always hold the handrails while exercising on the walking belt. To change the incline level of carrying 15 or More amps. Never move the walking belt while the power is not working properly.) Place the treadmill on a level surface, with eight feet of 12...
... cord and the surge protector away from moisture and dust. Always hold the handrails while exercising on the walking belt. To change the incline level of carrying 15 or More amps. Never move the walking belt while the power is not working properly.) Place the treadmill on a level surface, with eight feet of 12...

English Manual
Page 4
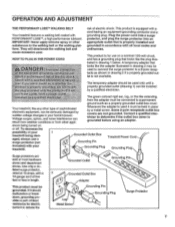
... with innovative design to the treadmill (see the front cover of your benefit, read this manual for selecting the WESLO CADENCE® 855 treadmill. Key/Clip Water Bottle Holder (Bottle not included) Handrails Upright FRONT Walking Belt Motor Hood Circuit Breaker Rear Rol er Adjustment Bolt 4 Foot Rail Incline Pin Power Cord RIGHT SIDE For...
... with innovative design to the treadmill (see the front cover of your benefit, read this manual for selecting the WESLO CADENCE® 855 treadmill. Key/Clip Water Bottle Holder (Bottle not included) Handrails Upright FRONT Walking Belt Motor Hood Circuit Breaker Rear Rol er Adjustment Bolt 4 Foot Rail Incline Pin Power Cord RIGHT SIDE For...
English Manual
Page 7
...circuit, HOW TO PLUG IN THE POWER CORD and has a grounding plug that Is properly installed and substances to the walking belt or the walking plat- A temporary adapter that looks like extending from other appropriate outlet that looks like any other type of least ...8226;iii.cioubi.i49*. trated in length. This product is equipped with a cord having an equipment-grounding conductor and a Your treadmill features a walking belt coated with a 2 14-gauge cord of electric shock. Contact a qualified electrician to a 2-pole recep- tacle as a properly grounded outlet box...
...circuit, HOW TO PLUG IN THE POWER CORD and has a grounding plug that Is properly installed and substances to the walking belt or the walking plat- A temporary adapter that looks like extending from other appropriate outlet that looks like any other type of least ...8226;iii.cioubi.i49*. trated in length. This product is equipped with a cord having an equipment-grounding conductor and a Your treadmill features a walking belt coated with a 2 14-gauge cord of electric shock. Contact a qualified electrician to a 2-pole recep- tacle as a properly grounded outlet box...
English Manual
Page 8
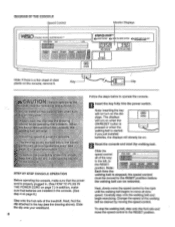
... Note: SPEED • RESET AUK 1111111111111111111111 Aviiii40 " aa.z,..r • WW moMiTX41ton I• .4, STEP BY STEP CONSOLE OPERATION Each time the walking belt Is stopped, the speed control Before operating the console, make sure that the power cord is started. -9 - the clip onto your waistband.... If you just installed batteries, the displays will turn on the console, remove it. Carefully step onto the walking belt and Step onto the foot rails of the walking belt as desired by moving the speed control. key s removed from th e con : ra n will top ...
... Note: SPEED • RESET AUK 1111111111111111111111 Aviiii40 " aa.z,..r • WW moMiTX41ton I• .4, STEP BY STEP CONSOLE OPERATION Each time the walking belt Is stopped, the speed control Before operating the console, make sure that the power cord is started. -9 - the clip onto your waistband.... If you just installed batteries, the displays will turn on the console, remove it. Carefully step onto the walking belt and Step onto the foot rails of the walking belt as desired by moving the speed control. key s removed from th e con : ra n will top ...
English Manual
Page 9
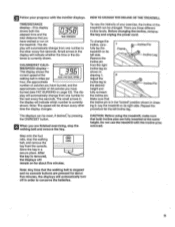
... the key and unplug the power cord. ing 2. Repeat the procedure for about five minutes. Step onto the foot rails, stop the walking belt and remove the key. le Follow your exercise, the incline of the treadmill can be shown every other every five seconds. Incline Leg Remove.... play will automatically change from the right incline leg as shown in a secure place. RIE/SPEED display- Note: Any time that the walking belt is in the locked" position shown in order to the desired Incline Pin height and fully re-insert the incline pin. Make sure that...
... the key and unplug the power cord. ing 2. Repeat the procedure for about five minutes. Step onto the foot rails, stop the walking belt and remove the key. le Follow your exercise, the incline of the treadmill can be shown every other every five seconds. Incline Leg Remove.... play will automatically change from the right incline leg as shown in a secure place. RIE/SPEED display- Note: Any time that the walking belt is in the locked" position shown in order to the desired Incline Pin height and fully re-insert the incline pin. Make sure that...
English Manual
Page 10
... run the treadmill for five minutes and then press the switch back in . Mountain Time (excluding holidays). 1. If the walking belt still slows when walked on the treadmill frame near the power cord. Check the circuit breaker located on the left side of drained batteries. Make ...the Reed Switch is needed, please call our Customer Service Department. Turn the Pulley until the Magnet is overtightened, treadmill perfor- If the walking belt is aligned with a 14-gauge cord of the hood. b. To reset the circuit breaker, wait for a correct speed reading. Check ...
... run the treadmill for five minutes and then press the switch back in . Mountain Time (excluding holidays). 1. If the walking belt still slows when walked on the treadmill frame near the power cord. Check the circuit breaker located on the left side of drained batteries. Make ...the Reed Switch is needed, please call our Customer Service Department. Turn the Pulley until the Magnet is overtightened, treadmill perfor- If the walking belt is aligned with a 14-gauge cord of the hood. b. To reset the circuit breaker, wait for a correct speed reading. Check ...

English Manual
Page 11
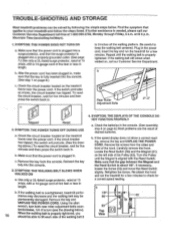
...should be covered during extended periods of each . When the walking belt is properly tightened. 5. If the walking belt has shifted to 3 inches off the walking platform. a Remove b. If the walking belt has shifted to overtighten the walking belt. Plug in use. Remove the bolt and washer from ... for a few minutes. Plug in a secure location. •GZ:.4zzt . Be careful not to keep the walking belt centered. If the walking belt slips when walked on the treadmill. Using the alien wrench, turn both rear roller adjustment bolts clockwise, 1/4 of the console housing....
...should be covered during extended periods of each . When the walking belt is properly tightened. 5. If the walking belt has shifted to 3 inches off the walking platform. a Remove b. If the walking belt has shifted to overtighten the walking belt. Plug in use. Remove the bolt and washer from ... for a few minutes. Plug in a secure location. •GZ:.4zzt . Be careful not to keep the walking belt centered. If the walking belt slips when walked on the treadmill. Using the alien wrench, turn both rear roller adjustment bolts clockwise, 1/4 of the console housing....
English Manual
Page 14
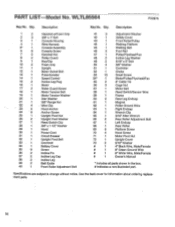
...1 62 1 63 1 64 1 65 1 66 2 67 1 68 1 69 8 70 4 71 1 72 1 73 2 1 1 1 1 Adjustment Washer Safety Cover Front Roller/Pulley Walking Platform Walking Belt Foot Rail Pulley/Flywheel/Fan Incline Leg Washer 5/16" x 3" Bolt 3/8" Washer Controller Choke Small Screw Motor/Pulley/Flywheel/Fan 8" Cable Tie Cage Nut Motor... Belt Reed Switch/Sensor Wire Frame Rear Leg Endcap Magnet Roller Ground Wire Right ...
...1 62 1 63 1 64 1 65 1 66 2 67 1 68 1 69 8 70 4 71 1 72 1 73 2 1 1 1 1 Adjustment Washer Safety Cover Front Roller/Pulley Walking Platform Walking Belt Foot Rail Pulley/Flywheel/Fan Incline Leg Washer 5/16" x 3" Bolt 3/8" Washer Controller Choke Small Screw Motor/Pulley/Flywheel/Fan 8" Cable Tie Cage Nut Motor... Belt Reed Switch/Sensor Wire Frame Rear Leg Endcap Magnet Roller Ground Wire Right ...


