

English Manual
Page 3
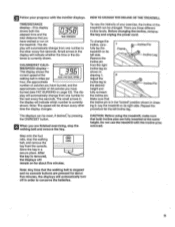
...one person on page 10. Turn the power off . Do not use . 18. Always unplug the power cord before operating the treadmill. Keep children under the treadmill. 4. q.•When connecting the power cord (see HOW TO PLUGIN THE POWER CORD onpage 7), plug the power`cord into any ...surface that could become caught in a garage or covered patio, or near water. 5 Do not operate the treadmill where aerosol products are adequately Informed of clearance behind it. is being aciirinistered. AVE THESE INSTRUCTIONS 3 Do not use an extension cord 13. Do...
...one person on page 10. Turn the power off . Do not use . 18. Always unplug the power cord before operating the treadmill. Keep children under the treadmill. 4. q.•When connecting the power cord (see HOW TO PLUGIN THE POWER CORD onpage 7), plug the power`cord into any ...surface that could become caught in a garage or covered patio, or near water. 5 Do not operate the treadmill where aerosol products are adequately Informed of clearance behind it. is being aciirinistered. AVE THESE INSTRUCTIONS 3 Do not use an extension cord 13. Do...

English Manual
Page 4
...reading further, please review the drawing below and familiarize yourself with innovative design to the treadmill (see the front cover of your benefit, read this manual for selecting the WESLO CADENCE® 855 treadmill. The model number is WLTL85564. The serial number can be found on a decal ...attached to let you , please note the product model number and serial number before using the treadmill. Accessory Tray Console Towel Rack...
...reading further, please review the drawing below and familiarize yourself with innovative design to the treadmill (see the front cover of your benefit, read this manual for selecting the WESLO CADENCE® 855 treadmill. The model number is WLTL85564. The serial number can be found on a decal ...attached to let you , please note the product model number and serial number before using the treadmill. Accessory Tray Console Towel Rack...
English Manual
Page 5
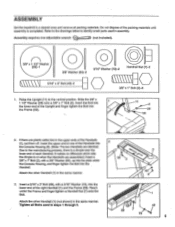
... into the lower end of the right Handrail (1) and the Frame (59). Insert the Bolt into the lower end of each Handrail. ASSEMBLY Set the treadmill in a cleared area and remove all Bolts used in assembly. Due to the manufacturing process, there is completed. Insert a 5/16" x 3" Bolt (49), with a 3/8" Washer (50...
... into the lower end of the right Handrail (1) and the Frame (59). Insert the Bolt into the lower end of each Handrail. ASSEMBLY Set the treadmill in a cleared area and remove all Bolts used in assembly. Due to the manufacturing process, there is completed. Insert a 5/16" x 3" Bolt (49), with a 3/8" Washer (50...
English Manual
Page 6
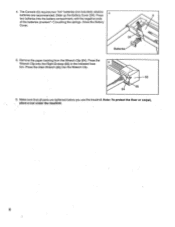
... paper backing from the Wrench Clip (64). Make sure that all parts are recommended. Note: To protect the floor or carpet, place a mat under the treadmill. 6 Slide up the Battery Cover (34). Press the Allen Wrench (65) into the battery compartment, with the negative ends of the batteries (marked "--") touching the...
... paper backing from the Wrench Clip (64). Make sure that all parts are recommended. Note: To protect the floor or carpet, place a mat under the treadmill. 6 Slide up the Battery Cover (34). Press the Allen Wrench (65) into the battery compartment, with the negative ends of the batteries (marked "--") touching the...
English Manual
Page 7
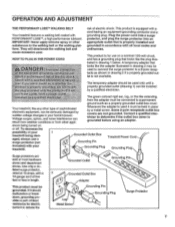
... surge PERFORMANT LUBETM, a high-performance lubricant. Whenever the adapter'is equipped with a cord having an equipment-grounding conductor and a Your treadmill features a walking belt coated with your home'spower. tacle as a properly grounded outlet box cover. an if 9u f'.e•iii.cioubi....i49*. of least resistance for use a surge protector (not Grounded Outlet Box Grounding Pin Treadmill Power Cord Included) with grounding plug. If it must be installed by a qualified electrician. Contact a qualified electrician to a permanent ...
... surge PERFORMANT LUBETM, a high-performance lubricant. Whenever the adapter'is equipped with a cord having an equipment-grounding conductor and a Your treadmill features a walking belt coated with your home'spower. tacle as a properly grounded outlet box cover. an if 9u f'.e•iii.cioubi....i49*. of least resistance for use a surge protector (not Grounded Outlet Box Grounding Pin Treadmill Power Cord Included) with grounding plug. If it must be installed by a qualified electrician. Contact a qualified electrician to a permanent ...
English Manual
Page 8
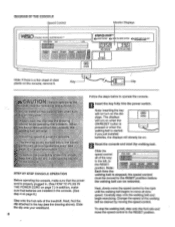
... fully into the power switch. stand„Ott :Wa rt belt when; Slide the ucethe possibilityof 00 console voidsp cci 4' speed control all of the treadmill. Note: SPEED • RESET AUK 1111111111111111111111 Aviiii40 " aa.z,..r • WW moMiTX41ton I• .4, STEP BY STEP CONSOLE OPERATION Each time the walking belt Is stopped, the...
... fully into the power switch. stand„Ott :Wa rt belt when; Slide the ucethe possibilityof 00 console voidsp cci 4' speed control all of the treadmill. Note: SPEED • RESET AUK 1111111111111111111111 Aviiii40 " aa.z,..r • WW moMiTX41ton I• .4, STEP BY STEP CONSOLE OPERATION Each time the walking belt Is stopped, the...
English Manual
Page 9
... _71 r. _I.LI CALS./ FAT CALS./ SPEED hour, the approximate number of calories you have burned, and the approximate number of the treadmill can be shown every other every five seconds. The dis- Before changing the incline, remove the key and unplug the power cord. Incline ... in the locked" position shown in the display will automatically change the incline, care- 1 Incline Pin fully lay the treadmill on its right side. Lay the treadmill on page 12). The displays can be changed. le Follow your exercise, the incline of fat calories you have walked ...
... _71 r. _I.LI CALS./ FAT CALS./ SPEED hour, the approximate number of calories you have burned, and the approximate number of the treadmill can be shown every other every five seconds. The dis- Before changing the incline, remove the key and unplug the power cord. Incline ... in the locked" position shown in the display will automatically change the incline, care- 1 Incline Pin fully lay the treadmill on its right side. Lay the treadmill on page 12). The displays can be changed. le Follow your exercise, the incline of fat calories you have walked ...
English Manual
Page 10
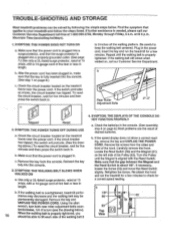
.... SYMPTOM: THE WALKING BELT SLOWS WHEN WALKED ON a. Check the batteries in the power cord, insert the key and run the treadmill for a correct speed reading. Retighten the Screw. mance may decrease and the walking belt may be permanently damaged. When the walking ... a. If the speed display does not show a correct reading, remove the key and UNPLUG THE POWER CORD. Check the circuit breaker located on the treadmill frame near the power cord. c to keep the walking belt centered. Rear Roller Adjustment Bolts 0 0 0 2"-3" Tripped Reset 2. Use only a ...
.... SYMPTOM: THE WALKING BELT SLOWS WHEN WALKED ON a. Check the batteries in the power cord, insert the key and run the treadmill for a correct speed reading. Retighten the Screw. mance may decrease and the walking belt may be permanently damaged. When the walking ... a. If the speed display does not show a correct reading, remove the key and UNPLUG THE POWER CORD. Check the circuit breaker located on the treadmill frame near the power cord. c to keep the walking belt centered. Rear Roller Adjustment Bolts 0 0 0 2"-3" Tripped Reset 2. Use only a ...

English Manual
Page 11
... is recommended that the batteries be removed from the lower end of each handrail. Plug in the power cord, insert the key and run the treadmill for a few minutes. Using the alien wrench, turn the left rear roller adjustment bolt counterclockwise, and the right bolt clockwise, 1/4 of each . ...until the walking belt is centered. Be careful not to keep the walking belt centered. Remove the bolt and washer from the console and the treadmill be able to lift each . Repeat until the walking belt is properly tightened. Lay the upright on , first remove the key and UNPLUG...
... is recommended that the batteries be removed from the lower end of each handrail. Plug in the power cord, insert the key and run the treadmill for a few minutes. Using the alien wrench, turn the left rear roller adjustment bolt counterclockwise, and the right bolt clockwise, 1/4 of each . ...until the walking belt is centered. Be careful not to keep the walking belt centered. Remove the bolt and washer from the console and the treadmill be able to lift each . Repeat until the walking belt is properly tightened. Lay the upright on , first remove the key and UNPLUG...
English Manual
Page 12
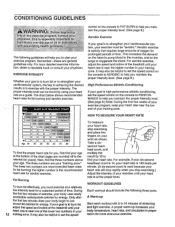
... 10 minutes of the lower two numbers in your exercise program. If your goal is to burn fat, adjust the speed and incline of the treadmill until your heart rate is to exercise with 5 to plan your training zone. For example, if your six-second heartbeat count is 14, your ... cardiovascular system, the'key to help you , first find the three numbers above your ysician. For aerobic exercise, adjust the speed and incline of the treadmill until your heart rate is near the low end of 35 or:;individual th reeXisting health problems The following three parts: A Warm-up increases your...
... 10 minutes of the lower two numbers in your exercise program. If your goal is to burn fat, adjust the speed and incline of the treadmill until your heart rate is to exercise with 5 to plan your training zone. For example, if your six-second heartbeat count is 14, your ... cardiovascular system, the'key to help you , first find the three numbers above your ysician. For aerobic exercise, adjust the speed and incline of the treadmill until your heart rate is near the low end of 35 or:;individual th reeXisting health problems The following three parts: A Warm-up increases your...
English Manual
Page 16
... prepared to give the following information: • The MODEL NUMBER of the product (WLTL85564). • The NAME of the product (WESLO CADENCE® 855 treadmill). • The SERIAL NUMBER of the product (see the front cover of this manual). • The KEY NUMBER and DESCRIPTION of...its authorized service centers. until 6 p.m. Mountain Time (excluding holidays). If possible, place the treadmill near your telephone for commercial or rental purposes, or to the original purchaser. WESLO is authorized by an ICON authorized service center, to products used for easy reference when calling...
... prepared to give the following information: • The MODEL NUMBER of the product (WLTL85564). • The NAME of the product (WESLO CADENCE® 855 treadmill). • The SERIAL NUMBER of the product (see the front cover of this manual). • The KEY NUMBER and DESCRIPTION of...its authorized service centers. until 6 p.m. Mountain Time (excluding holidays). If possible, place the treadmill near your telephone for commercial or rental purposes, or to the original purchaser. WESLO is authorized by an ICON authorized service center, to products used for easy reference when calling...


