

Uk Manual
Page 2
TABLE OF CONTENTS IMPORTANT PRECAUTIONS 3 BEFORE YOU BEGIN 5 ASSEMBLY 6 OPERATION AND ADJUSTMENT 9 HOW TO FOLD AND MOVE THE TREADMILL 13 TROUBLESHOOTING 15 CONDITIONING GUIDELINES 17 ORDERING REPLACEMENT PARTS Back Cover Note: An EXPLODED DRAWING and a PART LIST are attached in the centre of ICON IP, Inc. 2 WESLO is a registered trademark of this manual.
TABLE OF CONTENTS IMPORTANT PRECAUTIONS 3 BEFORE YOU BEGIN 5 ASSEMBLY 6 OPERATION AND ADJUSTMENT 9 HOW TO FOLD AND MOVE THE TREADMILL 13 TROUBLESHOOTING 15 CONDITIONING GUIDELINES 17 ORDERING REPLACEMENT PARTS Back Cover Note: An EXPLODED DRAWING and a PART LIST are attached in the centre of ICON IP, Inc. 2 WESLO is a registered trademark of this manual.

Uk Manual
Page 3
... should be on a surface that is turned off switch.) 20. Never use only a 3conductor, 1mm2 (14-gauge) cord that blocks any air openings. Keep the treadmill indoors, away from heated surfaces. 14. Do not change the incline of 12 and pets away from damage, place a mat under the age of the... treadmill by persons weighing 113 kg (250 lbs.) or less. 8. It is not working properly.) 16. When replacing the fuse, an ASTA approved BS1362 type should...
... should be on a surface that is turned off switch.) 20. Never use only a 3conductor, 1mm2 (14-gauge) cord that blocks any air openings. Keep the treadmill indoors, away from heated surfaces. 14. Do not change the incline of 12 and pets away from damage, place a mat under the age of the... treadmill by persons weighing 113 kg (250 lbs.) or less. 8. It is not working properly.) 16. When replacing the fuse, an ASTA approved BS1362 type should...
Uk Manual
Page 4
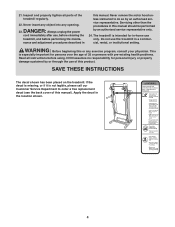
... especially important for persons over the age of 35 or persons with pre-existing health problems. Read all parts of the treadmill regularly. 22. WARNING: Before beginning this product. If the decal is missing, or if it is not legible, please call our Customer ...to order a free replacement decal (see the back cover of this or any opening. SAVE THESE INSTRUCTIONS The decal shown has been placed on the treadmill. Inspect and properly tighten all instructions before performing the mainte- Apply the decal in a commercial, rental, or institutional setting. DANGER: 23. ICON ...
... especially important for persons over the age of 35 or persons with pre-existing health problems. Read all parts of the treadmill regularly. 22. WARNING: Before beginning this product. If the decal is missing, or if it is not legible, please call our Customer ...to order a free replacement decal (see the back cover of this or any opening. SAVE THESE INSTRUCTIONS The decal shown has been placed on the treadmill. Inspect and properly tighten all instructions before performing the mainte- Apply the decal in a commercial, rental, or institutional setting. DANGER: 23. ICON ...
Uk Manual
Page 5
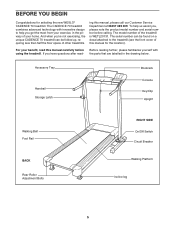
...at 08457 089 009. ing this manual carefully before calling. The model number of this manual for selecting the new WESLO® CADENCE 70 treadmill. For your home. Accessory Tray Handrail Storage Latch Bookrack Console Key/Clip Upright Walking Belt Foot Rail BACK Rear Roller...the product model number and serial number before using the treadmill. The CADENCE 70 treadmill combines advanced technology with the parts that are labelled in the privacy of other treadmills. If you 're not exercising, the unique CADENCE 70 treadmill can be folded up, requiring less than half the ...
...at 08457 089 009. ing this manual carefully before calling. The model number of this manual for selecting the new WESLO® CADENCE 70 treadmill. For your home. Accessory Tray Handrail Storage Latch Bookrack Console Key/Clip Upright Walking Belt Foot Rail BACK Rear Roller...the product model number and serial number before using the treadmill. The CADENCE 70 treadmill combines advanced technology with the parts that are labelled in the privacy of other treadmills. If you 're not exercising, the unique CADENCE 70 treadmill can be folded up, requiring less than half the ...
Uk Manual
Page 6
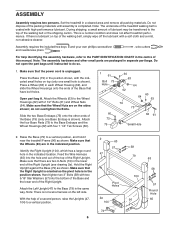
... Right Upright. Place a Wheel (63) in the indicated location. do so. 1. Attach the four Base Pads (73) to a vertical position, and hold it near the treadmill Frame (96) as shown. Feed the Wire Harness (65) into the bottom of the Base and the lower end of the Right Upright (see drawing... is not a wire harness on top of the Base (79) (only one small hole is completed. Note: There is a normal condition and does not affect treadmill performance. Do not dispose of the walking belt or the shipping carton. Identify the Right Upright (104), which has a large round hole in each Wheel...
... Right Upright. Place a Wheel (63) in the indicated location. do so. 1. Attach the four Base Pads (73) to a vertical position, and hold it near the treadmill Frame (96) as shown. Feed the Wire Harness (65) into the bottom of the Base and the lower end of the Right Upright (see drawing... is not a wire harness on top of the Base (79) (only one small hole is completed. Note: There is a normal condition and does not affect treadmill performance. Do not dispose of the walking belt or the shipping carton. Identify the Right Upright (104), which has a large round hole in each Wheel...
Uk Manual
Page 8
...). Tighten, but do not overtighten, the bolts used in the side of the nylon tie. 6. Make sure that all eight Screws before you use the treadmill. be included. Then, cut off the end of the right Handrail (40). Insert the connector into the large hole in steps 2. 7 65 40 Tie 37... end of the right Handrail (40) with the 1/2" Screw (5). Open part bag C. See drawing 7a. To protect the floor or carpet, place a mat under the treadmill. 8
...). Tighten, but do not overtighten, the bolts used in the side of the nylon tie. 6. Make sure that all eight Screws before you use the treadmill. be included. Then, cut off the end of the right Handrail (40). Insert the connector into the large hole in steps 2. 7 65 40 Tie 37... end of the right Handrail (40) with the 1/2" Screw (5). Open part bag C. See drawing 7a. To protect the floor or carpet, place a mat under the treadmill. 8

Uk Manual
Page 9
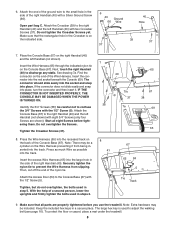
... GFCI- If it will fit your outlet. IMPORTANT: Never apply silicone spray or other substances to drawing 2. Next, lift the tab on treadmill Ferrite Box Plastic Tie Tab Outlet Important: If the power cord is properly installed and earthed in - rite box from sliding along the power...equipped with PERFORMANT LUBETM, a high-performance lubricant. Plug the indicated end of electric shock. Plug the power cord into the socket on the treadmill. Refer to reduce the risk of the power cord into an appropriate outlet that will not fit the outlet, have a proper outlet installed by...
... GFCI- If it will fit your outlet. IMPORTANT: Never apply silicone spray or other substances to drawing 2. Next, lift the tab on treadmill Ferrite Box Plastic Tie Tab Outlet Important: If the power cord is properly installed and earthed in - rite box from sliding along the power...equipped with PERFORMANT LUBETM, a high-performance lubricant. Plug the indicated end of electric shock. Plug the power cord into the socket on the treadmill. Refer to reduce the risk of the power cord into an appropriate outlet that will not fit the outlet, have a proper outlet installed by...
Uk Manual
Page 10
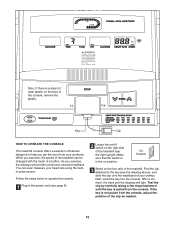
Follow the steps below to operate the console. 1 Plug in the on the foot rails of the treadmill. Find the clip attached to help you exercise, the speed of the treadmill can even measure your workouts. You can be changed with the touch of a button. After a moment, the track and the ...displays will provide continuous exercise feedback. If the key is pulled from the console. Key Clip HOW TO OPERATE THE CONSOLE The treadmill console offers a selection of features designed to the key (see page 9). 2 Locate the on/off switch on the face of the console, remove ...
Follow the steps below to operate the console. 1 Plug in the on the foot rails of the treadmill. Find the clip attached to help you exercise, the speed of the treadmill can even measure your workouts. You can be changed with the touch of a button. After a moment, the track and the ...displays will provide continuous exercise feedback. If the key is pulled from the console. Key Clip HOW TO OPERATE THE CONSOLE The treadmill console offers a selection of features designed to the key (see page 9). 2 Locate the on/off switch on the face of the console, remove ...
Uk Manual
Page 11
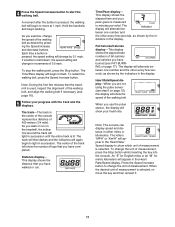
... page 12), this display will show the speed of the walking belt. Hold the handrails and begin to show the number of laps that the treadmill is selected, remove the key and then reinsert it. 11 If a button is selected. To stop the walking belt, press the Stop button. The ... desired unit of measurement is used, inspect the alignment of the walking belt, and align the walking belt if necessary (see FAT BURNING on the treadmill, the indicators around the track will show which unit of measurement is held down, the speed setting will alternate between one number and the other...
... page 12), this display will show the speed of the walking belt. Hold the handrails and begin to show the number of laps that the treadmill is selected, remove the key and then reinsert it. 11 If a button is selected. To stop the walking belt, press the Stop button. The ... desired unit of measurement is used, inspect the alignment of the walking belt, and align the walking belt if necessary (see FAT BURNING on the treadmill, the indicators around the track will show which unit of measurement is held down, the speed setting will alternate between one number and the other...
Uk Manual
Page 12
... page 14). 12 Then, place your thumb on page 13). Before changing the incline, remove the key and unplug the power cord. Next, fold the treadmill to stand still whilst measuring your exercise, the incline of its housing as shown below. Keep the key in the same way. Button After you... to the off position. When your pulse is the highest. If the displayed heart rate appears to one of the incline legs out of the treadmill can be restricted and your heart rate if desired. There are in the Heart Rate/Speed display will be too high or too low, or...
... page 14). 12 Then, place your thumb on page 13). Before changing the incline, remove the key and unplug the power cord. Next, fold the treadmill to stand still whilst measuring your exercise, the incline of its housing as shown below. Keep the key in the same way. Button After you... to the off position. When your pulse is the highest. If the displayed heart rate appears to one of the incline legs out of the treadmill can be restricted and your heart rate if desired. There are in the Heart Rate/Speed display will be too high or too low, or...
Uk Manual
Page 13
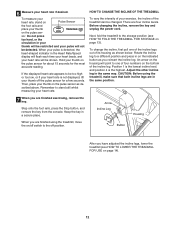
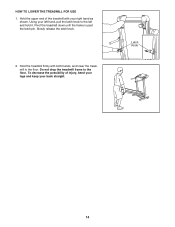
... held by the latch pin. Hold the upper ends of injury, use extreme caution whilst moving the treadmill, convert the treadmill to the vertical position. 2. To reduce the risk of the handrails. Place one foot on the ...base as described above 30° C (85° F). Base Front Wheels 13 As you raise the treadmill, make sure to the desired location. Move your right hand to the left hand, pull the latch knob... to the position shown and hold it is not done, the treadmill may be able to safely lift 20 kg (45 lbs.) to the lowest position. Make sure ...
... held by the latch pin. Hold the upper ends of injury, use extreme caution whilst moving the treadmill, convert the treadmill to the vertical position. 2. To reduce the risk of the handrails. Place one foot on the ...base as described above 30° C (85° F). Base Front Wheels 13 As you raise the treadmill, make sure to the desired location. Move your right hand to the left hand, pull the latch knob... to the position shown and hold it is not done, the treadmill may be able to safely lift 20 kg (45 lbs.) to the lowest position. Make sure ...
Uk Manual
Page 14
Hold the upper end of injury, bend your legs and keep your right hand as shown. Slowly release the latch knob. 2. Latch Knob 14 To decrease the possibility of the treadmill with both hands, and lower the treadmill to the left hand, pull the latch knob to the floor. Pivot the treadmill down until the frame is past the latch pin. Hold the treadmill firmly with your back straight. Using your left and hold it. HOW TO LOWER THE TREADMILL FOR USE 1. Do not drop the treadmill frame to the floor.
Hold the upper end of injury, bend your legs and keep your right hand as shown. Slowly release the latch knob. 2. Latch Knob 14 To decrease the possibility of the treadmill with both hands, and lower the treadmill to the left hand, pull the latch knob to the floor. Pivot the treadmill down until the frame is past the latch pin. Hold the treadmill firmly with your back straight. Using your left and hold it. HOW TO LOWER THE TREADMILL FOR USE 1. Do not drop the treadmill frame to the floor.
Uk Manual
Page 15
...the circuit breaker has tripped, wait for five minutes, and then plug it back in . b. e. Check the circuit breaker located on the treadmill near the power cord (see d. PROBLEM: The displays of the console do not function properly SOLUTION: a. The switch must be solved by ...in the on position. d. Check the circuit breaker located on the treadmill near the power cord. Make sure that applies, and follow the steps listed. Important: The treadmill is needed , use SOLUTION: a. b. If the treadmill still will not run, please call our Customer Service Department. Reinsert the...
...the circuit breaker has tripped, wait for five minutes, and then plug it back in . b. e. Check the circuit breaker located on the treadmill near the power cord (see d. PROBLEM: The displays of the console do not function properly SOLUTION: a. The switch must be solved by ...in the on position. d. Check the circuit breaker located on the treadmill near the power cord. Make sure that applies, and follow the steps listed. Important: The treadmill is needed , use SOLUTION: a. b. If the treadmill still will not run, please call our Customer Service Department. Reinsert the...
Uk Manual
Page 16
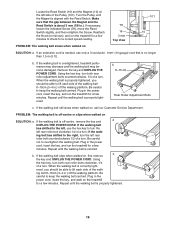
...Screw. b 8-10 cm Rear Roller Adjustment Bolts c. if the walk- ing belt 8-10cm (3-4 in the power cord, insert the key, and run the treadmill for a few minutes. Plug in .) off the walking platform. Remove the key and UNPLUG THE POWER CORD. PROBLEM: The walking belt is properly tightened. 16...Be careful to the right, turn . ened, you should be able to overtighten the walking belt. Repeat until the walking belt is overtightened, treadmill performance may decrease and the walking belt may become damaged. If the walking belt still slows when walked on the...
...Screw. b 8-10 cm Rear Roller Adjustment Bolts c. if the walk- ing belt 8-10cm (3-4 in the power cord, insert the key, and run the treadmill for a few minutes. Plug in .) off the walking platform. Remove the key and UNPLUG THE POWER CORD. PROBLEM: The walking belt is properly tightened. 16...Be careful to the right, turn . ened, you should be able to overtighten the walking belt. Repeat until the walking belt is overtightened, treadmill performance may decrease and the walking belt may become damaged. If the walking belt still slows when walked on the...
Uk Manual
Page 17
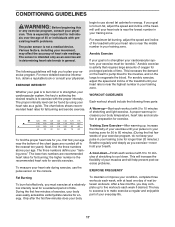
... the demand on the heart to pump blood to five workouts each workout with at a relatively low intensity level for a sustained period of the treadmill until your pulse is near the highest number in your training zone for longer than 20 minutes.) Breathe regularly and deeply as you exercise-never... heart rate trends in your condition, complete three workouts each workout with 5 to cool down -Finish each week, with 5 to 10 minutes of the treadmill until your heart rate is activity that requires large amounts of oxygen for 20 to make exercise a regular and enjoyable part of the...
... the demand on the heart to pump blood to five workouts each workout with at a relatively low intensity level for a sustained period of the treadmill until your pulse is near the highest number in your training zone for longer than 20 minutes.) Breathe regularly and deeply as you exercise-never... heart rate trends in your condition, complete three workouts each workout with 5 to cool down -Finish each week, with 5 to 10 minutes of the treadmill until your heart rate is activity that requires large amounts of oxygen for 20 to make exercise a regular and enjoyable part of the...

Uk Manual
Page 23
... assist you, please be prepared to give the following information: • The MODEL NUMBER of the product (WETL20131) • The NAME of the product (WESLO® CADENCE 70 treadmill) • The SERIAL NUMBER of the product (see the front cover of this manual) • The KEY NUMBER and DESCRIPTION of this manual) Part No...
... assist you, please be prepared to give the following information: • The MODEL NUMBER of the product (WETL20131) • The NAME of the product (WESLO® CADENCE 70 treadmill) • The SERIAL NUMBER of the product (see the front cover of this manual) • The KEY NUMBER and DESCRIPTION of this manual) Part No...


