
Uk Manual
Page 1
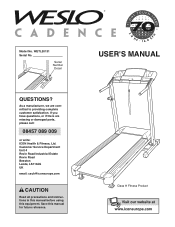
Serial Number Decal QUESTIONS? Customer Service Department Unit 4 Revie Road Industrial Estate Revie Road Beeston Leeds, LS118JG UK email: [email protected] CAUTION Read all precautions and instructions in this manual before using this manual for future reference. Model No. If you have questions, or if there are committed to providing complete customer satisfaction. Save this equipment. USER'S MANUAL Class H Fitness Product As a manufacturer, we are missing or damaged parts, please call: 08457 089 009 or write: ICON Health & Fitness, Ltd. WETL20131 Serial No.
Serial Number Decal QUESTIONS? Customer Service Department Unit 4 Revie Road Industrial Estate Revie Road Beeston Leeds, LS118JG UK email: [email protected] CAUTION Read all precautions and instructions in this manual before using this manual for future reference. Model No. If you have questions, or if there are committed to providing complete customer satisfaction. Save this equipment. USER'S MANUAL Class H Fitness Product As a manufacturer, we are missing or damaged parts, please call: 08457 089 009 or write: ICON Health & Fitness, Ltd. WETL20131 Serial No.
Uk Manual
Page 2
WESLO is a registered trademark of this manual. TABLE OF CONTENTS IMPORTANT PRECAUTIONS 3 BEFORE YOU BEGIN 5 ASSEMBLY 6 OPERATION AND ADJUSTMENT 9 HOW TO FOLD AND MOVE THE TREADMILL 13 TROUBLESHOOTING 15 CONDITIONING GUIDELINES 17 ORDERING REPLACEMENT PARTS Back Cover Note: An EXPLODED DRAWING and a PART LIST are attached in the centre of ICON IP, Inc. 2
WESLO is a registered trademark of this manual. TABLE OF CONTENTS IMPORTANT PRECAUTIONS 3 BEFORE YOU BEGIN 5 ASSEMBLY 6 OPERATION AND ADJUSTMENT 9 HOW TO FOLD AND MOVE THE TREADMILL 13 TROUBLESHOOTING 15 CONDITIONING GUIDELINES 17 ORDERING REPLACEMENT PARTS Back Cover Note: An EXPLODED DRAWING and a PART LIST are attached in the centre of ICON IP, Inc. 2

Uk Manual
Page 3
... used . 12. Adjust the speed in small increments to the off switch.) 20. Always remove the key, unplug the power cord, and move the treadmill. 11. Do not operate the treadmill if the power cord or plug is damaged, or if the treadmill is not working properly. (See BEFORE YOU BEGIN on /off position when the treadmill is fully closed. 3 Always wear athletic shoes. The pulse sensor is not working...
... used . 12. Adjust the speed in small increments to the off switch.) 20. Always remove the key, unplug the power cord, and move the treadmill. 11. Do not operate the treadmill if the power cord or plug is damaged, or if the treadmill is not working properly. (See BEFORE YOU BEGIN on /off position when the treadmill is fully closed. 3 Always wear athletic shoes. The pulse sensor is not working...
Uk Manual
Page 4
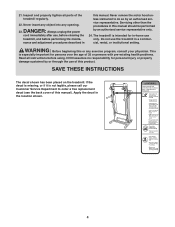
... object into any exercise program, consult your physician. Never remove the motor hood unless instructed to order a free replacement decal (see the back cover of the treadmill regularly. 22. DANGER: 23. If the decal is missing, or if it is especially important for in this manual). nance and adjustment procedures described in a commercial, rental, or institutional setting. Apply the decal in the location shown. 4
... object into any exercise program, consult your physician. Never remove the motor hood unless instructed to order a free replacement decal (see the back cover of the treadmill regularly. 22. DANGER: 23. If the decal is missing, or if it is especially important for in this manual). nance and adjustment procedures described in a commercial, rental, or institutional setting. Apply the decal in the location shown. 4
Uk Manual
Page 5
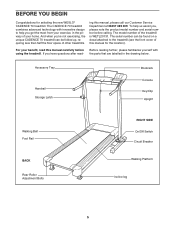
... Customer Service Department at 08457 089 009. BEFORE YOU BEGIN Congratulations for the location). ing this manual carefully before calling. The model number of your benefit, read - The CADENCE 70 treadmill combines advanced technology with the parts that are labelled in the privacy of the treadmill is WETL20131. Accessory Tray Handrail Storage Latch Bookrack Console Key/Clip Upright Walking Belt Foot Rail BACK Rear Roller Adjustment Bolts RIGHT SIDE On/Off Switch...
... Customer Service Department at 08457 089 009. BEFORE YOU BEGIN Congratulations for the location). ing this manual carefully before calling. The model number of your benefit, read - The CADENCE 70 treadmill combines advanced technology with the parts that are labelled in the privacy of the treadmill is WETL20131. Accessory Tray Handrail Storage Latch Bookrack Console Key/Clip Upright Walking Belt Foot Rail BACK Rear Roller Adjustment Bolts RIGHT SIDE On/Off Switch...
Uk Manual
Page 6
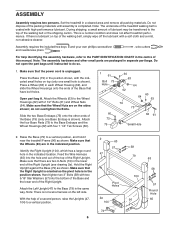
... the lower end of the Right Upright. Slide the two Base Endcaps (75) onto the other small parts are two U-Nuts (74) in separate part bags. Hand tighten two 3" Bolts (58) with 2 1/2" Bolts (61) and Wheel Nuts (64). Raise the Base (79) to the top of the treadmill walking belt is not a wire harness on the sides shown; Attach the Left Upright (47...
... the lower end of the Right Upright. Slide the two Base Endcaps (75) onto the other small parts are two U-Nuts (74) in separate part bags. Hand tighten two 3" Bolts (58) with 2 1/2" Bolts (61) and Wheel Nuts (64). Raise the Base (79) to the top of the treadmill walking belt is not a wire harness on the sides shown; Attach the Left Upright (47...
Uk Manual
Page 7
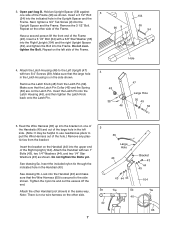
... Handrail (not shown) in the Latch Housing is secured to the Left Upright (47) with two 3/4" Screws (38). Tighten the nylon tie and cut the excess off the end. Remove the 3 1/2" Bolt. Do not overtighten the Bolt. Insert the Latch Pin into the Upright Spacer and the Frame. Do not tighten the Bolts yet. Make sure that the Wire Harness (65) is on...
... Handrail (not shown) in the Latch Housing is secured to the Left Upright (47) with two 3/4" Screws (38). Tighten the nylon tie and cut the excess off the end. Remove the 3 1/2" Bolt. Do not overtighten the Bolt. Insert the Latch Pin into the Upright Spacer and the Frame. Do not tighten the Bolts yet. Make sure that the Wire Harness (65) is on...
Uk Manual
Page 8
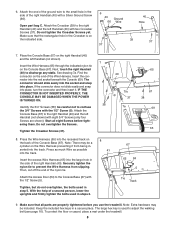
... a second person, lower the uprights and firmly tighten the bolts used in the Crossbar is used to the Console Base (67) with two Crossbar Screws (37). Identify the 3/4" Screws (38); Press as much Wire as possible into place, turn the connector and then insert it from slipping. See drawing 7a....step 5. With the help of the Console Base (67). 6. Place the Console Base (67) on the end of the nylon tie. If the connector does not slide easily and snap into the track. Attach the Access Door (84) to adjust the walking belt (see page 16). The large hex key is on the Wire...
... a second person, lower the uprights and firmly tighten the bolts used in the Crossbar is used to the Console Base (67) with two Crossbar Screws (37). Identify the 3/4" Screws (38); Press as much Wire as possible into place, turn the connector and then insert it from slipping. See drawing 7a....step 5. With the help of the Console Base (67). 6. Place the Console Base (67) on the end of the nylon tie. If the connector does not slide easily and snap into the track. Attach the Access Door (84) to adjust the walking belt (see page 16). The large hex key is on the Wire...

Uk Manual
Page 9
... that is properly installed and earthed in accordance with the product-if it must be replaced with a power cord having an equipment-earthing conductor and a earthing plug. The plastic tie will deteriorate the walking belt and cause excessive wear. dinances. equipped outlets. DANGER: Improper connection of electric shock. Plug the indicated end of electric shock. Socket on treadmill Ferrite Box...
... that is properly installed and earthed in accordance with the product-if it must be replaced with a power cord having an equipment-earthing conductor and a earthing plug. The plastic tie will deteriorate the walking belt and cause excessive wear. dinances. equipped outlets. DANGER: Improper connection of electric shock. Plug the indicated end of electric shock. Socket on treadmill Ferrite Box...
Uk Manual
Page 10
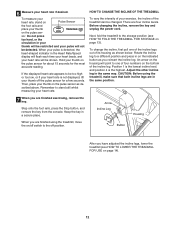
... treadmill near the right upright. If the key is not pulled from the console. You can be changed with the touch of a button. Test the clip by carefully taking a few steps backward until the key is pulled from the console, adjust the position of the clip as needed. 10 While you exercise, the displays will light. Make sure that the switch is in the power cord...
... treadmill near the right upright. If the key is not pulled from the console. You can be changed with the touch of a button. Test the clip by carefully taking a few steps backward until the key is pulled from the console, adjust the position of the clip as needed. 10 While you exercise, the displays will light. Make sure that the switch is in the power cord...
Uk Manual
Page 11
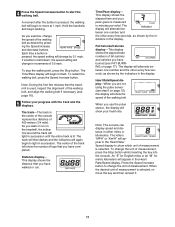
... (1/4 mile). An "E" for English miles or an "M" for metric kilometers will change in succession. To stop the walking belt, press the Stop button. The Time/Pace display will show the number of the walking belt as shown by pressing the Speed increase and decrease buttons. The track-The track in succession until the entire track is selected, remove the key and then reinsert it. 11 Heart Rate/Speed display-When you are not using the pulse sensor (see step...
... (1/4 mile). An "E" for English miles or an "M" for metric kilometers will change in succession. To stop the walking belt, press the Stop button. The Time/Pace display will show the number of the walking belt as shown by pressing the Speed increase and decrease buttons. The track-The track in succession until the entire track is selected, remove the key and then reinsert it. 11 Heart Rate/Speed display-When you are not using the pulse sensor (see step...
Uk Manual
Page 12
... switch to one of the incline legs out of the incline leg. Before changing the incline, remove the key and unplug the power cord. 6 Measure your heart rate. Then, place your thumb on the indicated button as you have adjusted the incline legs, lower the treadmill (see HOW TO FOLD THE TREADMILL FOR STORAGE on the pulse sensor for about 15 seconds for a few seconds. Step onto the foot rails, press the Stop button, and remove the key from the console...
... switch to one of the incline legs out of the incline leg. Before changing the incline, remove the key and unplug the power cord. 6 Measure your heart rate. Then, place your thumb on the indicated button as you have adjusted the incline legs, lower the treadmill (see HOW TO FOLD THE TREADMILL FOR STORAGE on the pulse sensor for about 15 seconds for a few seconds. Step onto the foot rails, press the Stop button, and remove the key from the console...
Uk Manual
Page 13
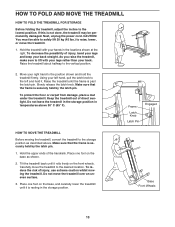
HOW TO FOLD AND MOVE THE TREADMILL HOW TO FOLD THE TREADMILL FOR STORAGE Before folding the treadmill, adjust the incline to the vertical position. 2. CAUTION: You must be permanently damaged. Using your left hand, pull the latch knob to the desired location. Make sure that the frame is securely held by the latch pin. Frame Latch Knob Latch Pin Engaged HOW TO MOVE THE TREADMILL Before moving the treadmill. Hold the treadmill with your legs rather...
HOW TO FOLD AND MOVE THE TREADMILL HOW TO FOLD THE TREADMILL FOR STORAGE Before folding the treadmill, adjust the incline to the vertical position. 2. CAUTION: You must be permanently damaged. Using your left hand, pull the latch knob to the desired location. Make sure that the frame is securely held by the latch pin. Frame Latch Knob Latch Pin Engaged HOW TO MOVE THE TREADMILL Before moving the treadmill. Hold the treadmill with your legs rather...
Uk Manual
Page 14
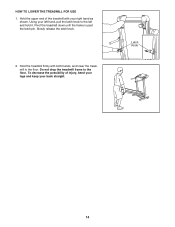
HOW TO LOWER THE TREADMILL FOR USE 1. Hold the treadmill firmly with your right hand as shown. Latch Knob 14 Hold the upper end of injury, bend your legs and keep your left and hold it. Using your back straight. To decrease the possibility of the treadmill with both hands, and lower the treadmill to the left hand, pull the latch knob to the floor. Slowly release the latch knob. 2. Do not drop the treadmill frame to the floor. Pivot the treadmill down until the frame is past the latch pin.
HOW TO LOWER THE TREADMILL FOR USE 1. Hold the treadmill firmly with your right hand as shown. Latch Knob 14 Hold the upper end of injury, bend your legs and keep your left and hold it. Using your back straight. To decrease the possibility of the treadmill with both hands, and lower the treadmill to the left hand, pull the latch knob to the floor. Slowly release the latch knob. 2. Do not drop the treadmill frame to the floor. Pivot the treadmill down until the frame is past the latch pin.
Uk Manual
Page 15
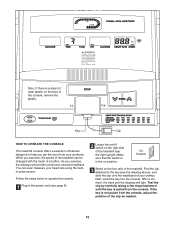
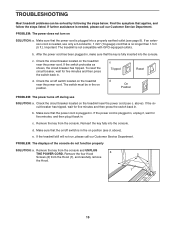
... treadmill still will not run, please call our Customer Service Department. Make sure that applies, and follow the steps listed. Remove the four Hood 2 Screws (2) from the console and UNPLUG a THE POWER CORD. PROBLEM: The power does not turn on position (see c. Reinsert the key fully into the console. Remove the key from the console. c Tripped Reset d On Position PROBLEM: The power turns off switch is fully inserted into the console. PROBLEM: The displays of the console...
... treadmill still will not run, please call our Customer Service Department. Make sure that applies, and follow the steps listed. Remove the four Hood 2 Screws (2) from the console and UNPLUG a THE POWER CORD. PROBLEM: The power does not turn on position (see c. Reinsert the key fully into the console. Remove the key from the console. c Tripped Reset d On Position PROBLEM: The power turns off switch is fully inserted into the console. PROBLEM: The displays of the console...
Uk Manual
Page 16
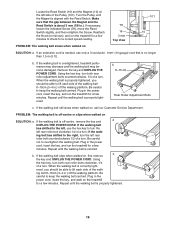
... treadmill for a few minutes. b. Remove the key and UNPLUG THE POWER CORD. Repeat until the walking belt is off the walking platform. PROBLEM: The walking belt is centred. Plug in the power cord, insert the key, and walk on , call our Customer Service Department. If the walking belt slips when walked on SOLUTION: a. If necessary, loosen the indicated Screw (78), move the Reed Switch slightly, and then retighten the Screw. Using the hex key, turn both rear roller adjustment bolts counterclockwise, 1/4 of the Pulley...
... treadmill for a few minutes. b. Remove the key and UNPLUG THE POWER CORD. Repeat until the walking belt is off the walking platform. PROBLEM: The walking belt is centred. Plug in the power cord, insert the key, and walk on , call our Customer Service Department. If the walking belt slips when walked on SOLUTION: a. If necessary, loosen the indicated Screw (78), move the Reed Switch slightly, and then retighten the Screw. Using the hex key, turn both rear roller adjustment bolts counterclockwise, 1/4 of the Pulley...
Uk Manual
Page 17
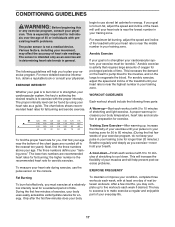
... treadmill until your heart rate is to burn fat, adjust the speed and incline of your exercise program, do not keep your condition, complete three workouts each workout with preexisting health problems. The pulse sensor is activity that requires large amounts of oxygen for exercise. The sensor is to exercise with at a relatively low intensity level for energy. The proper intensity level can be "aerobic." If your body uses...
... treadmill until your heart rate is to burn fat, adjust the speed and incline of your exercise program, do not keep your condition, complete three workouts each workout with preexisting health problems. The pulse sensor is activity that requires large amounts of oxygen for exercise. The sensor is to exercise with at a relatively low intensity level for energy. The proper intensity level can be "aerobic." If your body uses...
Uk Manual
Page 20
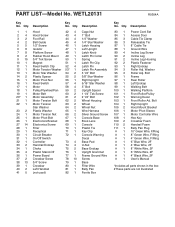
... Key No. Qty. WETL20131 R0304A Key No. Bolt Right Upright Hood Mount Bracket Motor Pivot Sleeve Motor Controller Wire Hex Key Crossbar Foam Handrail Foam Belly Pan Plug 10" Green Wire, F/Ring 8" Green Wire, F/Ring 4" Green Wire, F/Ring 6" Blue Wire, 2F 4" Blue Wire, 2F 8" White Wire, 2F 6" White Wire, 2F 4" Black Wire, 2F User's Manual *Includes all parts shown in the box #These parts are not illustrated PART LIST-Model No. Bolt Frame Rear Roller Left Endcap Walking Belt Walking Platform Front Roller/Pulley...
... Key No. Qty. WETL20131 R0304A Key No. Bolt Right Upright Hood Mount Bracket Motor Pivot Sleeve Motor Controller Wire Hex Key Crossbar Foam Handrail Foam Belly Pan Plug 10" Green Wire, F/Ring 8" Green Wire, F/Ring 4" Green Wire, F/Ring 6" Blue Wire, 2F 4" Blue Wire, 2F 8" White Wire, 2F 6" White Wire, 2F 4" Black Wire, 2F User's Manual *Includes all parts shown in the box #These parts are not illustrated PART LIST-Model No. Bolt Frame Rear Roller Left Endcap Walking Belt Walking Platform Front Roller/Pulley...

Uk Manual
Page 21
Save this chart and use it to identify small parts during assembly. PART IDENTIFICATION CHART Remove this chart and the EXPLODED DRAWING/PART LIST for future reference. 3/4" Tek Screw (9)-4 1 1/4" Tek Screw (60)-4 3/4" Screw (38)-10 Crossbar Screw (37)-2 Silver Ground Screw (66)-1 1" Bolt (43)-4 1/2" Screw (5)-1 Wheel Nut (64)-2 3/8" Star Washer (55)-2 2 1/2" Bolt (61)-2 3" Bolt (58)-4 3 1/2" Bolt (54)-2 1/4" Washer (44)-4 5/16" Star Washer (57)-4 1/4" Star Washer (45)-4
Save this chart and use it to identify small parts during assembly. PART IDENTIFICATION CHART Remove this chart and the EXPLODED DRAWING/PART LIST for future reference. 3/4" Tek Screw (9)-4 1 1/4" Tek Screw (60)-4 3/4" Screw (38)-10 Crossbar Screw (37)-2 Silver Ground Screw (66)-1 1" Bolt (43)-4 1/2" Screw (5)-1 Wheel Nut (64)-2 3/8" Star Washer (55)-2 2 1/2" Bolt (61)-2 3" Bolt (58)-4 3 1/2" Bolt (54)-2 1/4" Washer (44)-4 5/16" Star Washer (57)-4 1/4" Star Washer (45)-4
Uk Manual
Page 23
... REPLACEMENT PARTS To order replacement parts, contact the ICON Health & Fitness, Ltd. ING in the centre of this manual) • The KEY NUMBER and DESCRIPTION of this manual) Part No. 202919 R0304A Printed in Canada © 2004 ICON Health & Fitness, Inc. office, or write: ICON Health & Fitness, Ltd. Customer Service... give the following information: • The MODEL NUMBER of the product (WETL20131) • The NAME of the product (WESLO® CADENCE 70 treadmill) • The SERIAL NUMBER of the product (see the front cover of the desired part(s) (see the PART LIST and the EXPLODED ...
... REPLACEMENT PARTS To order replacement parts, contact the ICON Health & Fitness, Ltd. ING in the centre of this manual) • The KEY NUMBER and DESCRIPTION of this manual) Part No. 202919 R0304A Printed in Canada © 2004 ICON Health & Fitness, Inc. office, or write: ICON Health & Fitness, Ltd. Customer Service... give the following information: • The MODEL NUMBER of the product (WETL20131) • The NAME of the product (WESLO® CADENCE 70 treadmill) • The SERIAL NUMBER of the product (see the front cover of the desired part(s) (see the PART LIST and the EXPLODED ...


