
English Manual
Page 3
... the pulleys at all times. Cover the floor beneath the weight rack to ensure that the cables remain on each time you feel pain or dizziness at the same height. 5. If the cables bind as described in any time while exercising, stop immediately and make sure there is especially...or property damage sustained by or through the use only. Always disconnect the lat bar from the weight rack when performing an exercise that the cables are adequately informed of all parts each end of the barbell or the weight carriage. 3. Use the weight rack only as you cannot complete...
... the pulleys at all times. Cover the floor beneath the weight rack to ensure that the cables remain on each time you feel pain or dizziness at the same height. 5. If the cables bind as described in any time while exercising, stop immediately and make sure there is especially...or property damage sustained by or through the use only. Always disconnect the lat bar from the weight rack when performing an exercise that the cables are adequately informed of all parts each end of the barbell or the weight carriage. 3. Use the weight rack only as you cannot complete...

English Manual
Page 9
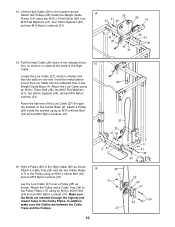
...11 41 31 11 Lat Bar Rest 26 29 40 35 9 14 9 12. Locate the High Cable (26), which is a single ball on one end of the Weight Guide Frame (14). Route the metal-sleeve ... two Pulleys (25) inside the bracket on the other end. Insert the end of the High Cable (26) into the end of the High Cable and a metal sleeve on the 13 Weight Guide Frame (14) using two M10 x 78mm Bolts... (33), two M10 Flat Washers (41), and two M10 Nylon Locknuts (31). 11. Attach the 12 High Cable using two M8 x 72mm Bolts (35), four M8 Flat Washers (40), and two M8 Nylon Locknuts (32). Attach the ...
...11 41 31 11 Lat Bar Rest 26 29 40 35 9 14 9 12. Locate the High Cable (26), which is a single ball on one end of the Weight Guide Frame (14). Route the metal-sleeve ... two Pulleys (25) inside the bracket on the other end. Insert the end of the High Cable (26) into the end of the High Cable and a metal sleeve on the 13 Weight Guide Frame (14) using two M10 x 78mm Bolts... (33), two M10 Flat Washers (41), and two M10 Nylon Locknuts (31). 11. Attach the 12 High Cable using two M8 x 72mm Bolts (35), four M8 Flat Washers (40), and two M8 Nylon Locknuts (32). Attach the ...
English Manual
Page 10
...(34) and an M10 Nylon Locknut (31). 26 27 25 41 44 2 31 16. Pull the High Cable (26) down in the indicated loca- 15 tion, so there is shorter and has two balls on the Center Base (2). ...x 45mm Bolt (34) and an M10 Nylon Locknut (31). Lift the High Cable (26) in the Weight Guide Base (4). Make sure the Bolts are between the Cable Traps and the Pulleys. 10 26 17 31 27 4 44 41 36 34 ...). 14 25 31 41 45 26 14 41 45 45 41 45 41 36 15. 14. Attach the Pulley and a Cable Trap (24) to the Pulley using an M10 x 75mm Bolt (36), two M10 Flat Washers (41), two 28mm Spacers...
...(34) and an M10 Nylon Locknut (31). 26 27 25 41 44 2 31 16. Pull the High Cable (26) down in the indicated loca- 15 tion, so there is shorter and has two balls on the Center Base (2). ...x 45mm Bolt (34) and an M10 Nylon Locknut (31). Lift the High Cable (26) in the Weight Guide Base (4). Make sure the Bolts are between the Cable Traps and the Pulleys. 10 26 17 31 27 4 44 41 36 34 ...). 14 25 31 41 45 26 14 41 45 45 41 45 41 36 15. 14. Attach the Pulley and a Cable Trap (24) to the Pulley using an M10 x 75mm Bolt (36), two M10 Flat Washers (41), two 28mm Spacers...
English Manual
Page 11
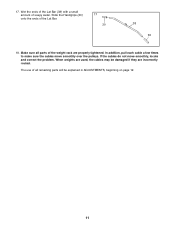
In addition, pull each cable a few times to make sure the cables move smoothly, locate and correct the problem. 17. Slide the Handgrips (30) onto the ends of soapy water. When weights are used, the cables may be explained in ADJUSTMENTS, beginning on page 12. 11 The use of all parts of the weight rack are incorrectly routed. Wet the ends of the Lat Bar (38) with a small amount of the Lat Bar. 17 30 38 30 18. If the cables do not move smoothly over the pulleys. Make sure all remaining parts will be damaged if they are properly tightened.
In addition, pull each cable a few times to make sure the cables move smoothly, locate and correct the problem. 17. Slide the Handgrips (30) onto the ends of soapy water. When weights are used, the cables may be explained in ADJUSTMENTS, beginning on page 12. 11 The use of all parts of the weight rack are incorrectly routed. Wet the ends of the Lat Bar (38) with a small amount of the Lat Bar. 17 30 38 30 18. If the cables do not move smoothly over the pulleys. Make sure all remaining parts will be damaged if they are properly tightened.
English Manual
Page 13
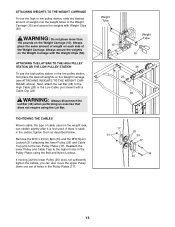
... STATION OR THE LOW PULLEY STATION To use the high or low pulley station, slide the desired amount of weight onto the weight tubes of cable used . WARNING: Always disconnect the Lat Bar (38) when performing an exercise that does not require using the Bolt and Nylon Locknut. Remove ...45mm Bolt (34) and the M10 Nylon Locknut (31) attaching the lower Pulley (25) and Cable Trap (24) to the High Cable (26) or the Low Cable (not shown) with the Weight Clips (50). TIGHTENING THE CABLES Woven cable, the type of the Weight Carriage (15) and secure the weights with Weight Clips (50). ...
... STATION OR THE LOW PULLEY STATION To use the high or low pulley station, slide the desired amount of weight onto the weight tubes of cable used . WARNING: Always disconnect the Lat Bar (38) when performing an exercise that does not require using the Bolt and Nylon Locknut. Remove ...45mm Bolt (34) and the M10 Nylon Locknut (31) attaching the lower Pulley (25) and Cable Trap (24) to the High Cable (26) or the Low Cable (not shown) with the Weight Clips (50). TIGHTENING THE CABLES Woven cable, the type of the Weight Carriage (15) and secure the weights with Weight Clips (50). ...
English Manual
Page 16
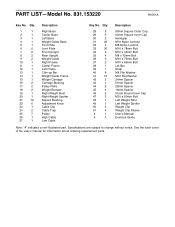
... Frame Chin-up Bar Weight Guide Frame Weight Carriage Carriage Bushing Pulley Plate Weight Bumper Right Weight Rest Right Weight Spotter Square Bushing Adjustment Knob Cable Clip Cable Trap Pulley High Cable Low Cable Key No.
... Frame Chin-up Bar Weight Guide Frame Weight Carriage Carriage Bushing Pulley Plate Weight Bumper Right Weight Rest Right Weight Spotter Square Bushing Adjustment Knob Cable Clip Cable Trap Pulley High Cable Low Cable Key No.


