
User Manual
Page 1
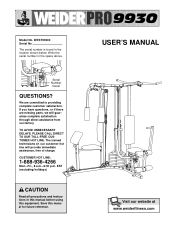
... in the space above. Serial Number Decal QUESTIONS? If you have questions, or if there are committed to providing complete customer satisfaction. We are missing parts, we will provide immediate assistance, free of charge. Save this equipment. USER'S MANUAL Visit our website at www.weiderfitness.com TO AVOID UNNECESSARY DELAYS, PLEASE...
... in the space above. Serial Number Decal QUESTIONS? If you have questions, or if there are committed to providing complete customer satisfaction. We are missing parts, we will provide immediate assistance, free of charge. Save this equipment. USER'S MANUAL Visit our website at www.weiderfitness.com TO AVOID UNNECESSARY DELAYS, PLEASE...
User Manual
Page 2
... ICON OF/DU CANADA, 900 de l'Industrie, St-Jérôme, QC J7Y 4B8 WEIDER is a registered trademark of purchase. Remove the PART LIST/EXPLODED DRAWING and the PART IDENTIFICATION CHART before beginning assembly. All returns must be pre-authorized by the retailer of your ... 4 ASSEMBLY 5 CABLE DIAGRAMS 19 ADJUSTMENT 21 TROUBLE-SHOOTING AND MAINTENANCE 22 WEIGHT RESISTANCE CHART 23 ORDERING REPLACEMENT PARTS Back Cover Note: A PART LIST/EXPLODED DRAWING and a PART IDENTIFICATION CHART are attached in the center of this warranty is limited to replacing or repairing, at ICON's ...
... ICON OF/DU CANADA, 900 de l'Industrie, St-Jérôme, QC J7Y 4B8 WEIDER is a registered trademark of purchase. Remove the PART LIST/EXPLODED DRAWING and the PART IDENTIFICATION CHART before beginning assembly. All returns must be pre-authorized by the retailer of your ... 4 ASSEMBLY 5 CABLE DIAGRAMS 19 ADJUSTMENT 21 TROUBLE-SHOOTING AND MAINTENANCE 22 WEIGHT RESISTANCE CHART 23 ORDERING REPLACEMENT PARTS Back Cover Note: A PART LIST/EXPLODED DRAWING and a PART IDENTIFICATION CHART are attached in the center of this warranty is limited to replacing or repairing, at ICON's ...
User Manual
Page 3
... performing an exercise that all users of the weight system are on the front cover of all instructions in this or any worn parts immediately. 12. WARNING: Before beginning this manual and in a commercial, rental, or institutional setting. 4. tions before using the ...weight system. 1. Always disconnect the lat bar or nylon strap from moving parts. 10. ICON assumes no responsibility for foot protection while exercising. 9. Replace any exercise program, consult your physician. If a decal is the...
... performing an exercise that all users of the weight system are on the front cover of all instructions in this or any worn parts immediately. 12. WARNING: Before beginning this manual and in a commercial, rental, or institutional setting. 4. tions before using the ...weight system. 1. Always disconnect the lat bar or nylon strap from moving parts. 10. ICON assumes no responsibility for foot protection while exercising. 9. Replace any exercise program, consult your physician. If a decal is the...
User Manual
Page 4
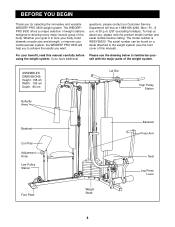
... you for selecting the innovative and versatile WEIDER® PRO 9930 weight system. questions, please contact our Customer Service Department toll-free at 1-888-936-4266, Mon.-Fri., 8 a.m.-6:30 p.m. BEFORE YOU BEGIN Thank you have additional self with the major parts of the weight system. To help you... , please note the product model number and serial number before Please use the drawing below to achieve the results you want. using the weight system. Whether your - The WEIDER® PRO 9930 offers a unique ...
... you for selecting the innovative and versatile WEIDER® PRO 9930 weight system. questions, please contact our Customer Service Department toll-free at 1-888-936-4266, Mon.-Fri., 8 a.m.-6:30 p.m. BEFORE YOU BEGIN Thank you have additional self with the major parts of the weight system. To help you... , please note the product model number and serial number before Please use the drawing below to achieve the results you want. using the weight system. Whether your - The WEIDER® PRO 9930 offers a unique ...
User Manual
Page 5
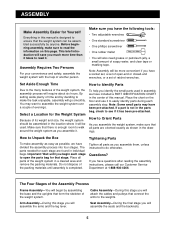
...You will also need grease or petroleum jelly, a small amount of time and by deciding to make assembly as easy as shown in the parts bag, check to the weights. Cable Assembly-During this manual. Assembly Requires Two Persons For your convenience and safety, assemble the weight system ...with the help you have a socket set, a set of open the parts bag for each stage are oriented exactly as possible, we have questions after reading the assembly instructions, please call our Customer Service Department at ...
...You will also need grease or petroleum jelly, a small amount of time and by deciding to make assembly as easy as shown in the parts bag, check to the weights. Cable Assembly-During this manual. Assembly Requires Two Persons For your convenience and safety, assemble the weight system ...with the help you have a socket set, a set of open the parts bag for each stage are oriented exactly as possible, we have questions after reading the assembly instructions, please call our Customer Service Department at ...

User Manual
Page 6
Locate and open the parts bag labelled "FRAME ASSEMBLY." Note: If the Bolts fall out, secure them by putting a small piece of tape over the head of the Press 62 ...
Locate and open the parts bag labelled "FRAME ASSEMBLY." Note: If the Bolts fall out, secure them by putting a small piece of tape over the head of the Press 62 ...
User Manual
Page 9
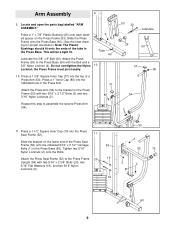
Locate and open the parts bag labelled "ARM ASSEMBLY." Press a 1" x 7/8" Plastic Bushing (29) onto each welded spacer on the Press Frame (53) with two 5/16" x 2 1/2" Bolts (3) and two 5/16" Nylon ...
Locate and open the parts bag labelled "ARM ASSEMBLY." Press a 1" x 7/8" Plastic Bushing (29) onto each welded spacer on the Press Frame (53) with two 5/16" x 2 1/2" Bolts (3) and two 5/16" Nylon ...
User Manual
Page 10
..., on the Leg Lever. Wet the lower end of 13 the Right Butterfly Arm (68). Place two 1" Retainers (25), with a #10 x 1" Screw (32). Open the parts bag labelled "CABLE ASSEMBLY AND PULLEYS." Insert a Bumper (33) between the brackets 12 on top of the Cable onto each Bolt with a 3/8" Flat Washer (17...
..., on the Leg Lever. Wet the lower end of 13 the Right Butterfly Arm (68). Place two 1" Retainers (25), with a #10 x 1" Screw (32). Open the parts bag labelled "CABLE ASSEMBLY AND PULLEYS." Insert a Bumper (33) between the brackets 12 on top of the Cable onto each Bolt with a 3/8" Flat Washer (17...
User Manual
Page 14
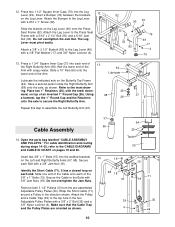
Note: For clarity, this and the following drawings 25 show some parts removed. Attach the Pulley and a Cable Trap (39) to the indicated hole in the Press Frame (53) with a 3/8" x 2" Bolt (35) and a 3/8" Nylon Locknut (4). Wrap the ...
Note: For clarity, this and the following drawings 25 show some parts removed. Attach the Pulley and a Cable Trap (39) to the indicated hole in the Press Frame (53) with a 3/8" x 2" Bolt (35) and a 3/8" Nylon Locknut (4). Wrap the ...
User Manual
Page 16
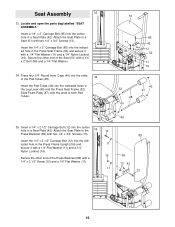
...) and a 1/4" Nylon Locknut (16). 16 Secure the other end of both Pad Tubes. 52 48 40 47 49 40 47 35. Locate and open the parts bag labelled "SEAT ASSEMBLY." Seat Assembly 33 33.
...) and a 1/4" Nylon Locknut (16). 16 Secure the other end of both Pad Tubes. 52 48 40 47 49 40 47 35. Locate and open the parts bag labelled "SEAT ASSEMBLY." Seat Assembly 33 33.
User Manual
Page 18
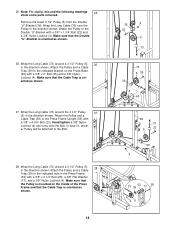
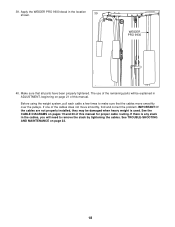
... this manual for proper cable routing. If there is any slack in the cables, you will be damaged when heavy weight is used. WEIDER PRO 9930 40. IMPORTANT: If the cables are not properly installed, they may be explained in the location 39 shown. See TROUBLE-SHOOTING AND MAINTENANCE...pages 19 and 20 of the cables does not move smoothly over the pulleys. Apply the WEIDER PRO 9930 decal in ADJUSTMENT, beginning on page 21 of the remaining parts will need to make sure that all parts have been properly tightened. Before using the weight system, pull each cable a few times...
... this manual for proper cable routing. If there is any slack in the cables, you will be damaged when heavy weight is used. WEIDER PRO 9930 40. IMPORTANT: If the cables are not properly installed, they may be explained in the location 39 shown. See TROUBLE-SHOOTING AND MAINTENANCE...pages 19 and 20 of the cables does not move smoothly over the pulleys. Apply the WEIDER PRO 9930 decal in ADJUSTMENT, beginning on page 21 of the remaining parts will need to make sure that all parts have been properly tightened. Before using the weight system, pull each cable a few times...

User Manual
Page 21
ADJUSTMENT The instructions below describe how each part of resistance at each exercise station may vary from the weight setting. Use the WEIGHT RESISTANCE CHART on page 23 to find the approximate amount ...
ADJUSTMENT The instructions below describe how each part of resistance at each exercise station may vary from the weight setting. Use the WEIGHT RESISTANCE CHART on page 23 to find the approximate amount ...
User Manual
Page 22
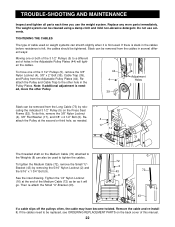
... Pulley and Cable Trap to tighten the cables. The threaded shaft on the Press Seat Frame (52). TROUBLE-SHOOTING AND MAINTENANCE Inspect and tighten all parts each time you use solvents. Remove the cable and re-install it is needed . To do this manual. 22 Then re-attach the Small "U"-...a damp cloth and mild non-abrasive detergent. en the cables. 35 To move one or both of the 3 1/2" Pulleys (5) to be replaced, see ORDERING REPLACEMENT PARTS on weight systems can be tightened. See the inset drawing. If there is slack in the Pulley Plates. Replace any worn...
... Pulley and Cable Trap to tighten the cables. The threaded shaft on the Press Seat Frame (52). TROUBLE-SHOOTING AND MAINTENANCE Inspect and tighten all parts each time you use solvents. Remove the cable and re-install it is needed . To do this manual. 22 Then re-attach the Small "U"-...a damp cloth and mild non-abrasive detergent. en the cables. 35 To move one or both of the 3 1/2" Pulleys (5) to be replaced, see ORDERING REPLACEMENT PARTS on weight systems can be tightened. See the inset drawing. If there is slack in the Pulley Plates. Replace any worn...
User Manual
Page 24
...be prepared to be sent further bulletins about ICON products? o Yes o No THANK YOU FOR YOUR TIME © 2001 ICON of the product (WEIDER® PRO 9930 weight system) 3. The SERIAL NUMBER of /du Canada Inc. o Bicycle o Exercise cycle o Treadmill o Home gym o Weight bench o Stepper...innovation o Other____________ 8) Did you own? The MODEL NUMBER of exercise equipment do you ever purchased an ICON product before? ORDERING REPLACEMENT PARTS To order replacement parts, simply call our Customer Service Department toll-free at 1-888-936-4266, Monday through Friday, 8 a.m. o Yes o No ...
...be prepared to be sent further bulletins about ICON products? o Yes o No THANK YOU FOR YOUR TIME © 2001 ICON of the product (WEIDER® PRO 9930 weight system) 3. The SERIAL NUMBER of /du Canada Inc. o Bicycle o Exercise cycle o Treadmill o Home gym o Weight bench o Stepper...innovation o Other____________ 8) Did you own? The MODEL NUMBER of exercise equipment do you ever purchased an ICON product before? ORDERING REPLACEMENT PARTS To order replacement parts, simply call our Customer Service Department toll-free at 1-888-936-4266, Monday through Friday, 8 a.m. o Yes o No ...
User Manual
Page 25
... stage to open the parts bag for that stage. and 4) seat assembly. Wait until you identify the small parts used in assembly. The hardware for shipping purposes. Note: Assembly is packaged separately. R0501A Important: Some parts may have been pre-assembled for each part refers to see if ...it has been pre-assembled. The number in the parts bags, check to the key number of the part. If you cannot find a part in parenthesis below each assembly stage is ...
... stage to open the parts bag for that stage. and 4) seat assembly. Wait until you identify the small parts used in assembly. The hardware for shipping purposes. Note: Assembly is packaged separately. R0501A Important: Some parts may have been pre-assembled for each part refers to see if ...it has been pre-assembled. The number in the parts bags, check to the key number of the part. If you cannot find a part in parenthesis below each assembly stage is ...

User Manual
Page 26
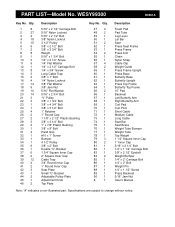
WESY99300 1/4" Flat Washer (11) 5/16" x 1 3/4" Bolt (9) 5/16" Flat Washer (19) 5/16" x 2 1/2" Bolt (3) 3/8" Flat Washer (17) 1/4" Nylon Locknut (16) 5/16" Nylon Locknut (2) 5/16" Jam Nut (90) 3/8" Nylon Locknut (4) 3/8" Jam Nut (18) 3/8" x 2 1/2" Eye Bolt (83) 5/16" x 2 3/4" Bolt (20) 5/16" x 2 1/2" Carriage Bolt (1) 1/4" x 2" Bolt (86) 1/4" x 2" Carriage Bolt (85) 1/4" x 2 1/2" Carriage Bolt (12) #10 x 1" Screw (32) 1/4" x 3/4" Screw (13) 1/4" x 2 1/2" Screw (10) PART IDENTIFICATION CHART-Model No.
WESY99300 1/4" Flat Washer (11) 5/16" x 1 3/4" Bolt (9) 5/16" Flat Washer (19) 5/16" x 2 1/2" Bolt (3) 3/8" Flat Washer (17) 1/4" Nylon Locknut (16) 5/16" Nylon Locknut (2) 5/16" Jam Nut (90) 3/8" Nylon Locknut (4) 3/8" Jam Nut (18) 3/8" x 2 1/2" Eye Bolt (83) 5/16" x 2 3/4" Bolt (20) 5/16" x 2 1/2" Carriage Bolt (1) 1/4" x 2" Bolt (86) 1/4" x 2" Carriage Bolt (85) 1/4" x 2 1/2" Carriage Bolt (12) #10 x 1" Screw (32) 1/4" x 3/4" Screw (13) 1/4" x 2 1/2" Screw (10) PART IDENTIFICATION CHART-Model No.

User Manual
Page 29
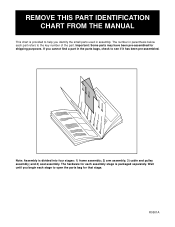
REMOVE THIS PART LIST/EXPLODED DRAWING FROM THE MANUAL 81
REMOVE THIS PART LIST/EXPLODED DRAWING FROM THE MANUAL 81
User Manual
Page 30
... Cap 5/16" x 2 1/4" Bolt 1/4" x 1 1/2" Carriage Bolt 3/8" x 2 1/2" Eyebolt Weight Bumper 1/4" x 2" Carriage Bolt 1/4" x 2" Bolt Weight Pin 1/4" x 1 1/2" Screw Press Backrest 5/16" Jam Nut User's Manual Note: "#" indicates a non-illustrated part. PART LIST-Model No.
... Cap 5/16" x 2 1/4" Bolt 1/4" x 1 1/2" Carriage Bolt 3/8" x 2 1/2" Eyebolt Weight Bumper 1/4" x 2" Carriage Bolt 1/4" x 2" Bolt Weight Pin 1/4" x 1 1/2" Screw Press Backrest 5/16" Jam Nut User's Manual Note: "#" indicates a non-illustrated part. PART LIST-Model No.


