
English Manual
Page 2
until 7 p.m. Table of Contents WARNING DECAL PLACEMENT 2 IMPORTANT PRECAUTIONS 3 BEFORE YOU BEGIN 4 PART IDENTIFICATION CHART 5 ASSEMBLY 6 USING THE WEIGHT BENCH 11 EXERCISE GUIDELINES 13 PART LIST 18 EXPLODED DRAWING 19 ORDERING REPLACEMENT PARTS Back Cover FULL 90 DAY WARRANTY Back Cover Warning Decal Placement The decal shown at 1-800-736-6879, Monday through Saturday, 7 a.m. Apply the... not legible, please call our toll-free HELPLINE at the right has been applied to order a free replacement decal. Central Time (excluding holidays), to the weight bench.
until 7 p.m. Table of Contents WARNING DECAL PLACEMENT 2 IMPORTANT PRECAUTIONS 3 BEFORE YOU BEGIN 4 PART IDENTIFICATION CHART 5 ASSEMBLY 6 USING THE WEIGHT BENCH 11 EXERCISE GUIDELINES 13 PART LIST 18 EXPLODED DRAWING 19 ORDERING REPLACEMENT PARTS Back Cover FULL 90 DAY WARRANTY Back Cover Warning Decal Placement The decal shown at 1-800-736-6879, Monday through Saturday, 7 a.m. Apply the... not legible, please call our toll-free HELPLINE at the right has been applied to order a free replacement decal. Central Time (excluding holidays), to the weight bench.
English Manual
Page 3
... surface. Inspect and tighten all times. 7. Keep hands and feet away from the front leg before beginning any worn parts immediately. 6. The weight bench is attached to ensure that 210 pounds, including a weight bar and weights, on the leg lever. 13. When using the leg lever, place a barbell with the same amount of 35 or...
... surface. Inspect and tighten all times. 7. Keep hands and feet away from the front leg before beginning any worn parts immediately. 6. The weight bench is attached to ensure that 210 pounds, including a weight bar and weights, on the leg lever. 13. When using the leg lever, place a barbell with the same amount of 35 or...
English Manual
Page 4
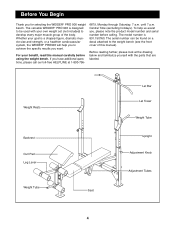
... parts that are labeled. Before You Begin Thank you have additional questions, please call our toll-free HELPLINE at the drawing below and familiarize yourself with your goal is 831.150760. The versatile WEIDER¨ PRO 900 is designed to be found on a decal attached to the weight bench ... holidays). Before reading further, please look at 1-800-736- 6879, Monday through Saturday, 7 a.m. until 7 p.m. If you for selecting the WEIDER¨ PRO 900 weight bench. To help you to develop every major muscle group of this manual carefully before calling. Whether your own...
... parts that are labeled. Before You Begin Thank you have additional questions, please call our toll-free HELPLINE at the drawing below and familiarize yourself with your goal is 831.150760. The versatile WEIDER¨ PRO 900 is designed to be found on a decal attached to the weight bench ... holidays). Before reading further, please look at 1-800-736- 6879, Monday through Saturday, 7 a.m. until 7 p.m. If you for selecting the WEIDER¨ PRO 900 weight bench. To help you to develop every major muscle group of this manual carefully before calling. Whether your own...
English Manual
Page 6
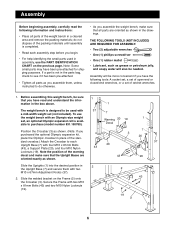
...see if it has been pre-attached. ¥ Tighten all parts of the weight bench in the Upright Base (7) and secure them , unless instructed to each assembly step before you assemble the weight bench, make sure that all parts are oriented exactly as grease or petroleum jelly, and soapy water ... the information in the box above. Assembly will also be sure that you have the following information and instructions: ¥ Place all parts as shown in assembly, use the weight bench with two M10 x 81mm Bolts (43) and two M10 Nylon Locknuts (19). 1 37 43 2 1 7 Warning 20 19 Decal 3 20 ...
...see if it has been pre-attached. ¥ Tighten all parts of the weight bench in the Upright Base (7) and secure them , unless instructed to each assembly step before you assemble the weight bench, make sure that all parts are oriented exactly as grease or petroleum jelly, and soapy water ... the information in the box above. Assembly will also be sure that you have the following information and instructions: ¥ Place all parts as shown in assembly, use the weight bench with two M10 x 81mm Bolts (43) and two M10 Nylon Locknuts (19). 1 37 43 2 1 7 Warning 20 19 Decal 3 20 ...
English Manual
Page 10
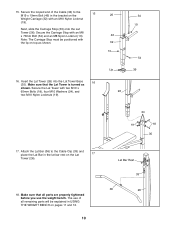
... sure that the Lat Tower is turned as shown. 16. Make sure that all remaining parts will be positioned with two M10 x 65mm Bolts (18), four M10 Washers (24), ...the 15 M19 x 19mm Bolt (46) in the bracket on the Lat 17 Tower (26). 18. The use the weight bench. Next, slide the Carriage Stop (39) onto the Lat Tower (26). Secure the Carriage Stop with an M10 Nylon Locknut...(19). Secure the looped end of all parts are properly tightened before you use of the Cable (34) to the Cable Clip (33) and place the Lat Bar in USING THE WEIGHT BENCH on top as shown. Insert the Lat ...
... sure that the Lat Tower is turned as shown. 16. Make sure that all remaining parts will be positioned with two M10 x 65mm Bolts (18), four M10 Washers (24), ...the 15 M19 x 19mm Bolt (46) in the bracket on the Lat 17 Tower (26). 18. The use the weight bench. Next, slide the Carriage Stop (39) onto the Lat Tower (26). Secure the Carriage Stop with an M10 Nylon Locknut...(19). Secure the looped end of all parts are properly tightened before you use of the Cable (34) to the Cable Clip (33) and place the Lat Bar in USING THE WEIGHT BENCH on top as shown. Insert the Lat ...
English Manual
Page 11
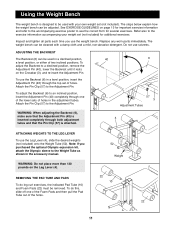
... position, insert the Adjustment Pin (40) completely through the top set (not included) for several exercises. Note: If you use solvents. Using the Weight Bench The weight bench is attached. Inspect and tighten all parts each time you purchased the optional Olympic expansion kit, attach the Olympic sleeve to the exercise information accompanying your own...
... position, insert the Adjustment Pin (40) completely through the top set (not included) for several exercises. Note: If you use solvents. Using the Weight Bench The weight bench is attached. Inspect and tighten all parts each time you purchased the optional Olympic expansion kit, attach the Olympic sleeve to the exercise information accompanying your own...
English Manual
Page 20
... assembling or operating the WEIDER¨ PRO 900 ¥ a part is used commercially or for immediate purchase or special order when you need to the frame. This warranty does not apply when the WEIGHT BENCH EXERCISER is missing ¥ or you visit your WEIDER¨ PRO 900 are available for rental ...information: ¥ The MODEL NUMBER of the product (831.150760) ¥ The NAME of the product (WEIDER¨ PRO 900 weight bench) ¥ The PART NUMBER of the PART (see the PART LIST and the EXPLODED DRAWING on pages 18 and 19 of the decal. This warranty gives you specific legal ...
... assembling or operating the WEIDER¨ PRO 900 ¥ a part is used commercially or for immediate purchase or special order when you need to the frame. This warranty does not apply when the WEIGHT BENCH EXERCISER is missing ¥ or you visit your WEIDER¨ PRO 900 are available for rental ...information: ¥ The MODEL NUMBER of the product (831.150760) ¥ The NAME of the product (WEIDER¨ PRO 900 weight bench) ¥ The PART NUMBER of the PART (see the PART LIST and the EXPLODED DRAWING on pages 18 and 19 of the decal. This warranty gives you specific legal ...


