

English Manual
Page 1
Write the serial number in the location shown below. Save this equipment. The serial number can be found in the space above. Serial Number Decal (under seat) USER'S MANUAL CAUTION Read all precautions and instructions in this manual before using this manual for future reference. SEARS, ROEBUCK AND CO., HOFFMAN ESTATES, IL 60179 PATENT PENDING Model No. 831.150471 Serial No.
Write the serial number in the location shown below. Save this equipment. The serial number can be found in the space above. Serial Number Decal (under seat) USER'S MANUAL CAUTION Read all precautions and instructions in this manual before using this manual for future reference. SEARS, ROEBUCK AND CO., HOFFMAN ESTATES, IL 60179 PATENT PENDING Model No. 831.150471 Serial No.
English Manual
Page 2
Remove the PART IDENTIFICATION CHART and the PART LIST/EXPLODED DRAWING before beginning assembly. 2 TABLE OF CONTENTS IMPORTANT PRECAUTIONS 3 WARNING DECAL PLACEMENT 4 BEFORE YOU BEGIN 5 ASSEMBLY 6 ADJUSTING THE WEIDER PRO 545 14 EXERCISE GUIDELINES 17 ORDERING REPLACEMENT PARTS Back Cover FULL 90 DAY WARRANTY Back Cover Note: A PART IDENTIFICATION CHART and a PART LIST/EXPLODED DRAWING are attached to the center of this manual.
Remove the PART IDENTIFICATION CHART and the PART LIST/EXPLODED DRAWING before beginning assembly. 2 TABLE OF CONTENTS IMPORTANT PRECAUTIONS 3 WARNING DECAL PLACEMENT 4 BEFORE YOU BEGIN 5 ASSEMBLY 6 ADJUSTING THE WEIDER PRO 545 14 EXERCISE GUIDELINES 17 ORDERING REPLACEMENT PARTS Back Cover FULL 90 DAY WARRANTY Back Cover Note: A PART IDENTIFICATION CHART and a PART LIST/EXPLODED DRAWING are attached to the center of this manual.
English Manual
Page 3
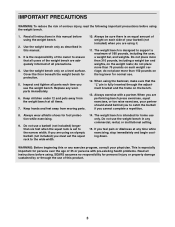
Use the weight bench only as described in this product. 3 The weight bench is intended for personal injury or property damage sustained by or through the adjustment bracket and the frame on a level surface. do not place more than six feet when the squat rack is set the squat rack to ensure that the "L" pin is the responsibility of all parts each weight carriage; The weight bench is designed to the narrow width. Do not place more than 150 pounds on the weight rests; Always exercise with pre-existing health problems. Read all instructions before using. ...
Use the weight bench only as described in this product. 3 The weight bench is intended for personal injury or property damage sustained by or through the adjustment bracket and the frame on a level surface. do not place more than six feet when the squat rack is set the squat rack to ensure that the "L" pin is the responsibility of all parts each weight carriage; The weight bench is designed to the narrow width. Do not place more than 150 pounds on the weight rests; Always exercise with pre-existing health problems. Read all instructions before using. ...
English Manual
Page 4
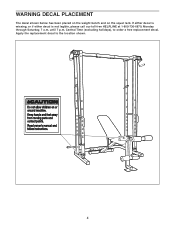
Central Time (excluding holidays), to the location shown. 4 Apply the replacement decal to order a free replacement decal. If either decal is missing, or if either decal is not legible, please call our toll-free HELPLINE at 1-800-736-6879, Monday through Saturday, 7 a.m. until 7 p.m. WARNING DECAL PLACEMENT The decal shown below has been placed on the weight bench and on the squat rack.
Central Time (excluding holidays), to the location shown. 4 Apply the replacement decal to order a free replacement decal. If either decal is missing, or if either decal is not legible, please call our toll-free HELPLINE at 1-800-736-6879, Monday through Saturday, 7 a.m. until 7 p.m. WARNING DECAL PLACEMENT The decal shown below has been placed on the weight bench and on the squat rack.
English Manual
Page 5
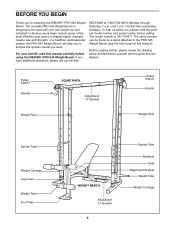
... weight set (not included) to the PRO 545 Weight Bench (see the front cover of the body. Whether your benefit, read this manual). If you , please note the product model number and serial number before using the WEIDER® PRO 545 Weight Bench. The model number is a... shapely figure, dramatic muscle size and strength, or a healthier cardiovascular system, the PRO 545 Weight Bench will help us assist you have additional questions, please call...
... weight set (not included) to the PRO 545 Weight Bench (see the front cover of the body. Whether your benefit, read this manual). If you , please note the product model number and serial number before using the WEIDER® PRO 545 Weight Bench. The model number is a... shapely figure, dramatic muscle size and strength, or a healthier cardiovascular system, the PRO 545 Weight Bench will help us assist you have additional questions, please call...
English Manual
Page 6
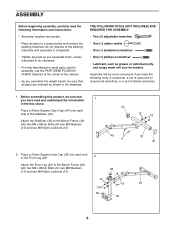
Press a 50mm Square Inner Cap (36) into each side of the manual. • As you assemble the weight bench, be needed. ASSEMBLY Before beginning assembly, carefully read and understand the information in the box above. THE FOLLOWING TOOLS (NOT INCLUDED) ARE REQUIRED FOR ASSEMBLY: • Two (2) adjustable wrenches • One (1) rubber mallet • One (1) standard screwdriver • One (1) phillips screwdriver • Lubricant, such as shown in the drawings. Assembly will be more convenient if you have the following information and instructions: • Assembly ...
Press a 50mm Square Inner Cap (36) into each side of the manual. • As you assemble the weight bench, be needed. ASSEMBLY Before beginning assembly, carefully read and understand the information in the box above. THE FOLLOWING TOOLS (NOT INCLUDED) ARE REQUIRED FOR ASSEMBLY: • Two (2) adjustable wrenches • One (1) rubber mallet • One (1) standard screwdriver • One (1) phillips screwdriver • Lubricant, such as shown in the drawings. Assembly will be more convenient if you have the following information and instructions: • Assembly ...
English Manual
Page 7
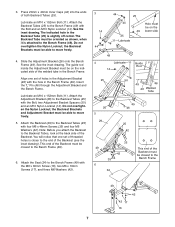
See the inset drawing. See the inset drawing. Attach the Adjustment Bracket (26) to the Bench Frame (49). 6. This end of the Backrest must be closest to the Backrest Tubes (25) with the Bolt and an M10 Nylon Locknut (14). Attach the Backrest Tubes (25) to move freely. 5. The guide rod inside the Adjustment Bracket must be on the lower side 49 4 Lubricate-11 Guide Rod 14 25 50 49 46 26 Welded Tube 26 5 29 49 46 25 42 35 49 42 35 6 34 This end of the welded tube in the Bench Frame. Lubricate an M10 x 152mm Bolt (11). Do not overtighten the Nylon ...
See the inset drawing. See the inset drawing. Attach the Adjustment Bracket (26) to the Bench Frame (49). 6. This end of the Backrest must be closest to the Backrest Tubes (25) with the Bolt and an M10 Nylon Locknut (14). Attach the Backrest Tubes (25) to move freely. 5. The guide rod inside the Adjustment Bracket must be on the lower side 49 4 Lubricate-11 Guide Rod 14 25 50 49 46 26 Welded Tube 26 5 29 49 46 25 42 35 49 42 35 6 34 This end of the welded tube in the Bench Frame. Lubricate an M10 x 152mm Bolt (11). Do not overtighten the Nylon ...
English Manual
Page 8
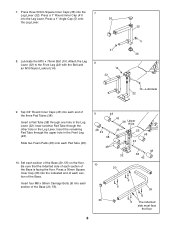
Press a 1" Angle Cap (5) onto 36 the Leg Lever. 41 8. Insert the remaining Pad Tube through one hole in the Leg Lever (32). Be sure that the indented side of the Base is facing the floor. Lubricate the M10 x 75mm Bolt (10). 7. Attach the Leg 8 Lever (32) to the Front Leg (22) with the Bolt and an M10 Nylon Locknut (14). 14 32 32 5 36 10-Lubricate 22 9. Slide two Foam Pads (48) onto each section of each Pad Tube (38). 10. Set each section of the Base (20, 55) on the floor. Insert four M8 x 58mm Carriage Bolts (6) into each section of the Base (20, 55). 9 48 ...
Press a 1" Angle Cap (5) onto 36 the Leg Lever. 41 8. Insert the remaining Pad Tube through one hole in the Leg Lever (32). Be sure that the indented side of the Base is facing the floor. Lubricate the M10 x 75mm Bolt (10). 7. Attach the Leg 8 Lever (32) to the Front Leg (22) with the Bolt and an M10 Nylon Locknut (14). 14 32 32 5 36 10-Lubricate 22 9. Slide two Foam Pads (48) onto each section of each Pad Tube (38). 10. Set each section of the Base (20, 55) on the floor. Insert four M8 x 58mm Carriage Bolts (6) into each section of the Base (20, 55). 9 48 ...
English Manual
Page 9
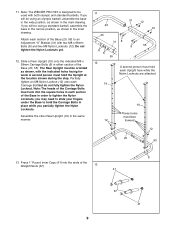
... oriented as shown in the inset drawing. If you may need to slide your fingers under the Base to tighten the Nylon Locknuts; Note: The WEIDER PRO 545 is designed to an Adjustment "U" Bracket (31) with two M8 x 68mm Bolts (8) and two M8 Nylon Locknuts (12). Attach each section of the Carriage Bolts...
... oriented as shown in the inset drawing. If you may need to slide your fingers under the Base to tighten the Nylon Locknuts; Note: The WEIDER PRO 545 is designed to an Adjustment "U" Bracket (31) with two M8 x 68mm Bolts (8) and two M8 Nylon Locknuts (12). Attach each section of the Carriage Bolts...

English Manual
Page 10
Be sure that the Weight Rests are attached 18 20 6 12 16. Assemble the other Weight Carriage (52) in the same manner. Note: The heads of the Carriage Bolts must lock into each section of the Base (20, 55). you may need to slide your fingers under the Base to tighten the Nylon Locknuts; Insert a Weight Rest (37) into the square holes in order to hold the Carriage Bolts in either section of the Base in each Rear Upright 14 (19). Slide a Front Upright (18) onto the indicated M8 x 58mm Carriage Bolts (6) in place while you partially tighten the Nylon Locknuts. ...
Be sure that the Weight Rests are attached 18 20 6 12 16. Assemble the other Weight Carriage (52) in the same manner. Note: The heads of the Carriage Bolts must lock into each section of the Base (20, 55). you may need to slide your fingers under the Base to tighten the Nylon Locknuts; Insert a Weight Rest (37) into the square holes in order to hold the Carriage Bolts in either section of the Base in each Rear Upright 14 (19). Slide a Front Upright (18) onto the indicated M8 x 58mm Carriage Bolts (6) in place while you partially tighten the Nylon Locknuts. ...
English Manual
Page 11
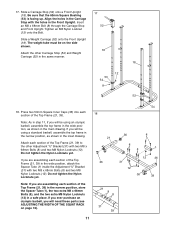
Insert an M8 x 68mm Bolt (8) through the Carriage Stop and Front Upright. Attach each section of the Top Frame (21, 39) in the main drawing. Do not tighten the Nylon Locknuts yet. 31 12 Note: If you will need these parts (see ADJUSTING THE WIDTH OF THE SQUAT RACK on the side shown. 18 Attach the other Adjustment "U" Bracket (31) with the holes in the same manner. 18 12 53 54 8 52 18. The weight tube must be on page 16). 21 8 8 31 39 11 54 8 8 1 12 36 36 39 If you are assembling each section of the Top Frame (21, 39) to the other Carriage Stop (54) and ...
Insert an M8 x 68mm Bolt (8) through the Carriage Stop and Front Upright. Attach each section of the Top Frame (21, 39) in the main drawing. Do not tighten the Nylon Locknuts yet. 31 12 Note: If you will need these parts (see ADJUSTING THE WIDTH OF THE SQUAT RACK on the side shown. 18 Attach the other Adjustment "U" Bracket (31) with the holes in the same manner. 18 12 53 54 8 52 18. The weight tube must be on page 16). 21 8 8 31 39 11 54 8 8 1 12 36 36 39 If you are assembling each section of the Top Frame (21, 39) to the other Carriage Stop (54) and ...

English Manual
Page 12
Attach each section of the "U" Bracket and should be rout- Attach the other Cable to the Rear Uprights (19) with two M8 x 68mm Bolts (8), two M8 Washers (13), and two M8 Nylon Locknuts (12). Assemble the other "U" Bracket (not shown) in the same manner. 14 30 14 23 9 24 30 51 12 19. Attach the Pulley to the other Pulley to the "U" Bracket (30) with an M10 x 75mm Bolt (10), two Cable Spacers (45), and an M10 Nylon Locknut (14). The Cable must be attached on the out- ed around a Pulley (24). Attach the other Weight Carriage (not shown) in place. side of the Top ...
Attach each section of the "U" Bracket and should be rout- Attach the other Cable to the Rear Uprights (19) with two M8 x 68mm Bolts (8), two M8 Washers (13), and two M8 Nylon Locknuts (12). Assemble the other "U" Bracket (not shown) in the same manner. 14 30 14 23 9 24 30 51 12 19. Attach the Pulley to the other Pulley to the "U" Bracket (30) with an M10 x 75mm Bolt (10), two Cable Spacers (45), and an M10 Nylon Locknut (14). The Cable must be attached on the out- ed around a Pulley (24). Attach the other Weight Carriage (not shown) in place. side of the Top ...
English Manual
Page 13
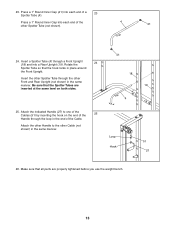
Be sure that the Spotter Tubes are properly tightened before you use the weight bench. 13 Make sure that the hook locks in the same manner. 41 18 19 4 Loop Hook 51 27 26. Attach the indicated Handle (27) to the other Front and Rear Upright (not shown) in the end of the other Spotter Tube (not shown). 4 41 24. Press a 1" Round Inner Cap (41) into each end of the 25 Handle through a Front Upright (18) and into a Rear Upright (19). Insert the other Spotter Tube through the other Cable (not shown) in place around the Front Upright. Rotate the 24 Spotter Tube so ...
Be sure that the Spotter Tubes are properly tightened before you use the weight bench. 13 Make sure that the hook locks in the same manner. 41 18 19 4 Loop Hook 51 27 26. Attach the indicated Handle (27) to the other Front and Rear Upright (not shown) in the end of the other Spotter Tube (not shown). 4 41 24. Press a 1" Round Inner Cap (41) into each end of the 25 Handle through a Front Upright (18) and into a Rear Upright (19). Insert the other Spotter Tube through the other Cable (not shown) in place around the Front Upright. Rotate the 24 Spotter Tube so ...
English Manual
Page 14
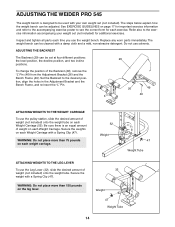
... be used with a Spring Clip (47). To change the position of weight (not included) onto the weight tube on each Weight Carriage (52). ADJUSTING THE WEIDER PRO 545 The weight bench is an equal amount of weight on each Weight Carriage. The steps below explain how the weight bench can be set (not...
... be used with a Spring Clip (47). To change the position of weight (not included) onto the weight tube on each Weight Carriage (52). ADJUSTING THE WEIDER PRO 545 The weight bench is an equal amount of weight on each Weight Carriage. The steps below explain how the weight bench can be set (not...
English Manual
Page 15
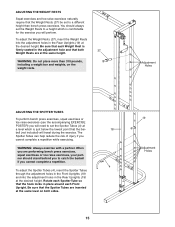
WARNING: Always exercise with a partner. When you are inserted at the same level on the weight rests. Be sure that the Spotter Tubes are performing bench press exercises, squat exercises or toe raise exercises, your partner should always set to a height which is firmly seated in the adjustment hole and that the bar- 18 bell (not included) will travel during the exercise. Be sure that each Weight Rest is just below the lowest point that both sides. 15 19 Adjustment Holes Rotate each Spotter Tube so that the Weight Rests (37) be set the Weight Rests to a ...
WARNING: Always exercise with a partner. When you are inserted at the same level on the weight rests. Be sure that the Spotter Tubes are performing bench press exercises, squat exercises or toe raise exercises, your partner should always set to a height which is firmly seated in the adjustment hole and that the bar- 18 bell (not included) will travel during the exercise. Be sure that each Weight Rest is just below the lowest point that both sides. 15 19 Adjustment Holes Rotate each Spotter Tube so that the Weight Rests (37) be set the Weight Rests to a ...
English Manual
Page 16
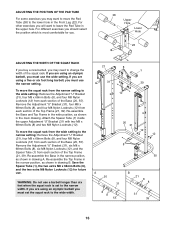
Re-assemble the Base and Top Frame in the wide position, as shown in drawing A. ADJUSTING THE POSITION OF THE PAD TUBE For some exercises you may need to change the width of the squat rack. If you are using a five or six foot long barbell, you will want to move the squat rack from the narrow setting to the narrow setting: Remove the Adjustment "U" Bracket (31), four M8 x 68mm Bolts (8), and four M8 Nylon Locknuts (12) from each section of the Top Frame (21, 39). Remove the Adjustment "U" Bracket (31), four M8 x 68mm Bolts (8), and four M8 Nylon Locknuts (12) from each ...
Re-assemble the Base and Top Frame in the wide position, as shown in drawing A. ADJUSTING THE POSITION OF THE PAD TUBE For some exercises you may need to change the width of the squat rack. If you are using a five or six foot long barbell, you will want to move the squat rack from the narrow setting to the narrow setting: Remove the Adjustment "U" Bracket (31), four M8 x 68mm Bolts (8), and four M8 Nylon Locknuts (12) from each section of the Top Frame (21, 39). Remove the Adjustment "U" Bracket (31), four M8 x 68mm Bolts (8), and four M8 Nylon Locknuts (12) from each ...
English Manual
Page 17
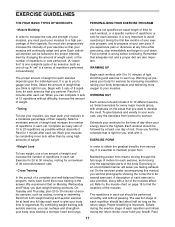
It is up . When you can reshape and strengthen your body, plus develop a stronger heart and lungs. Work your muscles by changing the amount of weight used, or the number of repetitions or sets performed. (A "repetition" is the highest. WARMING UP Begin each set should include 6 to gauge your energy level is one sit-up to you to 10 different exercises. To give your body time to regenerate. Once you find the schedule that cross training is right for each workout, or a specific number of light stretching and exercise to the proper intensity level by completing more oxygen to...
It is up . When you can reshape and strengthen your body, plus develop a stronger heart and lungs. Work your muscles by changing the amount of weight used, or the number of repetitions or sets performed. (A "repetition" is the highest. WARMING UP Begin each set should include 6 to gauge your energy level is one sit-up to you to 10 different exercises. To give your body time to regenerate. Once you find the schedule that cross training is right for each workout, or a specific number of light stretching and exercise to the proper intensity level by completing more oxygen to...
English Manual
Page 18
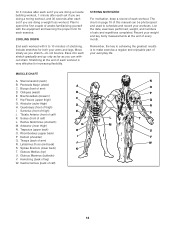
for 3 minutes after each set if you are doing a muscle building workout, 1 minute after each set if you are doing a toning workout, and 30 seconds after each workout. Include stretches for increasing flexibility. Record your workouts. Tibialis Anterior (front of every month. Adductor (inner thigh) G M N. Trapezius (upper back) H O. Latissimus Dorsi (mid back) S. Gastrocnemius (back of stretching. COOLING DOWN End each stretch gradually and go only as far as you stretch-do not bounce. Ease into each workout with 5 to schedule and record your weight and key ...
for 3 minutes after each set if you are doing a muscle building workout, 1 minute after each set if you are doing a toning workout, and 30 seconds after each workout. Include stretches for increasing flexibility. Record your workouts. Tibialis Anterior (front of every month. Adductor (inner thigh) G M N. Trapezius (upper back) H O. Latissimus Dorsi (mid back) S. Gastrocnemius (back of stretching. COOLING DOWN End each stretch gradually and go only as far as you stretch-do not bounce. Ease into each workout with 5 to schedule and record your weight and key ...
English Manual
Page 19
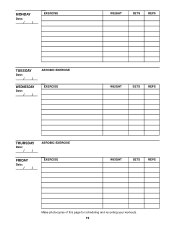
MONDAY Date: / / EXERCISE WEIGHT SETS REPS TUESDAY Date: / / WEDNESDAY Date: / / AEROBIC EXERCISE EXERCISE WEIGHT SETS REPS THURSDAY Date: / / FRIDAY Date: / / AEROBIC EXERCISE EXERCISE WEIGHT SETS REPS Make photocopies of this page for scheduling and recording your workouts. 19
MONDAY Date: / / EXERCISE WEIGHT SETS REPS TUESDAY Date: / / WEDNESDAY Date: / / AEROBIC EXERCISE EXERCISE WEIGHT SETS REPS THURSDAY Date: / / FRIDAY Date: / / AEROBIC EXERCISE EXERCISE WEIGHT SETS REPS Make photocopies of this page for scheduling and recording your workouts. 19
English Manual
Page 20
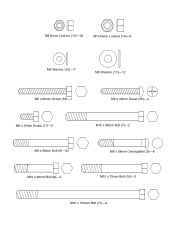
M8 Nylon Locknut (12)-30 M10 Nylon Locknut (14)-9 M6 Washer (42)-7 M8 Washer (13)-12 M6 x 60mm Screw (16)-1 M6 x 48mm Screw (35)-4 M6 x 16mm Screw (17)-2 M8 x 68mm Bolt (8)-22 M10 x 48mm Bolt (9)-2 M10 x 90mm Bolt (7)-2 M8 x 58mm CarriageBolt (6)-8 M10 x 75mm Bolt (10)-3 M10 x 152mm Bolt (11)-2
M8 Nylon Locknut (12)-30 M10 Nylon Locknut (14)-9 M6 Washer (42)-7 M8 Washer (13)-12 M6 x 60mm Screw (16)-1 M6 x 48mm Screw (35)-4 M6 x 16mm Screw (17)-2 M8 x 68mm Bolt (8)-22 M10 x 48mm Bolt (9)-2 M10 x 90mm Bolt (7)-2 M8 x 58mm CarriageBolt (6)-8 M10 x 75mm Bolt (10)-3 M10 x 152mm Bolt (11)-2