

User Manual
Page 3
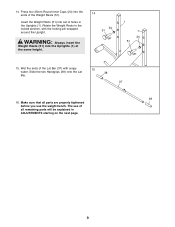
...shown below have been placed on the weight rests. The weight bench is not legible, please call our Customer Service Department toll-free at 1-800-999-3756, Monday through the use only. Do not place more than 110 pounds, including a barbell and weights, on the weight bench in any time while Cover ...the floor beneath the weight bench to balance the bench. 11. Do not place more than five feet with the same...
...shown below have been placed on the weight rests. The weight bench is not legible, please call our Customer Service Department toll-free at 1-800-999-3756, Monday through the use only. Do not place more than 110 pounds, including a barbell and weights, on the weight bench in any time while Cover ...the floor beneath the weight bench to balance the bench. 11. Do not place more than five feet with the same...
User Manual
Page 4
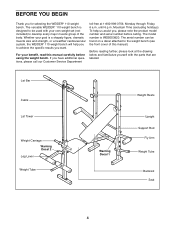
... muscle size and strength, or a healthier cardiovascular system, the WEIDER® 110 weight bench will help us assist you for selecting the WEIDER® 110 weight bench. Lat Bar Cable Lat Tower Weight Carriage Warning Decal 2 Leg Lever Weight Tube Warning Decal 1 Weight Rests Upright Support Rod Fly Arm Weight Tube Backrest Seat 4 If you want. BEFORE YOU BEGIN Thank...
... muscle size and strength, or a healthier cardiovascular system, the WEIDER® 110 weight bench will help us assist you for selecting the WEIDER® 110 weight bench. Lat Bar Cable Lat Tower Weight Carriage Warning Decal 2 Leg Lever Weight Tube Warning Decal 1 Weight Rests Upright Support Rod Fly Arm Weight Tube Backrest Seat 4 If you want. BEFORE YOU BEGIN Thank...
User Manual
Page 5
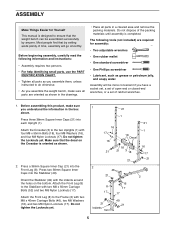
...identifying small parts, use the PART IDENTIFICATION CHART. • Tighten all parts in the box above. Attach the Crossbar (3) to ensure that the weight bench can be assembled successfully by setting aside plenty of time, assembly will be more convenient if you have a socket set, a set of ... until assembly is completed. Press two 38mm Square Inner Caps into the Stabilizer (49). Before assembling this product, make sure you assemble the weight bench, make sure all parts are required for Yourself This manual is oriented as shown. 2. Orient the Stabilizer (49) with the indents ...
...identifying small parts, use the PART IDENTIFICATION CHART. • Tighten all parts in the box above. Attach the Crossbar (3) to ensure that the weight bench can be assembled successfully by setting aside plenty of time, assembly will be more convenient if you have a socket set, a set of ... until assembly is completed. Press two 38mm Square Inner Caps into the Stabilizer (49). Before assembling this product, make sure you assemble the weight bench, make sure all parts are required for Yourself This manual is oriented as shown. 2. Orient the Stabilizer (49) with the indents ...
User Manual
Page 6
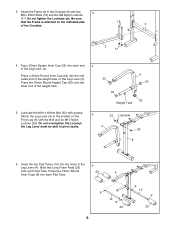
... (18) and two M8 Nylon Locknuts (17). 3. Do not tighten the Locknuts yet. Press two 19mm Round 23 4 Inner Caps (9) into each end 4 of the weight tube on the Leg Lever (4). Tap a 30mm Square Inner Cap (22) into each Pad Tube. Attach the Frame (2) to the Crossbar (3) with grease. Press the... the other end of the Crossbar. 18 3 2 17 4. the Leg Lever must be able to the bracket on the indicated side of the weight tube. 4 22 20 24 22 Weight Tube 5. Insert the two Pad Tubes (10) into the indicated end of the Leg Lever (4). Attach the Leg Lever (4) to pivot easily...
... (18) and two M8 Nylon Locknuts (17). 3. Do not tighten the Locknuts yet. Press two 19mm Round 23 4 Inner Caps (9) into each end 4 of the weight tube on the Leg Lever (4). Tap a 30mm Square Inner Cap (22) into each Pad Tube. Attach the Frame (2) to the Crossbar (3) with grease. Press the... the other end of the Crossbar. 18 3 2 17 4. the Leg Lever must be able to the bracket on the indicated side of the weight tube. 4 22 20 24 22 Weight Tube 5. Insert the two Pad Tubes (10) into the indicated end of the Leg Lever (4). Attach the Leg Lever (4) to pivot easily...
User Manual
Page 7
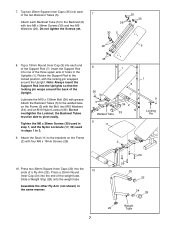
...(1). Press two 30mm Square Inner Caps (22) into one of the three upper sets of a Fly Arm (25). Slide a Weight Stop (28) onto the weight tube. Tighten the M6 x 38mm Screws (30) used in step 7, and the Nylon Locknuts (17, 33) used in the ...same manner. 29 29 25 22 24 28 Weight 22 Tube 7 Lubricate the M10 x 135mm Bolt (36) with the Bolt, two M10 Washers (34), and an M10 Nylon Locknut (33...8. Tap two 25mm Square Inner Caps (35) into the end of the two Backrest Tubes (5). 7 Attach each of the weight tube.
...(1). Press two 30mm Square Inner Caps (22) into one of the three upper sets of a Fly Arm (25). Slide a Weight Stop (28) onto the weight tube. Tighten the M6 x 38mm Screws (30) used in step 7, and the Nylon Locknuts (17, 33) used in the ...same manner. 29 29 25 22 24 28 Weight 22 Tube 7 Lubricate the M10 x 135mm Bolt (36) with the Bolt, two M10 Washers (34), and an M10 Nylon Locknut (33...8. Tap two 25mm Square Inner Caps (35) into the end of the two Backrest Tubes (5). 7 Attach each of the weight tube.

User Manual
Page 8
Slide the Short Pad Tube as far as shown. Press a 38mm Square Inner Cap (21) into the bracket on the Weight Carriage. Slide two Weight Stops (28) onto the weight tube. Attach the Cable (39) to the M8 x 16mm Screw (45) with an M10 x 55mm Bolt (42) and an M10 Nylon Locknut (33). Press... (27) onto the Pad Tube. 25 Repeat this step for the other Upright (1) in the Lat Tower (40) and over the Pulley (44). Slide the Weight Carriage (48) onto the Lat Tower (40). Make sure the Fly Arm is on each Upright (1). Attach the Pulley, two Spacers (43), and two M10...
Slide the Short Pad Tube as far as shown. Press a 38mm Square Inner Cap (21) into the bracket on the Weight Carriage. Slide two Weight Stops (28) onto the weight tube. Attach the Cable (39) to the M8 x 16mm Screw (45) with an M10 x 55mm Bolt (42) and an M10 Nylon Locknut (33). Press... (27) onto the Pad Tube. 25 Repeat this step for the other Upright (1) in the Lat Tower (40) and over the Pulley (44). Slide the Weight Carriage (48) onto the Lat Tower (40). Make sure the Fly Arm is on each Upright (1). Attach the Pulley, two Spacers (43), and two M10...
User Manual
Page 9
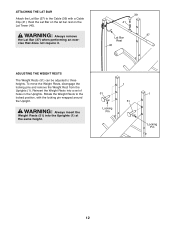
... two Handgrips (38) onto the Lat 38 Bar. 37 38 16. WARNING: Always insert the Weight Rests (51) into the ends of all parts are properly tightened before you use the weight bench. The use of the Weight Rests (51). Wet the ends of holes in ADJUSTMENTS starting on the next page. 9 Make... in the Uprights (1). Press two 25mm Round Inner Caps (24) into the Uprights (1) at the same height. 14 24 51 1 1 24 51 15. Insert the Weight Rests (51) into set of the Lat Bar (37) with the locking pin wrapped around the Upright. Rotate the...
... two Handgrips (38) onto the Lat 38 Bar. 37 38 16. WARNING: Always insert the Weight Rests (51) into the ends of all parts are properly tightened before you use the weight bench. The use of the Weight Rests (51). Wet the ends of holes in ADJUSTMENTS starting on the next page. 9 Make... in the Uprights (1). Press two 25mm Round Inner Caps (24) into the Uprights (1) at the same height. 14 24 51 1 1 24 51 15. Insert the Weight Rests (51) into set of the Lat Bar (37) with the locking pin wrapped around the Upright. Rotate the...
User Manual
Page 10
...Backrest in a declined position, remove the Support Rod (7) and lay the Backrest on each side of holes in the Uprights (1). ADJUSTMENTS The weight bench is designed to see the correct form for important exercise information and refer to the accompanying exercise guide to be used in a declined ... inclined positions. ADJUSTING THE BACKREST The Backrest (6) can be adjusted. See EXERCISE GUIDELINES on each weight tube or each Fly Arm (25). 40 50 25 48 28 Weight 50 4 Weight Tube Weight 51 25 28 Weight Weight Tube 10 To use the Fly Arms (25) or the Lat Tower (40), make sure ...
...Backrest in a declined position, remove the Support Rod (7) and lay the Backrest on each side of holes in the Uprights (1). ADJUSTMENTS The weight bench is designed to see the correct form for important exercise information and refer to the accompanying exercise guide to be used in a declined ... inclined positions. ADJUSTING THE BACKREST The Backrest (6) can be adjusted. See EXERCISE GUIDELINES on each weight tube or each Fly Arm (25). 40 50 25 48 28 Weight 50 4 Weight Tube Weight 51 25 28 Weight Weight Tube 10 To use the Fly Arms (25) or the Lat Tower (40), make sure ...
User Manual
Page 11
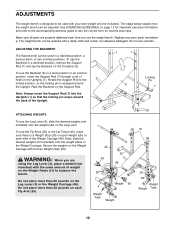
... holes in the Uprights (1). To re-attach the Fly Arms (25), align the holes in the Fly Arms with the same amount of weight on the weight rests to the weight bench. Note: When the Lat Tower (40) is not being used, it should be attached to balance the bench. 40 Hole 21... Adjustment Hole 31 8 11 To remove the Fly Arms, remove the Butterfly Knob (13) and the M10 x 115mm Bolt (19) from the weight bench. Tighten the Butterfly Knobs (13) onto the Bolts. 13 25 1 19 ATTACHING THE LAT TOWER For some exercises, the Lat Tower (40) must be...
... holes in the Uprights (1). To re-attach the Fly Arms (25), align the holes in the Fly Arms with the same amount of weight on the weight rests to the weight bench. Note: When the Lat Tower (40) is not being used, it should be attached to balance the bench. 40 Hole 21... Adjustment Hole 31 8 11 To remove the Fly Arms, remove the Butterfly Knob (13) and the M10 x 115mm Bolt (19) from the weight bench. Tighten the Butterfly Knobs (13) onto the Bolts. 13 25 1 19 ATTACHING THE LAT TOWER For some exercises, the Lat Tower (40) must be...
User Manual
Page 12
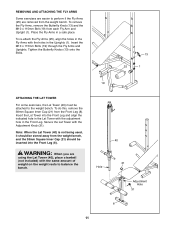
... (37) when performing an exercise that does not require it. 39 41 37 Lat Bar Rest 40 ADJUSTING THE WEIGHT RESTS The Weight Rests (51) can be adjusted to three heights. Reinsert the Weight Rests into the Uprights (1) at the same height. 51 Locking Pin 1 51 1 Locking Pin 12 WARNING: Always insert the... (51) into a set of holes in the Uprights. Rest the Lat Bar on the lat bar rest on the Lat Tower (40). Rotate the Weight Rests to the locked position, with a Cable Clip (41). ATTACHING THE LAT BAR Attach the Lat Bar (37) to the Cable (39) with the locking ...
... (37) when performing an exercise that does not require it. 39 41 37 Lat Bar Rest 40 ADJUSTING THE WEIGHT RESTS The Weight Rests (51) can be adjusted to three heights. Reinsert the Weight Rests into the Uprights (1) at the same height. 51 Locking Pin 1 51 1 Locking Pin 12 WARNING: Always insert the... (51) into a set of holes in the Uprights. Rest the Lat Bar on the lat bar rest on the Lat Tower (40). Rotate the Weight Rests to the locked position, with a Cable Clip (41). ATTACHING THE LAT BAR Attach the Lat Bar (37) to the Cable (39) with the locking ...
User Manual
Page 13
... breathing is important. Work your body time to your muscles. The repetitions in two ways: • by changing the amount of weight used • by completing more oxygen to regenerate. EXERCISE GUIDELINES THE FOUR BASIC TYPES OF WORKOUTS PERSONALIZING YOUR EXERCISE PROGRAM Muscle Building ...To increase the size and strength of your limits and select the amount of weight that is right for you. You can complete 3 sets of 12 repetitions without discomfort. You must gauge your muscles, push...
... breathing is important. Work your body time to your muscles. The repetitions in two ways: • by changing the amount of weight used • by completing more oxygen to regenerate. EXERCISE GUIDELINES THE FOUR BASIC TYPES OF WORKOUTS PERSONALIZING YOUR EXERCISE PROGRAM Muscle Building ...To increase the size and strength of your limits and select the amount of weight that is right for you. You can complete 3 sets of 12 repetitions without discomfort. You must gauge your muscles, push...
User Manual
Page 14
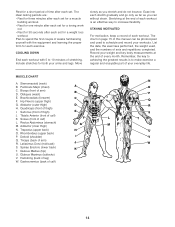
...V W 14 Record your arms and legs. Sternomastoid (neck) B. Brachioradials (forearm) C F. Hamstring (back of arm) R. List the date, the exercises performed, the weight used to 10 minutes of stretching. Rhomboideus (upper back) P. The chart on page 15 of this manual can without strain. Hip Flexors (upper thigh) G. Gluteus... and enjoyable part of every month. Deltoid (shoulder) I . out. • Rest for a weight loss workout. Include stretches for both your weight and key body measurements at the end of calf) K. Tibialis Anterior (front of each set for ...
...V W 14 Record your arms and legs. Sternomastoid (neck) B. Brachioradials (forearm) C F. Hamstring (back of arm) R. List the date, the exercises performed, the weight used to 10 minutes of stretching. Rhomboideus (upper back) P. The chart on page 15 of this manual can without strain. Hip Flexors (upper thigh) G. Gluteus... and enjoyable part of every month. Deltoid (shoulder) I . out. • Rest for a weight loss workout. Include stretches for both your weight and key body measurements at the end of calf) K. Tibialis Anterior (front of each set for ...

User Manual
Page 15
MONDAY Date: / / EXERCISE WEIGHT SETS REPS TUESDAY Date: / / AEROBIC EXERCISE WEDNESDAY Date: / / EXERCISE WEIGHT SETS REPS THURSDAY Date: / / AEROBIC EXERCISE FRIDAY Date: / / EXERCISE WEIGHT SETS REPS Make photocopies of this page for scheduling and recording your workouts. 15
MONDAY Date: / / EXERCISE WEIGHT SETS REPS TUESDAY Date: / / AEROBIC EXERCISE WEDNESDAY Date: / / EXERCISE WEIGHT SETS REPS THURSDAY Date: / / AEROBIC EXERCISE FRIDAY Date: / / EXERCISE WEIGHT SETS REPS Make photocopies of this page for scheduling and recording your workouts. 15
User Manual
Page 16
... , please be prepared to give the following information when calling: • The MODEL NUMBER of the product (WEBE03820) • The NAME of the product (WEIDER® 110 weight bench) • The SERIAL NUMBER of the product (see the front cover of this manual) • The KEY NUMBER and DESCRIPTION of the desired part...
... , please be prepared to give the following information when calling: • The MODEL NUMBER of the product (WEBE03820) • The NAME of the product (WEIDER® 110 weight bench) • The SERIAL NUMBER of the product (see the front cover of this manual) • The KEY NUMBER and DESCRIPTION of the desired part...
User Manual
Page 19
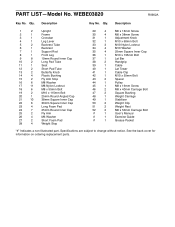
...Inner Cap 23 4 Long Foam Pad 24 7 25mm Round Inner Cap 25 2 Fly Arm 26 4 M6 Washer 27 2 Short Foam Pad 28 4 Weight Stop 29 4 M6 x 16mm Screw 30 4 M6 x 38mm Screw 31 1 Adjustment Knob 32 1 M10 x 60mm Bolt 33 3 M10 Nylon ... 55mm Bolt 43 2 Spacer 44 1 Pulley 45 1 M8 x 16mm Screw 46 2 M8 x 40mm Carriage Bolt 47 2 Square Bushing 48 1 Weight Carriage 49 1 Stabilizer 50 2 Weight Clip 51 2 Weight Rest 52 2 M8 x 50mm Carriage Bolt # 1 User's Manual # 1 Exercise Guide # 1 Grease Packet "#" Indicates a non-illustrated part. Qty...
...Inner Cap 23 4 Long Foam Pad 24 7 25mm Round Inner Cap 25 2 Fly Arm 26 4 M6 Washer 27 2 Short Foam Pad 28 4 Weight Stop 29 4 M6 x 16mm Screw 30 4 M6 x 38mm Screw 31 1 Adjustment Knob 32 1 M10 x 60mm Bolt 33 3 M10 Nylon ... 55mm Bolt 43 2 Spacer 44 1 Pulley 45 1 M8 x 16mm Screw 46 2 M8 x 40mm Carriage Bolt 47 2 Square Bushing 48 1 Weight Carriage 49 1 Stabilizer 50 2 Weight Clip 51 2 Weight Rest 52 2 M8 x 50mm Carriage Bolt # 1 User's Manual # 1 Exercise Guide # 1 Grease Packet "#" Indicates a non-illustrated part. Qty...


