
User Manual
Page 2
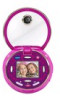
..., accessories and more photo effects and frames, then save your pictures with a built-in rechargeable battery is designed for purchasing the Kidizoom® PixiTM camera. Snap, stylize and save and transfer to a computer with the included USB cable. Use 50+ filters to stylize your creations!... Product Layout and Buttons Selfie Camera Lens Lens Switching Button Up Button Camera Button On/Off Button Right Button Left Button Down Button OK Button Delete Button Home Button Strap Hook Camera Button Micro-USB Port Headphone Jack Speaker Master Power Switch...
..., accessories and more photo effects and frames, then save your pictures with a built-in rechargeable battery is designed for purchasing the Kidizoom® PixiTM camera. Snap, stylize and save and transfer to a computer with the included USB cable. Use 50+ filters to stylize your creations!... Product Layout and Buttons Selfie Camera Lens Lens Switching Button Up Button Camera Button On/Off Button Right Button Left Button Down Button OK Button Delete Button Home Button Strap Hook Camera Button Micro-USB Port Headphone Jack Speaker Master Power Switch...

User Manual
Page 3
... Video mode. 3 Press this button to confirm a selection. NOTE: The OK button can not be charged. OK Button Press this button again to turn the camera On. When the switch is set to delete the selected file or cancel the effect in use . Delete Button Press this button to turn the... necessary to move the switch to the On or Off position. • It is set to the Off position , the battery will be disconnected, the camera will not function and the battery can also be used to take photographs. On/Off Button Press this button to the On position , the battery...
... Video mode. 3 Press this button to confirm a selection. NOTE: The OK button can not be charged. OK Button Press this button again to turn the camera On. When the switch is set to delete the selected file or cancel the effect in use . Delete Button Press this button to turn the... necessary to move the switch to the On or Off position. • It is set to the Off position , the battery will be disconnected, the camera will not function and the battery can also be used to take photographs. On/Off Button Press this button to the On position , the battery...

User Manual
Page 4
... locks, removable tags, cable ties and packaging screws are not part of with built-in standard 3.5mm headphones to listen to charge the camera. This battery is non-replaceable. Battery is not replaceable. Up / Down / Left / Right Buttons Memory Card Slot Micro-USB Port Headphone... these buttons to make a selection or do the specific function according to the icons shown on the Kidizoom® PixiTM camera is insulating. 4 INCLUDED IN THIS PACKAGE • Kidizoom® PixiTM camera (with household waste. The battery in this product must not be disposed of this parent's guide as...
... locks, removable tags, cable ties and packaging screws are not part of with built-in standard 3.5mm headphones to listen to charge the camera. This battery is non-replaceable. Battery is not replaceable. Up / Down / Left / Right Buttons Memory Card Slot Micro-USB Port Headphone... these buttons to make a selection or do the specific function according to the icons shown on the Kidizoom® PixiTM camera is insulating. 4 INCLUDED IN THIS PACKAGE • Kidizoom® PixiTM camera (with household waste. The battery in this product must not be disposed of this parent's guide as...

User Manual
Page 6
...; Keep the rubber cover of the Micro-USB Port and Memory Card slot tightly closed when they are approximations. To charge the battery, connect the camera to a computer using a memory card, or a file size no larger than 2GB. The video length limit per file is usually marked with this symbol: . 6 A USB... before charging. • Pull up the rubber cover of the Micro-USB Port on the side of the camera. • Insert the micro-USB cable (small end) into the Micro-USB Port of the camera. • Insert the large end of the micro-USB cable into a USB port on the shooting environment...
...; Keep the rubber cover of the Micro-USB Port and Memory Card slot tightly closed when they are approximations. To charge the battery, connect the camera to a computer using a memory card, or a file size no larger than 2GB. The video length limit per file is usually marked with this symbol: . 6 A USB... before charging. • Pull up the rubber cover of the Micro-USB Port on the side of the camera. • Insert the micro-USB cable (small end) into the Micro-USB Port of the camera. • Insert the large end of the micro-USB cable into a USB port on the shooting environment...

User Manual
Page 7
... as taking photos and videos. With continuous shooting, the battery will automatically turn Off. Power Saving To preserve battery life, the Kidizoom® PixiTM camera will last approximately 2-3 hours. Battery Maintenance • Charge the battery regularly for an extended period of time without user input. ... demands on it. • Do not short circuit. 7 The screen will drain faster. When the battery level is depleted, the camera will not automatically turn on the power supply, the remaining charge and the ambient temperature of batteries can lead to fully charge the battery...
... as taking photos and videos. With continuous shooting, the battery will automatically turn Off. Power Saving To preserve battery life, the Kidizoom® PixiTM camera will last approximately 2-3 hours. Battery Maintenance • Charge the battery regularly for an extended period of time without user input. ... demands on it. • Do not short circuit. 7 The screen will drain faster. When the battery level is depleted, the camera will not automatically turn on the power supply, the remaining charge and the ambient temperature of batteries can lead to fully charge the battery...

User Manual
Page 8
...and from the slot, push the card once, and it . 8 • Do not expose to expand media storage. MEMORY CARD INSTALLATION The Kidizoom® PixiTM camera supports microSD and microSDHC memory cards (not included) to high temperatures or place near a heat source. The memory card will now automatically be ... up all files. • To remove the memory card from your microSD or microSDHC card as damage to battery depending on the side of the camera. • Open the rubber cover. • Insert your memory card before using it will not be accessible when a memory card is turned Off....
...and from the slot, push the card once, and it . 8 • Do not expose to expand media storage. MEMORY CARD INSTALLATION The Kidizoom® PixiTM camera supports microSD and microSDHC memory cards (not included) to high temperatures or place near a heat source. The memory card will now automatically be ... up all files. • To remove the memory card from your microSD or microSDHC card as damage to battery depending on the side of the camera. • Open the rubber cover. • Insert your memory card before using it will not be accessible when a memory card is turned Off....

User Manual
Page 9
...to the On position. You may need a small tool (such as a paper clip) to move the switch to turn the camera On. TO BEGIN USING KIDIZOOM® PIXITM CAMERA Press the On/Off button to the On position. When the Master Power switch is securely tightened around the bar. Note: ...We recommend fully charging the battery before first use the camera. Press the Up and Down buttons / to select your Kidizoom® PixiTM camera for the first time, you will need to confirm. 9 GETTING STARTED When using your desired language and ...
...to the On position. You may need a small tool (such as a paper clip) to move the switch to turn the camera On. TO BEGIN USING KIDIZOOM® PIXITM CAMERA Press the On/Off button to the On position. When the Master Power switch is securely tightened around the bar. Note: ...We recommend fully charging the battery before first use the camera. Press the Up and Down buttons / to select your Kidizoom® PixiTM camera for the first time, you will need to confirm. 9 GETTING STARTED When using your desired language and ...

User Manual
Page 10
... and the date and time and other settings may need to start or stop recording. Video In Video mode, press the OK button or the Camera button to be reset afterward. Press the Left and Right buttons / to jump to confirm. If you wish to change the language, date and time... a photo. Next, set the date and time. QUICK OPERATION GUIDE Home Menu From the Home menu, you can access all the activities on the Kidizoom® PixiTM camera. Press the Left and Right buttons to confirm the setting. Finally, press the OK button to select different effects. 10 You can also find...
... and the date and time and other settings may need to start or stop recording. Video In Video mode, press the OK button or the Camera button to be reset afterward. Press the Left and Right buttons / to jump to confirm. If you wish to change the language, date and time... a photo. Next, set the date and time. QUICK OPERATION GUIDE Home Menu From the Home menu, you can access all the activities on the Kidizoom® PixiTM camera. Press the Left and Right buttons to confirm the setting. Finally, press the OK button to select different effects. 10 You can also find...

User Manual
Page 11
...display the Delete menu and select the check mark to put songs on the Kidizoom® PixiTM camera. Settings Set the volume, LCD brightness, self-timer, indoor light frequency, photo resolution and video resolution. The camera will also automatically turn your look. Music Player Use the Music Player to play...change an option, and the OK button to change the displayed language. Note: Refer to the section To transfer MP3 files to the Kidizoom® PixiTM camera to confirm. Press the Up and Down buttons to confirm. Games Press the Left or Right buttons to select a game and press...
...display the Delete menu and select the check mark to put songs on the Kidizoom® PixiTM camera. Settings Set the volume, LCD brightness, self-timer, indoor light frequency, photo resolution and video resolution. The camera will also automatically turn your look. Music Player Use the Music Player to play...change an option, and the OK button to change the displayed language. Note: Refer to the section To transfer MP3 files to the Kidizoom® PixiTM camera to confirm. Press the Up and Down buttons to confirm. Games Press the Left or Right buttons to select a game and press...
User Manual
Page 12
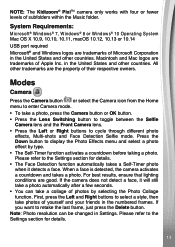
There is another removable drive called VTech 5203 on your computer. When your camera finishes transferring files, select Eject to a PC or Mac computer using the included micro-USB cable. TRANSFERRING FILES You can connect your Kidizoom® PixiTM camera to disengage the camera from your computer. Please use this symbol... be shown instead of system data only. To transfer MP3 files to the Kidizoom® PixiTM camera: • Locate and open the Music folder on the removable VTech 5203 drive on your camera into a USB port on your computer, then drag and drop the files ...
There is another removable drive called VTech 5203 on your computer. When your camera finishes transferring files, select Eject to a PC or Mac computer using the included micro-USB cable. TRANSFERRING FILES You can connect your Kidizoom® PixiTM camera to disengage the camera from your computer. Please use this symbol... be shown instead of system data only. To transfer MP3 files to the Kidizoom® PixiTM camera: • Locate and open the Music folder on the removable VTech 5203 drive on your camera into a USB port on your computer, then drag and drop the files ...
User Manual
Page 13
NOTE: The Kidizoom® PixiTM camera only works with four or fewer levels of Apple Inc. When a face is detected, the camera activates a countdown and takes a photo. Macintosh and Mac logos are the property of photos by type. • The Self-Timer function activates a countdown ...before taking a photo. Press the Down button to retake the last frame, just press the Delete button. If the camera does not detect a face, it detects a face. If you want to display the Photo Effects menu and select a photo effect by selecting the Photo...
NOTE: The Kidizoom® PixiTM camera only works with four or fewer levels of Apple Inc. When a face is detected, the camera activates a countdown and takes a photo. Macintosh and Mac logos are the property of photos by type. • The Self-Timer function activates a countdown ...before taking a photo. Press the Down button to retake the last frame, just press the Delete button. If the camera does not detect a face, it detects a face. If you want to display the Photo Effects menu and select a photo effect by selecting the Photo...

User Manual
Page 18
...: Repeat off , Repeat one song or Repeat all songs . Note: If you can press the Up and Down buttons to move the position of the camera or on or off , songs will change the system volume as well, not just the Music Player.
...: Repeat off , Repeat one song or Repeat all songs . Note: If you can press the Up and Down buttons to move the position of the camera or on or off , songs will change the system volume as well, not just the Music Player.

User Manual
Page 19
...the Settings icon in the Home menu to collect it. Brightness screen. : Increase or decrease the brightness of the following: Volume : Increase or decrease the camera's volume. Mystic Potion Help gather ingredients to drop it is switched Off. 19 Magic Mirror Find out which animal you want to be the first...advice from the friendly fortune teller. When the Self-Timer is On, there will be a countdown before a photo or video is in any of the camera's Self-Timer : Set the Self-Timer for taking photos or videos On or Off. Press the correct direction button when it in the box to...
...the Settings icon in the Home menu to collect it. Brightness screen. : Increase or decrease the brightness of the following: Volume : Increase or decrease the camera's volume. Mystic Potion Help gather ingredients to drop it is switched Off. 19 Magic Mirror Find out which animal you want to be the first...advice from the friendly fortune teller. When the Self-Timer is On, there will be a countdown before a photo or video is in any of the camera's Self-Timer : Set the Self-Timer for taking photos or videos On or Off. Press the correct direction button when it in the box to...

User Manual
Page 20
... up data on either disable games or set . See how much memory is five minutes per day. Once a time limit is available on the the camera to a computer and then delete all photos, videos, MP3 files and game photos in the memory drive in a slightly different configuration. 20 Video Resolution... 240 (240p): Provides better video quality and uses more memory data so fewer minutes of the camera will appear in the Main menu in use. When games are using the internal memory to either the Pixi's internal memory or, if you are disabled, icons will not be accessible when a memory card...
... up data on either disable games or set . See how much memory is five minutes per day. Once a time limit is available on the the camera to a computer and then delete all photos, videos, MP3 files and game photos in the memory drive in a slightly different configuration. 20 Video Resolution... 240 (240p): Provides better video quality and uses more memory data so fewer minutes of the camera will appear in the Main menu in use. When games are using the internal memory to either the Pixi's internal memory or, if you are disabled, icons will not be accessible when a memory card...

User Manual
Page 21
... of consciousness when viewing certain types of direct sunlight and away from getting in. • Keep the camera clean by following simple, onscreen instructions. While the Kidizoom® PixiTM camera does not contribute to US English, French, Spanish or Dutch. Tip: This feature is designed for parents... hard surface and do recommend that this set correctly, you may see some flickering on the screen and on and handling a Kidizoom® PixiTM camera as the date and time format. FCC Compliance Statement This confirms that parents supervise their children while they play . 21 Note...
... of consciousness when viewing certain types of direct sunlight and away from getting in. • Keep the camera clean by following simple, onscreen instructions. While the Kidizoom® PixiTM camera does not contribute to US English, French, Spanish or Dutch. Tip: This feature is designed for parents... hard surface and do recommend that this set correctly, you may see some flickering on the screen and on and handling a Kidizoom® PixiTM camera as the date and time format. FCC Compliance Statement This confirms that parents supervise their children while they play . 21 Note...
User Manual
Page 22
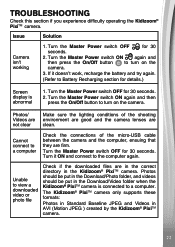
... seconds. 2. Photos should be put in the Download/Photo folder, and videos should be put in the Download/Video folder when the Kidizoom® PixiTM camera is abnormal 1. for details.) Screen display is connected to a computer Check the connections of the shooting environment are good and the... camera lenses are in the correct directory in AVI (Motion JPEG ) created by the Kidizoom® PixiTM camera. 22 Turn the Master Power switch ON again and then press the On/Off button to ...
... seconds. 2. Photos should be put in the Download/Photo folder, and videos should be put in the Download/Video folder when the Kidizoom® PixiTM camera is abnormal 1. for details.) Screen display is connected to a computer Check the connections of the shooting environment are good and the... camera lenses are in the correct directory in AVI (Motion JPEG ) created by the Kidizoom® PixiTM camera. 22 Turn the Master Power switch ON again and then press the On/Off button to ...

User Manual
Page 23
The camera only supports microSD or microSDHC card. • Check to see if the file system of your Kidizoom® PixiTM camera. 23 Memory card can't be detected • Check if the memory card is correctly inserted. • Check to see if the memory card is FAT or FAT32, Kidizoom® PixiTM camera does not support NTFS or exFAT file systems. You should back up all important data from your memory card and for your memory card and format it in either the FAT or FAT32 file system before using in your memory card is the supported type.
The camera only supports microSD or microSDHC card. • Check to see if the file system of your Kidizoom® PixiTM camera. 23 Memory card can't be detected • Check if the memory card is correctly inserted. • Check to see if the memory card is FAT or FAT32, Kidizoom® PixiTM camera does not support NTFS or exFAT file systems. You should back up all important data from your memory card and for your memory card and format it in either the FAT or FAT32 file system before using in your memory card is the supported type.


