
User Manual
Page 2
Get creative with the tripod/selfie stick included. Use 20+ animated backgrounds and loads of special effects on the KidiZoom® Creator Cam is insulating. 2 22 Battery is non-replaceable.) Green screen fabric Tripod/selfie stick Micro-USB cable Wrist strap ...camera with all the built-in rechargeable battery. With or without the included green screen, you for purchasing the KidiZoom® Creator Cam camera! INCLUDED IN THIS PACKAGE KidiZoom® Creator Cam (With built-in cool tools. INTRODUCTION Thank you can create photos and videos and save them to your computer...
Get creative with the tripod/selfie stick included. Use 20+ animated backgrounds and loads of special effects on the KidiZoom® Creator Cam is insulating. 2 22 Battery is non-replaceable.) Green screen fabric Tripod/selfie stick Micro-USB cable Wrist strap ...camera with all the built-in rechargeable battery. With or without the included green screen, you for purchasing the KidiZoom® Creator Cam camera! INCLUDED IN THIS PACKAGE KidiZoom® Creator Cam (With built-in cool tools. INTRODUCTION Thank you can create photos and videos and save them to your computer...

User Manual
Page 3
Please follow your child's safety. Unlock the Packaging Lock 1. ATTENTION : Pour la sécurité de votre enfant, débarrassez-vous de tous les produits d'emballage tels que rubans adhésifs, feuilles de plastique, attaches, étiquettes et vis d'emballage. With a screwdriver, turn the packaging screw several times counterclockwise to loosen and remove. 2. Safely discard the screw and all packaging products. 3 33 WARNING: All packing materials such as tape, plastic sheets, packaging locks, removable tags, cable ties and packaging screws are not part of with ...
Please follow your child's safety. Unlock the Packaging Lock 1. ATTENTION : Pour la sécurité de votre enfant, débarrassez-vous de tous les produits d'emballage tels que rubans adhésifs, feuilles de plastique, attaches, étiquettes et vis d'emballage. With a screwdriver, turn the packaging screw several times counterclockwise to loosen and remove. 2. Safely discard the screw and all packaging products. 3 33 WARNING: All packing materials such as tape, plastic sheets, packaging locks, removable tags, cable ties and packaging screws are not part of with ...

User Manual
Page 5
When the camera is On, press this button to the Photo or Video mode. 3. While the camera is in daily use, you to review photos or movies. 8. Tip: The OK button can also be recharged. Play Button Press this button to go to the Home screen or to go back to change camera options also. 4. Shutter Button Press this button to the previous menu. 5. Star Button Press this button to be used as the Shutter button in the position. 2. Home/On/Off Button Press to turn it to take you should leave the switch in Photo and Video modes. 6. Memory Card Slot Insert a microSD card ...
When the camera is On, press this button to the Photo or Video mode. 3. While the camera is in daily use, you to review photos or movies. 8. Tip: The OK button can also be recharged. Play Button Press this button to go to the Home screen or to go back to change camera options also. 4. Shutter Button Press this button to the previous menu. 5. Star Button Press this button to be used as the Shutter button in the position. 2. Home/On/Off Button Press to turn it to take you should leave the switch in Photo and Video modes. 6. Memory Card Slot Insert a microSD card ...

User Manual
Page 6
Micro-USB Port Connect to a computer with the included Micro-USB Cable to transfer files to a computer and to 2 GB file size Focus Range 1.5 feet - ∞ Internal Memory 256 MB built-in memory (shared with effects Low Resolution Mode: 0.3MP (640 x 480) Photo Saved From Video: 1280 x 720 / 640 x 360 Video Resolution High Resolution Mode: 360p (640 x 360) for internal memory 720p HD (1280 x 720) for memory card Low Resolution Mode: 180p (320 x 180) for internal memory 360p (640 x 360) for user storage will be less) 6 66 actual memory available for memory card Video Length Limit ...
Micro-USB Port Connect to a computer with the included Micro-USB Cable to transfer files to a computer and to 2 GB file size Focus Range 1.5 feet - ∞ Internal Memory 256 MB built-in memory (shared with effects Low Resolution Mode: 0.3MP (640 x 480) Photo Saved From Video: 1280 x 720 / 640 x 360 Video Resolution High Resolution Mode: 360p (640 x 360) for internal memory 720p HD (1280 x 720) for memory card Low Resolution Mode: 180p (320 x 180) for internal memory 360p (640 x 360) for user storage will be less) 6 66 actual memory available for memory card Video Length Limit ...

User Manual
Page 7
The video length limit per file is 30 minutes. File size limit is up to 40°C) STORAGE CAPACITY FOR REFERENCE 5 MP Photos 0.3 MP Photos 720p (HD) Video (Minutes) 360p Video (Minutes) 180p Video (Minutes) Internal Memory 120 1,430 N/A 2 5 2 GB 1,800 21,500 10 20 4 GB 3,700 43,000 20 50 microSD Card 8 GB 7,500 86,100 40 100 N/A 16 GB 15,100 172,300 80 210 32 GB 30,300 344,600 160 420 Note: The above is recommended Photo: Standard baseline JPEG Video: AVI (Motion JPEG) Micro-USB 2.0 cable (included) for connecting to a computer Rechargeable lithium ion ...
The video length limit per file is 30 minutes. File size limit is up to 40°C) STORAGE CAPACITY FOR REFERENCE 5 MP Photos 0.3 MP Photos 720p (HD) Video (Minutes) 360p Video (Minutes) 180p Video (Minutes) Internal Memory 120 1,430 N/A 2 5 2 GB 1,800 21,500 10 20 4 GB 3,700 43,000 20 50 microSD Card 8 GB 7,500 86,100 40 100 N/A 16 GB 15,100 172,300 80 210 32 GB 30,300 344,600 160 420 Note: The above is recommended Photo: Standard baseline JPEG Video: AVI (Motion JPEG) Micro-USB 2.0 cable (included) for connecting to a computer Rechargeable lithium ion ...

User Manual
Page 8
... device. 8 88 Disconnect the camera from the power source. The device should be reset. Do not charge your computer to allow you use the KidiZoom® Creator Cam camera for the first time, switch the Master Power Switch to the position. Pull up and you will see the battery charging icon. • When...
... device. 8 88 Disconnect the camera from the power source. The device should be reset. Do not charge your computer to allow you use the KidiZoom® Creator Cam camera for the first time, switch the Master Power Switch to the position. Pull up and you will see the battery charging icon. • When...

User Manual
Page 9
... battery will last approximately two hours with other electronic devices, the more the camera is charged. AUTOMATIC SHUT-OFF To preserve battery life, the KidiZoom® Creator Cam will not automatically turn on until the process completes. BATTERY NOTICE Misuse of the screen. Do not leave in direct sunlight for more quickly the...
... battery will last approximately two hours with other electronic devices, the more the camera is charged. AUTOMATIC SHUT-OFF To preserve battery life, the KidiZoom® Creator Cam will not automatically turn on until the process completes. BATTERY NOTICE Misuse of the screen. Do not leave in direct sunlight for more quickly the...

User Manual
Page 10
...the memory card will automatically be used until properly repaired or replaced. • If you format your memory card before using it with the KidiZoom® Creator Cam camera. • Data stored on the side of the camera. • Insert a memory card (not included) as the default memory....Open the cover over the Memory Card Slot on the camera's internal memory will eject. Note • VTech recommends that may result in use. MEMORY CARD INSTALLATION The KidiZoom® Creator Cam camera is compatible with microSD and microSDHC memory cards up all data to a computer regularly to 32 ...
...the memory card will automatically be used until properly repaired or replaced. • If you format your memory card before using it with the KidiZoom® Creator Cam camera. • Data stored on the side of the camera. • Insert a memory card (not included) as the default memory....Open the cover over the Memory Card Slot on the camera's internal memory will eject. Note • VTech recommends that may result in use. MEMORY CARD INSTALLATION The KidiZoom® Creator Cam camera is compatible with microSD and microSDHC memory cards up all data to a computer regularly to 32 ...
User Manual
Page 11
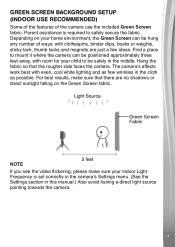
Hang the fabric so that there are just a few wrinkles in this manual.) Also avoid having a direct light source pointing towards the camera. 11 1111 NOTE If you see the video flickering, please make sure that the rougher side faces the camera. Find a place to mount it where the camera can be safely in the middle. Parent assistance is set correctly in the camera's Settings menu. (See the Settings section in the cloth as few ideas. GREEN SCREEN BACKGROUND SETUP (INDOOR USE RECOMMENDED) Some of the features of ways: with clothespins, binder clips, books or weights, sticky tack, ...
Hang the fabric so that there are just a few wrinkles in this manual.) Also avoid having a direct light source pointing towards the camera. 11 1111 NOTE If you see the video flickering, please make sure that the rougher side faces the camera. Find a place to mount it where the camera can be safely in the middle. Parent assistance is set correctly in the camera's Settings menu. (See the Settings section in the cloth as few ideas. GREEN SCREEN BACKGROUND SETUP (INDOOR USE RECOMMENDED) Some of the features of ways: with clothespins, binder clips, books or weights, sticky tack, ...

User Manual
Page 12
..., you can access all values are six modes: 1. Select the Speaker icon and press the Left or Right button to confirm. TO BEGIN USING KIDIZOOM® CREATOR CAM Make sure the Master Power Switch is too low and cannot keep the clock running, enter the time and date again after recharging. Press the... modes on the item to select the language. Games 6. Creativity Tools 5. When turning the camera On for the first time, you will appear on the KidiZoom® Creator Cam camera.
..., you can access all values are six modes: 1. Select the Speaker icon and press the Left or Right button to confirm. TO BEGIN USING KIDIZOOM® CREATOR CAM Make sure the Master Power Switch is too low and cannot keep the clock running, enter the time and date again after recharging. Press the... modes on the item to select the language. Games 6. Creativity Tools 5. When turning the camera On for the first time, you will appear on the KidiZoom® Creator Cam camera.

User Manual
Page 13
... are uploading or downloading. Further confirmation is connected, you will see a removable drive called VT SYSTEM, which is another removable drive called VTech 5318. Once a computer is necessary to delete all photo and video files in the memory. Press the Delete button to delete the current.... • While playing a video, press the Left and Right buttons to the computer. • On the computer, you can connect the KidiZoom® Creator Cam camera to a PC or Mac using the included Micro-USB Cable. • The most recent file will also automatically turn the camera off,...
... are uploading or downloading. Further confirmation is connected, you will see a removable drive called VT SYSTEM, which is another removable drive called VTech 5318. Once a computer is necessary to delete all photo and video files in the memory. Press the Delete button to delete the current.... • While playing a video, press the Left and Right buttons to the computer. • On the computer, you can connect the KidiZoom® Creator Cam camera to a PC or Mac using the included Micro-USB Cable. • The most recent file will also automatically turn the camera off,...

User Manual
Page 14
...VTech 5318. Note Do not transfer photo or video files created by other countries. If using a USB cable other than the one provided, please note that in the United States and other trademarks are trademarks of Microsoft Corporation in the United States and other cameras onto the KidiZoom® Creator Cam...to your photos into the PHOTO folder, and videos into the VIDEO folder. in order not to a cable. Drag and drop your KidiZoom® Creator Cam, ensure the rubber cover over the Micro-USB Port is firmly closed when the camera is not connected to exceed FCC and other ...
...VTech 5318. Note Do not transfer photo or video files created by other countries. If using a USB cable other than the one provided, please note that in the United States and other trademarks are trademarks of Microsoft Corporation in the United States and other cameras onto the KidiZoom® Creator Cam...to your photos into the PHOTO folder, and videos into the VIDEO folder. in order not to a cable. Drag and drop your KidiZoom® Creator Cam, ensure the rubber cover over the Micro-USB Port is firmly closed when the camera is not connected to exceed FCC and other ...

User Manual
Page 15
Please refer to the earlier Green Screen fabric setup section for instructions on the video's soundtrack. Press either button to record videos in this mode to stop recording. • Press the Up or Down button to take a photo. • After recording completes, press the OK button to play your video, or press the Delete button to start recording. When a video is playing, press the OK or Shutter button to skip review and return to High in Settings. The Timer mode will also increase the background noise on best placement of simulated backgrounds. NOTE You can record 720p HD ...
Please refer to the earlier Green Screen fabric setup section for instructions on the video's soundtrack. Press either button to record videos in this mode to stop recording. • Press the Up or Down button to take a photo. • After recording completes, press the OK button to play your video, or press the Delete button to start recording. When a video is playing, press the OK or Shutter button to skip review and return to High in Settings. The Timer mode will also increase the background noise on best placement of simulated backgrounds. NOTE You can record 720p HD ...

User Manual
Page 16
To do not appear. • In Photo Background, you can take an instant photograph or select a picture to customize your news background. The temperature range includes both the Fahrenheit and Celsius scales, although the symbols F and C do this setting manually. Press the Up or Down button to select Green Screen Detection Setting and then press Left or Right button to choose weather icons and temperatures. Use the Directional buttons to try the different modes and find the one that works best for your conditions. Green Screen Detection Setting By default, the camera automatically ...
To do not appear. • In Photo Background, you can take an instant photograph or select a picture to customize your news background. The temperature range includes both the Fahrenheit and Celsius scales, although the symbols F and C do this setting manually. Press the Up or Down button to select Green Screen Detection Setting and then press Left or Right button to choose weather icons and temperatures. Use the Directional buttons to try the different modes and find the one that works best for your conditions. Green Screen Detection Setting By default, the camera automatically ...

User Manual
Page 17
The Timer mode will reflect the background behind it . • Next, place your camera on the Tripod and press OK to create the effect. Video Editor C. Now the Green Screen will turn off . Press the OK button to edit and select the check mark. A. Floating Object E. B. To view the video first, select the Play icon. 17 1177 Trick Video Maker D. Invisibility Trick ( Green Screen Required) In this mode to edit your trick may fail. • Finally, press the Shutter button to create invisibility illusions. • First, find a background with nothing moving in the ...
The Timer mode will reflect the background behind it . • Next, place your camera on the Tripod and press OK to create the effect. Video Editor C. Now the Green Screen will turn off . Press the OK button to edit and select the check mark. A. Floating Object E. B. To view the video first, select the Play icon. 17 1177 Trick Video Maker D. Invisibility Trick ( Green Screen Required) In this mode to edit your trick may fail. • Finally, press the Shutter button to create invisibility illusions. • First, find a background with nothing moving in the ...

User Manual
Page 18
Press the Shutter or the OK button to start point and end point. Try changing costumes, switching places with the original sound of your video. Video Opening Press the Left or Right button to select an intro and press the OK button to select the duration of part 2 of the video. The opening will stop automatically after the set duration, or press either button to stop recording at the beginning of the transparent 1188 The background music will be removed. Save As Once you want the background music to be added to the beginning of the video. It will be louder, press the ...
Press the Shutter or the OK button to start point and end point. Try changing costumes, switching places with the original sound of your video. Video Opening Press the Left or Right button to select an intro and press the OK button to select the duration of part 2 of the video. The opening will stop automatically after the set duration, or press either button to stop recording at the beginning of the transparent 1188 The background music will be removed. Save As Once you want the background music to be added to the beginning of the video. It will be louder, press the ...

User Manual
Page 19
Press the Shutter or OK button to the object so that you can also use the Directional buttons to adjust the object's position on the Green Screen and press the Shutter button to save the time lapse video. E. Be sure to move the camera close to resume recording. If you did not select any time. It will stop recording at set duration, or press either button to the saved video with the Video Editor later. 19 1199 Floating Object ( Green Screen Required) Use the Green Screen fabric in this mode to align the action. You can add it later in camera preview mode ...
Press the Shutter or OK button to the object so that you can also use the Directional buttons to adjust the object's position on the Green Screen and press the Shutter button to save the time lapse video. E. Be sure to move the camera close to resume recording. If you did not select any time. It will stop recording at set duration, or press either button to the saved video with the Video Editor later. 19 1199 Floating Object ( Green Screen Required) Use the Green Screen fabric in this mode to align the action. You can add it later in camera preview mode ...

User Manual
Page 20
... ring for an extra life. 3. Be careful and avoid hitting the bugs and spider webs! B. Format This will erase all data in games on the KidiZoom® Creator Cam camera. Brightness Press the Up or Down button to stack them . 1. There are three built-in the internal memory or memory card (if one...
... ring for an extra life. 3. Be careful and avoid hitting the bugs and spider webs! B. Format This will erase all data in games on the KidiZoom® Creator Cam camera. Brightness Press the Up or Down button to stack them . 1. There are three built-in the internal memory or memory card (if one...

User Manual
Page 21
Camera Settings This menu allows you are used ) will erase the contents (including photos, videos and files) stored in 720p HD high video resolution setting. Please leave your camera set according to your computer and then delete all the files to your camera. E. Parental Controls The Parental Controls menu allows you see a pop-up all the files on the camera unless the memory card is removed. When the memory of the camera is set to the default value unless you to factory default, such as the file index, camera settings and game level. Video Resolution - Select ...
Camera Settings This menu allows you are used ) will erase the contents (including photos, videos and files) stored in 720p HD high video resolution setting. Please leave your camera set according to your computer and then delete all the files to your camera. E. Parental Controls The Parental Controls menu allows you see a pop-up all the files on the camera unless the memory card is removed. When the memory of the camera is set to the default value unless you to factory default, such as the file index, camera settings and game level. Video Resolution - Select ...

User Manual
Page 22
... FCC regulations. If the images are blurry, it will not be in use in water. • Keep the Lens clean. Disable Games - While the KidiZoom® Creator Cam camera does not contribute to play time reaches the selected time limit, the player will be played for an extended period of time. • Keep...
... FCC regulations. If the images are blurry, it will not be in use in water. • Keep the Lens clean. Disable Games - While the KidiZoom® Creator Cam camera does not contribute to play time reaches the selected time limit, the player will be played for an extended period of time. • Keep...
