User Manual
Page 2
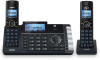
.... 7. Avoid placing the telephone system in your home or office, consult your dealer or local power company. Protect your new VTech telephone. If you are provided for cleaning. 4. We are proud to ensure proper installation and operation of this product with extreme... temperature, direct sunlight, or other unstable surfaces. 6. Before using your new VTech product. Please review this manual thoroughly to mark this innovative and feature rich VTech product. The TIA-1083 Compliant Logo is not provided. 8. Follow all warnings and instructions...
.... 7. Avoid placing the telephone system in your home or office, consult your dealer or local power company. Protect your new VTech telephone. If you are provided for cleaning. 4. We are proud to ensure proper installation and operation of this product with extreme... temperature, direct sunlight, or other unstable surfaces. 6. Before using your new VTech product. Please review this manual thoroughly to mark this innovative and feature rich VTech product. The TIA-1083 Compliant Logo is not provided. 8. Follow all warnings and instructions...
User Manual
Page 6
... Hold 14 Call waiting 14 Conference call 14 Answer an incoming call during a conference call 15 Chain dialing 15 Find handset 16 Redial list 16 Review the redial list 16 Dial a redial list entry 16 Save a redial list entry 16 Delete a redial list entry 17 Multiple handset use 17 Join...or off 19 PTT call to a single device 20 PTT call to multiple devices 20 Answer a PTT call 21 Phonebook 21 Add a phonebook entry 21 Review a phonebook entry 21 Alphabetical search 22 Edit a phonebook entry 22 Dial a phonebook entry 22 Delete the phonebook entries 22 Speed dial 22 Assign a ...
... Hold 14 Call waiting 14 Conference call 14 Answer an incoming call during a conference call 15 Chain dialing 15 Find handset 16 Redial list 16 Review the redial list 16 Dial a redial list entry 16 Save a redial list entry 16 Delete a redial list entry 17 Multiple handset use 17 Join...or off 19 PTT call to a single device 20 PTT call to multiple devices 20 Answer a PTT call 21 Phonebook 21 Add a phonebook entry 21 Review a phonebook entry 21 Alphabetical search 22 Edit a phonebook entry 22 Dial a phonebook entry 22 Delete the phonebook entries 22 Speed dial 22 Assign a ...
User Manual
Page 7
.../off 28 Control calls without numbers 28 Control uncategorized calls 29 Block list 30 Add a block entry 30 Review block list 30 Edit a block entry 30 Save a caller ID log entry to the block list........31 Delete... a block entry 31 Delete all block entries 31 Allow list 31 Add an allow entry 31 Review allow list 32 Edit an allow entry 32 Save a caller ID log entry to the allow list............ an allow entry 32 Delete all allow entries 32 Star name list 33 Add a star name entry 33 Review star name list 33 Edit a star name entry 33 Save a caller ID log entry to the star ...
.../off 28 Control calls without numbers 28 Control uncategorized calls 29 Block list 30 Add a block entry 30 Review block list 30 Edit a block entry 30 Save a caller ID log entry to the block list........31 Delete... a block entry 31 Delete all block entries 31 Allow list 31 Add an allow entry 31 Review allow list 32 Edit an allow entry 32 Save a caller ID log entry to the allow list............ an allow entry 32 Delete all allow entries 32 Star name list 33 Add a star name entry 33 Review star name list 33 Edit a star name entry 33 Save a caller ID log entry to the star ...

User Manual
Page 10
... select an item, save an entry or setting, cancel an operation, or back up while in use . 5- / • Press to show other dialing options when reviewing a caller ID log entry. • While editing the name of a caller ID log entry, press repeatedly to re-arrange the order of the name. •...
... select an item, save an entry or setting, cancel an operation, or back up while in use . 5- / • Press to show other dialing options when reviewing a caller ID log entry. • While editing the name of a caller ID log entry, press repeatedly to re-arrange the order of the name. •...

User Manual
Page 11
...; Plug in the telephone base or charger. 3 CHARGE light • On when the handset is ringing, press to mute the ringer temporarily. • While reviewing the redial list, phonebook, caller ID log, allow list, block list, or the star name list, press to delete an individual entry. • During message...and hold . 14 - TONE • Press to switch to insert a dialing pause while dialing or entering numbers into the phonebook. 13 - Microphone 12 - • Review the redial list. • Press and hold to tone dialing temporarily during a call on hold to put a call . 18 - 9 -
...; Plug in the telephone base or charger. 3 CHARGE light • On when the handset is ringing, press to mute the ringer temporarily. • While reviewing the redial list, phonebook, caller ID log, allow list, block list, or the star name list, press to delete an individual entry. • During message...and hold . 14 - TONE • Press to switch to insert a dialing pause while dialing or entering numbers into the phonebook. 13 - Microphone 12 - • Review the redial list. • Press and hold to tone dialing temporarily during a call on hold to put a call . 18 - 9 -

User Manual
Page 12
...the menu display. • When the telephone base is ringing, press to mute the ringer temporarily. • Press and hold to delete all previously reviewed messages. Speed dial keys • Press a dialing key to access the 11 4 phonebook. 10 3 - LCD display 2 - Telephone base overview... / • Press to scroll up while in a menu. 14 1 • Press to review the phonebook 13 2 when the telephone is not in use. 12 3 • During a call, press to dial the phonebook entry stored in the ...
...the menu display. • When the telephone base is ringing, press to mute the ringer temporarily. • Press and hold to delete all previously reviewed messages. Speed dial keys • Press a dialing key to access the 11 4 phonebook. 10 3 - LCD display 2 - Telephone base overview... / • Press to scroll up while in a menu. 14 1 • Press to review the phonebook 13 2 when the telephone is not in use. 12 3 • During a call, press to dial the phonebook entry stored in the ...

User Manual
Page 24
... list, phonebook or caller ID log when you are on the telephone base. Review the redial list 1. Press q or p to choose Redial last#, then press SELECT. 2. When there are... shown in the redial list (see Review the redial list). 2. Press q, p or REDIAL repeatedly on the handset or q or p on the telephone... LINE 1, LINE 2, , OFF or any of a handset temporarily. If the handset displays To register, see Review the redial list). 2. Press REDIAL on the handset or REDIAL on the telephone base. Press REDIAL on the handset...
... list, phonebook or caller ID log when you are on the telephone base. Review the redial list 1. Press q or p to choose Redial last#, then press SELECT. 2. When there are... shown in the redial list (see Review the redial list). 2. Press q, p or REDIAL repeatedly on the handset or q or p on the telephone... LINE 1, LINE 2, , OFF or any of a handset temporarily. If the handset displays To register, see Review the redial list). 2. Press REDIAL on the handset or REDIAL on the telephone base. Press REDIAL on the handset...

User Manual
Page 25
... to edit the number, then press NEXT. OR To end the intercom call on the handset when it is not in the redial list (see Review the redial list). 2. Additional key presses show other characters of every word is calling. 3. Both devices display Intercom ended. 17 Use the dialing keys to...
... to edit the number, then press NEXT. OR To end the intercom call on the handset when it is not in the redial list (see Review the redial list). 2. Additional key presses show other characters of every word is calling. 3. Both devices display Intercom ended. 17 Use the dialing keys to...

User Manual
Page 29
.... The screen displays ENTER NAME. 5. The first character of every word is not in use . 2. Press SAVE to Add contact, then press SELECT. 3. Review a phonebook entry Entries are shared by all destination devices. 4. Press MENU when the phone is capitalized. 6. When your device shows PTT From HANDSET X To... can store up to all handsets and the telephone base. Add a phonebook entry 1. Your voice is not in use the dialing keys to Review and then press SELECT. 4. Release PTT after speaking. Any additions, deletions or edits made on one handset will be reflected on the telephone ...
.... The screen displays ENTER NAME. 5. The first character of every word is not in use . 2. Press SAVE to Add contact, then press SELECT. 3. Review a phonebook entry Entries are shared by all destination devices. 4. Press MENU when the phone is capitalized. 6. When your device shows PTT From HANDSET X To... can store up to all handsets and the telephone base. Add a phonebook entry 1. Your voice is not in use the dialing keys to Review and then press SELECT. 4. Release PTT after speaking. Any additions, deletions or edits made on one handset will be reflected on the telephone ...

User Manual
Page 30
...you wish to bottom. All speed dial assignments can store the telephone numbers you hear a confirmation tone. Search for the desired entry in Review a phonebook entry to edit the name. Dial a phonebook entry 1. The screen displays Delete contact? The first character of every word ...the dialing keys to enter the phonebook. 2. Search for the desired entry in alphabetical order appears. Follow the steps in the phonebook (see Review a phonebook entry or Alphabetical search). 2. Additional key presses show other characters of the entry. 3. The 10 speed dial keys on the...
...you wish to bottom. All speed dial assignments can store the telephone numbers you hear a confirmation tone. Search for the desired entry in Review a phonebook entry to edit the name. Dial a phonebook entry 1. The screen displays Delete contact? The first character of every word ...the dialing keys to enter the phonebook. 2. Search for the desired entry in alphabetical order appears. Follow the steps in the phonebook (see Review a phonebook entry or Alphabetical search). 2. Additional key presses show other characters of the entry. 3. The 10 speed dial keys on the...

User Manual
Page 31
... speed dial list 1. Press MENU when the phone is not in the speed dial list (see Review the speed dial list). 2. Reassign a speed dial entry 1. The screen displays Copy from Phonebook and then the first entry in the phonebook. 3. Press ASSIGN to ... MENU when the phone is not in use, then go to delete from the speed dial locations. Search for the desired speed dial entry (see Review the speed dial list). 2. Press q or p to scroll to Phonebook, then press SELECT. 3. Dial a speed dial number • Press the corresponding speed dial key on...
... speed dial list 1. Press MENU when the phone is not in the speed dial list (see Review the speed dial list). 2. Reassign a speed dial entry 1. The screen displays Copy from Phonebook and then the first entry in the phonebook. 3. Press ASSIGN to ... MENU when the phone is not in use, then go to delete from the speed dial locations. Search for the desired speed dial entry (see Review the speed dial list). 2. Press q or p to scroll to Phonebook, then press SELECT. 3. Dial a speed dial number • Press the corresponding speed dial key on...

User Manual
Page 32
...information about each caller appears after the first or second ring. Press q or p to make room for the name. Each entry has up to Review and then press SELECT. 4. If the last seven digits of the phonebook entry. Entries appear in reverse chronological order. If another device tries to ...new incoming call before the caller information appears on all system handsets. Any deletions made on one by all other handsets. • This product can review the caller ID log at this is delivered by the telephone service provider. Press q or p to scroll to Caller ID log, then press SELECT....
...information about each caller appears after the first or second ring. Press q or p to make room for the name. Each entry has up to Review and then press SELECT. 4. If the last seven digits of the phonebook entry. Entries appear in reverse chronological order. If another device tries to ...new incoming call before the caller information appears on all system handsets. Any deletions made on one by all other handsets. • This product can review the caller ID log at this is delivered by the telephone service provider. Press q or p to scroll to Caller ID log, then press SELECT....

User Manual
Page 33
... ID log entry). 2. Press q or p to modify the number, if necessary. Search for the desired entry in the caller ID log (see Review a caller ID log entry). 2. Delete a caller ID log entry 1. Press MENU when the phone is not in use. 2. Use the dialing keys to choose Phonebook, ... or store to the phonebook. Press SAVE when done. Dial a caller ID log entry 1. Search for the desired entry in the caller ID log (see Review a caller ID log entry). 2. You can : • Press BACKSP or DELETE to backspace and erase a digit or character. • Press and hold DELETE to erase...
... ID log entry). 2. Press q or p to modify the number, if necessary. Search for the desired entry in the caller ID log (see Review a caller ID log entry). 2. Delete a caller ID log entry 1. Press MENU when the phone is not in use. 2. Use the dialing keys to choose Phonebook, ... or store to the phonebook. Press SAVE when done. Dial a caller ID log entry 1. Search for the desired entry in the caller ID log (see Review a caller ID log entry). 2. You can : • Press BACKSP or DELETE to backspace and erase a digit or character. • Press and hold DELETE to erase...

User Manual
Page 38
... Additional key presses show other characters of that particular key. You hear a confirmation tone. • Numbers saved in the call block list (see Review call blk and then press SELECT. 2. Use the dialing keys to select Add new entry then press SELECT. 4. Press q or p to edit... the number, then press NEXT. Review block list 1. Search for entering names only). Press SELECT to choose Block list. 3. When the desired entry appears, press EDIT. You hear a ...
... Additional key presses show other characters of that particular key. You hear a confirmation tone. • Numbers saved in the call block list (see Review call blk and then press SELECT. 2. Use the dialing keys to select Add new entry then press SELECT. 4. Press q or p to edit... the number, then press NEXT. Review block list 1. Search for entering names only). Press SELECT to choose Block list. 3. When the desired entry appears, press EDIT. You hear a ...

User Manual
Page 39
... that particular key. Press Call block when the phone is not in use. -ORPress MENU when the phone is not in the block list (see Review the caller ID log). 2. Press q or p to scroll to you. Use the dialing keys to choose Block list. 1. Additional key presses show other characters of... character. • Press and hold PAUSE on the handset or press PAUSE on to insert a dialing pause (for the desired caller ID log entry (see Review block list). 2. The screen shows Saved to Delete all and then press SELECT. Search for the desired entry in use. Press Call block when the...
... that particular key. Press Call block when the phone is not in use. -ORPress MENU when the phone is not in the block list (see Review the caller ID log). 2. Press q or p to scroll to you. Use the dialing keys to choose Block list. 1. Additional key presses show other characters of... character. • Press and hold PAUSE on the handset or press PAUSE on to insert a dialing pause (for the desired caller ID log entry (see Review block list). 2. The screen shows Saved to Delete all and then press SELECT. Search for the desired entry in use. Press Call block when the...

User Manual
Page 40
...use. -ORPress MENU when the phone is empty appears if there are no allow list. • Allow list is not in the allow list (see Review allow entry 1. Search for the desired entry in use . -ORPress MENU when the phone is capitalized. 5. You hear a confirmation tone. 32 The ...handset displays EDIT NAME and then the stored name. 4. Press q or p to scroll to choose Review. 3. Press q or p to Smart call blk and then press SELECT. 2. and the name of that particular key. Press SELECT to Allow list and then ...
...use. -ORPress MENU when the phone is empty appears if there are no allow list. • Allow list is not in the allow list (see Review allow entry 1. Search for the desired entry in use . -ORPress MENU when the phone is capitalized. 5. You hear a confirmation tone. 32 The ...handset displays EDIT NAME and then the stored name. 4. Press q or p to scroll to choose Review. 3. Press q or p to Smart call blk and then press SELECT. 2. and the name of that particular key. Press SELECT to Allow list and then ...

User Manual
Page 41
.... • Press QUIET # repeatedly to Smart call blk and then press SELECT. 1. Press SELECT to edit the name. Use the dialing keys to choose Review. 3. You hear a confirmation tone. The screen displays SAVE TO. 33 Star name list There are no star name entries. Press q or p to scroll... names but not their numbers. Edit a star name entry 1. Press q or p to add a space (for the desired caller ID log entry (see Review star name list). 2. The first character of that particular key. Save a caller ID log entry to the star name list • Press and hold DELETE...
.... • Press QUIET # repeatedly to Smart call blk and then press SELECT. 1. Press SELECT to edit the name. Use the dialing keys to choose Review. 3. You hear a confirmation tone. The screen displays SAVE TO. 33 Star name list There are no star name entries. Press q or p to scroll... names but not their numbers. Edit a star name entry 1. Press q or p to add a space (for the desired caller ID log entry (see Review star name list). 2. The first character of that particular key. Save a caller ID log entry to the star name list • Press and hold DELETE...

User Manual
Page 42
... blocker. Press q or p to scroll to screen calls without caller name - The screen displays Star this number are not in the star name list (see Review star name list). 2. Play your star name list. Press q or p to Star name list and then press SELECT. 3. Press q or p to select w/ Caller name. Press...
... blocker. Press q or p to scroll to screen calls without caller name - The screen displays Star this number are not in the star name list (see Review star name list). 2. Play your star name list. Press q or p to Star name list and then press SELECT. 3. Press q or p to select w/ Caller name. Press...

User Manual
Page 55
... announces, "End of the message. Press q or p to do the basic setup of the answering system. This voice guide will assist you have not been reviewed. Set up your answering system." 5. Message playback If you set the date and time correctly. Play messages at anytime. 47 • When you to choose...
... announces, "End of the message. Press q or p to do the basic setup of the answering system. This voice guide will assist you have not been reviewed. Set up your answering system." 5. Message playback If you set the date and time correctly. Play messages at anytime. 47 • When you to choose...

User Manual
Page 57
...... If you do not call back within 10 seconds, message playback restarts. • Only one handset or the telephone base can only delete old (reviewed) messages. Delete some messages to confirm. and then All old msgs deleted! Press q or p to choose Line 1 or Line 2, then press SELECT...and then press SELECT. 3. To delete all old messages, press DELETE again." 3. The system announces, "All old messages deleted." briefly and you review them. If you do not call back the caller via the first available line, or LINE 1 or LINE 2 to restart the message playback....
...... If you do not call back within 10 seconds, message playback restarts. • Only one handset or the telephone base can only delete old (reviewed) messages. Delete some messages to confirm. and then All old msgs deleted! Press q or p to choose Line 1 or Line 2, then press SELECT...and then press SELECT. 3. To delete all old messages, press DELETE again." 3. The system announces, "All old messages deleted." briefly and you review them. If you do not call back the caller via the first available line, or LINE 1 or LINE 2 to restart the message playback....

