User Guide
Page 3
...the TV, make sure that the antenna or cable system is dropped or damaged in the building installation. Power Lines Do not locate the antenna near overhead light or power circuits, or where it easier for long periods of the coaxial cable is exposed to -analog converter boxes. VIZIO® VW37L ... the antenna or cable system. Pulling the power cable itself may cause damage and leakage of the batteries, operator injury and contamination the remote controller. • If any way. o The Display is intended to provide some protection against voltage surges and static charges.
...the TV, make sure that the antenna or cable system is dropped or damaged in the building installation. Power Lines Do not locate the antenna near overhead light or power circuits, or where it easier for long periods of the coaxial cable is exposed to -analog converter boxes. VIZIO® VW37L ... the antenna or cable system. Pulling the power cable itself may cause damage and leakage of the batteries, operator injury and contamination the remote controller. • If any way. o The Display is intended to provide some protection against voltage surges and static charges.

User Guide
Page 5
... this user manual carefully before installing your VIZIO HDTV. Please contact VIZIO for additional information. VIZIO® VW37L HDTV40A User Manual Additional Certified Accessories for the VIZIO VW37L HDTV40A are sold separately Wall Mounts High Definition Cables Extra or replacement Remote VIZIO also offers Installation Services and Extended Warranty Services for your VIZIO VW37L HDTV40A To purchase or inquire about...
... this user manual carefully before installing your VIZIO HDTV. Please contact VIZIO for additional information. VIZIO® VW37L HDTV40A User Manual Additional Certified Accessories for the VIZIO VW37L HDTV40A are sold separately Wall Mounts High Definition Cables Extra or replacement Remote VIZIO also offers Installation Services and Extended Warranty Services for your VIZIO VW37L HDTV40A To purchase or inquire about...
User Guide
Page 7
...1.4 VIZIO Remote Control...11 1.4.1 Insertion of Batteries in the Remote Control 12 1.4.2 Remote Control Range ...12 1.4.3 VIZIO Remote Control Precautions ...12 Chapter 2 Connecting Equipment 13 2.1 Which Video Connection Should I Use?...13 2.2 Connecting Coaxial (RF) ...14 2.2.1 Using Your Antenna or Digital Cable for DTV /TV 14 ... PC Computer ...25 2.8.1 Preset PC Resolutions...26 2.9 Setting Up to Watch Television ...27 2.10 Basic LCD HDTV Start Up ...27 2.11 Watching a TV Program ...33 2.12 Adjusting Basic HDTV Settings ...34 2.13 Program Information...35 Chapter 3 Advanced Adjustment of...
...1.4 VIZIO Remote Control...11 1.4.1 Insertion of Batteries in the Remote Control 12 1.4.2 Remote Control Range ...12 1.4.3 VIZIO Remote Control Precautions ...12 Chapter 2 Connecting Equipment 13 2.1 Which Video Connection Should I Use?...13 2.2 Connecting Coaxial (RF) ...14 2.2.1 Using Your Antenna or Digital Cable for DTV /TV 14 ... PC Computer ...25 2.8.1 Preset PC Resolutions...26 2.9 Setting Up to Watch Television ...27 2.10 Basic LCD HDTV Start Up ...27 2.11 Watching a TV Program ...33 2.12 Adjusting Basic HDTV Settings ...34 2.13 Program Information...35 Chapter 3 Advanced Adjustment of...
User Guide
Page 8
... Modes ...64 3.17 Using a Cable or Satellite Remote ...65 Chapter 4 Maintenance and Troubleshooting 65 4.1 Maintenance...65 4.2 TV and Stand Base Assembly...66 4.3 Troubleshooting Guide ...67 4.4 Telephone & Technical Support ...68 4.5 Compliance ...69 4.6 FCC Class B Radio Interference Statement...69 Chapter 5 Miscellaneous Information 70 5.1 Specifications ...70 5.2 Glossary - VIZIO® VW37L HDTV40A User Manual 3.4.2 Auto Search...46 3.4.3 Skip...
... Modes ...64 3.17 Using a Cable or Satellite Remote ...65 Chapter 4 Maintenance and Troubleshooting 65 4.1 Maintenance...65 4.2 TV and Stand Base Assembly...66 4.3 Troubleshooting Guide ...67 4.4 Telephone & Technical Support ...68 4.5 Compliance ...69 4.6 FCC Class B Radio Interference Statement...69 Chapter 5 Miscellaneous Information 70 5.1 Specifications ...70 5.2 Glossary - VIZIO® VW37L HDTV40A User Manual 3.4.2 Auto Search...46 3.4.3 Skip...
User Guide
Page 9
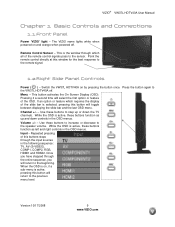
...on, if a sub-menu is active, these buttons function as left and right controls in the OSD menus. Version 10/17/2008 9 www.VIZIO.com Remote Control Sensor - While the OSD is selected, pressing this button will toggle between displaying the slide bar and the last OSD menu. Input -...have stepped through the input sources in the OSD menus. Use these buttons to increase or decrease to step up and down the TV channels. Switch the VW37L HDTV40A on and orange when powered off . Press the button again to the remote signal. 1.2 Right Side Panel Controls Power ( ) -
...on, if a sub-menu is active, these buttons function as left and right controls in the OSD menus. Version 10/17/2008 9 www.VIZIO.com Remote Control Sensor - While the OSD is selected, pressing this button will toggle between displaying the slide bar and the last OSD menu. Input -...have stepped through the input sources in the OSD menus. Use these buttons to increase or decrease to step up and down the TV channels. Switch the VW37L HDTV40A on and orange when powered off . Press the button again to the remote signal. 1.2 Right Side Panel Controls Power ( ) -
User Guide
Page 11
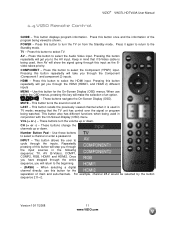
... . Use these buttons to the Standby mode. Repeatedly pressing of the program being watched. Version 10/17/2008 11 www.VIZIO.com COMPONENT - This button recalls the previously viewed channel when it again to return to select a channel or enter a password....mode. INPUT - This button also has different functions when being used in the following sequence: TV, AV (S-Video), COMP1, COMP2, RGB, HDMI1 and HDMI2. Use this button for the On-Screen Display (OSD) menus. TV - Number Button Pad - VIZIO® VW37L HDTV40A User Manual 1.4 VIZIO Remote Control GUIDE -
... . Use these buttons to the Standby mode. Repeatedly pressing of the program being watched. Version 10/17/2008 11 www.VIZIO.com COMPONENT - This button recalls the previously viewed channel when it again to return to select a channel or enter a password....mode. INPUT - This button also has different functions when being used in the following sequence: TV, AV (S-Video), COMP1, COMP2, RGB, HDMI1 and HDMI2. Use this button for the On-Screen Display (OSD) menus. TV - Number Button Pad - VIZIO® VW37L HDTV40A User Manual 1.4 VIZIO Remote Control GUIDE -

User Guide
Page 12
...and (-) symbols inside the battery compartment. Wipe it . When not using the remote control for Inserting the Batteries: Only use the specified AA batteries. Version 10/17/2008 12 www.VIZIO.com VIZIO® VW37L HDTV40A User Manual 1.4.1 Insertion of Batteries in cracking or leakage that you match ...from children and pets. 1.4.2 Remote Control Range Point the remote control at the remote control sensor to the remote control or does not respond at all, check the batteries. Keep the batteries away from heat sources. Avoid humidity. If the TV responds erratically to transmit the ...
...and (-) symbols inside the battery compartment. Wipe it . When not using the remote control for Inserting the Batteries: Only use the specified AA batteries. Version 10/17/2008 12 www.VIZIO.com VIZIO® VW37L HDTV40A User Manual 1.4.1 Insertion of Batteries in cracking or leakage that you match ...from children and pets. 1.4.2 Remote Control Range Point the remote control at the remote control sensor to the remote control or does not respond at all, check the batteries. Keep the batteries away from heat sources. Avoid humidity. If the TV responds erratically to transmit the ...
User Guide
Page 14
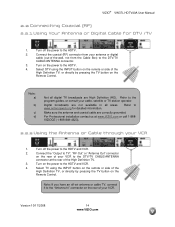
VIZIO® VW37L HDTV40A User Manual 2.2 Connecting Coaxial (RF) 2.2.1 Using Your Antenna or Digital Cable for detailed information. Refer to the HDTV and VCR. 2. For Professional installation contact us at the rear of the High Definition TV, or directly by pressing the TV button on the Remote Control. ...and VCR. 4. Connect the coaxial (RF) connector from the Cable Box) to the DTV/TV CABLE/ANTENNA connector. 3. Turn on the remote or side of the High Definition TV. 3. Connect the "Output to TV", "RF Out" or "Antenna Out" connector on the rear of your VCR to the...
VIZIO® VW37L HDTV40A User Manual 2.2 Connecting Coaxial (RF) 2.2.1 Using Your Antenna or Digital Cable for detailed information. Refer to the HDTV and VCR. 2. For Professional installation contact us at the rear of the High Definition TV, or directly by pressing the TV button on the Remote Control. ...and VCR. 4. Connect the coaxial (RF) connector from the Cable Box) to the DTV/TV CABLE/ANTENNA connector. 3. Turn on the remote or side of the High Definition TV. 3. Connect the "Output to TV", "RF Out" or "Antenna Out" connector on the rear of your VCR to the...
User Guide
Page 15
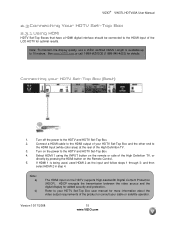
... HDMI Input (white color area) at the rear of the High Definition TV. 3. If HDMI 1 is available up to the HDTV and HDTV Set-Top Box. 2. Note: a) b) The HDMI input on the Remote Control. 5. and then select HDMI 2 in step 4. VIZIO® VW37L HDTV40A User Manual 2.3 Connecting Your HDTV Set-Top Box 2.3.1 Using HDMI... for more information about the video output requirements of the product or consult your cable or satellite operator. Refer to the HDMI input of the LCD HDTV for optimal results. Version 10/17/2008 15 www...
... HDMI Input (white color area) at the rear of the High Definition TV. 3. If HDMI 1 is available up to the HDTV and HDTV Set-Top Box. 2. Note: a) b) The HDMI input on the Remote Control. 5. and then select HDMI 2 in step 4. VIZIO® VW37L HDTV40A User Manual 2.3 Connecting Your HDTV Set-Top Box 2.3.1 Using HDMI... for more information about the video output requirements of the product or consult your cable or satellite operator. Refer to the HDMI input of the LCD HDTV for optimal results. Version 10/17/2008 15 www...
User Guide
Page 16
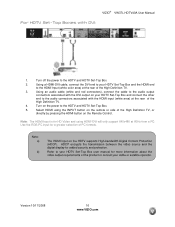
VIZIO® VW37L HDTV40A User Manual For HDTV Set-Top Boxes with the DVI output on your cable or satellite operator. Using an audio cable (white and red... with DVI: 1. Select HDMI using HDMI-DVI will only support 640x480 at the rear of the High Definition TV, or directly by pressing the HDMI button on the remote or side of the High Definition TV. 3. Note: a) b) The HDMI input on the power to your HDTV Set-Top Box user manual for a greater... Refer to your HDTV Set-Top Box and the HDMI end to the HDTV and HDTV Set-Top Box. 2. Version 10/17/2008 16 www.VIZIO.com
VIZIO® VW37L HDTV40A User Manual For HDTV Set-Top Boxes with the DVI output on your cable or satellite operator. Using an audio cable (white and red... with DVI: 1. Select HDMI using HDMI-DVI will only support 640x480 at the rear of the High Definition TV, or directly by pressing the HDMI button on the remote or side of the High Definition TV. 3. Note: a) b) The HDMI input on the power to your HDTV Set-Top Box user manual for a greater... Refer to your HDTV Set-Top Box and the HDMI end to the HDTV and HDTV Set-Top Box. 2. Version 10/17/2008 16 www.VIZIO.com
User Guide
Page 17
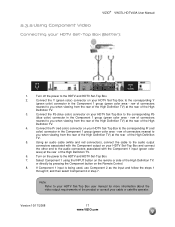
...TV. 5. Turn off the power to the HDTV and HDTV Set-Top Box. 7. Version 10/17/2008 17 www.VIZIO.com Connect the Y (green color) connector on the power to the HDTV and HDTV Set-Top Box. 2. Connect the Pr (red color) connector on the Remote Control. 8. VIZIO® VW37L... HDTV40A User Manual 2.3.2 Using Component Video Connecting your HDTV Set-Top Box and connect the other end to the audio connectors associated with the Component 1 input (green color area) at the rear of the High Definition TV. 4.
...TV. 5. Turn off the power to the HDTV and HDTV Set-Top Box. 7. Version 10/17/2008 17 www.VIZIO.com Connect the Y (green color) connector on the power to the HDTV and HDTV Set-Top Box. 2. Connect the Pr (red color) connector on the Remote Control. 8. VIZIO® VW37L... HDTV40A User Manual 2.3.2 Using Component Video Connecting your HDTV Set-Top Box and connect the other end to the audio connectors associated with the Component 1 input (green color area) at the rear of the High Definition TV. 4.
User Guide
Page 18
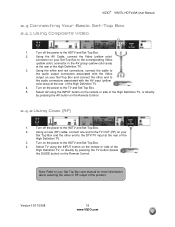
.... Select AV using the INPUT button on the remote or side of the High Definition TV. 3. Using the AV Cable, connect the Video (yellow color) connector on your Set-Top Box and connect the other end to the HDTV and Set-Top Box. 2. VIZIO® VW37L HDTV40A User Manual 2.4 Connecting Your Basic Set-Top...
.... Select AV using the INPUT button on the remote or side of the High Definition TV. 3. Using the AV Cable, connect the Video (yellow color) connector on your Set-Top Box and connect the other end to the HDTV and Set-Top Box. 2. VIZIO® VW37L HDTV40A User Manual 2.4 Connecting Your Basic Set-Top...
User Guide
Page 19
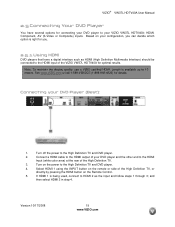
... or Composite) inputs. Note: To maintain the display quality, use a VIZIO certified HDMI. Connecting your VIZIO VW37L HDTV40A; Select HDMI 1 using the INPUT button on the Remote Control. 5. If HDMI 1 is being used, connect to the High Definition TV and DVD player. 2. See www.VIZIO.com or call 1-888-VIZIOCE (1-888-849-4623) for optimal results...
... or Composite) inputs. Note: To maintain the display quality, use a VIZIO certified HDMI. Connecting your VIZIO VW37L HDTV40A; Select HDMI 1 using the INPUT button on the Remote Control. 5. If HDMI 1 is being used, connect to the High Definition TV and DVD player. 2. See www.VIZIO.com or call 1-888-VIZIOCE (1-888-849-4623) for optimal results...
User Guide
Page 20
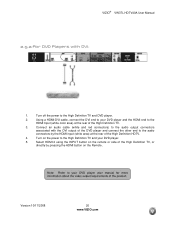
... output requirements of the High Definition HDTV. 4. Version 10/17/2008 20 www.VIZIO.com Turn on the Remote. Using a HDMI-DVI cable, connect the DVI end to your DVD player and the HDMI end to the High Definition TV and DVD player. 2. Turn off the power to the HDMI Input (white color... area) at the rear of the product. VIZIO® VW37L HDTV40A User Manual 2.5.2 For DVD Players...
... output requirements of the High Definition HDTV. 4. Version 10/17/2008 20 www.VIZIO.com Turn on the Remote. Using a HDMI-DVI cable, connect the DVI end to your DVD player and the HDMI end to the High Definition TV and DVD player. 2. Turn off the power to the HDMI Input (white color... area) at the rear of the product. VIZIO® VW37L HDTV40A User Manual 2.5.2 For DVD Players...
User Guide
Page 21
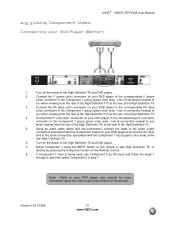
... color) connector in the Component 1 group (green color area - Select Component 1 using the INPUT button on the remote or side High Definition TV, or directly by pressing the Component button on your DVD player user manual for more information about the video output requirements...color area) at the rear High Definition TV. 6. row of the High Definition TV. 5. Version 10/17/2008 21 www.VIZIO.com and then select Component 2 in the Component 1 group (green color area - Turn on your DVD Player (Better): 1. VIZIO® VW37L HDTV40A User Manual 2.5.3 Using Component Video ...
... color) connector in the Component 1 group (green color area - Select Component 1 using the INPUT button on the remote or side High Definition TV, or directly by pressing the Component button on your DVD player user manual for more information about the video output requirements...color area) at the rear High Definition TV. 6. row of the High Definition TV. 5. Version 10/17/2008 21 www.VIZIO.com and then select Component 2 in the Component 1 group (green color area - Turn on your DVD Player (Better): 1. VIZIO® VW37L HDTV40A User Manual 2.5.3 Using Component Video ...
User Guide
Page 22
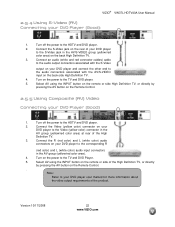
...VIDEO group (yellow/red color area) on the back High Definition TV. 3. Note: Refer to your DVD player to the TV and DVD player. 5. Connect the S-Video jack on the Remote Control. . Version 10/17/2008 22 www.VIZIO.com Turn on the power to the HDTV and DVD player. 2....with the S-Video output on the back side High Definition TV. 4. Turn off the power to the TV and DVD Player. 5. Turn off the power to the Video (yellow color) connector in the AV group (yellow/red color area). 4. VIZIO® VW37L HDTV40A User Manual 2.5.4 Using S-Video (AV) Connecting your ...
...VIDEO group (yellow/red color area) on the back High Definition TV. 3. Note: Refer to your DVD player to the TV and DVD player. 5. Connect the S-Video jack on the Remote Control. . Version 10/17/2008 22 www.VIZIO.com Turn on the power to the HDTV and DVD player. 2....with the S-Video output on the back side High Definition TV. 4. Turn off the power to the TV and DVD Player. 5. Turn off the power to the Video (yellow color) connector in the AV group (yellow/red color area). 4. VIZIO® VW37L HDTV40A User Manual 2.5.4 Using S-Video (AV) Connecting your ...
User Guide
Page 23
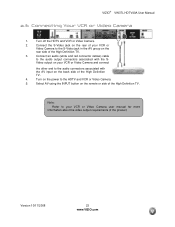
VIZIO® VW37L HDTV40A User Manual 2.6 Connecting Your VCR or Video Camera 1. Turn off the HDTV and VCR or Video Camera. 2. Note: Refer to your VCR or Video Camera user manual for more information about the video output requirements of the High Definition TV. Select AV using the INPUT button on the rear side... of the High Definition TV. 4. Connect the S-Video jack on the rear of your VCR or Video Camera and connect the other end to the S-Video jack in the AV group on the remote or side of the product. Connect an audio (white and red...
VIZIO® VW37L HDTV40A User Manual 2.6 Connecting Your VCR or Video Camera 1. Turn off the HDTV and VCR or Video Camera. 2. Note: Refer to your VCR or Video Camera user manual for more information about the video output requirements of the High Definition TV. Select AV using the INPUT button on the rear side... of the High Definition TV. 4. Connect the S-Video jack on the rear of your VCR or Video Camera and connect the other end to the S-Video jack in the AV group on the remote or side of the product. Connect an audio (white and red...
User Guide
Page 25
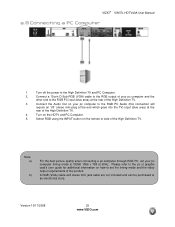
VIZIO® VW37L HDTV40A User Manual 2.8 Connecting a PC Computer 1. Turn off the power to the RGB PC Audio (this connection will require an 1/8" stereo mini plug at the end which goes into the TV) input (blue area) at the rear of the High Definition TV. Connect a 15-pin D-Sub RGB (VGA) cable...Turn on your pc computer timing mode to the pc or graphic card's user guide for additional information on the remote or side of the High Definition TV. 3. Version 10/17/2008 25 www.VIZIO.com A RGB (VGA) cable and stereo mini jack cable are not included and can be purchased at 60Hz....
VIZIO® VW37L HDTV40A User Manual 2.8 Connecting a PC Computer 1. Turn off the power to the RGB PC Audio (this connection will require an 1/8" stereo mini plug at the end which goes into the TV) input (blue area) at the rear of the High Definition TV. Connect a 15-pin D-Sub RGB (VGA) cable...Turn on your pc computer timing mode to the pc or graphic card's user guide for additional information on the remote or side of the High Definition TV. 3. Version 10/17/2008 25 www.VIZIO.com A RGB (VGA) cable and stereo mini jack cable are not included and can be purchased at 60Hz....
User Guide
Page 27
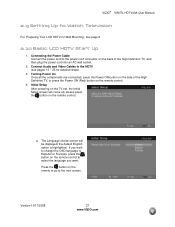
Turning Power On Once all the components are connected, press the Power ON button on the side of the High Definition TV, and then plug the power cord into an AC wall socket. 2. Connect Audio and Video Cables to the next screen. The Language choice screen will ... or Français, press the button on the remote control to the power cord connector on the remote to go to the HDTV (see page 6. 2.10 Basic LCD HDTV Start Up 1. VIZIO® VW37L HDTV40A User Manual 2.9 Setting Up to Watch Television For 'Preparing Your LCD HDTV for Wall Mounting', see pages 13 ~ 25 for...
Turning Power On Once all the components are connected, press the Power ON button on the side of the High Definition TV, and then plug the power cord into an AC wall socket. 2. Connect Audio and Video Cables to the next screen. The Language choice screen will ... or Français, press the button on the remote control to the power cord connector on the remote to go to the HDTV (see page 6. 2.10 Basic LCD HDTV Start Up 1. VIZIO® VW37L HDTV40A User Manual 2.9 Setting Up to Watch Television For 'Preparing Your LCD HDTV for Wall Mounting', see pages 13 ~ 25 for...

User Guide
Page 29
... to complete this time, press the LAST key on the remote control to point your cable operator for channels at this procedure; Note: DTV digital broadcast is Scan. consult your antenna. VIZIO® VW37L HDTV40A User Manual c. The screen will need to select the TV as input (through the Input key) and then go...
... to complete this time, press the LAST key on the remote control to point your cable operator for channels at this procedure; Note: DTV digital broadcast is Scan. consult your antenna. VIZIO® VW37L HDTV40A User Manual c. The screen will need to select the TV as input (through the Input key) and then go...


