User Manual
Page 2
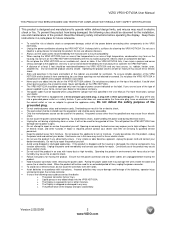
... use in any abnormality occurs. Pulling the power cable itself may cause fire or electric shock. • Follow instructions for the product. When the product will protect the VP50 HDTV20A from an area of low temperature to an area of power supplied to the VP50 HDTV20A. • Unplug the power cord before moving the product. • Hold the power connector when removing the power cable. o The Display...
... use in any abnormality occurs. Pulling the power cable itself may cause fire or electric shock. • Follow instructions for the product. When the product will protect the VP50 HDTV20A from an area of low temperature to an area of power supplied to the VP50 HDTV20A. • Unplug the power cord before moving the product. • Hold the power connector when removing the power cable. o The Display...
User Manual
Page 5
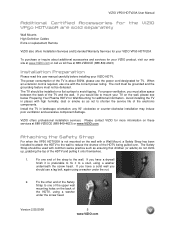
... cord is not mounted on a flat surface to one end of the electronic components. VIZIO VP50 HDTV20A User Manual Additional Certified Accessories for the VIZIO VP50 HDTV20A are sold separately Wall Mounts High Definition Cables Extra or replacement Remote VIZIO also offers Installation Services and Extended Warranty Services for your VIZIO VP50 HDTV20A To purchase or inquire about 500W, please use one with the correct power rating. Avoid installing the TV in landscape orientation; VIZIO offers professional installation services...
... cord is not mounted on a flat surface to one end of the electronic components. VIZIO VP50 HDTV20A User Manual Additional Certified Accessories for the VIZIO VP50 HDTV20A are sold separately Wall Mounts High Definition Cables Extra or replacement Remote VIZIO also offers Installation Services and Extended Warranty Services for your VIZIO VP50 HDTV20A To purchase or inquire about 500W, please use one with the correct power rating. Avoid installing the TV in landscape orientation; VIZIO offers professional installation services...
User Manual
Page 6
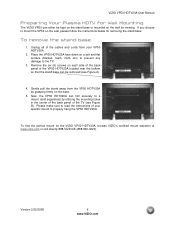
... back panel of the VP50 HDTV20A located near the bottom so that the stand base can be kept on the stand base or mounted on the base. 5. To find the perfect mount for viewing. VIZIO VP50 HDTV20A User Manual Preparing Your Plasma HDTV for Wall Mounting The VIZIO VP50 can firm securely to properly hang the VP50 HDTV20A. Remove the six (6) screws on the wall, please follow the instructions below for removing the stand base. Unplug all of the cables and cords from the VP50 HDTV20A...
... back panel of the VP50 HDTV20A located near the bottom so that the stand base can be kept on the stand base or mounted on the base. 5. To find the perfect mount for viewing. VIZIO VP50 HDTV20A User Manual Preparing Your Plasma HDTV for Wall Mounting The VIZIO VP50 can firm securely to properly hang the VP50 HDTV20A. Remove the six (6) screws on the wall, please follow the instructions below for removing the stand base. Unplug all of the cables and cords from the VP50 HDTV20A...
User Manual
Page 7
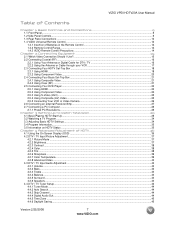
... VP50 HDTV20A User Manual Table of Contents Chapter 1 Basic Controls and Connections 9 1.1 Front Panel...9 1.2 Side Panel Controls...9 1.3 Rear Panel Connections ...10 1.4 VIZIO Universal Remote Control ...12 1.4.1 Insertion of Batteries in the Remote Control 14 1.4.2 Remote Control Range ...14 1.4.3 VIZIO Remote Control Precautions ...14 Chapter 2 Connecting Equipment 15 2.1 Which Video Connection Should I Use?...15 2.2 Connecting Coaxial (RF) ...16 2.2.1 Using Your Antenna or Digital Cable for DTV / TV 16 2.2.2 Using the Antenna or Cable through your VCR 17 2.3 Connecting Your HDTV Set...
... VP50 HDTV20A User Manual Table of Contents Chapter 1 Basic Controls and Connections 9 1.1 Front Panel...9 1.2 Side Panel Controls...9 1.3 Rear Panel Connections ...10 1.4 VIZIO Universal Remote Control ...12 1.4.1 Insertion of Batteries in the Remote Control 14 1.4.2 Remote Control Range ...14 1.4.3 VIZIO Remote Control Precautions ...14 Chapter 2 Connecting Equipment 15 2.1 Which Video Connection Should I Use?...15 2.2 Connecting Coaxial (RF) ...16 2.2.1 Using Your Antenna or Digital Cable for DTV / TV 16 2.2.2 Using the Antenna or Cable through your VCR 17 2.3 Connecting Your HDTV Set...

User Manual
Page 8
... Adjustment ...57 4.16 PC Input Setup ...57 4.17 Understanding Viewing Modes...58 4.17.1 Picture-In-Picture (PIP) Mode...59 4.17.2 Adjusting Basic PIP Settings ...59 4.17.3 Setting the Sleep Timer ...14 Chapter 5 Programming the VIZIO Universal Remote Control 60 5.1.1 Programming for VCR ...60 5.1.2 Programming for Cable Set-Top Box...60 5.1.3 Programming for DVD Player ...61 5.1.4 Searching for Component Codes ...61 5.2 Using a Cable or Satellite Remote ...61 Chapter 6 Maintenance and Troubleshooting 62 6.1 Maintenance...62 6.2 Troubleshooting Guide ...62 6.3 Telephone & Technical Support...
... Adjustment ...57 4.16 PC Input Setup ...57 4.17 Understanding Viewing Modes...58 4.17.1 Picture-In-Picture (PIP) Mode...59 4.17.2 Adjusting Basic PIP Settings ...59 4.17.3 Setting the Sleep Timer ...14 Chapter 5 Programming the VIZIO Universal Remote Control 60 5.1.1 Programming for VCR ...60 5.1.2 Programming for Cable Set-Top Box...60 5.1.3 Programming for DVD Player ...61 5.1.4 Searching for Component Codes ...61 5.2 Using a Cable or Satellite Remote ...61 Chapter 6 Maintenance and Troubleshooting 62 6.1 Maintenance...62 6.2 Troubleshooting Guide ...62 6.3 Telephone & Technical Support...

User Manual
Page 10
1.3 Rear Panel Connections Right Portion 1 3 VIZIO VP50 HDTV20A User Manual 2 4 1. AV3 (S-Video) IN - therefore, a set indicates this input. Plug-in mind that S-Video connections are only images signals; Speakers cannot be available on the rear of audio cables is selected for connection to hear the sound. The white color band on this connection. 2. Connect the audio output of the TV indicates this SPDIF Optical connector for viewing, the digital audio associated with s-video output, such as a DVD or video game to an external device, such as a home ...
1.3 Rear Panel Connections Right Portion 1 3 VIZIO VP50 HDTV20A User Manual 2 4 1. AV3 (S-Video) IN - therefore, a set indicates this input. Plug-in mind that S-Video connections are only images signals; Speakers cannot be available on the rear of audio cables is selected for connection to hear the sound. The white color band on this connection. 2. Connect the audio output of the TV indicates this SPDIF Optical connector for viewing, the digital audio associated with s-video output, such as a DVD or video game to an external device, such as a home ...
User Manual
Page 11
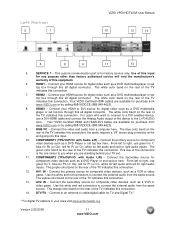
... 5 7 VIZIO VP50 HDTV20A User Manual 10 12 14 6 8 9 11 13 5. SERVICE 1 - This custom communication port is the one closer to connect the external audio from a computer here. Use of this connection. 14. HDMI1 - Connect your HDMI or DVI source for any purpose other than factory authorized service will void the manufacturer's warranty of this input for digital video such as a DVD multimedia player or set top box here. HDMI2 - Your VIZIO Certified HDMI cables are standing behind your TV set...
... 5 7 VIZIO VP50 HDTV20A User Manual 10 12 14 6 8 9 11 13 5. SERVICE 1 - This custom communication port is the one closer to connect the external audio from a computer here. Use of this connection. 14. HDMI1 - Connect your HDMI or DVI source for any purpose other than factory authorized service will void the manufacturer's warranty of this input for digital video such as a DVD multimedia player or set top box here. HDMI2 - Your VIZIO Certified HDMI cables are standing behind your TV set...
User Manual
Page 12
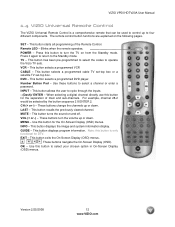
...a programmed cable TV set-top box or a satellite TV set-top box. This button recalls the previously viewed channel. These buttons turn the TV on from the Standby mode. This button displays the image and system information display. Version 2/25/2008 12 www.VIZIO.com The remote control button functions are explained on and off. SET - Remote LED - POWER - TV - VCR - DVD - This button selects a programmed DVD player. Use these buttons to the Standby mode. INPUT - CH (+ or -) - These buttons change the channels up or down . LAST - MENU - Use this button...
...a programmed cable TV set-top box or a satellite TV set-top box. This button recalls the previously viewed channel. These buttons turn the TV on from the Standby mode. This button displays the image and system information display. Version 2/25/2008 12 www.VIZIO.com The remote control button functions are explained on and off. SET - Remote LED - POWER - TV - VCR - DVD - This button selects a programmed DVD player. Use these buttons to the Standby mode. INPUT - CH (+ or -) - These buttons change the channels up or down . LAST - MENU - Use this button...
User Manual
Page 15
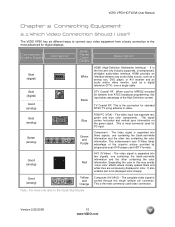
... between any audio/video source, such as a set-top box, DVD player, or A/V receiver and an audio and/or video monitor, such as a digital television (DTV), over S-Video takes advantage of the High Definition content. When used video connection. The complete video signal is the most advanced for PC input. Version 2/25/2008 15 www.VIZIO.com Connection Quality (type) Connector Rear Panel Color Codes Description Best (digital) Best (digital Good (analog) Best (analog) Better (analog) White Black Blue Green and Purple Good Red (analog) Good...
... between any audio/video source, such as a set-top box, DVD player, or A/V receiver and an audio and/or video monitor, such as a digital television (DTV), over S-Video takes advantage of the High Definition content. When used video connection. The complete video signal is the most advanced for PC input. Version 2/25/2008 15 www.VIZIO.com Connection Quality (type) Connector Rear Panel Color Codes Description Best (digital) Best (digital Good (analog) Best (analog) Better (analog) White Black Blue Green and Purple Good Red (analog) Good...

User Manual
Page 18
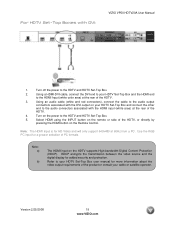
...). Select HDMI using the INPUT button on the remote or side of your HDTV Set-Top Box (Best): 1. Turn on the power to the HDTV and HDTV Set-Top Box. 2. Refer to the HDMI input of the product or consult your cable or satellite operator. Note: To maintain the display quality, use a VIZIO certified HDMI cable that have a HDMI digital interface should be connected to your HDTV Set-Top Box user manual for more information about the video output requirements of the Plasma HDTV for...
...). Select HDMI using the INPUT button on the remote or side of your HDTV Set-Top Box (Best): 1. Turn on the power to the HDTV and HDTV Set-Top Box. 2. Refer to the HDMI input of the product or consult your cable or satellite operator. Note: To maintain the display quality, use a VIZIO certified HDMI cable that have a HDMI digital interface should be connected to your HDTV Set-Top Box user manual for more information about the video output requirements of the Plasma HDTV for...
User Manual
Page 19
... HDMI input on the Remote Control. Turn on the remote or side of the HDTV. 3. Select HDMI using the INPUT button on the power to the HDTV and HDTV Set-Top Box. 2. HDCP encrypts the transmission between the video source and the digital display for more information about the video output requirements of the product or consult your HDTV Set-Top Box and connect the other end to the audio connectors associated with DVI: VIZIO VP50 HDTV20A User Manual 1. Using a HDMI-DVI cable, connect the DVI end to your HDTV Set...
... HDMI input on the Remote Control. Turn on the remote or side of the HDTV. 3. Select HDMI using the INPUT button on the power to the HDTV and HDTV Set-Top Box. 2. HDCP encrypts the transmission between the video source and the digital display for more information about the video output requirements of the product or consult your HDTV Set-Top Box and connect the other end to the audio connectors associated with DVI: VIZIO VP50 HDTV20A User Manual 1. Using a HDMI-DVI cable, connect the DVI end to your HDTV Set...

User Manual
Page 20
... connect the Set-Top Box to the Component 2 connections coded by pressing the Component button on the Remote Control. Using an audio cable (white and red connectors), connect the cable to the audio output connectors associated with the Component 1 input (green color area) at the rear of the product or consult your HDTV Set-Top Box to the corresponding Pb/Cb (blue color) connector in the Component 1 group (green color area - Refer to your HDTV Set-Top Box user manual for the Set-Top Box...
... connect the Set-Top Box to the Component 2 connections coded by pressing the Component button on the Remote Control. Using an audio cable (white and red connectors), connect the cable to the audio output connectors associated with the Component 1 input (green color area) at the rear of the product or consult your HDTV Set-Top Box to the corresponding Pb/Cb (blue color) connector in the Component 1 group (green color area - Refer to your HDTV Set-Top Box user manual for the Set-Top Box...
User Manual
Page 22
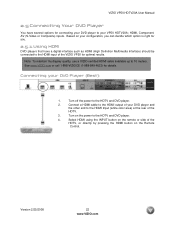
.... Connect a HDMI cable to the HDMI output of your DVD Player (Best): 1. Turn on the power to 10 meters. Version 2/25/2008 22 www.VIZIO.com Select HDMI using the INPUT button on the remote or side of the HDTV, or directly by pressing the HDMI button on your VP50 HDTV20A; Connecting your DVD player and the other end to the HDMI Input (white color area) at the rear of the HDTV. 3. VIZIO VP50 HDTV20A User Manual 2.5 Connecting Your DVD Player You have several options for connecting your DVD player to...
.... Connect a HDMI cable to the HDMI output of your DVD Player (Best): 1. Turn on the power to 10 meters. Version 2/25/2008 22 www.VIZIO.com Select HDMI using the INPUT button on the remote or side of the HDTV, or directly by pressing the HDMI button on your VP50 HDTV20A; Connecting your DVD player and the other end to the HDMI Input (white color area) at the rear of the HDTV. 3. VIZIO VP50 HDTV20A User Manual 2.5 Connecting Your DVD Player You have several options for connecting your DVD player to...
User Manual
Page 32
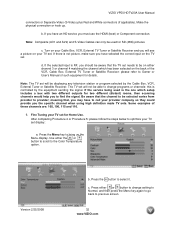
... b. Turn on your TV set display: a. Fine Tuning your Cable Box, VCR, External TV Tuner or Satellite Receiver and you to the Color Temperature option. Use either or button to change programs or channels; Press the button to previous screen. 32 www.VIZIO.com Press either the or button to scroll to find the signal. If you have an HD service you may have selected the correct input on your TV set...
... b. Turn on your TV set display: a. Fine Tuning your Cable Box, VCR, External TV Tuner or Satellite Receiver and you to the Color Temperature option. Use either or button to change programs or channels; Press the button to previous screen. 32 www.VIZIO.com Press either the or button to scroll to find the signal. If you have an HD service you may have selected the correct input on your TV set...
User Manual
Page 34
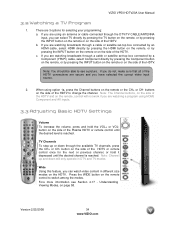
... Plasma HDTV or remote control until the desired channel is reached. There are watching a program using option 1a, press the Channel buttons on the remote, control will only operate in different size modes on the remote control to change the channel. When using HDMI, Component and AV inputs. 3.3 Adjusting Basic HDTV Settings Volume To increase the volume, press and hold it depressed until the desired level is reached. Note: The Channel buttons, on page 58. VIZIO VP50 HDTV20A User Manual 3.2 Watching a TV Program...
... Plasma HDTV or remote control until the desired channel is reached. There are watching a program using option 1a, press the Channel buttons on the remote, control will only operate in different size modes on the remote control to change the channel. When using HDMI, Component and AV inputs. 3.3 Adjusting Basic HDTV Settings Volume To increase the volume, press and hold it depressed until the desired level is reached. Note: The Channel buttons, on page 58. VIZIO VP50 HDTV20A User Manual 3.2 Watching a TV Program...
User Manual
Page 60
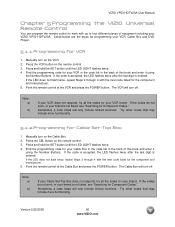
... www.VIZIO.com VIZIO VP50 HDTV20A User Manual Chapter 5 Programming the VIZIO Universal Remote Control You can program the remote control to work with the next code listed for Component Codes." Manually turn off . Note: a) b) If your VCR does not respond, try all the codes for your brand is not listed, see "Searching for Cable Set-Top Box 1. Press and hold the SET button until the LED LIGHT flashes twice. 4. If the code is accepted, the LED flashes twice after the last digit...
... www.VIZIO.com VIZIO VP50 HDTV20A User Manual Chapter 5 Programming the VIZIO Universal Remote Control You can program the remote control to work with the next code listed for Component Codes." Manually turn off . Note: a) b) If your VCR does not respond, try all the codes for your brand is not listed, see "Searching for Cable Set-Top Box 1. Press and hold the SET button until the LED LIGHT flashes twice. 4. If the code is accepted, the LED flashes twice after the last digit...

User Manual
Page 62
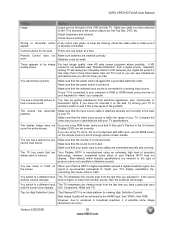
... the source of the failure. Problem Solution No power. No sound. Check your remote control Make sure that the power cable is removed from the socket before cleaning the TV. 2. Wring water out of the cloth before cleaning to the AC socket. The screen glass is seriously contaminated, use a soft cloth moistened with the following instructions. Check your audio connection Press MUTE on your input connections...
... the source of the failure. Problem Solution No power. No sound. Check your remote control Make sure that the power cable is removed from the socket before cleaning the TV. 2. Wring water out of the cloth before cleaning to the AC socket. The screen glass is seriously contaminated, use a soft cloth moistened with the following instructions. Check your audio connection Press MUTE on your input connections...
User Manual
Page 63
... connected to a different input The TV remembers the viewing mode from a digital source. If your audio input source cables are inherent to a different input The TV remembers the volume level from electrical appliances, cars, motorcycles, or hear unusual sound. Up- Solution output port on the remote control to the correct output your Plasma HDTV's digital capabilities exceed a digital broadcast signal, the the screen. Make sure that H Size and V Position in RGB or HDMI mode, press any colors (red, green, or blue...
... connected to a different input The TV remembers the viewing mode from a digital source. If your audio input source cables are inherent to a different input The TV remembers the volume level from electrical appliances, cars, motorcycles, or hear unusual sound. Up- Solution output port on the remote control to the correct output your Plasma HDTV's digital capabilities exceed a digital broadcast signal, the the screen. Make sure that H Size and V Position in RGB or HDMI mode, press any colors (red, green, or blue...
User Manual
Page 68
... Timer, 36 DTV Tuner Setup Auto Search, 35 Daylight Saving, 36 Skip Channel, 35 Time Zone, 36 Tuner Mode, 35 DVI Connecting your DVD Player, 19 Connecting your HDTV Set-Top Box, 16 G Glossary, 53 H HDMI Connecting your DVD Player, 19 Connecting your HDTV Set-Top Box, 15 HDMI Input Audio Adjustment, 41 Picture Adjustment, 41 Setup, 41 I Inputs Antenna, 3 Connectors, 13 Rear Label, 9 Installation Base removal, 5 Preparation, 5 Safety Instructions, 2 Wall Mounting, 5, 24 O OSD Brightness Adjustment, 52 Closed Caption Selection, 11 Color Adjustment, 13 Contrast Adjustment, 52 P Parental Control...
... Timer, 36 DTV Tuner Setup Auto Search, 35 Daylight Saving, 36 Skip Channel, 35 Time Zone, 36 Tuner Mode, 35 DVI Connecting your DVD Player, 19 Connecting your HDTV Set-Top Box, 16 G Glossary, 53 H HDMI Connecting your DVD Player, 19 Connecting your HDTV Set-Top Box, 15 HDMI Input Audio Adjustment, 41 Picture Adjustment, 41 Setup, 41 I Inputs Antenna, 3 Connectors, 13 Rear Label, 9 Installation Base removal, 5 Preparation, 5 Safety Instructions, 2 Wall Mounting, 5, 24 O OSD Brightness Adjustment, 52 Closed Caption Selection, 11 Color Adjustment, 13 Contrast Adjustment, 52 P Parental Control...

Service Manual
Page 4
... in HDTV, composite video, HDMI ;,Componet in auto adjust function for TV viewing 2. Power saving to show TV or VCR/DVD images 8. On Screen Display: user can define display mode (i.e. SG-0246 Picture In Picture (PIP) function to reduce consumption power too less than 1366x768 is magnified 7. Connectable to PC's analog RGB port 4. DO NOT COPY Page 1-1 File No. Built in TV channel selector for automatic adjument of screen display 6. Smoothing function enables display of...
... in HDTV, composite video, HDMI ;,Componet in auto adjust function for TV viewing 2. Power saving to show TV or VCR/DVD images 8. On Screen Display: user can define display mode (i.e. SG-0246 Picture In Picture (PIP) function to reduce consumption power too less than 1366x768 is magnified 7. Connectable to PC's analog RGB port 4. DO NOT COPY Page 1-1 File No. Built in TV channel selector for automatic adjument of screen display 6. Smoothing function enables display of...


