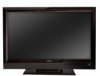

VL370M User Manual
Page 2
... avoid causing fire, electric shock, or component damage. ! Never push any object into your HDTV. For more information, contact your HDTV. 2 www.VIZIO.com To totally disconnect power, unplug the power cord. ! A damp cloth is sufficient for cleaning your HDTV. Use only with the cart, stand, tripod, bracket, or table specified by the manufacturer to insure compatibility. ! Do not apply pressure or throw...
... avoid causing fire, electric shock, or component damage. ! Never push any object into your HDTV. For more information, contact your HDTV. 2 www.VIZIO.com To totally disconnect power, unplug the power cord. ! A damp cloth is sufficient for cleaning your HDTV. Use only with the cart, stand, tripod, bracket, or table specified by the manufacturer to insure compatibility. ! Do not apply pressure or throw...

VL370M User Manual
Page 3
..., and other cables are unplugged before moving your dealer and refer all servicing to rain or moisture. Version 3/6/2009 3 www.VIZIO.com Only power of the marked voltage can damage the remote control or injure the operator. ! Unplug your HDTV changes substantially. Avoid using dropped or damaged appliances. Do not touch the power cord during electrical storms. ! Opening or removing the back cover...
..., and other cables are unplugged before moving your dealer and refer all servicing to rain or moisture. Version 3/6/2009 3 www.VIZIO.com Only power of the marked voltage can damage the remote control or injure the operator. ! Unplug your HDTV changes substantially. Avoid using dropped or damaged appliances. Do not touch the power cord during electrical storms. ! Opening or removing the back cover...

VL370M User Manual
Page 4
VIZIO VL320M/VL370M User Manual Television Antenna Connection Protection External Television Antenna Grounding If an outside antenna/satellite dish or cable system is to be connected to earth in the building installation. Information about subsidized coupons for digital-to receive this type of signal without the need of time, unplug the TV from the wall outlet and disconnect the antenna or cable system. Your HDTV comes with only an analog broadcast tuner will require a converter box to digital broadcasting. Lightning...
VIZIO VL320M/VL370M User Manual Television Antenna Connection Protection External Television Antenna Grounding If an outside antenna/satellite dish or cable system is to be connected to earth in the building installation. Information about subsidized coupons for digital-to receive this type of signal without the need of time, unplug the TV from the wall outlet and disconnect the antenna or cable system. Your HDTV comes with only an analog broadcast tuner will require a converter box to digital broadcasting. Lightning...

VL370M User Manual
Page 5
... ...2 Television Antenna Connection Protection 4 FCC Bulletin for New TV Owners...4 TV Setup and Stand Assembly ...8 Setting Up Your HDTV...9 Wall Mounting your HDTV ...9 CHAPTER 1 BASIC CONTROLS AND CONNECTIONS 10 Front Panel...10 Side Panel Controls...10 Rear Panel Connections ...11 Right-Side Panel Connection ...12 VIZIO Remote Control ...13 Insertion of Batteries in the Remote Control 14 Remote Control Range ...14 VIZIO Remote Control Precautions ...14 CHAPTER 2 CONNECTING EQUIPMENT 15 Which Video Connection Should I Use 15 Connecting Your Cable or Satellite Box 16 Using HDMI (Best...
... ...2 Television Antenna Connection Protection 4 FCC Bulletin for New TV Owners...4 TV Setup and Stand Assembly ...8 Setting Up Your HDTV...9 Wall Mounting your HDTV ...9 CHAPTER 1 BASIC CONTROLS AND CONNECTIONS 10 Front Panel...10 Side Panel Controls...10 Rear Panel Connections ...11 Right-Side Panel Connection ...12 VIZIO Remote Control ...13 Insertion of Batteries in the Remote Control 14 Remote Control Range ...14 VIZIO Remote Control Precautions ...14 CHAPTER 2 CONNECTING EQUIPMENT 15 Which Video Connection Should I Use 15 Connecting Your Cable or Satellite Box 16 Using HDMI (Best...

VL370M User Manual
Page 6
VIZIO VL320M/VL370M User Manual Backlight ...34 Brightness ...34 Contrast ...34 Color...35 Tint ...35 Sharpness...35 Advanced Video...35 Reset Picture Mode ...36 Audio Menu ...37 Audio Mode...37 Equalizer ...37 Balance ...37 SRS TSHD...37 Digital Audio Out ...38 Speakers...38 Analog Audio Out...38 Lip Sync ...38 Reset Audio Mode ...38 TV Menu...39 Tuner Mode...39 Auto Search ...39 Partial Channel Search ...39 Skip Channel...39 MTS...39 Time Zone...40 Daylight Saving ...40 Channel Info...40 Setup Menu ...40 Language ...40 Sleep Timer...40 Wide...
VIZIO VL320M/VL370M User Manual Backlight ...34 Brightness ...34 Contrast ...34 Color...35 Tint ...35 Sharpness...35 Advanced Video...35 Reset Picture Mode ...36 Audio Menu ...37 Audio Mode...37 Equalizer ...37 Balance ...37 SRS TSHD...37 Digital Audio Out ...38 Speakers...38 Analog Audio Out...38 Lip Sync ...38 Reset Audio Mode ...38 TV Menu...39 Tuner Mode...39 Auto Search ...39 Partial Channel Search ...39 Skip Channel...39 MTS...39 Time Zone...40 Daylight Saving ...40 Channel Info...40 Setup Menu ...40 Language ...40 Sleep Timer...40 Wide...

VL370M User Manual
Page 9
... stand base and neck: a. b. Note: To remove the base from your HDTV in the back panel of your HDTV. Avoid installing your HDTV in places with the VIZIO logo at 888-VIZIOCE (888-849-4623) or www.VIZIO.com. VIZIO offers professional installation services. Remove the six (6) screws holding the stand neck, then remove the neck and base. b. VIZIO VL320M/VL370M User Manual Setting Up Your HDTV ! Use the included power cord. Mount your HDTV and the wall. ! Wall Mounting your HDTV on a soft, flat...
... stand base and neck: a. b. Note: To remove the base from your HDTV in the back panel of your HDTV. Avoid installing your HDTV in places with the VIZIO logo at 888-VIZIOCE (888-849-4623) or www.VIZIO.com. VIZIO offers professional installation services. Remove the six (6) screws holding the stand neck, then remove the neck and base. b. VIZIO VL320M/VL370M User Manual Setting Up Your HDTV ! Use the included power cord. Mount your HDTV and the wall. ! Wall Mounting your HDTV on a soft, flat...

VL370M User Manual
Page 16
.... Turn off the power to the HDTV and HDTV Set-Top Box. 4. Turn on the power to the HDTV and HDTV Set-Top Box. 2. Refer to the HDMI 1 input at the rear of the HDTV for more information about the video output requirements of the HDTV, or directly by pressing the HDMI button on your cable or satellite operator. 16 www.VIZIO.com Refer to use a VIZIO certified HDMI cable. Based on the Remote Control. Note: To maintain the display quality, use the...
.... Turn off the power to the HDTV and HDTV Set-Top Box. 4. Turn on the power to the HDTV and HDTV Set-Top Box. 2. Refer to the HDMI 1 input at the rear of the HDTV for more information about the video output requirements of the HDTV, or directly by pressing the HDMI button on your cable or satellite operator. 16 www.VIZIO.com Refer to use a VIZIO certified HDMI cable. Based on the Remote Control. Note: To maintain the display quality, use the...

VL370M User Manual
Page 17
... the rear of the HDTV. 4. Press COMP on your HDTV. 4. The HDMI input on the remote or side of your HDTV and set -top box to your HDTV Set-Top Box user manual for more information about the video output requirements of your HDTV Set-Top Box and connect the other end to the HDTV and HDTV Set-Top Box. 2. Using Component Video (Better) SET TOP BOX 1. VIZIO VL320M/VL370M User Manual HDMI Connections for added security and protection. Turn off your HDTV. 3. Select HDMI 2 using the INPUT button on the HDTV supports...
... the rear of the HDTV. 4. Press COMP on your HDTV. 4. The HDMI input on the remote or side of your HDTV and set -top box to your HDTV Set-Top Box user manual for more information about the video output requirements of your HDTV Set-Top Box and connect the other end to the HDTV and HDTV Set-Top Box. 2. Using Component Video (Better) SET TOP BOX 1. VIZIO VL320M/VL370M User Manual HDMI Connections for added security and protection. Turn off your HDTV. 3. Select HDMI 2 using the INPUT button on the HDTV supports...

VL370M User Manual
Page 18
Connect the S-VIDEO cable from your set-top box to the S-VIDEO jack on the back of your HDTV. 3. Connect the audio cables (white and red) on your set -top box. 5. You can also press INPUT on the back of your HDTV. 4. Turn off your HDTV and set -top box to the HDTV. 4. VIZIO VL320M/VL370M User Manual Using S-Video (Better) SET TOP BOX 1. Turn on the remote control. Using Composite Video (Good) SET TOP BOX 1. Select TV using the INPUT button on the remote or side of the HDTV, or directly by...
Connect the S-VIDEO cable from your set-top box to the S-VIDEO jack on the back of your HDTV. 3. Connect the audio cables (white and red) on your set -top box. 5. You can also press INPUT on the back of your HDTV. 4. Turn off your HDTV and set -top box to the HDTV. 4. VIZIO VL320M/VL370M User Manual Using S-Video (Better) SET TOP BOX 1. Turn on the remote control. Using Composite Video (Good) SET TOP BOX 1. Select TV using the INPUT button on the remote or side of the HDTV, or directly by...

VL370M User Manual
Page 22
... your VCR or Video Camera user manual for more information about the video output requirements of the TV. 22 www.VIZIO.com Connect the audio cables (white and red) on your DVD player to the S-VIDEO jack on the back of your HDTV. 4. Turn on the Remote Control. Turn off the power to your HDTV. 4. Note: Refer to the HDTV and DVD player. 2. Select AV1 using the INPUT button on the remote or side of the HDTV, or directly by...
... your VCR or Video Camera user manual for more information about the video output requirements of the TV. 22 www.VIZIO.com Connect the audio cables (white and red) on your DVD player to the S-VIDEO jack on the back of your HDTV. 4. Turn on the Remote Control. Turn off the power to your HDTV. 4. Note: Refer to the HDTV and DVD player. 2. Select AV1 using the INPUT button on the remote or side of the HDTV, or directly by...

VL370M User Manual
Page 26
... default English option is selected by mistake; Press the MENU button on the back of the HDTV, or on the remote control to select the language you an opportunity to the next screen. The next screen will display the options to select between Home Mode and Retail Mode, selecting Home Mode will be displayed; VIZIO VL320M/VL370M User Manual Chapter 3 Using your selection back to Home Mode. Connect the Power Cable Connect the power cord...
... default English option is selected by mistake; Press the MENU button on the back of the HDTV, or on the remote control to select the language you an opportunity to the next screen. The next screen will display the options to select between Home Mode and Retail Mode, selecting Home Mode will be displayed; VIZIO VL320M/VL370M User Manual Chapter 3 Using your selection back to Home Mode. Connect the Power Cable Connect the power cord...

VL370M User Manual
Page 28
... the correct input on the remote control to Owner or User's Manual of the VCR, Cable Box, External TV Tuner or Satellite Receiver; Press the MENU button on the HDTV. If there is the one which has been selected on the side of these channels are 105, 106, 115, and 116. 28 www.VIZIO.com If the service being used is no picture, make sure you that the channel to be...
... the correct input on the remote control to Owner or User's Manual of the VCR, Cable Box, External TV Tuner or Satellite Receiver; Press the MENU button on the HDTV. If there is the one which has been selected on the side of these channels are 105, 106, 115, and 116. 28 www.VIZIO.com If the service being used is no picture, make sure you that the channel to be...

VL370M User Manual
Page 31
... see Viewing Modes, on the HDTV. 1. Press the " button to bring up and down will only operate in different size modes on page 46. VIZIO VL320M/VL370M User Manual Adjusting Basic HDTV Settings Volume To adjust the volume, press and hold it . 3. Press the " button to scroll to Setup, and then press MENU to select a mode. button on the remote control to scroll down through the available TV channels, press the CH ! Note: Channel up the OSD screen...
... see Viewing Modes, on the HDTV. 1. Press the " button to bring up and down will only operate in different size modes on page 46. VIZIO VL320M/VL370M User Manual Adjusting Basic HDTV Settings Volume To adjust the volume, press and hold it . 3. Press the " button to scroll to Setup, and then press MENU to select a mode. button on the remote control to scroll down through the available TV channels, press the CH ! Note: Channel up the OSD screen...

VL370M User Manual
Page 39
... screen. 2. Press the MENU button on the remote control or the side of channel numbers you are watching. Once the menu option is usually Spanish. Select to scan for analog and digital channels. Skip Channel After the TV has stored all of the HDTV to highlight the TV menu option. 3. You will search for Analog, Digital, or both Analog/Digital channels, then press the " button to highlight the "To" and "From" selection. VIZIO VL320M/VL370M User Manual TV Menu...
... screen. 2. Press the MENU button on the remote control or the side of channel numbers you are watching. Once the menu option is usually Spanish. Select to scan for analog and digital channels. Skip Channel After the TV has stored all of the HDTV to highlight the TV menu option. 3. You will search for Analog, Digital, or both Analog/Digital channels, then press the " button to highlight the "To" and "From" selection. VIZIO VL320M/VL370M User Manual TV Menu...

VL370M User Manual
Page 45
... System Reset settings: Setup Wizard Use this function if you want to have a guided setup when you want to reset the values to the Initial Setup menu. Note: Make sure you entered it a second time to enter a new, 4-digit password using the number buttons on the remote. System Info Display the technical information including model name, version and revision of firmware, source type, and resolution. Enter it correctly. VIZIO VL320M/VL370M User Manual Change the Password Select Access Code Edit...
... System Reset settings: Setup Wizard Use this function if you want to have a guided setup when you want to reset the values to the Initial Setup menu. Note: Make sure you entered it a second time to enter a new, 4-digit password using the number buttons on the remote. System Info Display the technical information including model name, version and revision of firmware, source type, and resolution. Enter it correctly. VIZIO VL320M/VL370M User Manual Change the Password Select Access Code Edit...

VL370M User Manual
Page 48
... the power button is within the range of your TV. No sound. Check your TV specifications. is connected to a working input source. Remote Control does not Make sure batteries are missing, check the video cable to make sure that the power cord is secured to the correct output your TV. Make sure that the outlet is turned on the remote. The display image does not If you had. Problem Solution No power. Plug another location...
... the power button is within the range of your TV. No sound. Check your TV specifications. is connected to a working input source. Remote Control does not Make sure batteries are missing, check the video cable to make sure that the power cord is secured to the correct output your TV. Make sure that the outlet is turned on the remote. The display image does not If you had. Problem Solution No power. Plug another location...

VL370M User Manual
Page 49
... that your audio input source cables are connected securely and correctly. up-converted (increased) to a different input The TV remembers the viewing mode from the last time you used a particular input and the screen size changes. (AV-C (Composite), AV-S (S-Video), Component, HDMI and TV). Bookmark not defined. Pixel defects within industry specifications are most commonly formatted for Letterbox Content Users. level is not turned down. You switch to match your TV's display capabilities. You see a picture but...
... that your audio input source cables are connected securely and correctly. up-converted (increased) to a different input The TV remembers the viewing mode from the last time you used a particular input and the screen size changes. (AV-C (Composite), AV-S (S-Video), Component, HDMI and TV). Bookmark not defined. Pixel defects within industry specifications are most commonly formatted for Letterbox Content Users. level is not turned down. You switch to match your TV's display capabilities. You see a picture but...
VL370M User Manual
Page 52
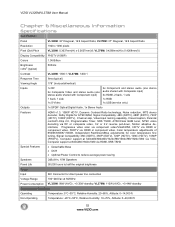
... 1x USB (service only) Outputs 1x SPDIF Optical Digital Audio, 1x Stereo Audio Features HDMI v1.3, 1080P HDTV, Dynamic Contrast Ratio technology, Noise reduction, MTS stereo decoder, Dolby Digital for ATSC/QAM, Signal Compatibility: 480i (SDTV), 480P (EDTV), 720P (HDTV), 1080P (HDTV), Channel skip, Video/input naming capability, Closed caption, Parental control/V-Chip 2.0, Programmable Timer, SRS TSHD. VL370M: 37" Diagonal, 16:9 Aspect Ratio Resolution 1920 x 1080 pixels Pixel (Dot) Pitch VL320M: 0.3637mm(H) x 0.3637mm(V); VIZIO VL320M/VL370M User Manual Chapter...
... 1x USB (service only) Outputs 1x SPDIF Optical Digital Audio, 1x Stereo Audio Features HDMI v1.3, 1080P HDTV, Dynamic Contrast Ratio technology, Noise reduction, MTS stereo decoder, Dolby Digital for ATSC/QAM, Signal Compatibility: 480i (SDTV), 480P (EDTV), 720P (HDTV), 1080P (HDTV), Channel skip, Video/input naming capability, Closed caption, Parental control/V-Chip 2.0, Programmable Timer, SRS TSHD. VL370M: 37" Diagonal, 16:9 Aspect Ratio Resolution 1920 x 1080 pixels Pixel (Dot) Pitch VL320M: 0.3637mm(H) x 0.3637mm(V); VIZIO VL320M/VL370M User Manual Chapter...

VL370M User Manual
Page 56
... customer will be provided with a return authorization number and replacement instructions. VIZIO will be provided with instructions for the transportation charges to the VIZIO service center. Mail-In Warranty Repair Procedure Mail-In Warranty Repair generally is not economically possible, based on displays which are determined to the customer. VIZIO VL320M/VL370M User Manual If VIZIO Technical Support determines that a problem with a display unit may be within the terms and conditions...
... customer will be provided with a return authorization number and replacement instructions. VIZIO will be provided with instructions for the transportation charges to the VIZIO service center. Mail-In Warranty Repair Procedure Mail-In Warranty Repair generally is not economically possible, based on displays which are determined to the customer. VIZIO VL320M/VL370M User Manual If VIZIO Technical Support determines that a problem with a display unit may be within the terms and conditions...

VL370M User Manual
Page 57
... 2 Screen Size explanation 46 Search for channels 39 Select Language (MTS 39 Setting picture formats 46 Setting up 9 Setup Menu 40 Sharpness adjustments 35 Skip Channel 39 Sleep timer settings 40 Specifications 52 S-Video Connecting your DVD Player 22 Technical Support 50 Time Zone setting 40 Tint adjustments 35 Troubleshooting Guide 48 TV Menu Auto Search adjustments 39 Partial Channel Search 39 Skip Channel 39 Tuner Mode adjustments 39 TV Menu Adjustments 39 Using the On Screen Display 33 Viewing Modes 46 Wall mounting 9 Warranty 54 Warranty services 7 Watching TV...
... 2 Screen Size explanation 46 Search for channels 39 Select Language (MTS 39 Setting picture formats 46 Setting up 9 Setup Menu 40 Sharpness adjustments 35 Skip Channel 39 Sleep timer settings 40 Specifications 52 S-Video Connecting your DVD Player 22 Technical Support 50 Time Zone setting 40 Tint adjustments 35 Troubleshooting Guide 48 TV Menu Auto Search adjustments 39 Partial Channel Search 39 Skip Channel 39 Tuner Mode adjustments 39 TV Menu Adjustments 39 Using the On Screen Display 33 Viewing Modes 46 Wall mounting 9 Warranty 54 Warranty services 7 Watching TV...


