

Quickstart Guide (English)
Page 2
... the polarized or grounding-type plug. Never spill liquids on your Unit. • When connected to a power outlet, power is used as radiators, heat registers, stoves, or other components to rain or moisture. Overloading can damage the remote control or injure the operator. • See the important note and rating located on your dealer. Unplug the power cord immediately and contact your...
... the polarized or grounding-type plug. Never spill liquids on your Unit. • When connected to a power outlet, power is used as radiators, heat registers, stoves, or other components to rain or moisture. Overloading can damage the remote control or injure the operator. • See the important note and rating located on your dealer. Unplug the power cord immediately and contact your...
Quickstart Guide (English)
Page 3
TABLE OF CONTENTS Package Contents 4 Controls & Connections 5 First-Time Setup 8 Using the Remote 15 Connecting with HDMI 16 LED Indicators 18 Programming the Sound Bar 21 Using Button Combinations 22 Bluetooth Pairing 23 Using Bluetooth Mode 24 Re-Linking the Subwoofer with the Sound Bar 25 Advanced Setup 26 Advanced Setup - HDMI 27 Wall-Mounting the Sound Bar 28 Wall-Mounting the Satellite Speakers 30 Help & Troubleshooting 33 One-Year Limited Warranty 34 Legal & Compliance 35
TABLE OF CONTENTS Package Contents 4 Controls & Connections 5 First-Time Setup 8 Using the Remote 15 Connecting with HDMI 16 LED Indicators 18 Programming the Sound Bar 21 Using Button Combinations 22 Bluetooth Pairing 23 Using Bluetooth Mode 24 Re-Linking the Subwoofer with the Sound Bar 25 Advanced Setup 26 Advanced Setup - HDMI 27 Wall-Mounting the Sound Bar 28 Wall-Mounting the Satellite Speakers 30 Help & Troubleshooting 33 One-Year Limited Warranty 34 Legal & Compliance 35

Quickstart Guide (English)
Page 5
AUX (1) Analog Audio In (Stereo RCA) AUX (2) Analog Audio In (Stereo 3.5mm) OPTICAL (4) Digital Optical Audio In DIGITAL (3) Coaxial In USB* (7) USB In 5 HDMI OUT (6) HDMI Out (ARC) HDMI IN (5) HDMI IN CONTROLS & CONNECTIONS Back of Sound Bar Power Port * Supports .WAV file format playback only.
AUX (1) Analog Audio In (Stereo RCA) AUX (2) Analog Audio In (Stereo 3.5mm) OPTICAL (4) Digital Optical Audio In DIGITAL (3) Coaxial In USB* (7) USB In 5 HDMI OUT (6) HDMI Out (ARC) HDMI IN (5) HDMI IN CONTROLS & CONNECTIONS Back of Sound Bar Power Port * Supports .WAV file format playback only.

Quickstart Guide (English)
Page 6
Bluetooth Input Hold to pair. (See 'Bluetooth Pairing' for more information.) Input Press to turn soundbar on or off. Top of Sound Bar 6 Volume Increase or decrease the loudness of the audio. Power Press to change the audio source.
Bluetooth Input Hold to pair. (See 'Bluetooth Pairing' for more information.) Input Press to turn soundbar on or off. Top of Sound Bar 6 Volume Increase or decrease the loudness of the audio. Power Press to change the audio source.
Quickstart Guide (English)
Page 8
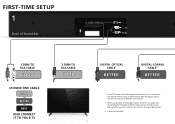
FIRST-TIME SETUP 1 Back of the Digital Inputs, if there is no audio: (A) try setting the TV output to PCM or (B) Connect directly to your other source, some TVs do not pass through digital audio. ‡ Cable not included. 8 To connect the Sound Bar directly to your Blu-ray/other devices (Blu-Ray player, game system, etc.) see your device's user manual. † When using either of Sound Bar 3.5MM TO RCA...
FIRST-TIME SETUP 1 Back of the Digital Inputs, if there is no audio: (A) try setting the TV output to PCM or (B) Connect directly to your other source, some TVs do not pass through digital audio. ‡ Cable not included. 8 To connect the Sound Bar directly to your Blu-ray/other devices (Blu-Ray player, game system, etc.) see your device's user manual. † When using either of Sound Bar 3.5MM TO RCA...

Quickstart Guide (English)
Page 9
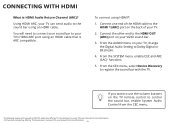
... audio: (A) try setting the TV output to PCM or (B) Connect directly to your Sound Bar. HDMI CABLE BEST HDMI cables send Video (Out) and receive Audio from the TV. Connect the Sound Bar to your device's user manual. 9 See the Connecting with HDMI section for First-Time Setup. See Advanced Setup if you would like to connect HDMI devices (such as Blu-ray™ players, cable boxes, and game consoles) to your TV* using the Digital Inputs...
... audio: (A) try setting the TV output to PCM or (B) Connect directly to your Sound Bar. HDMI CABLE BEST HDMI cables send Video (Out) and receive Audio from the TV. Connect the Sound Bar to your device's user manual. 9 See the Connecting with HDMI section for First-Time Setup. See Advanced Setup if you would like to connect HDMI devices (such as Blu-ray™ players, cable boxes, and game consoles) to your TV* using the Digital Inputs...

Quickstart Guide (English)
Page 14
.... 10 Turn your TV to Input 1, set the Sound Bar to switch between audio sources. For example, if you must do a Factory Reset or by gently sliding it away from the remote. 8 Top 9 Top Remove the battery cover by pressing and holding the Input button for an active input. Input Power You can press the INPUT button to Input 1. * Auto detect function only occurs once when the Sound Bar is detected...
.... 10 Turn your TV to Input 1, set the Sound Bar to switch between audio sources. For example, if you must do a Factory Reset or by gently sliding it away from the remote. 8 Top 9 Top Remove the battery cover by pressing and holding the Input button for an active input. Input Power You can press the INPUT button to Input 1. * Auto detect function only occurs once when the Sound Bar is detected...

Quickstart Guide (English)
Page 15
.../unmute. Enter/Play/Pause Press to turn on or off. Display Displays Sound Bar Settings Power Press to select an option. Previous Press to return to previous track. (Changes audio settings in Menu) Volume +/Press to increase and decrease volume. * Press and hold the INPUT button for 5 seconds to select previous input. USING THE REMOTE Input Press to change input source. (Press INPUT then Previous to activate the input auto detect function...
.../unmute. Enter/Play/Pause Press to turn on or off. Display Displays Sound Bar Settings Power Press to select an option. Previous Press to return to previous track. (Changes audio settings in Menu) Volume +/Press to increase and decrease volume. * Press and hold the INPUT button for 5 seconds to select previous input. USING THE REMOTE Input Press to change input source. (Press INPUT then Previous to activate the input auto detect function...
Quickstart Guide (English)
Page 16
... more information. 16 If you want to use with the TV. Using HDMI ARC, your TV, change the Digital Audio Setting to the sound bar using an HDMI cable. From the SYSTEM menu, enable CEC and ARC (SAC)† functions. 5. See your sound bar to register the sound bar with a VIZIO TV, steps may differ by TV manufacturer. You will need to connect your TV's user manual for use the volume buttons...
... more information. 16 If you want to use with the TV. Using HDMI ARC, your TV, change the Digital Audio Setting to the sound bar using an HDMI cable. From the SYSTEM menu, enable CEC and ARC (SAC)† functions. 5. See your sound bar to register the sound bar with a VIZIO TV, steps may differ by TV manufacturer. You will need to connect your TV's user manual for use the volume buttons...
Quickstart Guide (English)
Page 18
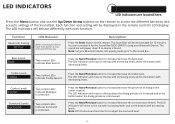
... to adjust the surround level. 18 You can now search for the Sound Bar (VIZIO SB4051) using your Bluetooth device into pairing mode prior to increase/decrease the presence of the Sound Bar. The LED indicators will behave differently with decreasing levels. The LED Indicators will move to the top when the dialog presence is decreased. Each function and setting will be displayed on the remote control...
... to adjust the surround level. 18 You can now search for the Sound Bar (VIZIO SB4051) using your Bluetooth device into pairing mode prior to increase/decrease the presence of the Sound Bar. The LED indicators will behave differently with decreasing levels. The LED Indicators will move to the top when the dialog presence is decreased. Each function and setting will be displayed on the remote control...
Quickstart Guide (English)
Page 19
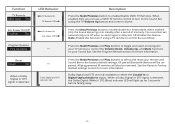
... speakers will lower bass frequency levels to the top with sleeping children). Press the Next/Previous button to activate the speaker test function. When enabled (On), the Sound Bar will be disabled. Press the Next/Previous button to enable/disable Night Mode. When enabled (On), TruVolume provides a consistent and comfortable volume level for apartment living and homes with increasing audio delay levels. Surround On/Off Surnd Surround...
... speakers will lower bass frequency levels to the top with sleeping children). Press the Next/Previous button to activate the speaker test function. When enabled (On), the Sound Bar will be disabled. Press the Next/Previous button to enable/disable Night Mode. When enabled (On), TruVolume provides a consistent and comfortable volume level for apartment living and homes with increasing audio delay levels. Surround On/Off Surnd Surround...
Quickstart Guide (English)
Page 20
... Remotes. All paired Bluetooth devices will also be unpaired. When a Dolby Digital or DTS signal is detected. All programmed IR remotes will be removed. Note: Enable this feature. See the Program Remote section for more information. When enabled (On), the Sound Bar will automatically turn on the Sound Bar (using a TV remote to control the Volume Down, Volume Up, and Mute functions on either the Coaxial In or Digital Optical Audio In inputs...
... Remotes. All paired Bluetooth devices will also be unpaired. When a Dolby Digital or DTS signal is detected. All programmed IR remotes will be removed. Note: Enable this feature. See the Program Remote section for more information. When enabled (On), the Sound Bar will automatically turn on the Sound Bar (using a TV remote to control the Volume Down, Volume Up, and Mute functions on either the Coaxial In or Digital Optical Audio In inputs...
Quickstart Guide (English)
Page 22
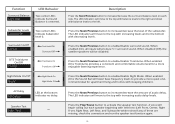
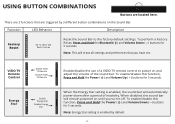
... Reset the Sound Bar to power on until you have set. Note: Energy Star setting is enabled, the sound bar will erase all settings and preferences that are triggered by default. 22 There are located here. Function LED Behavior Description Factory Reset All 12 LEDs will remain powered on and adjust the volume of inactivity. To perform a Factory Reset, Press and Hold the Bluetooth( ) and Volume...
... Reset the Sound Bar to power on until you have set. Note: Energy Star setting is enabled, the sound bar will erase all settings and preferences that are triggered by default. 22 There are located here. Function LED Behavior Description Factory Reset All 12 LEDs will remain powered on and adjust the volume of inactivity. To perform a Factory Reset, Press and Hold the Bluetooth( ) and Volume...
Quickstart Guide (English)
Page 23
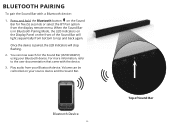
... Bluetooth Pairing Mode, the LED Indicators on the Display Panel on your source device and the Sound Bar. Bluetooth Device 23 Top of the Sound Bar will stop flashing. 2. Volume can now search for five (5) seconds or select the BT Pair option from your Bluetooth device. You can be controlled on the front of Sound Bar Press and hold the Bluetooth button on the Sound Bar for the Sound Bar (VIZIO SB4051) using...
... Bluetooth Pairing Mode, the LED Indicators on the Display Panel on your source device and the Sound Bar. Bluetooth Device 23 Top of the Sound Bar will stop flashing. 2. Volume can now search for five (5) seconds or select the BT Pair option from your Bluetooth device. You can be controlled on the front of Sound Bar Press and hold the Bluetooth button on the Sound Bar for the Sound Bar (VIZIO SB4051) using...

Quickstart Guide (English)
Page 24
... cannot operate as you stay within range of -sight between the Sound Bar and the source device. • Other wireless devices can damage your device's documentation for a smartphone. Turning off or moving these devices may lose some integrity when compared to a wired connection. High volume levels can affect Bluetooth range, including wireless security cameras, wireless video baby monitors, cordless phones, and microwave ovens. USING BLUETOOTH MODE Your Sound Bar supports music...
... cannot operate as you stay within range of -sight between the Sound Bar and the source device. • Other wireless devices can damage your device's documentation for a smartphone. Turning off or moving these devices may lose some integrity when compared to a wired connection. High volume levels can affect Bluetooth range, including wireless security cameras, wireless video baby monitors, cordless phones, and microwave ovens. USING BLUETOOTH MODE Your Sound Bar supports music...

Quickstart Guide (English)
Page 25
.... However, they may need to blink. Turn off your TV speakers when programming your sound bar. 1 2 Top of the sound bar for 5 seconds. The LED indicators on the top of Sound Bar First confirm that the power switch is now linked with the sound bar by VIZIO. The subwoofer is in the ON position. RE-LINKING THE SUBWOOFER WITH THE SOUND BAR The subwoofer has already been paired with the sound bar. 25
.... However, they may need to blink. Turn off your TV speakers when programming your sound bar. 1 2 Top of the sound bar for 5 seconds. The LED indicators on the top of Sound Bar First confirm that the power switch is now linked with the sound bar by VIZIO. The subwoofer is in the ON position. RE-LINKING THE SUBWOOFER WITH THE SOUND BAR The subwoofer has already been paired with the sound bar. 25
Quickstart Guide (English)
Page 27
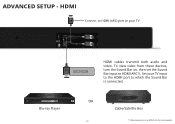
Set your TV input to the HDMI port to HDMI (ARC) port on , then set the Sound Bar input to HDMI-ARC 5. To view video from the ones supplied. HDMI Connect to which the Sound Bar is connected. Blu-ray Player OR 27 Cable/Satellite Box * Cables appearance may differ from these devices, turn the Sound Bar on your TV HDMI CABLE HDMI cables transmit both audio and video. ADVANCED SETUP -
Set your TV input to the HDMI port to HDMI (ARC) port on , then set the Sound Bar input to HDMI-ARC 5. To view video from the ones supplied. HDMI Connect to which the Sound Bar is connected. Blu-ray Player OR 27 Cable/Satellite Box * Cables appearance may differ from these devices, turn the Sound Bar on your TV HDMI CABLE HDMI cables transmit both audio and video. ADVANCED SETUP -

Quickstart Guide (English)
Page 33
... not, the problem may be with new ones. • Point the remote directly at the center of your source device is turned up and that the audio output setting is set to see if the buzzing persists. There is working . • Replace the remote batteries with the original device. • Connect your device to a different input on your Sound Bar. • Ensure the power cord is securely connected. • Plug a different device...
... not, the problem may be with new ones. • Point the remote directly at the center of your source device is turned up and that the audio output setting is set to see if the buzzing persists. There is working . • Replace the remote batteries with the original device. • Connect your device to a different input on your Sound Bar. • Ensure the power cord is securely connected. • Plug a different device...
Quickstart Guide (English)
Page 34
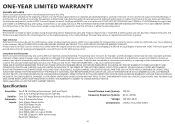
... VIZIO's option and sole discretion. Specifications Sound Bar: Satellite: Subwoofer: Inputs: Two 2.75" Full-Range Transducers (Left and Right) One 2.75" Full-Range Transducer (Center) One 2.5" High-Efficiency Full-Range Transducer (Each Satellite) One 6" Subwoofer Driver One 3.5mm Stereo Audio One RCA Stereo Audio One Optical (Toslink) One Digital Coaxial Audio One HDMI (ARC on output HDMI) One USB (Supports .WAV format only) Bluetooth (Wireless) Sound Pressure Level (System): 102 dB Frequency Response...
... VIZIO's option and sole discretion. Specifications Sound Bar: Satellite: Subwoofer: Inputs: Two 2.75" Full-Range Transducers (Left and Right) One 2.75" Full-Range Transducer (Center) One 2.5" High-Efficiency Full-Range Transducer (Each Satellite) One 6" Subwoofer Driver One 3.5mm Stereo Audio One RCA Stereo Audio One Optical (Toslink) One Digital Coaxial Audio One HDMI (ARC on output HDMI) One USB (Supports .WAV format only) Bluetooth (Wireless) Sound Pressure Level (System): 102 dB Frequency Response...

Quickstart Guide (English)
Page 35
...rating. Other: Image(s) used in a particular installation. All Rights Reserved. DTS, the Symbol, & DTS and the Symbol together are registered trademarks, and DTS Digital Surround is a trademark of DTS, Inc. © DTS, Inc. Shielded interface cables and AC power cord, if any, must be installed and operated with the limits for a Class B digital device, pursuant to Part... against harmful interference in which the receiver is connected. 4. DTS, the Symbol, & DTS and the Symbol together are registered trademarks, and DTS Studio Sound is no guarantee that may not ...
...rating. Other: Image(s) used in a particular installation. All Rights Reserved. DTS, the Symbol, & DTS and the Symbol together are registered trademarks, and DTS Digital Surround is a trademark of DTS, Inc. © DTS, Inc. Shielded interface cables and AC power cord, if any, must be installed and operated with the limits for a Class B digital device, pursuant to Part... against harmful interference in which the receiver is connected. 4. DTS, the Symbol, & DTS and the Symbol together are registered trademarks, and DTS Studio Sound is no guarantee that may not ...


