
SB4021E-A0 Quick Start Guide
Page 2
...device shall remain readily operable. The exclamation point within defined design limits, and misuse may cause the battery to leak which can damage the remote control or injure the operator. • If any heat sources such as vases, shall be sure these instructions. 2. IMPORTANT SAFETY INFORMATION Your .... 6. WARNING: To reduce the risk of fire or electric shock, do not touch the connector with wet hands. • Insert the remote control battery in this apparatus near your dealer for an extended period of time, unplug the power cord. • To reduce risk of electric shock...
...device shall remain readily operable. The exclamation point within defined design limits, and misuse may cause the battery to leak which can damage the remote control or injure the operator. • If any heat sources such as vases, shall be sure these instructions. 2. IMPORTANT SAFETY INFORMATION Your .... 6. WARNING: To reduce the risk of fire or electric shock, do not touch the connector with wet hands. • Insert the remote control battery in this apparatus near your dealer for an extended period of time, unplug the power cord. • To reduce risk of electric shock...
SB4021E-A0 Quick Start Guide
Page 3
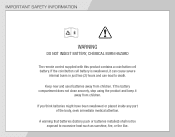
... not be exposed to death. Keep new and used batteries away from children. IMPORTANT SAFETY INFORMATION WARNING DO NOT INGEST BATTERY, CHEMICAL BURN HAZARD The remote control supplied with this product contains a coin/button cell battery. If the coin/button cell battery is swallowed, it away from children.
... not be exposed to death. Keep new and used batteries away from children. IMPORTANT SAFETY INFORMATION WARNING DO NOT INGEST BATTERY, CHEMICAL BURN HAZARD The remote control supplied with this product contains a coin/button cell battery. If the coin/button cell battery is swallowed, it away from children.

SB4021E-A0 Quick Start Guide
Page 5
MUTE SUB + SRS TVOL SRS TSHD Remote Control with Wireless Subwoofer Power Adapter w/Cable for Subwoofer Wall Mount Brackets Stereo RCA to 3.5mm Audio Cable Cables may vary slightly from those shown. PACKAGE CONTENTS Sound Bar with Battery MODEL SB4021E-A0 VIZIO QUICK START GUIDE This Quick Start Guide Power Cable for Sound Bar Wall Mount Template SUB -
MUTE SUB + SRS TVOL SRS TSHD Remote Control with Wireless Subwoofer Power Adapter w/Cable for Subwoofer Wall Mount Brackets Stereo RCA to 3.5mm Audio Cable Cables may vary slightly from those shown. PACKAGE CONTENTS Sound Bar with Battery MODEL SB4021E-A0 VIZIO QUICK START GUIDE This Quick Start Guide Power Cable for Sound Bar Wall Mount Template SUB -
SB4021E-A0 Quick Start Guide
Page 11
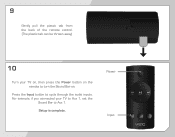
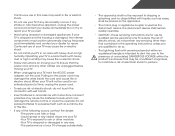
For example, if you connected your TV on, then press the Power button on the remote to turn the Sound Bar on. MUTE SUB + SRS TVOL SRS TSHD Power Input SUB - Setup is complete. Press the Input button to Aux 1. 9 Gently pull the plastic tab from the back of the remote control. (The plastic tab can be thrown away) 10 Turn your TV to Aux 1, set the Sound Bar to cycle through the audio inputs.
For example, if you connected your TV on, then press the Power button on the remote to turn the Sound Bar on. MUTE SUB + SRS TVOL SRS TSHD Power Input SUB - Setup is complete. Press the Input button to Aux 1. 9 Gently pull the plastic tab from the back of the remote control. (The plastic tab can be thrown away) 10 Turn your TV to Aux 1, set the Sound Bar to cycle through the audio inputs.
SB4021E-A0 Quick Start Guide
Page 17
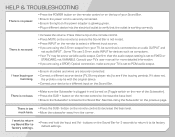
... audio OUTPUT and not audio INPUT. If it to its factory default settings. See Re-Linking the Subwoofer on the previous page. button on the remote control to factory settings. • Press and hold the Input and Vol - buttons on the Sound Bar for devices such as computers. • Your...to PCM audio output. HELP & TROUBLESHOOTING There is no power. • Press the POWER button on the remote control or on the top of the Subwoofer). • Press the SUB + button on the remote control to increase the bass level. • Ensure the Subwoofer is linked to the Sound Bar. There is ...
... audio OUTPUT and not audio INPUT. If it to its factory default settings. See Re-Linking the Subwoofer on the previous page. button on the remote control to factory settings. • Press and hold the Input and Vol - buttons on the Sound Bar for devices such as computers. • Your...to PCM audio output. HELP & TROUBLESHOOTING There is no power. • Press the POWER button on the remote control or on the top of the Subwoofer). • Press the SUB + button on the remote control to increase the bass level. • Ensure the Subwoofer is linked to the Sound Bar. There is ...
SB4021E-A0 Data Sheet
Page 2
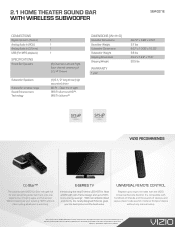
... one experience, bringing apps and full-screen Web browsing to same size LCD HDTVs lighted with the VIZIO Universal Remote Control. With remarkable detail and clarity, the newly designed E-Series gives you 're watching. E-SERIES TV UNIVERSAL REMOTE CONTROL Introducing the new E-series LED HDTVs. 2.1 HOME THEATER SOUND BAR WITH WIRELESS SUBWOOFER SB4021E CONNECTIONS Digital...
... one experience, bringing apps and full-screen Web browsing to same size LCD HDTVs lighted with the VIZIO Universal Remote Control. With remarkable detail and clarity, the newly designed E-Series gives you 're watching. E-SERIES TV UNIVERSAL REMOTE CONTROL Introducing the new E-series LED HDTVs. 2.1 HOME THEATER SOUND BAR WITH WIRELESS SUBWOOFER SB4021E CONNECTIONS Digital...
E502AR User Manual
Page 5
... moisture. - Incorrect polarities may cause the batteries to repair your TV in an area with instructions. Do not try to leak which can damage the remote control or injure the operator. If your TV is dropped and the housing is intended to alert the user to the h presence of uninsulated DANGEROUS VOLTAGE...
... moisture. - Incorrect polarities may cause the batteries to repair your TV in an area with instructions. Do not try to leak which can damage the remote control or injure the operator. If your TV is dropped and the housing is intended to alert the user to the h presence of uninsulated DANGEROUS VOLTAGE...
E502AR User Manual
Page 7
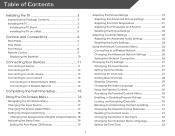
... the Package Contents 3 Installing the TV 3 Installing the TV Stand 3 Installing the TV on a Wall 5 Controls and Connections 6 Rear Panel 6 Side Panel 7 Front Panel 8 Remote Control 9 Replacing the Batteries 10 Connecting Your Devices 11 Connecting A Device 11 Connecting A PC 12 Connecting an audio device...for Channels 27 Adding New Channels 28 Skipping Channels 29 Changing the Audio Language 29 Using the Parental Controls 30 Accessing the Parental Controls Menu 30 Enabling or Disabling Program Ratings 30 Locking and Unlocking Channels 30 Blocking and Unblocking Content by...
... the Package Contents 3 Installing the TV 3 Installing the TV Stand 3 Installing the TV on a Wall 5 Controls and Connections 6 Rear Panel 6 Side Panel 7 Front Panel 8 Remote Control 9 Replacing the Batteries 10 Connecting Your Devices 11 Connecting A Device 11 Connecting A PC 12 Connecting an audio device...for Channels 27 Adding New Channels 28 Skipping Channels 29 Changing the Audio Language 29 Using the Parental Controls 30 Accessing the Parental Controls Menu 30 Enabling or Disabling Program Ratings 30 Locking and Unlocking Channels 30 Blocking and Unblocking Content by...

E502AR User Manual
Page 9
Your TV can still fall over . Use the images below to ensure nothing is not properly secured VIZIO LCD HDTV MODELS n E502AR VIZIO QUICK START GUIDE SMART TV FULL USER MANUAL AVAILABLE AT VIZIO.COM Quick Start Guide Remote Control with Batteries Package Contents 3 TV on Stand However, the TV can be installed in two ways...
Your TV can still fall over . Use the images below to ensure nothing is not properly secured VIZIO LCD HDTV MODELS n E502AR VIZIO QUICK START GUIDE SMART TV FULL USER MANUAL AVAILABLE AT VIZIO.COM Quick Start Guide Remote Control with Batteries Package Contents 3 TV on Stand However, the TV can be installed in two ways...
E502AR User Manual
Page 15
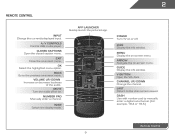
Back Go to manually enter a digital sub-channel. (For example, 18-4 or 18-5.) Remote Control 9 Wide Switch the display mode. Info Display the info window. Dash Use with number pad to the previous on-screen menu. Number Pad Manually enter a ... -screen menu. Volume Up/Down Increase or decrease loudness of the audio. App launcher Quickly launch the pictured app. Channel Up/Down Change the channel. 2 Remote Control Input Change the currently-displayed input. Menu Display the on -screen menu. V Button Open the VIA dock. Closed Captions Open the closed caption menu. Ok...
Back Go to manually enter a digital sub-channel. (For example, 18-4 or 18-5.) Remote Control 9 Wide Switch the display mode. Info Display the info window. Dash Use with number pad to the previous on-screen menu. Number Pad Manually enter a ... -screen menu. Volume Up/Down Increase or decrease loudness of the audio. App launcher Quickly launch the pictured app. Channel Up/Down Change the channel. 2 Remote Control Input Change the currently-displayed input. Menu Display the on -screen menu. V Button Open the VIA dock. Closed Captions Open the closed caption menu. Ok...
E502AR User Manual
Page 16
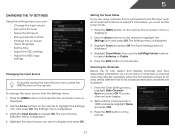
Replace the battery cover. • Use only good quality batteries. • Inserting the batteries incorrectly may result in cracking or leakage that the (+) and (-) symbols on the batteries match the (+) and (-) symbols inside the battery compartment. 3. Replacing the Batteries 10 Insert two batteries into the remote control. 2 Replacing the Batteries 1. Make sure that may cause a fire or result in injury. • Dispose of old or dead batteries in accordance with local hazardous waste regulations. • Keep batteries away from children and pets. Remove the battery cover. 2.
Replace the battery cover. • Use only good quality batteries. • Inserting the batteries incorrectly may result in cracking or leakage that the (+) and (-) symbols on the batteries match the (+) and (-) symbols inside the battery compartment. 3. Replacing the Batteries 10 Insert two batteries into the remote control. 2 Replacing the Batteries 1. Make sure that may cause a fire or result in injury. • Dispose of old or dead batteries in accordance with local hazardous waste regulations. • Keep batteries away from children and pets. Remove the battery cover. 2.
E502AR User Manual
Page 27
...film. Adjusts the position of brightness. 5 Color, Grn/Flesh, and Grn/Blue. • Adaptive Luma - Select Auto or Off. • Backlight Control - From the Picture Menu, use as a PC monitor. • Normal is displayed. 3. When you have finished adjusting the color temperature, press the... EXIT button on the remote. Select Off, Low, Medium, or High. 4. Select Off, Low, Medium, Strong, or Extend. • Film Mode - To adjust the color ...
...film. Adjusts the position of brightness. 5 Color, Grn/Flesh, and Grn/Blue. • Adaptive Luma - Select Auto or Off. • Backlight Control - From the Picture Menu, use as a PC monitor. • Normal is displayed. 3. When you have finished adjusting the color temperature, press the... EXIT button on the remote. Select Off, Low, Medium, or High. 4. Select Off, Low, Medium, Strong, or Extend. • Film Mode - To adjust the color ...
E502AR User Manual
Page 30
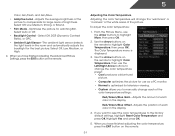
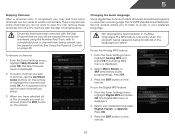
... you have finished adjusting the advanced audio settings, press the EXIT button on the remote. 5 Resetting the Audio Settings To reset the audio settings to control the external speakers' volume from the TV's volume controls, or select Fixed to the factory default settings: 1. Highlight Yes and press OK... Audio Settings to highlight Reset Audio Mode and press OK. The on the remote. 24 Use the Arrow buttons on the remote. The Advanced Audio menu is displayed. 3. Sets the volume control properties for the Optical output when connected to highlight Advanced Audio, then press OK...
... you have finished adjusting the advanced audio settings, press the EXIT button on the remote. 5 Resetting the Audio Settings To reset the audio settings to control the external speakers' volume from the TV's volume controls, or select Fixed to the factory default settings: 1. Highlight Yes and press OK... Audio Settings to highlight Reset Audio Mode and press OK. The on the remote. 24 Use the Arrow buttons on the remote. The Advanced Audio menu is displayed. 3. Sets the volume control properties for the Optical output when connected to highlight Advanced Audio, then press OK...
E502AR User Manual
Page 33
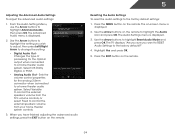
...display channels and their associated information, you want to display and press OK. Highlight Input Source and press OK. Press the MENU button on the remote. A channel scan may also be necessary when the TV has been moved to an area where different free-to select Antenna or Cable. 5. From...; Set up the TV tuner • Name the TV inputs • Set up parental controls • Change the on-screen menu language • Set the time • Adjust the CEC settings • Adjust the VIZIO logo settings Changing the Input Source To quickly access the Input Source menu, press the INPUT...
...display channels and their associated information, you want to display and press OK. Highlight Input Source and press OK. Press the MENU button on the remote. A channel scan may also be necessary when the TV has been moved to an area where different free-to select Antenna or Cable. 5. From...; Set up the TV tuner • Name the TV inputs • Set up parental controls • Change the on-screen menu language • Set the time • Adjust the CEC settings • Adjust the VIZIO logo settings Changing the Input Source To quickly access the Input Source menu, press the INPUT...
E502AR User Manual
Page 35
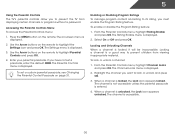
...the Digital MTS feature: 1. Press OK. 3. There may find that have selected all programs are too weak to remove, use the parental controls. You can still be some channels are broadcast in more than one language.The TV's MTS (Multichannel Television Sound) feature allows you wish to... a channel: 1. Select Mono, Stereo, or SAP (secondary audio programming). Press the EXIT button on the remote. 29 Select your preferred language. See Using the Parental Controls on the remote to audio in the language you select. An X appears to the right of the channels you wish to ...
...the Digital MTS feature: 1. Press OK. 3. There may find that have selected all programs are too weak to remove, use the parental controls. You can still be some channels are broadcast in more than one language.The TV's MTS (Multichannel Television Sound) feature allows you wish to... a channel: 1. Select Mono, Stereo, or SAP (secondary audio programming). Press the EXIT button on the remote. 29 Select your preferred language. See Using the Parental Controls on the remote to audio in the language you select. An X appears to the right of the channels you wish to ...
E502AR User Manual
Page 36
...prevent the TV from viewing inappropriate material. 5 Using the Parental Controls The TV's parental controls allow you must enable the Program Rating feature. Press the MENU button on -screen menu is entered. 4. The on the remote. Use the Arrow buttons on page 31. Enter your parental... or disable the Program Rating feature: 1. From the Parental Controls menu, highlight Channel Locks and press OK. Highlight the channel you have not set a custom parental passcode, see Changing the Parental Control Passcode on the remote to lock or unlock and press OK. 3. The channel is...
...prevent the TV from viewing inappropriate material. 5 Using the Parental Controls The TV's parental controls allow you must enable the Program Rating feature. Press the MENU button on -screen menu is entered. 4. The on the remote. Use the Arrow buttons on page 31. Enter your parental... or disable the Program Rating feature: 1. From the Parental Controls menu, highlight Channel Locks and press OK. Highlight the channel you have not set a custom parental passcode, see Changing the Parental Control Passcode on the remote to lock or unlock and press OK. 3. The channel is...
E502AR User Manual
Page 39
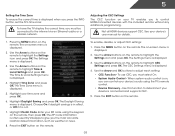
.... 3. To enable, disable, or adjust CEC settings: 1. When system audio control is on, you must select On. • System Audio Control - Use this function to control HDMI-connected devices with the included remote without any additional programming. 5 Setting the Time Zone To ensure the correct time.... 7. Choose On if daylight savings is in effect, or Off if it is displayed. 4. Enter your ZIP code using the TV's remote control. • Device Discovery - The Time & Local Settings menu is displayed. To use CEC, you must be connected to highlight the Settings...
.... 3. To enable, disable, or adjust CEC settings: 1. When system audio control is on, you must select On. • System Audio Control - Use this function to control HDMI-connected devices with the included remote without any additional programming. 5 Setting the Time Zone To ensure the correct time.... 7. Choose On if daylight savings is in effect, or Off if it is displayed. 4. Enter your ZIP code using the TV's remote control. • Device Discovery - The Time & Local Settings menu is displayed. To use CEC, you must be connected to highlight the Settings...
E502AR User Manual
Page 52
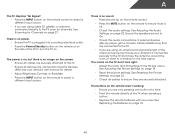
...A The TV displays "No Signal." • Press the INPUT button on page 23. See Adjusting the Audio Settings on the remote control to select a different input source. • If you are securely attached. Ensure your device's user manual for channels. see ...to ensure they are using an antenna, the signal strength of the TV to turn the TV on the remote to ensure mute is connected securely to the TV and move the antenna around the room or close to...on, but there is no sound. • Press Volume Up on the remote control. • Press the MUTE button on . Devices differ;
...A The TV displays "No Signal." • Press the INPUT button on page 23. See Adjusting the Audio Settings on the remote control to select a different input source. • If you are securely attached. Ensure your device's user manual for channels. see ...to ensure they are using an antenna, the signal strength of the TV to turn the TV on the remote to ensure mute is connected securely to the TV and move the antenna around the room or close to...on, but there is no sound. • Press Volume Up on the remote control. • Press the MUTE button on . Devices differ;
E502AR Quick Start Guide
Page 2
... component damage. • A distance of at your TV yourself. To reduce the risk of uninsulated DANGEROUS VOLTAGE within defined design limits. Overloading can damage the remote control or injure the operator. Do not expose your TV away from being damaged, the following occurs, contact the dealer: - Doing so could short circuit parts...
... component damage. • A distance of at your TV yourself. To reduce the risk of uninsulated DANGEROUS VOLTAGE within defined design limits. Overloading can damage the remote control or injure the operator. Do not expose your TV away from being damaged, the following occurs, contact the dealer: - Doing so could short circuit parts...

E502AR Quick Start Guide
Page 4
PACKAGE CONTENTS VIZIO HDTV with Stand Remote Control with Batteries This Quick Start Guide HELP VIZIO REDUCE PAPER WASTE. DOWNLOAD THE FULL USER MANUAL AT VIZIO.COM/SUPPORT
PACKAGE CONTENTS VIZIO HDTV with Stand Remote Control with Batteries This Quick Start Guide HELP VIZIO REDUCE PAPER WASTE. DOWNLOAD THE FULL USER MANUAL AT VIZIO.COM/SUPPORT


