
Service Manual
Page 8
Chapter 3 On Screen Display Main unit button POWER MENU ▲ ▼ VOL-/W VOL+/X INPUT OSD Adjustment Mode Image Settings Picture Mode(User, Vivid, VIDEO Movie, Game, Sport) Brightness(0~100) Contrast(0~100) VIDEO Saturation(0~100) VIDEO Hue(-50~50) VIDEO Sharpness(0~24) Advanced VIDEO Noise Reduction VIDEO Motion(0~16) VIDEO Digital(0~64) VIDEO Fleshtone Off...
Chapter 3 On Screen Display Main unit button POWER MENU ▲ ▼ VOL-/W VOL+/X INPUT OSD Adjustment Mode Image Settings Picture Mode(User, Vivid, VIDEO Movie, Game, Sport) Brightness(0~100) Contrast(0~100) VIDEO Saturation(0~100) VIDEO Hue(-50~50) VIDEO Sharpness(0~24) Advanced VIDEO Noise Reduction VIDEO Motion(0~16) VIDEO Digital(0~64) VIDEO Fleshtone Off...

Service Manual
Page 26
...) is low the LED is Yellow (Close power) when FLI8532 (VPCON) is high the LED is Yellow and Green. SG-0173 They are "Power, Source, MENU keys and LED. 1.The power key controls video processor FLI8532, FLI8532 will be reader by FLI8532 through internal ADC to indicate the status of the...
...) is low the LED is Yellow (Close power) when FLI8532 (VPCON) is high the LED is Yellow and Green. SG-0173 They are "Power, Source, MENU keys and LED. 1.The power key controls video processor FLI8532, FLI8532 will be reader by FLI8532 through internal ADC to indicate the status of the...
User Manual
Page 2
...VIZIO Universal Remote Control 33 3.7.2 - Using a Cable Box or Satellite Box Remote 36 Chapter 4 - Telephone & Technical Support ...39 4.4 - Image Sticking...3 1.5 - Front Panel Controls ...7 1.8 - Rear Panel... VIZIO Universal Remote Control 12 Chapter 2 - Maintenance and Troubleshooting 37 4.1 - Turning your Plasma ...Menu Operations...24 3.5.2 - Maintenance ...37 4.2 - Standard Definitions 46 Version - 5/24/2005 1 www.vizioce.com Before Use ...2 1.2 - Package Contents...6 1.7 - Key Remote Control Functions 10 1.10.2 - Getting Started ...21 3.1 - Preparing the Plasma...
...VIZIO Universal Remote Control 33 3.7.2 - Using a Cable Box or Satellite Box Remote 36 Chapter 4 - Telephone & Technical Support ...39 4.4 - Image Sticking...3 1.5 - Front Panel Controls ...7 1.8 - Rear Panel... VIZIO Universal Remote Control 12 Chapter 2 - Maintenance and Troubleshooting 37 4.1 - Turning your Plasma ...Menu Operations...24 3.5.2 - Maintenance ...37 4.2 - Standard Definitions 46 Version - 5/24/2005 1 www.vizioce.com Before Use ...2 1.2 - Package Contents...6 1.7 - Key Remote Control Functions 10 1.10.2 - Getting Started ...21 3.1 - Preparing the Plasma...
User Manual
Page 8
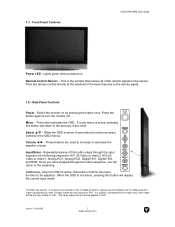
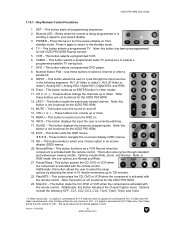
Front Panel Controls VIZIO P50 HDM User Guide Power LED - Point the remote control directly at ...then Video will be adjusted. Remote Control Sensor - This is active, pressing this button confirms the menu function to the previous menu level. These buttons are connected to the sensor. The same input priority scheme applies to turn the... monitor off. Switch the monitor on . 1.7 - Side Panel Controls Power - This button activates the OSD. If a sub-menu is the window that passes all of this button steps through the entire sequence, you ...
Front Panel Controls VIZIO P50 HDM User Guide Power LED - Point the remote control directly at ...then Video will be adjusted. Remote Control Sensor - This is active, pressing this button confirms the menu function to the previous menu level. These buttons are connected to the sensor. The same input priority scheme applies to turn the... monitor off. Switch the monitor on . 1.7 - Side Panel Controls Power - This button activates the OSD. If a sub-menu is the window that passes all of this button steps through the entire sequence, you ...
User Manual
Page 9
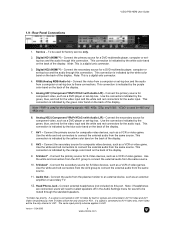
...the video from a computer or set-top box and the audio from the plasma monitor to connect the external audio from the same source. 11. Use the... the AV1 group to connect the external audio from the same source. 10. VIZIO P50 HDM User Guide 1.9 - YCbCr is indicated by the white color band on...secondary TV. 12. Connect the primary source for 480i and 480p only. 6. Rear Panel Connections 1. Service - Note: if headphones are connected to these connections. If a ...off in the Audio Settings menu for sound to AV1 Video only, then Video will be the only choice for factory...
...the video from a computer or set-top box and the audio from the plasma monitor to connect the external audio from the same source. 11. Use the... the AV1 group to connect the external audio from the same source. 10. VIZIO P50 HDM User Guide 1.9 - YCbCr is indicated by the white color band on...secondary TV. 12. Connect the primary source for 480i and 480p only. 6. Rear Panel Connections 1. Service - Note: if headphones are connected to these connections. If a ...off in the Audio Settings menu for sound to AV1 Video only, then Video will be the only choice for factory...
User Manual
Page 11
... RGB. 10. VCR - Enter - Note: these buttons to turn volume up or down . 15. MENU - This button plays the CD, DVD or VCR when the component is currently watching. 17. VIZIO P50 HDM User Guide 1.10.1 - Blinks when the remote is being programmed or is not functional for... with the remote control. SET - Note: this button is activated with the remote control. Number Button Pad - LAST - These buttons turn the plasma display on -screen display (OSD) menus. 20. GUIDE - This button displays the electronic program guide. This button exits the OSD menus. This ...
... RGB. 10. VCR - Enter - Note: these buttons to turn volume up or down . 15. MENU - This button plays the CD, DVD or VCR when the component is currently watching. 17. VIZIO P50 HDM User Guide 1.10.1 - Blinks when the remote is being programmed or is not functional for... with the remote control. SET - Note: this button is activated with the remote control. Number Button Pad - LAST - These buttons turn the plasma display on -screen display (OSD) menus. 20. GUIDE - This button displays the electronic program guide. This button exits the OSD menus. This ...
User Manual
Page 12
... one of the screen is activated with the remote control. PiP Input - Choose from the OSD menu. Note: this button is connected to "Freeze-Frame" the current screen. If a signal is not functional for the VIZIO P50 HDM. 33. RGB - PiP - Press this key to AV1 S-Video by itself or ... of the PiP screen from the main screen and the sub-screen while in ZOOM mode, a small window will resume automatically after one minute. 30. VIZIO P50 HDM User Guide 24. This button functions as a PC. 31. Swap - This button selects a connected RGB component such as a DVD "next chapter" ...
... one of the screen is activated with the remote control. PiP Input - Choose from the OSD menu. Note: this button is connected to "Freeze-Frame" the current screen. If a signal is not functional for the VIZIO P50 HDM. 33. RGB - PiP - Press this key to AV1 S-Video by itself or ... of the PiP screen from the main screen and the sub-screen while in ZOOM mode, a small window will resume automatically after one minute. 30. VIZIO P50 HDM User Guide 24. This button functions as a PC. 31. Swap - This button selects a connected RGB component such as a DVD "next chapter" ...

User Manual
Page 21
...graphic card's user guide for more information about the video output requirements of the plasma monitor, "RGB" or "Input button on the power to VESA 1024 x 768 @60Hz. Connecting External Amplified Speakers or Amplifier Installation: VIZIO P50 HDM User Guide 1. Turn on the remote control to the RGB Audio ...the R (red color) and L (white color) audio output connectors in the rear of your computer. 5. Then press the menu button on the rear of your amplifier to the plasma monitor and amplifier. 4. Connect a 15-pin D-sub RGB cable to the RGB output of your computer and the other end...
...graphic card's user guide for more information about the video output requirements of the plasma monitor, "RGB" or "Input button on the power to VESA 1024 x 768 @60Hz. Connecting External Amplified Speakers or Amplifier Installation: VIZIO P50 HDM User Guide 1. Turn on the remote control to the RGB Audio ...the R (red color) and L (white color) audio output connectors in the rear of your computer. 5. Then press the menu button on the rear of your amplifier to the plasma monitor and amplifier. 4. Connect a 15-pin D-sub RGB cable to the RGB output of your computer and the other end...
User Manual
Page 25
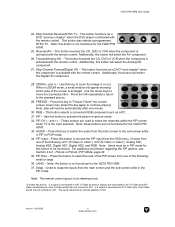
...on the front panel of the selected option by pressing e/f buttons on -screen display (OSD) allows you wish to the settings even if the Plasma monitor is selected. 1. Press the MENU button on the remote control and the Main Menu will now change the setting of the Plasma monitor can ... The OSD consists of a Main Menu of items and each of the feature selected, as shown in figure 3.5.1.b. 4. Use the c /d buttons on the remote control to exit the OSD. Press the OK button to adjust additional options. 8. VIZIO P50 HDM User Guide 3.5 - Options include the following: Image, ...
...on the front panel of the selected option by pressing e/f buttons on -screen display (OSD) allows you wish to the settings even if the Plasma monitor is selected. 1. Press the MENU button on the remote control and the Main Menu will now change the setting of the Plasma monitor can ... The OSD consists of a Main Menu of items and each of the feature selected, as shown in figure 3.5.1.b. 4. Use the c /d buttons on the remote control to exit the OSD. Press the OK button to adjust additional options. 8. VIZIO P50 HDM User Guide 3.5 - Options include the following: Image, ...
User Manual
Page 27
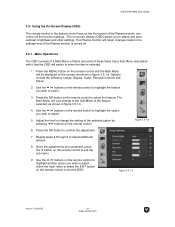
... PIP, the following submenu options will be the only choice for PC) The following menu options are connected to manually set the position of the picture. PiP input - Choose...or video*), Analog HD1, Analog HD2, Digital HD1, Digital HD2, and RGB. *S-Video has priority. VIZIO P50 HDM User Guide 3.5.2.1.2 - PIP Position - For additional information regarding the PiP source options, see..., and BottomRight. The same input priority scheme applies to readjust the brightness after the plasma monitor warms up. Brightness - Adjusts the level of white between the lightest and darkest...
... PIP, the following submenu options will be the only choice for PC) The following menu options are connected to manually set the position of the picture. PiP input - Choose...or video*), Analog HD1, Analog HD2, Digital HD1, Digital HD2, and RGB. *S-Video has priority. VIZIO P50 HDM User Guide 3.5.2.1.2 - PIP Position - For additional information regarding the PiP source options, see..., and BottomRight. The same input priority scheme applies to readjust the brightness after the plasma monitor warms up. Brightness - Adjusts the level of white between the lightest and darkest...

User Manual
Page 29
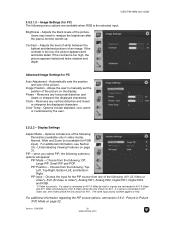
... TEXT4. VIZIO P50 HDM User Guide 3.5.2.5 - Firmware Version - Choose from the following : Off, CC1, CC2, CC3, CC4, TEXT1, TEXT2, TEXT3, TEXT4 Language: Changes the language of the firmware. Note: The usual Plasma panel precautions of avoiding prolonged display of previous images. This feature will appear: Display - Displays the version of the OSD menu. Options...
... TEXT4. VIZIO P50 HDM User Guide 3.5.2.5 - Firmware Version - Choose from the following : Off, CC1, CC2, CC3, CC4, TEXT1, TEXT2, TEXT3, TEXT4 Language: Changes the language of the firmware. Note: The usual Plasma panel precautions of avoiding prolonged display of previous images. This feature will appear: Display - Displays the version of the OSD menu. Options...

User Manual
Page 30
... • Movie X (no one under 17 years of the menu. 9. Press until the Parental Controls menu is highlighted. Then press OK. 3. Setting a Password, page 30...not age appropriate, such as programs containing violence or adult language. 1. Press Menu repeatedly to enter the default password "0000". Press OK. 8. Press OK...audience) • Unblocked Then Press OK. 7. Press the MENU button on the remote control and the Main Menu will be displayed on the screen. 2. If you want... use the Number Buttons to exit the menu. Version - 5/24/2005 29 www.vizioce.com Press the buttons ...
... • Movie X (no one under 17 years of the menu. 9. Press until the Parental Controls menu is highlighted. Then press OK. 3. Setting a Password, page 30...not age appropriate, such as programs containing violence or adult language. 1. Press Menu repeatedly to enter the default password "0000". Press OK. 8. Press OK...audience) • Unblocked Then Press OK. 7. Press the MENU button on the remote control and the Main Menu will be displayed on the screen. 2. If you want... use the Number Buttons to exit the menu. Version - 5/24/2005 29 www.vizioce.com Press the buttons ...

User Manual
Page 31
VIZIO P50 HDM User Guide 3.5.4 - The default password is highlighted. Press ▼ until the Parental Controls menu is highlighted in the Password option, press the and ► in the exact sequence. 4. Then press OK. 3. Press Menu repeatedly to any four-digit number. When the first box is highlighted...., as shown opposite. 2. Enter your new password. 6. Enter your password. Press the MENU button on the remote control and the Main Menu will appear. To change the password to exit the menu. Then press OK. 3. Press OK. 5. The password has now been reset to the...
VIZIO P50 HDM User Guide 3.5.4 - The default password is highlighted. Press ▼ until the Parental Controls menu is highlighted in the Password option, press the and ► in the exact sequence. 4. Then press OK. 3. Press Menu repeatedly to any four-digit number. When the first box is highlighted...., as shown opposite. 2. Enter your new password. 6. Enter your password. Press the MENU button on the remote control and the Main Menu will appear. To change the password to exit the menu. Then press OK. 3. Press OK. 5. The password has now been reset to the...