
Download
Page 5
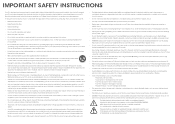
... other cables are unplugged before moving your TV, hold the AC/DC power adapter, not the cord. Your TV is damaged, the internal components may result in an area with instructions. These servicing instructions are qualified to excessive heat such as the disconnect device, the disconnect device shall remain readily operable. • CAUTION - If water penetrates into your TV changes...
... other cables are unplugged before moving your TV, hold the AC/DC power adapter, not the cord. Your TV is damaged, the internal components may result in an area with instructions. These servicing instructions are qualified to excessive heat such as the disconnect device, the disconnect device shall remain readily operable. • CAUTION - If water penetrates into your TV changes...
Download
Page 7
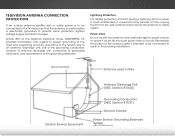
... periods of time, unplug the TV from the wall outlet and disconnect the antenna or cable system. Ground Clamp Antenna Lead In Wire Electric Service Equipment Antenna Discharge Unit (NEC Section 810-20) Grounding Conductors (NEC Section 810-21) Ground Clamps Power Service Grounding Electrode System (NEC ART 250, part H) Television Antenna Connection Protection If an outside antenna/satellite dish or cable system is...
... periods of time, unplug the TV from the wall outlet and disconnect the antenna or cable system. Ground Clamp Antenna Lead In Wire Electric Service Equipment Antenna Discharge Unit (NEC Section 810-20) Grounding Conductors (NEC Section 810-21) Ground Clamps Power Service Grounding Electrode System (NEC ART 250, part H) Television Antenna Connection Protection If an outside antenna/satellite dish or cable system is...
Download
Page 8
... Cable Types 13 Connecting an Audio Device - ARC 14 Without HDMI ARC 14 With HDMI ARC 14 Connecting to your Network 15 Connecting to a Wired Network (Best 15 Connecting to a Wireless Network 15 Completing the First-Time Setup 16 Using the On-Screen Menu 17 Navigating the On-Screen Menu 17 Changing the 3D Mode 17 Changing the Input Source 18 Changing the Screen Aspect Ratio 18 Adjusting the Picture Settings 19 Adjusting the Picture Size and Position 20 Adjusting the Color Temperature 20 Adjusting the Advanced Picture Settings 21 Resetting the Picture Settings 21 Adjusting...
... Cable Types 13 Connecting an Audio Device - ARC 14 Without HDMI ARC 14 With HDMI ARC 14 Connecting to your Network 15 Connecting to a Wired Network (Best 15 Connecting to a Wireless Network 15 Completing the First-Time Setup 16 Using the On-Screen Menu 17 Navigating the On-Screen Menu 17 Changing the 3D Mode 17 Changing the Input Source 18 Changing the Screen Aspect Ratio 18 Adjusting the Picture Settings 19 Adjusting the Picture Size and Position 20 Adjusting the Color Temperature 20 Adjusting the Advanced Picture Settings 21 Resetting the Picture Settings 21 Adjusting...

Download
Page 9
Changing the Parental Control Passcode 34 Resetting the Content Locks 34 Changing the On-Screen Menu Language 34 Setting the Time Zone 35 Adjusting the CEC Settings 35 Turning the Power Indicator On or Off 36 Using the Reset & Admin Menu 36 Resetting the TV Settings 37 Restoring the TV to Factory Default Settings 37 Performing a Service Check 37 Using the Guided Setup Menu 38 Using Guided Setup 38 Using the Info Window 39 Using the USB Media Player 40 Using the USB Media Player 40 Connecting a USB Thumb Drive to...
Changing the Parental Control Passcode 34 Resetting the Content Locks 34 Changing the On-Screen Menu Language 34 Setting the Time Zone 35 Adjusting the CEC Settings 35 Turning the Power Indicator On or Off 36 Using the Reset & Admin Menu 36 Resetting the TV Settings 37 Restoring the TV to Factory Default Settings 37 Performing a Service Check 37 Using the Guided Setup Menu 38 Using Guided Setup 38 Using the Info Window 39 Using the USB Media Player 40 Using the USB Media Player 40 Connecting a USB Thumb Drive to...

Download
Page 12
... someone to your TV model: Installing a TV on a wall, you will need a wall mount. Place the TV face-down on a wall: 1. 1 M801d-A3 3. When you . Consult the information below to the wall, carefully following the instructions that came with a UL-listed wall mount bracket rated for the weight/load of debris that you have determined that can begin the installation. Disconnect any cables connected to help you are finished, place...
... someone to your TV model: Installing a TV on a wall, you will need a wall mount. Place the TV face-down on a wall: 1. 1 M801d-A3 3. When you . Consult the information below to the wall, carefully following the instructions that came with a UL-listed wall mount bracket rated for the weight/load of debris that you have determined that can begin the installation. Disconnect any cables connected to help you are finished, place...
Download
Page 25
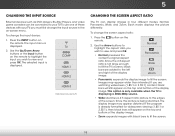
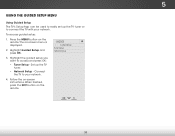
... images with black bars to your TV.To use one of the display image. 5 Changing the Input Source External devices such as DVD players, Blu-Ray Players, and video game consoles can display images in the on-screen menu. TV COMP HDMI-1 HDMI-2 HDMI-3 Note: Inputs may appear wider than intended. If the program is being stretched, the display image may appear distorted. Use the Up/Down Arrow buttons or the Input button on the...
... images with black bars to your TV.To use one of the display image. 5 Changing the Input Source External devices such as DVD players, Blu-Ray Players, and video game consoles can display images in the on-screen menu. TV COMP HDMI-1 HDMI-2 HDMI-3 Note: Inputs may appear wider than intended. If the program is being stretched, the display image may appear distorted. Use the Up/Down Arrow buttons or the Input button on the...
Download
Page 26
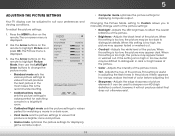
... buttons on -screen menu is displayed. 3. Changing the Picture Mode setting to Custom allows you to suit your preferences and viewing conditions. Adjusts the black level of the picture. • Input ColWoidre- If the setting is too high or too low, detail may appear faded or washed out. If flesh appears Sleep • Timer too orange, reduce Picture Audio Sharpness - It can be adjusted to manually change the picture mode: VIZIO Picture Picture Mode Backlight Brightness Contrast Color...
... buttons on -screen menu is displayed. 3. Changing the Picture Mode setting to Custom allows you to suit your preferences and viewing conditions. Adjusts the black level of the picture. • Input ColWoidre- If the setting is too high or too low, detail may appear faded or washed out. If flesh appears Sleep • Timer too orange, reduce Picture Audio Sharpness - It can be adjusted to manually change the picture mode: VIZIO Picture Picture Mode Backlight Brightness Contrast Color...
Download
Page 28
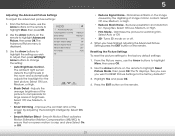
... High. • Reduce Block Noise - Turns 3D mode on -screen motion is displayed. 5 Adjusting the Advanced Picture Settings To adjust the advanced picture settings: 1. Use the Arrow buttons on the remote. 21 Press the EXIT button on the remote to change the setting: • Auto Brightness Control The ambient light sensor detects the light levels in the image caused by adjusting the backlight intelligently. From the Picture menu, use the Arrow buttons to compensate for .mpeg files...
... High. • Reduce Block Noise - Turns 3D mode on -screen motion is displayed. 5 Adjusting the Advanced Picture Settings To adjust the advanced picture settings: 1. Use the Arrow buttons on the remote. 21 Press the EXIT button on the remote to change the setting: • Auto Brightness Control The ambient light sensor detects the light levels in the image caused by adjusting the backlight intelligently. From the Picture menu, use the Arrow buttons to compensate for .mpeg files...
Download
Page 29
... to control the external speakers' volume from the TV's volume controls, or select Fixed to change Reset Audio Mode the setting: • Balance - VIZIO Audio Balance - Turns the built-in speakers on page 23. 4. Restores the audio settings to highlight Audio and press OK. See Resetting the Audio Settings on or off. • Surround Sound - Use the Arrow buttons on -screen menu is displayed. Sets the volume control properties for the Optical and HDMI ARC output when connected to Basic, then adjust Bass and Trebel settings. • Reset Audio Mode -
... to control the external speakers' volume from the TV's volume controls, or select Fixed to change Reset Audio Mode the setting: • Balance - VIZIO Audio Balance - Turns the built-in speakers on page 23. 4. Restores the audio settings to highlight Audio and press OK. See Resetting the Audio Settings on or off. • Surround Sound - Use the Arrow buttons on -screen menu is displayed. Sets the volume control properties for the Optical and HDMI ARC output when connected to Basic, then adjust Bass and Trebel settings. • Reset Audio Mode -

Download
Page 30
... setting to turn the TV off : 30, 60, 90, 120, or 180 minutes. Use the Up/Down Arrow buttons on the remote. Press the MENU button on the remote to highlight the period of time. Use the Up/Down Arrow buttons on the remote. Press OK, then press EXIT. 23 The Sleep Timer menu is displayed. 2. Press the EXIT button on the remote to the factory defaults?" 4. The on-screen menu is displayed. VIZIO Timers Sleep Timer Auto Power...
... setting to turn the TV off : 30, 60, 90, 120, or 180 minutes. Use the Up/Down Arrow buttons on the remote. Press the MENU button on the remote to highlight the period of time. Use the Up/Down Arrow buttons on the remote. Press OK, then press EXIT. 23 The Sleep Timer menu is displayed. 2. Press the EXIT button on the remote to the factory defaults?" 4. The on-screen menu is displayed. VIZIO Timers Sleep Timer Auto Power...
Download
Page 42
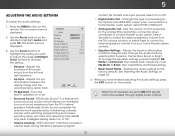
... System menu is displayed. 4. Use the Arrow and OK buttons to determine if your ZIP code using the TV's remote control. Sleep • Timer DePvicitcuree DiAsucdoiovery - The Time & Local Settings menu is displayed. 3. The ZIP code information is on -screen menu is connected and supports CEC. 5. The on , you to the internet via an Ethernet cable or a wireless network. ABC 4. Not all HDMI devices support CEC. Use this function to adjust each setting: • Input CECWidFeunctCioCn - Network Settings Help 35 VIZIO Time Zone Alaska...
... System menu is displayed. 4. Use the Arrow and OK buttons to determine if your ZIP code using the TV's remote control. Sleep • Timer DePvicitcuree DiAsucdoiovery - The Time & Local Settings menu is displayed. 3. The ZIP code information is on -screen menu is connected and supports CEC. 5. The on , you to the internet via an Ethernet cable or a wireless network. ABC 4. Not all HDMI devices support CEC. Use this function to adjust each setting: • Input CECWidFeunctCioCn - Network Settings Help 35 VIZIO Time Zone Alaska...
Download
Page 45
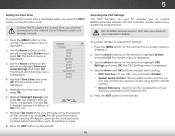
...; Tuner Setup - When finished, press the EXIT button on -screen menu is displayed. 2. Set up the TV tuner or to connect the TV with your network. 4. Press the MENU button on -screen instructions. To access guided setup: 1. Follow the on the remote. Highlight Guided Setup and press OK. 5 Using the Guided Setup Menu Using Guided Setup The TV's Setup App can be used to easily set up the TV tuner. • Network Setup - Wide Zoom Normal Panoramic Exit 2D 3D ABC Input Wide CC Sleep Timer Picture Audio Network Settings Help...
...; Tuner Setup - When finished, press the EXIT button on -screen menu is displayed. 2. Set up the TV tuner or to connect the TV with your network. 4. Press the MENU button on -screen instructions. To access guided setup: 1. Follow the on the remote. Highlight Guided Setup and press OK. 5 Using the Guided Setup Menu Using Guided Setup The TV's Setup App can be used to easily set up the TV tuner. • Network Setup - Wide Zoom Normal Panoramic Exit 2D 3D ABC Input Wide CC Sleep Timer Picture Audio Network Settings Help...

Download
Page 55
.... • Adjust the Color and Tint settings in the Picture menu. See Resetting the Picture Settings on page 21. • Check all devices are set to the TV, scan for details. • Adjust Brightness, Contrast, or Backlight. The power is on, but there is no headphones are connected to the TV. • Check the audio connections of external devices (Blu-ray player, game console, cable/satellite box) that are connected to...
.... • Adjust the Color and Tint settings in the Picture menu. See Resetting the Picture Settings on page 21. • Check all devices are set to the TV, scan for details. • Adjust Brightness, Contrast, or Backlight. The power is on, but there is no headphones are connected to the TV. • Check the audio connections of external devices (Blu-ray player, game console, cable/satellite box) that are connected to...
Download
Page 56
... (improved) to change input source, the display image changes size. • The TV remembers the viewing mode on the screen. • When your antenna is higher or lower than the level on the source you switch from the one on the remote to match your devices with HDMI cables. • If you are securely attached. If the volume level on the new input source is connected securely to the...
... (improved) to change input source, the display image changes size. • The TV remembers the viewing mode on the screen. • When your antenna is higher or lower than the level on the source you switch from the one on the remote to match your devices with HDMI cables. • If you are securely attached. If the volume level on the new input source is connected securely to the...
Download
Page 59
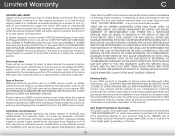
... defective within the warranty period. VIZIO provides a warranty to the VIZIO service center. To obtain warranty service, contact VIZIO Technical Support via e-mail: TechSupport@VIZIO.com or via phone at 877 MY VIZIO (877.698.4946) from warranty service or replacement, whichever is within the warranty period,VIZIO will provide instructions for example: cosmetic damage, normal wear and tear, improper operation, improper voltage supply or power surges, signal issues, damages from shipping...
... defective within the warranty period. VIZIO provides a warranty to the VIZIO service center. To obtain warranty service, contact VIZIO Technical Support via e-mail: TechSupport@VIZIO.com or via phone at 877 MY VIZIO (877.698.4946) from warranty service or replacement, whichever is within the warranty period,VIZIO will provide instructions for example: cosmetic damage, normal wear and tear, improper operation, improper voltage supply or power surges, signal issues, damages from shipping...
Download
Page 2
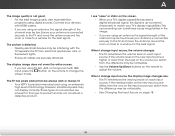
... to repair or service your TV. - This plug will not be used for replacement of the obsolete outlet. • Protect the power cord from being damaged, the following instructions should be installed near your TV and easily accessible. • Only power of the marked voltage can damage the remote control or injure the operator. Overloading can result in fire or electric shock. • The wall...
... to repair or service your TV. - This plug will not be used for replacement of the obsolete outlet. • Protect the power cord from being damaged, the following instructions should be installed near your TV and easily accessible. • Only power of the marked voltage can damage the remote control or injure the operator. Overloading can result in fire or electric shock. • The wall...
Download
Page 13
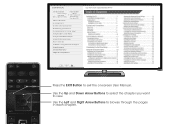
GUIDE Use the Left and Right Arrow Buttons to exit the on-screen User Manual. Table of Contents Installing the TV Controls and Connections Connecting your Devices Completing the First-Time Setup Using the On-Screen Menu Using the USB Media Player Using VIZIO Internet Apps How to View 3D Troubleshooting & Technical Support Specifications Limited Warranty Legal & Compliance LCD HDTV WITH VIZIO INTERNET APPS® MENU Press the EXIT Button to browse through the pages in each chapter. INPUT LIST EXIT BACK USER MANUAL USE YOUR REMOTE Previous Page Next Page...
GUIDE Use the Left and Right Arrow Buttons to exit the on-screen User Manual. Table of Contents Installing the TV Controls and Connections Connecting your Devices Completing the First-Time Setup Using the On-Screen Menu Using the USB Media Player Using VIZIO Internet Apps How to View 3D Troubleshooting & Technical Support Specifications Limited Warranty Legal & Compliance LCD HDTV WITH VIZIO INTERNET APPS® MENU Press the EXIT Button to browse through the pages in each chapter. INPUT LIST EXIT BACK USER MANUAL USE YOUR REMOTE Previous Page Next Page...

Download
Page 16
... WITH WIFI 1 If you have already set up a wireless connection during the first-time setup, you will need: Wireless Router High-speed Internet connection SSID (Wireless network name) Network Password For streaming video, your Internet Service Provider (ISP). 2 Press the MENU Button to display the TV Settings menu. Highlight Network Setup and press OK. VIZIO TV Settings Picture Audio Timers Network Tuner CC CC System Guided Setup User Manual Wide VIZIO Guided Setup ZoToumner SeNtuoprmal Panoramic Network Setup Exit 2D 3D ABC Input Wide CC Wide Exit Input Sleep Timer Picture Audio...
... WITH WIFI 1 If you have already set up a wireless connection during the first-time setup, you will need: Wireless Router High-speed Internet connection SSID (Wireless network name) Network Password For streaming video, your Internet Service Provider (ISP). 2 Press the MENU Button to display the TV Settings menu. Highlight Network Setup and press OK. VIZIO TV Settings Picture Audio Timers Network Tuner CC CC System Guided Setup User Manual Wide VIZIO Guided Setup ZoToumner SeNtuoprmal Panoramic Network Setup Exit 2D 3D ABC Input Wide CC Wide Exit Input Sleep Timer Picture Audio...

Download
Page 21
... remote, then turn it is not working . • Be sure your TV is set to Wide or Zoom mode. If it back on -screen menu has guided setup. Select the type of setup you are connecting wirelessly, try plugging the power cord into a different outlet. HELP TOPICS How do not work, try repositioning your router for the best connection. • Turn off . • Press MENU, then select TV Settings > Audio. The V.I.A. Press MENU, then select HELP > Guided Setup...
... remote, then turn it is not working . • Be sure your TV is set to Wide or Zoom mode. If it back on -screen menu has guided setup. Select the type of setup you are connecting wirelessly, try plugging the power cord into a different outlet. HELP TOPICS How do not work, try repositioning your router for the best connection. • Turn off . • Press MENU, then select TV Settings > Audio. The V.I.A. Press MENU, then select HELP > Guided Setup...
Download
Page 23
... commercial use. To obtain warranty service, contact VIZIO Technical Support via e-mail: TechSupport@VIZIO.com or via phone at 877 MY VIZIO (877.698.4946) from shipping, acts of God, any repairs attempted by this guarantee applies to your product will either the original carton box and shipping material or packaging that you configured as installation and set-up issues or any type...
... commercial use. To obtain warranty service, contact VIZIO Technical Support via e-mail: TechSupport@VIZIO.com or via phone at 877 MY VIZIO (877.698.4946) from shipping, acts of God, any repairs attempted by this guarantee applies to your product will either the original carton box and shipping material or packaging that you configured as installation and set-up issues or any type...


