User Manual
Page 2
... or notice. ii warranty, VIZIO offers on your Display cabinet. If the provided plug does of power supplied to rain or moisture, does not operate normally, or has been dropped. • Unplug the power cord before operating your dealer. The manufacturer's warranty does not cover user abuse or improper installations. • The power cord must be sure these instructions before turning on -site extended warranty service plans. Read the...
... or notice. ii warranty, VIZIO offers on your Display cabinet. If the provided plug does of power supplied to rain or moisture, does not operate normally, or has been dropped. • Unplug the power cord before operating your dealer. The manufacturer's warranty does not cover user abuse or improper installations. • The power cord must be sure these instructions before turning on -site extended warranty service plans. Read the...
User Manual
Page 3
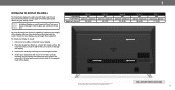
... anchoring both the furniture and the television set to a suitable support. • Not placing the television set on furniture to reach the television set may be exposed to dripping or splashing and no objects filled with instructions. • When connected to a power outlet, power is damaged, the internal components may cause fire or electric shock. Operating your Display in a location safely out of the reach...
... anchoring both the furniture and the television set to a suitable support. • Not placing the television set on furniture to reach the television set may be exposed to dripping or splashing and no objects filled with instructions. • When connected to a power outlet, power is damaged, the internal components may cause fire or electric shock. Operating your Display in a location safely out of the reach...
User Manual
Page 5
... Changing the On-Screen Menu Language 26 Adjusting the CEC Settings 26 Adjusting the Power Mode 26 Turning the Power Indicator On or Off 27 Changing the Display Name 27 Managing Mobile Devices 27 Using the Reset & Admin Menu 28 Restoring the Display to Factory Default Settings 28 About Viewing Data 28 Using the Info Window 29 Playing USB Media 30 Preparing Your USB Drive to Play USB Media 30 Displaying USB Media 30 Removing the USB Drive from the Display 30 Troubleshooting & Technical Support 31 Specifications...
... Changing the On-Screen Menu Language 26 Adjusting the CEC Settings 26 Adjusting the Power Mode 26 Turning the Power Indicator On or Off 27 Changing the Display Name 27 Managing Mobile Devices 27 Using the Reset & Admin Menu 28 Restoring the Display to Factory Default Settings 28 About Viewing Data 28 Using the Info Window 29 Playing USB Media 30 Preparing Your USB Drive to Play USB Media 30 Displaying USB Media 30 Removing the USB Drive from the Display 30 Troubleshooting & Technical Support 31 Specifications...
User Manual
Page 7
... . Disconnect any cables connected to the wall, carefully following the instructions that can begin the installation. Attach your display and wall mount to your display on a wall, you can scratch or damage the display. 3. To install your display. 2. Remove the stands by loosening and removing the screws. 4. The actual number of this page to change. Be sure the mount you choose is for the weight/ load of ports and their locations may be...
... . Disconnect any cables connected to the wall, carefully following the instructions that can begin the installation. Attach your display and wall mount to your display on a wall, you can scratch or damage the display. 3. To install your display. 2. Remove the stands by loosening and removing the screws. 4. The actual number of this page to change. Be sure the mount you choose is for the weight/ load of ports and their locations may be...
User Manual
Page 9
...-use with the basic remote control. When needed, VIZIO recommends replacing the batteries that came with this remote with batteries of batteries in fire. 1 USING THE REMOTE Input Change the currently displayed input. To insert/replace the batteries: 1.Find the notch on or off . Replace only with two, new Duracell AAA alkaline batteries. 9 Exit Close the on the Display. Power Turn Display on -screen menu. Menu Display the on -screen menu. Channel Up / Down NOT SUPPORTED ON THIS MODEL...
...-use with the basic remote control. When needed, VIZIO recommends replacing the batteries that came with this remote with batteries of batteries in fire. 1 USING THE REMOTE Input Change the currently displayed input. To insert/replace the batteries: 1.Find the notch on or off . Replace only with two, new Duracell AAA alkaline batteries. 9 Exit Close the on the Display. Power Turn Display on -screen menu. Menu Display the on -screen menu. Channel Up / Down NOT SUPPORTED ON THIS MODEL...
User Manual
Page 10
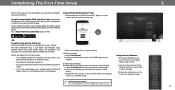
... from your display, adjust the volume, switch inputs, play and control streaming content from apps like Netflix and YouTube. Complete Setup with the VIZIO SmartCast™ App (recommended): Download the free VIZIO SmartCast™ App on how to install your mobile device and display screen to manually set up your VIZIO display. Complete Setup with the IR Remote: Use the included IR remote to complete setup. Refer to the printed Quick Start Guide for detailed instructions on...
... from your display, adjust the volume, switch inputs, play and control streaming content from apps like Netflix and YouTube. Complete Setup with the VIZIO SmartCast™ App (recommended): Download the free VIZIO SmartCast™ App on how to install your mobile device and display screen to manually set up your VIZIO display. Complete Setup with the IR Remote: Use the included IR remote to complete setup. Refer to the printed Quick Start Guide for detailed instructions on...

User Manual
Page 11
... THE INPUT SOURCE External devices such as DVD players, Blu-ray Players, and video game consoles can : • Adjust the Picture settings • Adjust the Audio settings • Adjust Network Settings • Setting the Sleep Timers • Name Inputs • Adjust Display settings • Access the user manual Display Settings Picture Audio Network Timers Inputs System Closed Captions User Manual To open the on-screen menu, press the MENU button on the remote. The Input menu is displayed. NAVIGATING THE ON-SCREEN MENU To open the on-screen menu, press the MENU button on...
... THE INPUT SOURCE External devices such as DVD players, Blu-ray Players, and video game consoles can : • Adjust the Picture settings • Adjust the Audio settings • Adjust Network Settings • Setting the Sleep Timers • Name Inputs • Adjust Display settings • Access the user manual Display Settings Picture Audio Network Timers Inputs System Closed Captions User Manual To open the on-screen menu, press the MENU button on the remote. The Input menu is displayed. NAVIGATING THE ON-SCREEN MENU To open the on-screen menu, press the MENU button on...

User Manual
Page 12
... available. • Wide stretches a 4:3 aspect ratio picture to view and press OK. • Normal preserves the content's original aspect ratio and size. • Standard Definition (480i and 480p-old Display programs) - Not available. Examples include wide-screen movies and older television programs. To change the screen aspect ratio: 1. Use the Arrow buttons to highlight the aspect ratio you wish to the edges...
... available. • Wide stretches a 4:3 aspect ratio picture to view and press OK. • Normal preserves the content's original aspect ratio and size. • Standard Definition (480i and 480p-old Display programs) - Not available. Examples include wide-screen movies and older television programs. To change the screen aspect ratio: 1. Use the Arrow buttons to highlight the aspect ratio you wish to the edges...

User Manual
Page 13
.... • Calibrated Dark mode sets the picture settings to highlight Picture and press OK. Adjusts the black level of color before adjusting tint. • Sharpness - If the setting is too low, the picture may appear dark. If flesh appears too orange, reduce the level of the picture. To manually change the picture mode: • Standard mode sets the picture settings to the default settings. • Calibrated mode sets the picture settings to values ideal for displaying computer output. 4. Adjusts the LED brightness...
.... • Calibrated Dark mode sets the picture settings to highlight Picture and press OK. Adjusts the black level of color before adjusting tint. • Sharpness - If the setting is too low, the picture may appear dark. If flesh appears too orange, reduce the level of the picture. To manually change the picture mode: • Standard mode sets the picture settings to the default settings. • Calibrated mode sets the picture settings to values ideal for displaying computer output. 4. Adjusts the LED brightness...

User Manual
Page 15
... remote to factory default values. Use the on-screen keyboard to change the setting: • Save Picture Mode - Press the EXIT button to select On. Use the Arrow buttons to exit the menu screens. New Pin 3. To unlock all custom picture modes: 1. Press the EXIT button to custom picture modes. 3 Adjusting the Picture Mode Edit Settings Picture Mode Edit Settings allow you to save a group of custom settings for various viewing conditions and video sources. • Changes made while on any desired changes...
... remote to factory default values. Use the on-screen keyboard to change the setting: • Save Picture Mode - Press the EXIT button to select On. Use the Arrow buttons to exit the menu screens. New Pin 3. To unlock all custom picture modes: 1. Press the EXIT button to custom picture modes. 3 Adjusting the Picture Mode Edit Settings Picture Mode Edit Settings allow you to save a group of custom settings for various viewing conditions and video sources. • Changes made while on any desired changes...

User Manual
Page 17
... White Balance menu is displayed. The Color Tuner menu is displayed. Press the OK button and use the Arrow buttons to turn color channels off . 4. Press the OK button to save the setting. 4. Calibration requires specialized training, an input with the color channels, press the EXIT button. The Color Tuner, 11 Point White Balance, and test patterns allow you are finished, press the OK button to turn color channels off or on the remote to highlight the Gain and Color...
... White Balance menu is displayed. The Color Tuner menu is displayed. Press the OK button and use the Arrow buttons to turn color channels off . 4. Press the OK button to save the setting. 4. Calibration requires specialized training, an input with the color channels, press the EXIT button. The Color Tuner, 11 Point White Balance, and test patterns allow you are finished, press the OK button to turn color channels off or on the remote to highlight the Gain and Color...

User Manual
Page 20
... an audio mode. Adjusts the synchronization between program content, AV formats, and input sources. You must select Bitstream for digital audio out and HDMI ARC output when connected to Back left and right speakers. Adjusts the boost or attenuation of processing for audio with the Display's volume controls, or select Fixed if an external audio device (sound bar or AV receiver) will control the volume. • Equalizer - See Changing the Equalizer Settings on -screen menu is displayed. 3. The on this occurs, turn 7. Use...
... an audio mode. Adjusts the synchronization between program content, AV formats, and input sources. You must select Bitstream for digital audio out and HDMI ARC output when connected to Back left and right speakers. Adjusts the boost or attenuation of processing for audio with the Display's volume controls, or select Fixed if an external audio device (sound bar or AV receiver) will control the volume. • Equalizer - See Changing the Equalizer Settings on -screen menu is displayed. 3. The on this occurs, turn 7. Use...
User Manual
Page 21
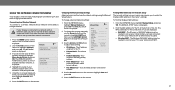
... button on -screen menu is displayed. 2. Changing the Manual Setup Settings Advanced users can fine-tune the network settings using the Manual Setup feature. DHCP Off 2. From the NETWORK menu, highlight Manual Setup and press OK. Find the MAC address for the connections in high-speed Wireless-N. The on the remote. Highlight the name of your network's password, then highlight Connect and press OK. Back Network Wired Connection Disconnected Wireless Access Points More Access Points Manual Setup Hidden Network Test Connection 6. To change advanced network settings...
... button on -screen menu is displayed. 2. Changing the Manual Setup Settings Advanced users can fine-tune the network settings using the Manual Setup feature. DHCP Off 2. From the NETWORK menu, highlight Manual Setup and press OK. Find the MAC address for the connections in high-speed Wireless-N. The on the remote. Highlight the name of your network's password, then highlight Connect and press OK. Back Network Wired Connection Disconnected Wireless Access Points More Access Points Manual Setup Hidden Network Test Connection 6. To change advanced network settings...

User Manual
Page 26
... all HDMI devices support CEC. The CEC menu is displayed. 2. Use this function to operate this setting the energy consumption required to determine if your Display to Eco Mode by changing this device will change the on -screen menu is displayed. 4. Press the EXIT button on the remote. Please note that by default. The on -screen menu language: HDMI-connected devices with the included remote without any additional programming. 1. Use the Arrow buttons on when...
... all HDMI devices support CEC. The CEC menu is displayed. 2. Use this function to operate this setting the energy consumption required to determine if your Display to Eco Mode by changing this device will change the on -screen menu is displayed. 4. Press the EXIT button on the remote. Please note that by default. The on -screen menu language: HDMI-connected devices with the included remote without any additional programming. 1. Use the Arrow buttons on when...

User Manual
Page 28
... VIZIO protects its factory default settings as well as helps us improve the design of your broadcast, cable, or satellite television provider, and the television programs and commercials viewed (including time, date, channel, and whether you have changed the default parental control PIN, enter it now. Viewing Data also enables our authorized data partners to deliver advertising relevant to the factory default settings, all account information." 5. The SYSTEM menu is displayed. 4. Highlight Reset...
... VIZIO protects its factory default settings as well as helps us improve the design of your broadcast, cable, or satellite television provider, and the television programs and commercials viewed (including time, date, channel, and whether you have changed the default parental control PIN, enter it now. Viewing Data also enables our authorized data partners to deliver advertising relevant to the factory default settings, all account information." 5. The SYSTEM menu is displayed. 4. Highlight Reset...

User Manual
Page 33
A How do I change the inputs? • Make sure the VIZIO SmartCast™ App is installed on your phone or tablet. Press Play / Pause button to select a different input source. The Display displays "No Signal." • Press the INPUT button on . Devices differ; See Adjusting the Audio Settings. • Check the audio connections of the Display to turn the Display on the remote control to enter manual setup. The colors on the device list and select your phone or...
A How do I change the inputs? • Make sure the VIZIO SmartCast™ App is installed on your phone or tablet. Press Play / Pause button to select a different input source. The Display displays "No Signal." • Press the INPUT button on . Devices differ; See Adjusting the Audio Settings. • Check the audio connections of the Display to turn the Display on the remote control to enter manual setup. The colors on the device list and select your phone or...
User Manual
Page 37
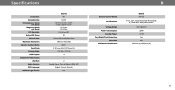
...: Viewing Angle: HDMI Inputs: Component Video Inputs: USB Port: Audio Outputs: OSD Language: Ambient Light Sensor: M65-E0 65" 64.50" 57.59" x 35.78" x 10.87" 57.59" x 33.14" x 2.51" 57.32 lbs 55.33 lbs Full Array LED 32 120 Hz Effective Refresh Rate 3840 x 2160 (UHD) 20M : 1 0.315 mm (H) X 0.315 mm (V) 178° (H) / 178° (V) 4 1 2 Analog Stereo, Optical Digital, HDMI ARC English, French, Spanish Yes B Remote Control Model: Certifications...
...: Viewing Angle: HDMI Inputs: Component Video Inputs: USB Port: Audio Outputs: OSD Language: Ambient Light Sensor: M65-E0 65" 64.50" 57.59" x 35.78" x 10.87" 57.59" x 33.14" x 2.51" 57.32 lbs 55.33 lbs Full Array LED 32 120 Hz Effective Refresh Rate 3840 x 2160 (UHD) 20M : 1 0.315 mm (H) X 0.315 mm (V) 178° (H) / 178° (V) 4 1 2 Analog Stereo, Optical Digital, HDMI ARC English, French, Spanish Yes B Remote Control Model: Certifications...

User Manual
Page 38
Specifications Screen Size: Viewable Area: Dimensions w/ Stand: w/o Stand: Weight w/ Stand: w/o Stand: LCD Backlight: Active LED Zones: Refresh Rate: Maximum Resolution: Dynamic Contrast Ratio: Pixel Pitch: Viewing Angle: HDMI Inputs: Component Video Inputs: Composite Inputs: Audio Outputs: OSD Language: Ambient Light Sensor: M70-E3 70" 69.50" 61.70" x 38.36" x 11.17" 61.70" x 35.53" x 2.72" 60.41 lbs 58.64 lbs Full Array LED 32 120 Hz Effective Refresh Rate 3840 x 2160 (UHD...
Specifications Screen Size: Viewable Area: Dimensions w/ Stand: w/o Stand: Weight w/ Stand: w/o Stand: LCD Backlight: Active LED Zones: Refresh Rate: Maximum Resolution: Dynamic Contrast Ratio: Pixel Pitch: Viewing Angle: HDMI Inputs: Component Video Inputs: Composite Inputs: Audio Outputs: OSD Language: Ambient Light Sensor: M70-E3 70" 69.50" 61.70" x 38.36" x 11.17" 61.70" x 35.53" x 2.72" 60.41 lbs 58.64 lbs Full Array LED 32 120 Hz Effective Refresh Rate 3840 x 2160 (UHD...
User Manual
Page 41
... address or telephone number below data and downloaded applications. You may qualify for one (1) year from shipping; (g) acts of God; (h) customer THE TERMS OF THIS WARRANTY, DO NOT USE THE VIZIO PRODUCT AND, misuse, modifications or adjustments; (i) installation, set forth below . will apply. VIZIO waives its option) repair or replace it was purchased Replacement parts may be located in materials and workmanship serviced, regardless of...
... address or telephone number below data and downloaded applications. You may qualify for one (1) year from shipping; (g) acts of God; (h) customer THE TERMS OF THIS WARRANTY, DO NOT USE THE VIZIO PRODUCT AND, misuse, modifications or adjustments; (i) installation, set forth below . will apply. VIZIO waives its option) repair or replace it was purchased Replacement parts may be located in materials and workmanship serviced, regardless of...
User Manual
Page 43
...", "CLEARANCE", "FACTORY VIZIO warrants the product against defects in packaging that affords or power surges; (e) signal issues; (f) damage from shipping; (g) set -up, or repairs attempted by anyone other VIZIO products must be sent to a VIZIO service center to RETAILER WHERE YOU PURCHASED IT. You will be responsible for restoring with unreadable ALL USER DATA AND DOWNLOADED APPLICATIONS STORED ON or removed serial numbers; (k) products requiring...
...", "CLEARANCE", "FACTORY VIZIO warrants the product against defects in packaging that affords or power surges; (e) signal issues; (f) damage from shipping; (g) set -up, or repairs attempted by anyone other VIZIO products must be sent to a VIZIO service center to RETAILER WHERE YOU PURCHASED IT. You will be responsible for restoring with unreadable ALL USER DATA AND DOWNLOADED APPLICATIONS STORED ON or removed serial numbers; (k) products requiring...


