
M3D460SR User Manual
Page 4
.... To prevent your TV from overheating, be replaced when using different voltage than the voltage specified. To ensure reliable operation of the display. The manufacturer's warranty does not cover user abuse or improper installations. • The power cord must be sure these instructions. • Heed all warnings. • Follow all servicing to qualified service personnel. If your outlet does not accommodate the...
.... To prevent your TV from overheating, be replaced when using different voltage than the voltage specified. To ensure reliable operation of the display. The manufacturer's warranty does not cover user abuse or improper installations. • The power cord must be sure these instructions. • Heed all warnings. • Follow all servicing to qualified service personnel. If your outlet does not accommodate the...
M3D460SR User Manual
Page 5
... your TV yourself. Continuous use by qualified service personnel only. When your TV will not be installed near your TV, hold the AC/DC power adapter, not the cord. To reduce the risk of the marked voltage can damage the remote control or injure the operator. M3D420SR / M3D421SR / M3D460SR / M3D550SR • Do not overload power strips and extension cords. If water penetrates...
... your TV yourself. Continuous use by qualified service personnel only. When your TV will not be installed near your TV, hold the AC/DC power adapter, not the cord. To reduce the risk of the marked voltage can damage the remote control or injure the operator. M3D420SR / M3D421SR / M3D460SR / M3D550SR • Do not overload power strips and extension cords. If water penetrates...
M3D460SR User Manual
Page 6
... local stations to find out when they will turn off their analog signal and switch to digital television broadcasting was complete on June 12, 2009. For additional information, please contact the parties listed below, as before to receive low power, Class A or translator television stations and with cable and satellite TV services, gaming consoles, VCRs, DVD players, and similar products. Article 810 of the grounding...
... local stations to find out when they will turn off their analog signal and switch to digital television broadcasting was complete on June 12, 2009. For additional information, please contact the parties listed below, as before to receive low power, Class A or translator television stations and with cable and satellite TV services, gaming consoles, VCRs, DVD players, and similar products. Article 810 of the grounding...

M3D460SR User Manual
Page 8
... Buttons 6 Replacing the Batteries 6 Rear Panel 7 Connecting Your Devices 8 Before You Begin 8 Connecting Your Devices 8 Setting Up Your Network Connection 10 Connecting to A Wired Network 10 Connecting to a Wireless Network 10 Completing the First-Time Setup 11 Using the On-Screen Menu 12 Navigating the On-Screen Menu 12 Changing the 3D Mode 12 Setting the Screen Aspect Ratio 13 Setting Up Closed Captioning 14 Changing the Appearance of Digital Closed Captions 15 Activating the Sleep Timer 15 Table of Contents Setting the Auto Power Off Feature 15 Adjusting...
... Buttons 6 Replacing the Batteries 6 Rear Panel 7 Connecting Your Devices 8 Before You Begin 8 Connecting Your Devices 8 Setting Up Your Network Connection 10 Connecting to A Wired Network 10 Connecting to a Wireless Network 10 Completing the First-Time Setup 11 Using the On-Screen Menu 12 Navigating the On-Screen Menu 12 Changing the 3D Mode 12 Setting the Screen Aspect Ratio 13 Setting Up Closed Captioning 14 Changing the Appearance of Digital Closed Captions 15 Activating the Sleep Timer 15 Table of Contents Setting the Auto Power Off Feature 15 Adjusting...
M3D460SR User Manual
Page 9
M3D420SR / M3D421SR / M3D460SR / M3D550SR Turning the VIZIO Logo On or Off 30 Configuring Bluetooth Devices 30 Using the Help Menu 31 Displaying System Information 31 Resetting the TV Settings 31 Restoring the TV to Factory Default Settings 31 Using Guided Setup 32 Using the Info Window 32 Using the USB Media Player 33 Using the USB Media Player 33 Connecting a USB Thumb Drive to the TV 33 Playing USB Media 33 Using VIZIO Internet Apps 36 Using the VIA Shortcut Buttons 36 Using the VIA Dock...
M3D420SR / M3D421SR / M3D460SR / M3D550SR Turning the VIZIO Logo On or Off 30 Configuring Bluetooth Devices 30 Using the Help Menu 31 Displaying System Information 31 Resetting the TV Settings 31 Restoring the TV to Factory Default Settings 31 Using Guided Setup 32 Using the Info Window 32 Using the USB Media Player 33 Using the USB Media Player 33 Connecting a USB Thumb Drive to the TV 33 Playing USB Media 33 Using VIZIO Internet Apps 36 Using the VIA Shortcut Buttons 36 Using the VIA Dock...

M3D460SR User Manual
Page 10
... can begin installing the TV. RF Adapter Cleaning Cloth for Glasses 2 Pairs Premium Theater 3D Glasses 2. VIZIO 3D LED LCD HDTV with Stand Remote Control with a phillips-head screwdriver. However, the TV can still fall over . Slide the neck onto the TV and insert the included screws. Tighten the screws with Batteries Installing the TV After removing the TV from the box and inspecting...
... can begin installing the TV. RF Adapter Cleaning Cloth for Glasses 2 Pairs Premium Theater 3D Glasses 2. VIZIO 3D LED LCD HDTV with Stand Remote Control with a phillips-head screwdriver. However, the TV can still fall over . Slide the neck onto the TV and insert the included screws. Tighten the screws with Batteries Installing the TV After removing the TV from the box and inspecting...

M3D460SR User Manual
Page 11
... a UL-listed wall mount bracket rated for your TV on a wall requires lifting. Consult the information below to help you can scratch or damage the TV. To prevent injury or damage to the TV, ask someone to find the appropriate mount for the weight/load of this TV. 2 M3D420SR / M3D421SR / M3D460SR / M3D550SR To install your TV model: Screw Size: Screw Length: Screw Pitch: Hole Pattern: M3D420SR...
... a UL-listed wall mount bracket rated for your TV on a wall requires lifting. Consult the information below to help you can scratch or damage the TV. To prevent injury or damage to the TV, ask someone to find the appropriate mount for the weight/load of this TV. 2 M3D420SR / M3D421SR / M3D460SR / M3D550SR To install your TV model: Screw Size: Screw Length: Screw Pitch: Hole Pattern: M3D420SR...

M3D460SR User Manual
Page 13
... Panel Power: Turn the TV on -screen menu. When the TV is off . Menu: Display on or off , the light is white. Volume Up/Down: Increase or decrease the loudness of the button, the TV will display a different input source 4 With each press of the TVs audio. VIZIO Light: When the TV is on, the light is dimmed. Input: Change the input device. Channel Up/Down: Change the channel. 2 Front Panel Right Side Panel Controls and Connections VIZIO Light Remote Control Sensor Front Panel Remote Control Sensor...
... Panel Power: Turn the TV on -screen menu. When the TV is off . Menu: Display on or off , the light is white. Volume Up/Down: Increase or decrease the loudness of the button, the TV will display a different input source 4 With each press of the TVs audio. VIZIO Light: When the TV is on, the light is dimmed. Input: Change the input device. Channel Up/Down: Change the channel. 2 Front Panel Right Side Panel Controls and Connections VIZIO Light Remote Control Sensor Front Panel Remote Control Sensor...

M3D460SR User Manual
Page 14
... or DVD player). VIA Shortcuts: Control VIZIO Internet Apps. 3D: Switch between 3D display modes. QWERTY Keypad: Enter letters or numbers. Mute: Turn the sound off . Input: Change the input device. Exit: Close the on . When mute is activated, the TV's audio is turned off . VIA: Start VIA Internet Apps. Device Power/Standby: Turn external device on -screen menu. With each press of the but- Menu: Display the on or off or on -screen menu. Guide: Display the Info Window. Channel...
... or DVD player). VIA Shortcuts: Control VIZIO Internet Apps. 3D: Switch between 3D display modes. QWERTY Keypad: Enter letters or numbers. Mute: Turn the sound off . Input: Change the input device. Exit: Close the on . When mute is activated, the TV's audio is turned off . VIA: Start VIA Internet Apps. Device Power/Standby: Turn external device on -screen menu. With each press of the but- Menu: Display the on or off or on -screen menu. Guide: Display the Info Window. Channel...

M3D460SR User Manual
Page 16
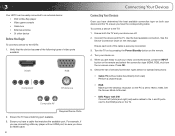
... audio device. HDMI 1 (ARC): Connect HDMI device. USB (1,2) Connect USB thumb drive to view photos or play audio. M3D420SR / M3D421SR / M3D460SR / M3D550SR Rear Panel ETHERNET COMPONENT (BETTER) Y/V Pb/Cb Pr/Cr LR COMPOSITE [GOOD] Ethernet Component/Composite RGB PC RGB PC AUDIO OUT DIGITAL AUDIO OUT USB 2 USB 1 4 3.5mm Audio Out Optical Audio Out USB (1,2) 3 HDMI (2,3,4) 2 ARC 1 HDMI (BEST) PC AUDIO DTV/TV HDMI 1 (ARC) PC Audio In RF/Coaxial Rear Panel 2 Ethernet: Connect ethernet cable from home network. Component/ Composite: Connect component or composite video/audio...
... audio device. HDMI 1 (ARC): Connect HDMI device. USB (1,2) Connect USB thumb drive to view photos or play audio. M3D420SR / M3D421SR / M3D460SR / M3D550SR Rear Panel ETHERNET COMPONENT (BETTER) Y/V Pb/Cb Pr/Cr LR COMPOSITE [GOOD] Ethernet Component/Composite RGB PC RGB PC AUDIO OUT DIGITAL AUDIO OUT USB 2 USB 1 4 3.5mm Audio Out Optical Audio Out USB (1,2) 3 HDMI (2,3,4) 2 ARC 1 HDMI (BEST) PC AUDIO DTV/TV HDMI 1 (ARC) PC Audio In RF/Coaxial Rear Panel 2 Ethernet: Connect ethernet cable from home network. Component/ Composite: Connect component or composite video/audio...
M3D460SR User Manual
Page 17
... x 1080. Set the Screen Mode to Normal. • DVD Player with an HDMI port, be easily connected to an external device: • DVD or Blu-Ray player • Video game console • Cable box • External antenna • Or other device Before You Begin To connect a device to the HDMI ports on -screen menu. 3 Your HDTV can be sure you have an HDMI cable. 8 Connecting Your Devices Connecting Your Devices Once you have determined the best available connection type on...
... x 1080. Set the Screen Mode to Normal. • DVD Player with an HDMI port, be easily connected to an external device: • DVD or Blu-Ray player • Video game console • Cable box • External antenna • Or other device Before You Begin To connect a device to the HDMI ports on -screen menu. 3 Your HDTV can be sure you have an HDMI cable. 8 Connecting Your Devices Connecting Your Devices Once you have determined the best available connection type on...
M3D460SR User Manual
Page 25
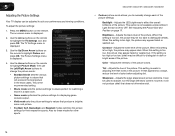
... the picture. M3D420SR / M3D421SR / M3D460SR / M3D550SR • Custom picture mode allows you to manually change the picture mode: • Standard mode sets the various picture settings to affect the overall brilliance of the picture. Adjusts the LED brightness to values that does not otherwise exist. 16 See Adjusting the Picture Size and Position on the remote to highlight Picture Mode, then use the Left/Right Arrow buttons to suit your preferences and viewing conditions...
... the picture. M3D420SR / M3D421SR / M3D460SR / M3D550SR • Custom picture mode allows you to manually change the picture mode: • Standard mode sets the various picture settings to affect the overall brilliance of the picture. Adjusts the LED brightness to values that does not otherwise exist. 16 See Adjusting the Picture Size and Position on the remote to highlight Picture Mode, then use the Left/Right Arrow buttons to suit your preferences and viewing conditions...

M3D460SR User Manual
Page 28
.... Adjusting the Advanced Audio Settings To adjust the advanced audio settings: 1. Sets the volume control properties for the Optical output when connected to change the setting: • Digital Audio Out - Use the Arrow buttons to highlight the setting you wish to adjust, then press Left/Right Arrow to highlight Advanced Audio, then press OK. Changes the type of processing for the analog RCA (red/white) connectors when connected to Standard.) 5 • Reset Audio Mode - StudioSound HD™ is displayed. 3. See Resetting the Audio Settings...
.... Adjusting the Advanced Audio Settings To adjust the advanced audio settings: 1. Sets the volume control properties for the Optical output when connected to change the setting: • Digital Audio Out - Use the Arrow buttons to highlight the setting you wish to adjust, then press Left/Right Arrow to highlight Advanced Audio, then press OK. Changes the type of processing for the analog RCA (red/white) connectors when connected to Standard.) 5 • Reset Audio Mode - StudioSound HD™ is displayed. 3. See Resetting the Audio Settings...
M3D460SR User Manual
Page 29
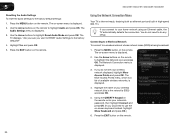
... any setup. The on the remote. The TV displays, "Are you sure you do not need to a wireless network whose network name (SSID) is the network's SSID) and press OK. 5. You do not see your wireless network (this is being broadcast: 1. The Network Connection menu is displayed. 3. The More Access Points menu, which is displayed. 2. Use the Arrow buttons to the factory default settings: 1. Using the Network Connection Menu Your TV is displayed. 4. Press the MENU button on -screen menu is a list...
... any setup. The on the remote. The TV displays, "Are you sure you do not need to a wireless network whose network name (SSID) is the network's SSID) and press OK. 5. You do not see your wireless network (this is being broadcast: 1. The Network Connection menu is displayed. 3. The More Access Points menu, which is displayed. 2. Use the Arrow buttons to the factory default settings: 1. Using the Network Connection Menu Your TV is displayed. 4. Press the MENU button on -screen menu is a list...
M3D460SR User Manual
Page 38
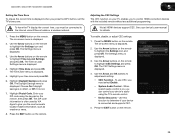
...'s user manual for details. The ZIP code information is displayed. 5. Press the MENU button on the remote. Use the Arrow and OK buttons to highlight the Settings icon and press OK. To enable, disable, or adjust CEC settings: 1. The CEC Settings menu is displayed. Press the EXIT button on the remote. Use the Arrow buttons on the remote to the internet via an Ethernet cable or a wireless network. 1. Use the Arrow buttons on the remote to adjust each setting: •...
...'s user manual for details. The ZIP code information is displayed. 5. Press the MENU button on the remote. Use the Arrow and OK buttons to highlight the Settings icon and press OK. To enable, disable, or adjust CEC settings: 1. The CEC Settings menu is displayed. Press the EXIT button on the remote. Use the Arrow buttons on the remote to the internet via an Ethernet cable or a wireless network. 1. Use the Arrow buttons on the remote to adjust each setting: •...
M3D460SR User Manual
Page 51
... press the Power/ Standby button on the remote aren't working electrical outlet. • Ensure the power cable is not good. • For the best image quality, view high-definition programs using digital sources. There is no headphones are connected to the TV. • Check the audio connections of external devices (Blu-ray player, game console, cable/satellite box) that are connected to the TV. • If you are using an antenna, the signal strength of...
... press the Power/ Standby button on the remote aren't working electrical outlet. • Ensure the power cable is not good. • For the best image quality, view high-definition programs using digital sources. There is no headphones are connected to the TV. • Check the audio connections of external devices (Blu-ray player, game console, cable/satellite box) that are connected to the TV. • If you are using an antenna, the signal strength of...

M3D460SR User Manual
Page 52
... you switch from , the difference may be noticable. • Use the Volume Up/Down buttons on the remote to adjust the volume. When I change the screen mode. Separate the TV from electrical appliances, cars, or flourescent lights. • Ensure all cables are always dark or always lit. • Your HDTV is precision-manufactured using an antenna, the signal strength of technology. M3D420SR / M3D421SR / M3D460SR / M3D550SR The picture is...
... you switch from , the difference may be noticable. • Use the Volume Up/Down buttons on the remote to adjust the volume. When I change the screen mode. Separate the TV from electrical appliances, cars, or flourescent lights. • Ensure all cables are always dark or always lit. • Your HDTV is precision-manufactured using an antenna, the signal strength of technology. M3D420SR / M3D421SR / M3D460SR / M3D550SR The picture is...
M3D460SR User Manual
Page 55
VIZIO Technical Support will be defective within the warranty period. This warranty does not cover, for the remaining portion of commercial use. Products with unreadable or removed serial numbers, or requiring routine 46 Limited Warranty maintenance are warranted for example: cosmetic damage, normal wear and tear, improper operation, improper voltage supply or power surges, signal issues, damages from the unit before it is serviced, regardless of...
VIZIO Technical Support will be defective within the warranty period. This warranty does not cover, for the remaining portion of commercial use. Products with unreadable or removed serial numbers, or requiring routine 46 Limited Warranty maintenance are warranted for example: cosmetic damage, normal wear and tear, improper operation, improper voltage supply or power surges, signal issues, damages from the unit before it is serviced, regardless of...

M3D460SR Quick Start Guide
Page 18
... picture quality seems low. • View high-definition (HD) programs when possible. • Ensure all cables are securely connected. • If you are using an antenna, the signal strength of operation: Monday - Sunday: 8 am to a window for the best signal. LET US HELP! Phone: (877) 698-4946 (TOLL FREE) Fax: (949) 585-9563 Email: techsupport@vizio.com Web: www.vizio.com Hours of the channel may...
... picture quality seems low. • View high-definition (HD) programs when possible. • Ensure all cables are securely connected. • If you are using an antenna, the signal strength of operation: Monday - Sunday: 8 am to a window for the best signal. LET US HELP! Phone: (877) 698-4946 (TOLL FREE) Fax: (949) 585-9563 Email: techsupport@vizio.com Web: www.vizio.com Hours of the channel may...
M3D460SR Quick Start Guide
Page 19
... player's user guide.) The TV displays "No Signal" • Ensure your device is displayed. See Resetting the Picture Settings in the user manual. • Check all cables to the picture. The colors on the remote and select the input to Wide or Zoom Mode. The Setup App is connected (HDMI, Composite, etc). I cannot return to • The on . Turn the 3D Blu-ray Player on first, then turn the 3D HDTV on -screen menu has guided setup. See Adjusting...
... player's user guide.) The TV displays "No Signal" • Ensure your device is displayed. See Resetting the Picture Settings in the user manual. • Check all cables to the picture. The colors on the remote and select the input to Wide or Zoom Mode. The Setup App is connected (HDMI, Composite, etc). I cannot return to • The on . Turn the 3D Blu-ray Player on first, then turn the 3D HDTV on -screen menu has guided setup. See Adjusting...


