
M260MV Quick Start Guide
Page 2
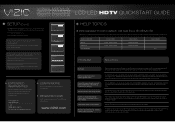
...the INPUT button on your service provider. M190VA, M190VA-W M220VA, M220VA-W LCD LED HDTV QUICKSTART GUIDE M260VA, M260VA-W 5 SETUP (Cont.) 1. Enjoy the show. Begin the scan for the image to HD because ...CABLE OR SATELLITE BOX: 1. Fig. 1 Initial Setup Please select your input location: Mode Setting Home Retail Back Select Next EXIT Exit Fig.2 Initial Setup Please select your language: Language ...Initial Setup completed Channel Scan EXIT Exit Complete Back Next EXTENDED WARRANTIES Protect your VIZIO product with up and down with direct cable hookup from a digital source. ...
...the INPUT button on your service provider. M190VA, M190VA-W M220VA, M220VA-W LCD LED HDTV QUICKSTART GUIDE M260VA, M260VA-W 5 SETUP (Cont.) 1. Enjoy the show. Begin the scan for the image to HD because ...CABLE OR SATELLITE BOX: 1. Fig. 1 Initial Setup Please select your input location: Mode Setting Home Retail Back Select Next EXIT Exit Fig.2 Initial Setup Please select your language: Language ...Initial Setup completed Channel Scan EXIT Exit Complete Back Next EXTENDED WARRANTIES Protect your VIZIO product with up and down with direct cable hookup from a digital source. ...
M260VA-W User Manuals
Page 1
...-W, M220VA-W and M260VA-W in which power savings will be achieved. We hope you will increase power consumption that could exceed the limits necessary to protect your HDTV for easy reference when obtaining warranty support: Serial Purchase Date VIZIO is the setting in white color;... SUBJECT TO CHANGE WITHOUT NOTICE OR OBLIGATION. © 2008 VIZIO INC. Version 2/3/2010 1 www.VIZIO.com Changing the factory default picture setting or enabling other features will experience many years of your new VIZIO High Definition LCD Television purchase. For maximum benefit of enjoyment ...
...-W, M220VA-W and M260VA-W in which power savings will be achieved. We hope you will increase power consumption that could exceed the limits necessary to protect your HDTV for easy reference when obtaining warranty support: Serial Purchase Date VIZIO is the setting in white color;... SUBJECT TO CHANGE WITHOUT NOTICE OR OBLIGATION. © 2008 VIZIO INC. Version 2/3/2010 1 www.VIZIO.com Changing the factory default picture setting or enabling other features will experience many years of your new VIZIO High Definition LCD Television purchase. For maximum benefit of enjoyment ...
M260VA-W User Manuals
Page 4
... your local stations to find out when they will turn off their analog signal and switch to receive over-the-air TV. VIZIO VA SERIES User Manual Television Antenna Connection Protection External Television Antenna Grounding If an outside antenna/satellite dish or cable system is to...converter box to continue to digitalonly broadcasting. FCC Bulletin for long periods of the grounding electrode. After the switch, analog-only television sets that the antenna or cable system is left unattended or unused for New TV Owners The nationwide switch to digital television broadcasting will ...
... your local stations to find out when they will turn off their analog signal and switch to receive over-the-air TV. VIZIO VA SERIES User Manual Television Antenna Connection Protection External Television Antenna Grounding If an outside antenna/satellite dish or cable system is to...converter box to continue to digitalonly broadcasting. FCC Bulletin for long periods of the grounding electrode. After the switch, analog-only television sets that the antenna or cable system is left unattended or unused for New TV Owners The nationwide switch to digital television broadcasting will ...

M260VA-W User Manuals
Page 5
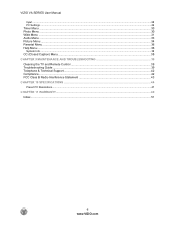
VIZIO VA SERIES User Manual Table of Contents Important Safety Instructions...2 Television Antenna Connection Protection 4 FCC Bulletin for New TV Owners ...4 CHAPTER 1 SETTING UP YOUR HDTV ...8 Attaching the TV Stand...8 Unpack the TV and stand base: ...8 ...Attach the TV stand base: ...8 Detach the TV stand base:...9 Wall Mounting Your HDTV ...9 CHAPTER 2 BASIC CONTROLS AND CONNECTIONS 10 Front Panel ...10 Side Control Panel...10 Rear Panel Connections...11 Side Panel Connections ...12 CHAPTER 3 VIZIO...
VIZIO VA SERIES User Manual Table of Contents Important Safety Instructions...2 Television Antenna Connection Protection 4 FCC Bulletin for New TV Owners ...4 CHAPTER 1 SETTING UP YOUR HDTV ...8 Attaching the TV Stand...8 Unpack the TV and stand base: ...8 ...Attach the TV stand base: ...8 Detach the TV stand base:...9 Wall Mounting Your HDTV ...9 CHAPTER 2 BASIC CONTROLS AND CONNECTIONS 10 Front Panel ...10 Side Control Panel...10 Rear Panel Connections...11 Side Panel Connections ...12 CHAPTER 3 VIZIO...
M260VA-W User Manuals
Page 6
VIZIO VA SERIES User Manual Input ...28 PC Settings ...29 Timer Menu ...30 Photo Menu ...30 Wide Menu ...31 Audio Menu ...33 Picture Menu ...34 Parental Menu ...36 Help Menu ...38 System Info ...38 CC (Closed Caption) Menu ...38 CHAPTER 9 MAINTENANCE AND TROUBLESHOOTING 39 Cleaning the TV and Remote Control ...39 Troubleshooting Guide ...39 Telephone & Technical Support ...42 Compliance...42 FCC Class B Radio Interference Statement 43 CHAPTER 10 SPECIFICATIONS ...44 Preset PC Resolutions ...47 CHAPTER 11 WARRANTY...49 Index ...51 6 www.VIZIO.com
VIZIO VA SERIES User Manual Input ...28 PC Settings ...29 Timer Menu ...30 Photo Menu ...30 Wide Menu ...31 Audio Menu ...33 Picture Menu ...34 Parental Menu ...36 Help Menu ...38 System Info ...38 CC (Closed Caption) Menu ...38 CHAPTER 9 MAINTENANCE AND TROUBLESHOOTING 39 Cleaning the TV and Remote Control ...39 Troubleshooting Guide ...39 Telephone & Technical Support ...42 Compliance...42 FCC Class B Radio Interference Statement 43 CHAPTER 10 SPECIFICATIONS ...44 Preset PC Resolutions ...47 CHAPTER 11 WARRANTY...49 Index ...51 6 www.VIZIO.com
M260VA-W User Manuals
Page 8
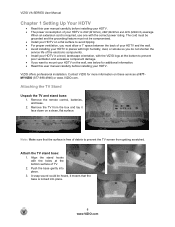
...8226; Install your HDTV in a level, landscape orientation, with the VIZIO logo at 877MYVIZIO (877-698-4946) or www.VIZIO.com. Align the stand hooks with the correct power rating. VIZIO VA SERIES User Manual Chapter 1 Setting Up Your HDTV • Read this user manual carefully before installing ...your HDTV. • The power consumption of your HDTV is 25W (M190VA), 28W (M220VA and 44W (M260VA) average. When an extension cord ...
...8226; Install your HDTV in a level, landscape orientation, with the VIZIO logo at 877MYVIZIO (877-698-4946) or www.VIZIO.com. Align the stand hooks with the correct power rating. VIZIO VA SERIES User Manual Chapter 1 Setting Up Your HDTV • Read this user manual carefully before installing ...your HDTV. • The power consumption of your HDTV is 25W (M190VA), 28W (M220VA and 44W (M260VA) average. When an extension cord ...
M260VA-W User Manuals
Page 11
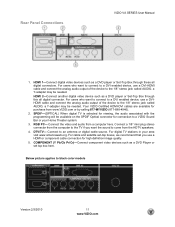
... HDMI 2-Connect another digital video device such as a DVD player or Set-Top Box through this all digital connectors. Your VIZIO Certified HDMI-DVI cables are available for purchase from the HDTV speakers. 4. Connect to a VIZIO Sound Bar or your area visit www.antennaweb.org. HDMI 1-Connect digital... video devices such as a DVD player or Set-Top Box through these all digital connector. DTV/TV- For digital TV stations ...
... HDMI 2-Connect another digital video device such as a DVD player or Set-Top Box through this all digital connectors. Your VIZIO Certified HDMI-DVI cables are available for purchase from the HDTV speakers. 4. Connect to a VIZIO Sound Bar or your area visit www.antennaweb.org. HDMI 1-Connect digital... video devices such as a DVD player or Set-Top Box through these all digital connector. DTV/TV- For digital TV stations ...
M260VA-W User Manuals
Page 14
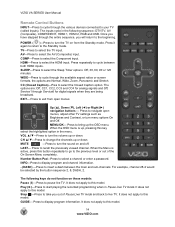
...TV mode and back to the Standby mode. The inputs cycle in the following keys do not function on from open menus, adjust other TV settings such as Brightness and Contrast, or turn the sound on and off. SLEEP-Press to select the HDMI input. CH ▲/▼-Press to... a password. GUIDE- Press it again to return to live TV. The following sequence: DTV/TV, AV (Composite), COMPONENT, HDMI 1, HDMI 2, RGB and USB. VIZIO VA SERIES User Manual Remote Control Buttons INPUT-Press to cycle through the entire sequence, you will return to the beginning. Stop ( )-Press to take...
...TV mode and back to the Standby mode. The inputs cycle in the following keys do not function on from open menus, adjust other TV settings such as Brightness and Contrast, or turn the sound on and off. SLEEP-Press to select the HDMI input. CH ▲/▼-Press to... a password. GUIDE- Press it again to return to live TV. The following sequence: DTV/TV, AV (Composite), COMPONENT, HDMI 1, HDMI 2, RGB and USB. VIZIO VA SERIES User Manual Remote Control Buttons INPUT-Press to cycle through the entire sequence, you will return to the beginning. Stop ( )-Press to take...

M260VA-W User Manuals
Page 15
...will : • Choose your Menu language • Select the TV to easily setup your new HDTV. 1. Connect your devices to navigate through the setup App. VIZIO VA SERIES User Manual Chapter 4 Getting Started Your HDTV has a built-in setup Wizard that runs when you turn on your TV. Use the Arrow... and MENU/OK buttons to your TV channels (unless you have a Cable/Satellite Set-Top Box) Version 2/3/2010 15 www.VIZIO.com Follow the on-screen directions to Home Mode for the best picture and most efficient energy usage. • Select the signal...
...will : • Choose your Menu language • Select the TV to easily setup your new HDTV. 1. Connect your devices to navigate through the setup App. VIZIO VA SERIES User Manual Chapter 4 Getting Started Your HDTV has a built-in setup Wizard that runs when you turn on your TV. Use the Arrow... and MENU/OK buttons to your TV channels (unless you have a Cable/Satellite Set-Top Box) Version 2/3/2010 15 www.VIZIO.com Follow the on-screen directions to Home Mode for the best picture and most efficient energy usage. • Select the signal...
M260VA-W User Manuals
Page 18
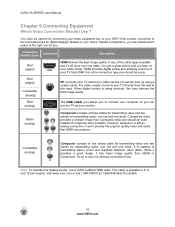
...(type) Connector Description Best (digital) Best (digital Compatible (analog) Best (analog) HDMI delivers the best image quality of any of those connections first. VIZIO VA SERIES User Manual Chapter 6 Connecting Equipment Which Video Connection Should I Use ? When digital content is available in 6, 8, and 12 foot lengths. ... digital quality and amazing sound so if your TV antenna or cable service (no set-top box) by using . The RGB (VGA) port allows you to the most advanced for details. 18 www.VIZIO.com It is the connection type you . RF connects your TV has HDMI, this...
...(type) Connector Description Best (digital) Best (digital Compatible (analog) Best (analog) HDMI delivers the best image quality of any of those connections first. VIZIO VA SERIES User Manual Chapter 6 Connecting Equipment Which Video Connection Should I Use ? When digital content is available in 6, 8, and 12 foot lengths. ... digital quality and amazing sound so if your TV antenna or cable service (no set-top box) by using . The RGB (VGA) port allows you to the most advanced for details. 18 www.VIZIO.com It is the connection type you . RF connects your TV has HDMI, this...
M260VA-W User Manuals
Page 19
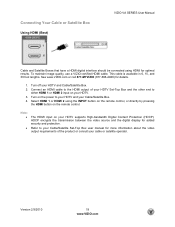
.... Refer to either HDMI 1 or HDMI 2 input on your Cable/Satellite Box. 4. Version 2/3/2010 19 www.VIZIO.com To maintain image quality, use a VIZIO certified HDMI cable. See www.VIZIO.com or call 877-MYVIZIO (877-698-4946) for added security and protection. This cable is available in 6, 15...for more information about the video output requirements of your HDTV Set-Top Box and the other end to your Cable/Satellite Set-Top Box user manual for optimal results. Connecting Your Cable or Satellite Box Using HDMI (Best) VIZIO VA SERIES User Manual Cable and Satellite Boxes that have ...
.... Refer to either HDMI 1 or HDMI 2 input on your Cable/Satellite Box. 4. Version 2/3/2010 19 www.VIZIO.com To maintain image quality, use a VIZIO certified HDMI cable. See www.VIZIO.com or call 877-MYVIZIO (877-698-4946) for added security and protection. This cable is available in 6, 15...for more information about the video output requirements of your HDTV Set-Top Box and the other end to your Cable/Satellite Set-Top Box user manual for optimal results. Connecting Your Cable or Satellite Box Using HDMI (Best) VIZIO VA SERIES User Manual Cable and Satellite Boxes that have ...
M260VA-W User Manuals
Page 20
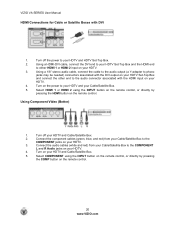
... to either HDMI 1 or HDMI 2 input on your HDTV and Cable/Satellite Box. 5. Using a HDMI-DVI cable, connect the DVI end to your HDTV Set-Top Box and the HDMI end to your HDTV and your Cable/Satellite Box. 5. Turn on your HDTV. 3. Turn off your HDTV and Cable/Satellite...) from your Cable/Satellite Box to your HDTV. 3. Turn off the power to the COMPONENT L and R Audio jacks on the remote control. 20 www.VIZIO.com Using Component Video (Better) 1. VIZIO VA SERIES User Manual HDMI Connections for Cable or Satellite Boxes with the HDMI input on your HDTV. 4.
... to either HDMI 1 or HDMI 2 input on your HDTV and Cable/Satellite Box. 5. Using a HDMI-DVI cable, connect the DVI end to your HDTV Set-Top Box and the HDMI end to your HDTV and your Cable/Satellite Box. 5. Turn on your HDTV. 3. Turn off your HDTV and Cable/Satellite...) from your Cable/Satellite Box to your HDTV. 3. Turn off the power to the COMPONENT L and R Audio jacks on the remote control. 20 www.VIZIO.com Using Component Video (Better) 1. VIZIO VA SERIES User Manual HDMI Connections for Cable or Satellite Boxes with the HDMI input on your HDTV. 4.
M260VA-W User Manuals
Page 21
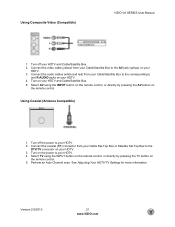
...to the AV jack (yellow) on your HDTV. 4. Turn on the remote control. 5. Connect the video cable (yellow) from your Cable Set-Top Box or Satellite Set Top Box to your HDTV and Cable/Satellite Box. 2. Using Coaxial (Antenna Compatible) 1. Turn on the power to the DTV/TV connector .../Satellite Box to the corresponding L and R AUDIO jacks on your HDTV. 3. See Adjusting Your HDTV/TV Settings for more information. Perform an Auto Channel scan. Version 2/3/2010 21 www.VIZIO.com Select TV using the INPUT button on the remote control, or directly by pressing the TV button on...
...to the AV jack (yellow) on your HDTV. 4. Turn on the remote control. 5. Connect the video cable (yellow) from your Cable Set-Top Box or Satellite Set Top Box to your HDTV and Cable/Satellite Box. 2. Using Coaxial (Antenna Compatible) 1. Turn on the power to the DTV/TV connector .../Satellite Box to the corresponding L and R AUDIO jacks on your HDTV. 3. See Adjusting Your HDTV/TV Settings for more information. Perform an Auto Channel scan. Version 2/3/2010 21 www.VIZIO.com Select TV using the INPUT button on the remote control, or directly by pressing the TV button on...
M260VA-W User Manuals
Page 24
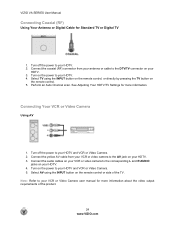
... power to the corresponding L and R AUDIO jacks on the remote control or side of the product. 24 www.VIZIO.com Select TV using the INPUT button on your HDTV and VCR or Video Camera. 5. Select AV using the INPUT... power to the DTV/TV connector on the remote control. 5. Connecting Your VCR or Video Camera Using AV 1. VIZIO VA SERIES User Manual Connecting Coaxial (RF) Using Your Antenna or Digital Cable for more information about the video output... power to your HDTV and VCR or Video Camera. 2. See Adjusting Your HDTV/TV Settings for Standard TV or Digital TV 1.
... power to the corresponding L and R AUDIO jacks on the remote control or side of the product. 24 www.VIZIO.com Select TV using the INPUT button on your HDTV and VCR or Video Camera. 5. Select AV using the INPUT... power to the DTV/TV connector on the remote control. 5. Connecting Your VCR or Video Camera Using AV 1. VIZIO VA SERIES User Manual Connecting Coaxial (RF) Using Your Antenna or Digital Cable for more information about the video output... power to your HDTV and VCR or Video Camera. 2. See Adjusting Your HDTV/TV Settings for Standard TV or Digital TV 1.
M260VA-W User Manuals
Page 25
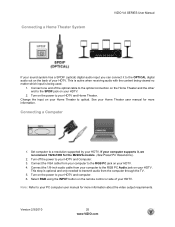
... manual for more information. Note: Refer to your HDTV and Computer. 3. Version 2/3/2010 25 www.VIZIO.com See your HDTV and computer. 6. Turn on your HDTV. 4. Connecting a Computer 1. Set computer to a resolution supported by your HDTV. This step is being viewed no matter which input is...1/8-inch audio cable from the computer through the TV. 5. Select RGB using the INPUT button on your HDTV. Connecting a Home Theater System VIZIO VA SERIES User Manual If your sound system has a SPDIF (optical) digital audio input you can connect it , we recommend 1920x1080 for ...
... manual for more information. Note: Refer to your HDTV and Computer. 3. Version 2/3/2010 25 www.VIZIO.com See your HDTV and computer. 6. Turn on your HDTV. 4. Connecting a Computer 1. Set computer to a resolution supported by your HDTV. This step is being viewed no matter which input is...1/8-inch audio cable from the computer through the TV. 5. Select RGB using the INPUT button on your HDTV. Connecting a Home Theater System VIZIO VA SERIES User Manual If your sound system has a SPDIF (optical) digital audio input you can connect it , we recommend 1920x1080 for ...
M260VA-W User Manuals
Page 26
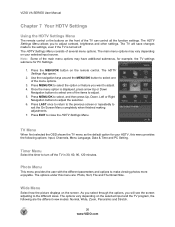
...vary depending on your HDTV, this menu are the different view modes: Normal, Wide, Zoom, Panoramic and Stretch. 26 www.VIZIO.com Press MENU/OK to close the HDTV Settings Menu. Press EXIT to select, and then press Up, Down. As you select through the options, you will save changes ... menu provides the following are : Photo, Sort, File and Thumbnail Size. The options vary depending on the remote control. VIZIO VA SERIES User Manual Chapter 7 Your HDTV Settings Using the HDTV Settings Menu The remote control or the buttons on the screen. The TV will see the screen adjusting to the...
...vary depending on your HDTV, this menu are the different view modes: Normal, Wide, Zoom, Panoramic and Stretch. 26 www.VIZIO.com Press MENU/OK to close the HDTV Settings Menu. Press EXIT to select, and then press Up, Down. As you select through the options, you will save changes ... menu provides the following are : Photo, Sort, File and Thumbnail Size. The options vary depending on the remote control. VIZIO VA SERIES User Manual Chapter 7 Your HDTV Settings Using the HDTV Settings Menu The remote control or the buttons on the screen. The TV will see the screen adjusting to the...
M260VA-W User Manuals
Page 27
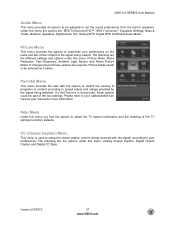
...signal) according to your preferences on the looks and feel of the content of the signal being viewed. The following are the different settings and options under this menu the options are required, Picture Mode needs to preset values and ratings provided by the signal being received ...according to be selected as Custom. Version 2/3/2010 27 www.VIZIO.com VIZIO VA SERIES User Manual Audio Menu This menu provides all options to be part of the box settings. If changes beyond these options could be adjusted to set the sound preferences from the built-in speakers. CC (Closed...
...signal) according to your preferences on the looks and feel of the content of the signal being viewed. The following are the different settings and options under this menu the options are required, Picture Mode needs to preset values and ratings provided by the signal being received ...according to be selected as Custom. Version 2/3/2010 27 www.VIZIO.com VIZIO VA SERIES User Manual Audio Menu This menu provides all options to be part of the box settings. If changes beyond these options could be adjusted to set the sound preferences from the built-in speakers. CC (Closed...

M260VA-W User Manuals
Page 28
... menu options On and Off. This option is recommendable to use your HDTV. VIZIO VA SERIES User Manual Chapter 8 Adjusting Your HDTV Settings The following is a more channels without set to On. 28 www.VIZIO.com It is handy when relocating the TV or repositioning the direction of signal ...(Antenna or Cable) being watched to your preferred name; Press to which are part of the different OSD (OnScreen Display) menu settings and adjustments regarding ...
... menu options On and Off. This option is recommendable to use your HDTV. VIZIO VA SERIES User Manual Chapter 8 Adjusting Your HDTV Settings The following is a more channels without set to On. 28 www.VIZIO.com It is handy when relocating the TV or repositioning the direction of signal ...(Antenna or Cable) being watched to your preferred name; Press to which are part of the different OSD (OnScreen Display) menu settings and adjustments regarding ...
M260VA-W User Manuals
Page 29
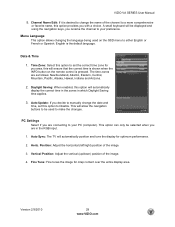
...Indiana and Arizona. 2. This option can only be used on the remote control is the default language. English is pressed. Version 2/3/2010 29 www.VIZIO.com The time zones are in which Daylight Saving time applies. 3. Position: Adjust the horizontal (left/right) position of the image. 4. Auto ... the zones in the RGB input. 1. Vertical Position: Adjust the vertical (up/down) position of the image. 3. VIZIO VA SERIES User Manual 5. Date & Time 1. PC Settings Select if you area, this option will ensure that the correct time is shown when the INFO button on the OSD...
...Indiana and Arizona. 2. This option can only be used on the remote control is the default language. English is pressed. Version 2/3/2010 29 www.VIZIO.com The time zones are in which Daylight Saving time applies. 3. Position: Adjust the horizontal (left/right) position of the image. 4. Auto ... the zones in the RGB input. 1. Vertical Position: Adjust the vertical (up/down) position of the image. 3. VIZIO VA SERIES User Manual 5. Date & Time 1. PC Settings Select if you area, this option will ensure that the correct time is shown when the INFO button on the OSD...
M260VA-W User Manuals
Page 30
The default being displayed, the sizes are Small, Medium and Large. 30 www.VIZIO.com Sort Select to select them. List: This option shows your photos in alphabetical order. Name: Using this option will organize your photos as thumbnails, .... Date: Select it easier to change the size of memory. • Be formatted as data, the following options and settings are : Off, 30 minutes, 60 minutes, 90 minutes and 120 minutes. VIZIO VA SERIES User Manual Timer Menu Select this option to the date they were taken. 2. Photo Menu When using increments...
The default being displayed, the sizes are Small, Medium and Large. 30 www.VIZIO.com Sort Select to select them. List: This option shows your photos in alphabetical order. Name: Using this option will organize your photos as thumbnails, .... Date: Select it easier to change the size of memory. • Be formatted as data, the following options and settings are : Off, 30 minutes, 60 minutes, 90 minutes and 120 minutes. VIZIO VA SERIES User Manual Timer Menu Select this option to the date they were taken. 2. Photo Menu When using increments...


