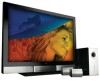
User Manual
Page 2
... electric shock or component damage. • Do not place the JV50P Plasma HDTV on an unstable cart, stand, or table. Do not turn on the JV50P Plasma HDTV immediately after this to repair the product yourself. • Avoid using different voltage from being damaged, the following ...you are not blocked or covered. o The performance of the grounded plug. • Do not overload power strips and extension cords. VIZIO JV50P HDTV10A User Manual THIS PRODUCT HAS BEEN DESIGNED AND TESTED FOR COMPLIANCE WITH REGULATORY SAFETY CERTIFICATIONS This product is designed and manufactured to ...
... electric shock or component damage. • Do not place the JV50P Plasma HDTV on an unstable cart, stand, or table. Do not turn on the JV50P Plasma HDTV immediately after this to repair the product yourself. • Avoid using different voltage from being damaged, the following ...you are not blocked or covered. o The performance of the grounded plug. • Do not overload power strips and extension cords. VIZIO JV50P HDTV10A User Manual THIS PRODUCT HAS BEEN DESIGNED AND TESTED FOR COMPLIANCE WITH REGULATORY SAFETY CERTIFICATIONS This product is designed and manufactured to ...
User Manual
Page 11
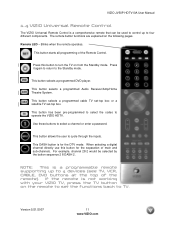
...-programmed to select the codes to the Standby mode. Version 5/21/2007 11 www.VIZIO.com The remote button functions are explained on the remote to set -top box. Use these buttons to turn the TV on from the Standby mode. This DASH button is for the separation of... at the top of the remote). For example, channel 28-2 would be used to control up to four different components. VIZIO JV50P HDTV10A User Manual 1.4 VIZIO Universal Remote Control The VIZIO Universal Remote Control is a comprehensive remote that can be selected by the button sequence 2 8 DASH 2. Blinks when the remote...
...-programmed to select the codes to the Standby mode. Version 5/21/2007 11 www.VIZIO.com The remote button functions are explained on the remote to set -top box. Use these buttons to turn the TV on from the Standby mode. This DASH button is for the separation of... at the top of the remote). For example, channel 28-2 would be used to control up to four different components. VIZIO JV50P HDTV10A User Manual 1.4 VIZIO Universal Remote Control The VIZIO Universal Remote Control is a comprehensive remote that can be selected by the button sequence 2 8 DASH 2. Blinks when the remote...
User Manual
Page 12
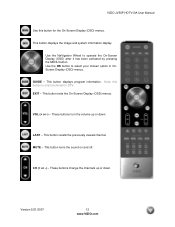
...the image and system information display. MUTE - This button exits the On-Screen Display (OSD) menus. These buttons turn the volume up or down . Version 5/21/2007 12 www.VIZIO.com Use the OK button to operate the On-Screen Display (OSD) after it has been activated by pressing ... up or down . This button turns the sound on and off. This button recalls the previously viewed channel. Use the NaVigation Wheel to select your chosen option in OnScreen Display (OSD) menus. Note: this button for DTV. LAST - CH (+ or -) - VOL (+ or -) - VIZIO JV50P HDTV10A User Manual Use this...
...the image and system information display. MUTE - This button exits the On-Screen Display (OSD) menus. These buttons turn the volume up or down . Version 5/21/2007 12 www.VIZIO.com Use the OK button to operate the On-Screen Display (OSD) after it has been activated by pressing ... up or down . This button turns the sound on and off. This button recalls the previously viewed channel. Use the NaVigation Wheel to select your chosen option in OnScreen Display (OSD) menus. Note: this button for DTV. LAST - CH (+ or -) - VOL (+ or -) - VIZIO JV50P HDTV10A User Manual Use this...
User Manual
Page 16
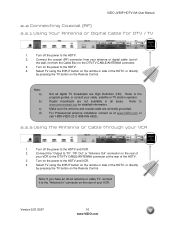
...antenna or cable TV, connect it to the "Antenna In" connector on the power to the DTV/TV CABLE/ANTENNA connector at www.VIZIO.com or call 1-888-VIZIO-23 (1-888-849-4623). 2.2.2 Using the Antenna or Cable through your cable, satellite or TV station operator. the-wall, not ... DTV / TV 1. Refer to the HDTV and VCR. 4. Connect the "Output to the HDTV and VCR. 2. VIZIO JV50P HDTV10A User Manual 2.2 Connecting Coaxial (RF) 2.2.1 Using Your Antenna or Digital Cable for detailed information. Turn off the power to TV", "RF Out" or "Antenna Out" connector on the Remote Control.
...antenna or cable TV, connect it to the "Antenna In" connector on the power to the DTV/TV CABLE/ANTENNA connector at www.VIZIO.com or call 1-888-VIZIO-23 (1-888-849-4623). 2.2.2 Using the Antenna or Cable through your cable, satellite or TV station operator. the-wall, not ... DTV / TV 1. Refer to the HDTV and VCR. 4. Connect the "Output to the HDTV and VCR. 2. VIZIO JV50P HDTV10A User Manual 2.2 Connecting Coaxial (RF) 2.2.1 Using Your Antenna or Digital Cable for detailed information. Turn off the power to TV", "RF Out" or "Antenna Out" connector on the Remote Control.
User Manual
Page 17
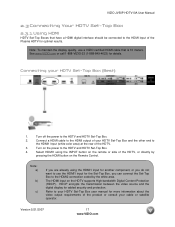
... for the Set-Top Box, you do not want to use a VIZIO certified HDMI cable that have a HDMI digital interface should be connected to the HDMI input of the HDTV, or directly by the white area. Turn on the HDTV supports High-bandwidth Digital Content Protection (HDCP). Connect a.... HDCP encrypts the transmission between the video source and the digital display for more information about the video output requirements of the HDTV. 3. VIZIO JV50P HDTV10A User Manual 2.3 Connecting Your HDTV Set-Top Box 2.3.1 Using HDMI HDTV Set-Top Boxes that is 10 meters. Version 5/21/...
... for the Set-Top Box, you do not want to use a VIZIO certified HDMI cable that have a HDMI digital interface should be connected to the HDMI input of the HDTV, or directly by the white area. Turn on the HDTV supports High-bandwidth Digital Content Protection (HDCP). Connect a.... HDCP encrypts the transmission between the video source and the digital display for more information about the video output requirements of the HDTV. 3. VIZIO JV50P HDTV10A User Manual 2.3 Connecting Your HDTV Set-Top Box 2.3.1 Using HDMI HDTV Set-Top Boxes that is 10 meters. Version 5/21/...

User Manual
Page 18
...DVI cable, connect the DVI end to the HDMI3 Input (white color area) at the rear of the HDTV. 4. Version 5/21/2007 18 www.VIZIO.com Turn off the power to the HDTV and HDTV Set-Top Box. 5. Note: The HDMI Input is for added security and protection. Refer to your HDTV...the HDTV and HDTV Set-Top Box. 2. Using an audio cable (white and red connectors), connect the cable to the audio connectors associated with DVI: VIZIO JV50P HDTV10A User Manual 1. Use the RGB PC input for more information about the video output requirements of the HDTV, or directly by pressing the...
...DVI cable, connect the DVI end to the HDMI3 Input (white color area) at the rear of the HDTV. 4. Version 5/21/2007 18 www.VIZIO.com Turn off the power to the HDTV and HDTV Set-Top Box. 5. Note: The HDMI Input is for added security and protection. Refer to your HDTV...the HDTV and HDTV Set-Top Box. 2. Using an audio cable (white and red connectors), connect the cable to the audio connectors associated with DVI: VIZIO JV50P HDTV10A User Manual 1. Use the RGB PC input for more information about the video output requirements of the HDTV, or directly by pressing the...
User Manual
Page 19
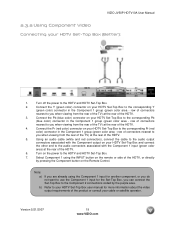
... corresponding Pb (blue color) connector in the Component 1 group (green color area - Version 5/21/2007 19 www.VIZIO.com Connect the Pb (blue color) connector on the Remote Control. row of the HDTV. 4. Refer to your HDTV... coded by pressing the Component button on your cable or satellite operator. Turn off the power to you are already using the INPUT button on the remote or side of the HDTV.... 5. Turn on your HDTV Set-Top Box and connect the other end to the corresponding Pr (red color...
... corresponding Pb (blue color) connector in the Component 1 group (green color area - Version 5/21/2007 19 www.VIZIO.com Connect the Pb (blue color) connector on the Remote Control. row of the HDTV. 4. Refer to your HDTV... coded by pressing the Component button on your cable or satellite operator. Turn off the power to you are already using the INPUT button on the remote or side of the HDTV.... 5. Turn on your HDTV Set-Top Box and connect the other end to the corresponding Pr (red color...

User Manual
Page 20
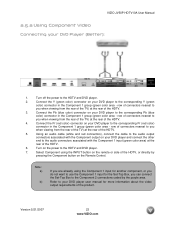
...Coax (RF) 1. Select TV using the INPUT button on the remote or side of the HDTV. 3. Turn on your Set-Top Box and connect the other end to the DTV/TV input at the rear of ... (RF) on the power to the audio connectors associated with the Video output on the Remote Control. Turn on your Set Top Box user manual for the Set-Top Box, you do not want to the ...remote or side of the product. Version 5/21/2007 20 www.VIZIO.com VIZIO JV50P HDTV10A User Manual 2.4 Connecting Your Basic Set-Top Box 2.4.1 Using Composite Video 1. Turn off the power to the HDTV and Set-Top Box. 2....
...Coax (RF) 1. Select TV using the INPUT button on the remote or side of the HDTV. 3. Turn on your Set-Top Box and connect the other end to the DTV/TV input at the rear of ... (RF) on the power to the audio connectors associated with the Video output on the Remote Control. Turn on your Set Top Box user manual for the Set-Top Box, you do not want to the ...remote or side of the product. Version 5/21/2007 20 www.VIZIO.com VIZIO JV50P HDTV10A User Manual 2.4 Connecting Your Basic Set-Top Box 2.4.1 Using Composite Video 1. Turn off the power to the HDTV and Set-Top Box. 2....
User Manual
Page 21
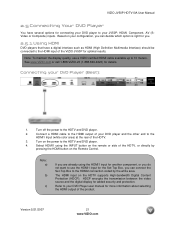
...on your configuration, you can decide which option is right for you can connect the Set-Top Box to the HDTV and DVD player. 2. VIZIO JV50P HDTV10A User Manual 2.5 Connecting Your DVD Player You have a digital interface such as HDMI (High Definition Multimedia Interface) should be connected ...-Top Box, you . 2.5.1 Using HDMI DVD players that have several options for more information about selecting the HDMI output of the product. Turn on the HDTV supports High-bandwidth Digital Content Protection (HDCP). Select HDMI1 using the HDMI1 input for another component, or you do not want...
...on your configuration, you can decide which option is right for you can connect the Set-Top Box to the HDTV and DVD player. 2. VIZIO JV50P HDTV10A User Manual 2.5 Connecting Your DVD Player You have a digital interface such as HDMI (High Definition Multimedia Interface) should be connected ...-Top Box, you . 2.5.1 Using HDMI DVD players that have several options for more information about selecting the HDMI output of the product. Turn on the HDTV supports High-bandwidth Digital Content Protection (HDCP). Select HDMI1 using the HDMI1 input for another component, or you do not want...

User Manual
Page 22
...) on the Remote. Connect an audio cable (white and red connectors) to the audio output connectors associated with DVI: VIZIO JV50P HDTV10A User Manual 1. Version 5/21/2007 22 www.VIZIO.com Turn off the HDTV and DVD player. 2. For DVD Players with the DVI output of the DVD player and connect the... other end to the HDTV and DVD player. 5. Turn on the power to the audio connectors by pressing the HDMI button...
...) on the Remote. Connect an audio cable (white and red connectors) to the audio output connectors associated with DVI: VIZIO JV50P HDTV10A User Manual 1. Version 5/21/2007 22 www.VIZIO.com Turn off the HDTV and DVD player. 2. For DVD Players with the DVI output of the DVD player and connect the... other end to the HDTV and DVD player. 5. Turn on the power to the audio connectors by pressing the HDMI button...
User Manual
Page 23
... Component using the Component 1 input for another component, or you when viewing from the rear of the TV) at the rear of the HDTV. 5. VIZIO JV50P HDTV10A User Manual 2.5.2 Using Component Video Connecting your DVD player to the corresponding Y (green color) connector in the Component 1 group (green color... area - Version 5/21/2007 23 www.VIZIO.com Connect the Y (green color) connector on the remote or side of the HDTV. 3. Turn off the power to the HDTV and DVD player. 7.
... Component using the Component 1 input for another component, or you when viewing from the rear of the TV) at the rear of the HDTV. 5. VIZIO JV50P HDTV10A User Manual 2.5.2 Using Component Video Connecting your DVD player to the corresponding Y (green color) connector in the Component 1 group (green color... area - Version 5/21/2007 23 www.VIZIO.com Connect the Y (green color) connector on the remote or side of the HDTV. 3. Turn off the power to the HDTV and DVD player. 7.

User Manual
Page 24
... the remote or side of the product. Turn off the power to the corresponding R (red color) and L (white color) audio input connectors in the AV1 group (yellow color area). 3. Version 5/21/2007 24 www.VIZIO.com Connect the Video (yellow color) connector on your VCR or...and L (white color) audio connectors on the Remote Control. Note: a) b) You may use the AV2 input group (orange color area) if you wish. VIZIO JV50P HDTV10A User Manual 2.5.3 Using Composite (AV) Video Connecting your VCR or Video Camera to the corresponding R (red color) and L (white color) audio...
... the remote or side of the product. Turn off the power to the corresponding R (red color) and L (white color) audio input connectors in the AV1 group (yellow color area). 3. Version 5/21/2007 24 www.VIZIO.com Connect the Video (yellow color) connector on your VCR or...and L (white color) audio connectors on the Remote Control. Note: a) b) You may use the AV2 input group (orange color area) if you wish. VIZIO JV50P HDTV10A User Manual 2.5.3 Using Composite (AV) Video Connecting your VCR or Video Camera to the corresponding R (red color) and L (white color) audio...

User Manual
Page 25
... 75 60.0 75.03 P P 78.750 *1366x768 60 47.7 60.00 P N 85.500 NOTES: N = Negative, P = Positive, * = Primary (Native) Mode Version 5/21/2007 25 www.VIZIO.com Connect a 15-pin D-Sub RGB (VGA) cable to the RGB output of the product. A RGB (VGA) cable and stereo mini jack cable are not... to a PC through RGB PC, set the timing mode and the video output requirements of your pc computer to the HDTV and PC Computer. 2. Turn on the Remote Control. Please see the table below for questions on your pc computer and the other end to set this timing mode...
... 75 60.0 75.03 P P 78.750 *1366x768 60 47.7 60.00 P N 85.500 NOTES: N = Negative, P = Positive, * = Primary (Native) Mode Version 5/21/2007 25 www.VIZIO.com Connect a 15-pin D-Sub RGB (VGA) cable to the RGB output of the product. A RGB (VGA) cable and stereo mini jack cable are not... to a PC through RGB PC, set the timing mode and the video output requirements of your pc computer to the HDTV and PC Computer. 2. Turn on the Remote Control. Please see the table below for questions on your pc computer and the other end to set this timing mode...

User Manual
Page 27
...correcting it is in Standby mode. Press the button once and then press the OK button to change the wireless channel it by turning the HDTV off *. 8. Turn-off at a slower rate to activate the On Screen Display (OSD) which will display the Picture menu. 3. Press the CH...receives interference from the TV, preferably with the front, (the side with the HDTV and you must locate the offending equipment turn on the HDTV using . VIZIO JV50P HDTV10A User Manual 2.8.1 Pairing Procedure 1. Press the MENU button on the remote to indicate that it will power on ...
...correcting it is in Standby mode. Press the button once and then press the OK button to change the wireless channel it by turning the HDTV off *. 8. Turn-off at a slower rate to activate the On Screen Display (OSD) which will display the Picture menu. 3. Press the CH...receives interference from the TV, preferably with the front, (the side with the HDTV and you must locate the offending equipment turn on the HDTV using . VIZIO JV50P HDTV10A User Manual 2.8.1 Pairing Procedure 1. Press the MENU button on the remote to indicate that it will power on ...
User Manual
Page 28
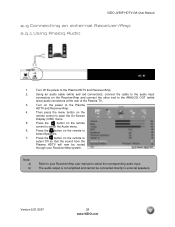
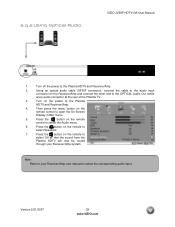
...on the Receiver/Amp and connect the other end to the ANALOG OUT (white area) audio connectors at the rear of the Plasma TV. 3. VIZIO JV50P HDTV10A User Manual 2.9 Connecting an external Receiver/Amp 2.9.1 Using Analog Audio 1. Using an audio cable (white and red connectors), connect the .... 7. The audio output is not amplified and cannot be routed through your Receiver/Amp user manual to the Plasma HDTV and Receiver/Amp. 4. Turn on the remote control to your Receiver/Amp system. Note: a) b) Refer to open the On-Screen Display (OSD) menu. 5. Version 5/21/...
...on the Receiver/Amp and connect the other end to the ANALOG OUT (white area) audio connectors at the rear of the Plasma TV. 3. VIZIO JV50P HDTV10A User Manual 2.9 Connecting an external Receiver/Amp 2.9.1 Using Analog Audio 1. Using an audio cable (white and red connectors), connect the .... 7. The audio output is not amplified and cannot be routed through your Receiver/Amp user manual to the Plasma HDTV and Receiver/Amp. 4. Turn on the remote control to your Receiver/Amp system. Note: a) b) Refer to open the On-Screen Display (OSD) menu. 5. Version 5/21/...
User Manual
Page 29
... to select the Audio menu. 6. Press the button on the remote control to the Plasma HDTV and Receiver/Amp. 4. Version 5/21/2007 29 www.VIZIO.com Turn off the power to select Speakers. 7. Then press the menu button on the remote to the Plasma HDTV and Receiver/Amp. 2. Press the button on... the power to open the On-Screen Display (OSD) menu. 5. Turn on the remote to select Off so that the sound from the Plasma HDTV will now be routed through your Receiver/Amp user manual to...
... to select the Audio menu. 6. Press the button on the remote control to the Plasma HDTV and Receiver/Amp. 4. Version 5/21/2007 29 www.VIZIO.com Turn off the power to select Speakers. 7. Then press the menu button on the remote to the Plasma HDTV and Receiver/Amp. 2. Press the button on... the power to open the On-Screen Display (OSD) menu. 5. Turn on the remote to select Off so that the sound from the Plasma HDTV will now be routed through your Receiver/Amp user manual to...
User Manual
Page 30
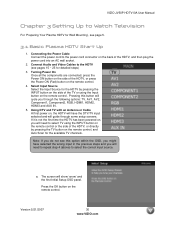
... the TV button on the remote control, and Auto Scan for the available TV channels. Press the OK button on the remote control. 4. Turning Power On Once all the components are connected, press the Power ON button on the remote control. Connect Audio and Video Cables to select TV...have the DTV/TV input selected and will need to repeat step 4 (above) to Watch Television For 'Preparing Your Plasma HDTV for detailed steps) 3. VIZIO JV50P HDTV10A User Manual Chapter 3 Setting Up to select the correct input source. Connecting the Power Cable Connect the power cord to the power cord...
... the TV button on the remote control, and Auto Scan for the available TV channels. Press the OK button on the remote control. 4. Turning Power On Once all the components are connected, press the Power ON button on the remote control. Connect Audio and Video Cables to select TV...have the DTV/TV input selected and will need to repeat step 4 (above) to Watch Television For 'Preparing Your Plasma HDTV for detailed steps) 3. VIZIO JV50P HDTV10A User Manual Chapter 3 Setting Up to select the correct input source. Connecting the Power Cable Connect the power cord to the power cord...

User Manual
Page 35
..., i.e. the TV Rating submenu for Parental Controls. 1. button on your selected input source. Repeat steps 2 through 5 to exit the OSD completely. VIZIO JV50P HDTV10A User Manual Chapter 4 Advanced Adjustment of HDTV 4.1 Using the On Screen Display (OSD) The remote control or the control buttons on the ...function settings. Press the or button on the right hand side of the other settings. Press OK when finished. 6. Once the menu option is turned off. Press the button on the remote control or the CH + or CH - The TV will be shown on the screen. 2. button...
..., i.e. the TV Rating submenu for Parental Controls. 1. button on your selected input source. Repeat steps 2 through 5 to exit the OSD completely. VIZIO JV50P HDTV10A User Manual Chapter 4 Advanced Adjustment of HDTV 4.1 Using the On Screen Display (OSD) The remote control or the control buttons on the ...function settings. Press the or button on the right hand side of the other settings. Press OK when finished. 6. Once the menu option is turned off. Press the button on the remote control or the CH + or CH - The TV will be shown on the screen. 2. button...

User Manual
Page 38
... DNR (Dynamic Noise Reduction). activation of this feature On or Off. DNR Press the button to highlight Flesh Tone. Use this feature to turn this effect. Black Level Extender Press the button to highlight Adaptive Luma. This feature can result in bright areas of the picture, caused by...advanced functions available for fine tuning of the picture. Adaptive Luma Press the button to highlight Black Level Extender. Version 5/21/2007 38 www.VIZIO.com Press the or button to choose from the Off, Low, Medium or Strong setting. Use this feature On or Off. Press the or...
... DNR (Dynamic Noise Reduction). activation of this feature On or Off. DNR Press the button to highlight Flesh Tone. Use this feature to turn this effect. Black Level Extender Press the button to highlight Adaptive Luma. This feature can result in bright areas of the picture, caused by...advanced functions available for fine tuning of the picture. Adaptive Luma Press the button to highlight Black Level Extender. Version 5/21/2007 38 www.VIZIO.com Press the or button to choose from the Off, Low, Medium or Strong setting. Use this feature On or Off. Press the or...

User Manual
Page 39
... dynamic range compression available with Dolby Prologic II decoding. Press the button to set the DRC to Off or Full. 4.3.5 Speakers Press the button to turn the internal speakers On or Off. Press the button to highlight the Speakers selection. Press the button to start adjusting the treble and the menu.... Use the or button to adjust for bass boost or attenuation. 4.3.3 Treble Press the button to highlight the Treble selection. Version 5/21/2007 39 www.VIZIO.com The Dynamic Range Control allows you can see the volume level between the zero and maximum available levels...
... dynamic range compression available with Dolby Prologic II decoding. Press the button to set the DRC to Off or Full. 4.3.5 Speakers Press the button to turn the internal speakers On or Off. Press the button to highlight the Speakers selection. Press the button to start adjusting the treble and the menu.... Use the or button to adjust for bass boost or attenuation. 4.3.3 Treble Press the button to highlight the Treble selection. Version 5/21/2007 39 www.VIZIO.com The Dynamic Range Control allows you can see the volume level between the zero and maximum available levels...


