User Manual
Page 4
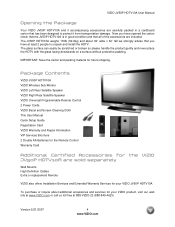
... 2 Double AA Batteries for the Remote Control Warranty Card Additional Certified Accessories for the VIZIO JV50P HDTV10A are sold separately Wall Mounts High Definition Cables Extra or replacement Remote VIZIO also offers Installation Services and Extended Warranty Services for your VIZIO JV50P HDTV10A To purchase or inquire about 49" wide x 32" tall we strongly...
... 2 Double AA Batteries for the Remote Control Warranty Card Additional Certified Accessories for the VIZIO JV50P HDTV10A are sold separately Wall Mounts High Definition Cables Extra or replacement Remote VIZIO also offers Installation Services and Extended Warranty Services for your VIZIO JV50P HDTV10A To purchase or inquire about 49" wide x 32" tall we strongly...
User Manual
Page 5
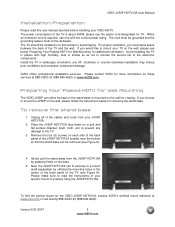
...the JV50P HDTV10A by utilizing the mounting holes in landscape orientation; The TV should be kept on the stand base or mounted on the wall for the VIZIO JV50P HDTV10A, browse VIZIO's certified mount selection at 888-VIZIO-23 (888-849-4623) or www.VIZIO.com. any damage to the ...user manual carefully before installing your VIZIO HDTV. Version 5/21/2007 5 www.VIZIO.com VIZIO JV50P HDTV10A User Manual Installation Preparation Please read the instructions of your specific mount to mount the JV50P on these services at www.vizio.com or call directly 888-VIZIO-23 (888-849-4623). ...
...the JV50P HDTV10A by utilizing the mounting holes in landscape orientation; The TV should be kept on the stand base or mounted on the wall for the VIZIO JV50P HDTV10A, browse VIZIO's certified mount selection at 888-VIZIO-23 (888-849-4623) or www.VIZIO.com. any damage to the ...user manual carefully before installing your VIZIO HDTV. Version 5/21/2007 5 www.VIZIO.com VIZIO JV50P HDTV10A User Manual Installation Preparation Please read the instructions of your specific mount to mount the JV50P on these services at www.vizio.com or call directly 888-VIZIO-23 (888-849-4623). ...
User Manual
Page 26
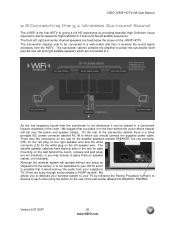
...to your HDTV and it is possible that you place it would pick-up the audio from the HDTV. VIZIO JV50P HDTV10A User Manual 2.8 Connecting the 5.1 Wireless Surround Sound The JV50P is the first HDTV to giving... the red plug on the right speaker wire and the white connector (LS) for easy mounting on the left , right and center channel speakers are fixed below the screen of the JV50P HDTV. Version... 5/21/2007 26 www.VIZIO.com We suggest that it on speaker stands, (not included). The satellite speaker cabinets have keyhole...
...to your HDTV and it is possible that you place it would pick-up the audio from the HDTV. VIZIO JV50P HDTV10A User Manual 2.8 Connecting the 5.1 Wireless Surround Sound The JV50P is the first HDTV to giving... the red plug on the right speaker wire and the white connector (LS) for easy mounting on the left , right and center channel speakers are fixed below the screen of the JV50P HDTV. Version... 5/21/2007 26 www.VIZIO.com We suggest that it on speaker stands, (not included). The satellite speaker cabinets have keyhole...
User Manual
Page 30
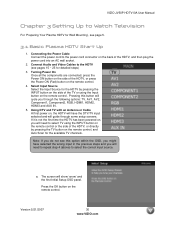
..., AV2, Component1, Component2, RGB, HDMI1, HDMI2, HDMI3 and AUX IN. 5. a. Select Input Source Select the Input Source for detailed steps) 3. Version 5/21/2007 30 www.VIZIO.com Press the OK button on the remote control. 4. If it is not the first time the HDTV has been powered on the remote control..., and Auto Scan for Wall Mounting', see this button will need to repeat step 4 (above) to the power cord connector on the back of the HDTV, and then plug the power...
..., AV2, Component1, Component2, RGB, HDMI1, HDMI2, HDMI3 and AUX IN. 5. a. Select Input Source Select the Input Source for detailed steps) 3. Version 5/21/2007 30 www.VIZIO.com Press the OK button on the remote control. 4. If it is not the first time the HDTV has been powered on the remote control..., and Auto Scan for Wall Mounting', see this button will need to repeat step 4 (above) to the power cord connector on the back of the HDTV, and then plug the power...
User Manual
Page 57
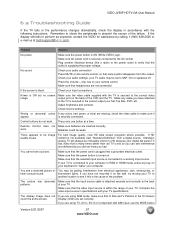
...TV fails or the performance changes dramatically, check the display in accordance with 480i input, use the WIDE button Version 5/21/2007 57 www.VIZIO.com Power is not available view "Standard Definition" from electrical appliances, cars, motorcycles, or hear unusual sound. Remote Control does not Make ...connection Press MUTE on your TV to another electrical device (like a radio) to the power outlet to the AC socket. If you have not mounted it appear. Problem Solution No power. Plug another location to SAP, min or speakers off Press the Volume + (Up) key on the wall...
...TV fails or the performance changes dramatically, check the display in accordance with 480i input, use the WIDE button Version 5/21/2007 57 www.VIZIO.com Power is not available view "Standard Definition" from electrical appliances, cars, motorcycles, or hear unusual sound. Remote Control does not Make ...connection Press MUTE on your TV to another electrical device (like a radio) to the power outlet to the AC socket. If you have not mounted it appear. Problem Solution No power. Plug another location to SAP, min or speakers off Press the Volume + (Up) key on the wall...

User Manual
Page 70
... Speaker Volume Levels, 41 Treble adjustment, 39 Turn-off Speakers, 39 Turn-off Wireless Speakers, 40 Volume adjustment, 39 C Cleaning your VIZIO TV, 57 Coax (RF) Connecting for DTV / TV, 16 Connecting your Basic Set Top Box, 20 Component Connecting your DVD Player,..., 49 I Image Sticking Image Cleaner, 45 Inputs Antenna, 3 Connectors, 15 Rear Label, 9 Installation Base removal, 5 Preparation, 5 Safety Instructions, 2 Wall Mounting, 5, 30 O OSD Brightness Adjustment, 61 Closed Caption Selection, 13 Color Adjustment, 15 Contrast Adjustment, 61 Outputs Using an external Receiver/Amp, 28 P Parental...
... Speaker Volume Levels, 41 Treble adjustment, 39 Turn-off Speakers, 39 Turn-off Wireless Speakers, 40 Volume adjustment, 39 C Cleaning your VIZIO TV, 57 Coax (RF) Connecting for DTV / TV, 16 Connecting your Basic Set Top Box, 20 Component Connecting your DVD Player,..., 49 I Image Sticking Image Cleaner, 45 Inputs Antenna, 3 Connectors, 15 Rear Label, 9 Installation Base removal, 5 Preparation, 5 Safety Instructions, 2 Wall Mounting, 5, 30 O OSD Brightness Adjustment, 61 Closed Caption Selection, 13 Color Adjustment, 15 Contrast Adjustment, 61 Outputs Using an external Receiver/Amp, 28 P Parental...

