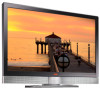
Brochure
Page 2
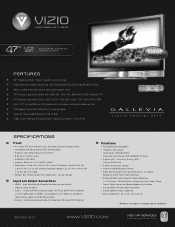
... TFT Active Matrix LCD panel with stand, Gross- 101 lbs (46 kg) Input and Output Connections • HDMI - Digital and Analog Audio, 5.1 Audio from DTV only (SPDIF Optical) Functions: • Removable base and speakers • Supports wall mounts (wall mount sold separately) • Connectors for pure digital video & sound w/ HDCP • Inputs - Picture ON Picture • V-Chip for Parental Control • Universal Backlit Remote Control • Video Scaling Engine with one button 16:9, 4:3, Zoom, Panoramic and Stretch mode switching • Advanced Video processing with Noise...
... TFT Active Matrix LCD panel with stand, Gross- 101 lbs (46 kg) Input and Output Connections • HDMI - Digital and Analog Audio, 5.1 Audio from DTV only (SPDIF Optical) Functions: • Removable base and speakers • Supports wall mounts (wall mount sold separately) • Connectors for pure digital video & sound w/ HDCP • Inputs - Picture ON Picture • V-Chip for Parental Control • Universal Backlit Remote Control • Video Scaling Engine with one button 16:9, 4:3, Zoom, Panoramic and Stretch mode switching • Advanced Video processing with Noise...
User Manual
Page 2
... shock. • Follow instructions for an extended period of time, unplug the power connector. • To avoid risk of power supplied to the GV47L LCD HDTV. • Unplug the power cord before moving the product. Operating the product close to the appliance. Do not place the GV47L LCD HDTV in fire or electric shock. • The wall socket shall be installed near the equipment and...
... shock. • Follow instructions for an extended period of time, unplug the power connector. • To avoid risk of power supplied to the GV47L LCD HDTV. • Unplug the power cord before moving the product. Operating the product close to the appliance. Do not place the GV47L LCD HDTV in fire or electric shock. • The wall socket shall be installed near the equipment and...

User Manual
Page 5
..., use the power cord designated for TV. VIZIO GV47L FHD TV User Manual Additional Certified Accessories for the VIZIO GV47L FHD TV are sold separately Wall Mounts High Definition Cables Extra or replacement Remote VIZIO also offers Installation Services and Extended Warranty Services for your VIZIO GV47L FHD TV To purchase or inquire about 280W, please use one with high humidity, dust or smoke so as not to mount your VIZIO HDTV.
..., use the power cord designated for TV. VIZIO GV47L FHD TV User Manual Additional Certified Accessories for the VIZIO GV47L FHD TV are sold separately Wall Mounts High Definition Cables Extra or replacement Remote VIZIO also offers Installation Services and Extended Warranty Services for your VIZIO GV47L FHD TV To purchase or inquire about 280W, please use one with high humidity, dust or smoke so as not to mount your VIZIO HDTV.

User Manual
Page 6
... cables and cords from your specific mount to release the retaining plastic tabs. 4. To remove the stand base 1. Pull the stand cover off by utilizing the mounting holes in the center of the back panel of your GV47LHDTV. 2. VIZIO GV47L FHD TV User Manual Preparing Your LCD HDTV for Wall Mounting The VIZIO GV47LHDTV can either be removed. 5. Now, the GV47LHDTV can be kept on the stand base or mounted on the wall...
... cables and cords from your specific mount to release the retaining plastic tabs. 4. To remove the stand base 1. Pull the stand cover off by utilizing the mounting holes in the center of the back panel of your GV47LHDTV. 2. VIZIO GV47L FHD TV User Manual Preparing Your LCD HDTV for Wall Mounting The VIZIO GV47LHDTV can either be removed. 5. Now, the GV47LHDTV can be kept on the stand base or mounted on the wall...

User Manual
Page 8
... User Manual Table of Contents Chapter 1 Basic Controls and Connections 10 1.1 Front Bezel ...10 1.2 Sensor Touch Controls...10 1.3 Rear Panel Connections ...11 1.4 VIZIO Universal Remote Control ...13 1.4.1 Insertion of Batteries in the Remote Control 15 1.4.2 Remote Control Range ...15 1.4.3 VIZIO Universal Remote Control Precautions 15 Chapter 2 Connecting Equipment 16 2.1 Which Video Connection Should I Use?...16 2.2 Connecting Your Cable or Satellite Box ...17 2.2.1 Using HDMI ...17 2.2.2 Using Component Video...19 2.3 Connecting Coaxial (RF) ...20 2.3.1 Using Your Antenna or Digital...
... User Manual Table of Contents Chapter 1 Basic Controls and Connections 10 1.1 Front Bezel ...10 1.2 Sensor Touch Controls...10 1.3 Rear Panel Connections ...11 1.4 VIZIO Universal Remote Control ...13 1.4.1 Insertion of Batteries in the Remote Control 15 1.4.2 Remote Control Range ...15 1.4.3 VIZIO Universal Remote Control Precautions 15 Chapter 2 Connecting Equipment 16 2.1 Which Video Connection Should I Use?...16 2.2 Connecting Your Cable or Satellite Box ...17 2.2.1 Using HDMI ...17 2.2.2 Using Component Video...19 2.3 Connecting Coaxial (RF) ...20 2.3.1 Using Your Antenna or Digital...
User Manual
Page 9
...Input Special Features ...53 4.15.1 Understanding Viewing Features...54 4.15.2 Viewing Modes ...54 4.15.3 Picture-In-Picture(PIP)/Picture-by-Picture(POP)Mode 55 4.15.4 Adjusting Basic PIP/POP Settings ...55 4.15.5 Setting the Sleep Timer ...56 4.16 Programming the VIZIO Universal Remote Control 57 4.16.1 Programming for VCR ...57 4.16.2 Programming for Cable Set-Top Box...57 4.16.3 Programming for DVD Player ...58 4.16.4 Searching for Component Codes ...58 4.17 Using a Cable or Satellite Remote ...58 Chapter 5 Maintenance and Troubleshooting 59 5.1 Maintenance...59 5.2 Troubleshooting Guide...
...Input Special Features ...53 4.15.1 Understanding Viewing Features...54 4.15.2 Viewing Modes ...54 4.15.3 Picture-In-Picture(PIP)/Picture-by-Picture(POP)Mode 55 4.15.4 Adjusting Basic PIP/POP Settings ...55 4.15.5 Setting the Sleep Timer ...56 4.16 Programming the VIZIO Universal Remote Control 57 4.16.1 Programming for VCR ...57 4.16.2 Programming for Cable Set-Top Box...57 4.16.3 Programming for DVD Player ...58 4.16.4 Searching for Component Codes ...58 4.17 Using a Cable or Satellite Remote ...58 Chapter 5 Maintenance and Troubleshooting 59 5.1 Maintenance...59 5.2 Troubleshooting Guide...
User Manual
Page 13
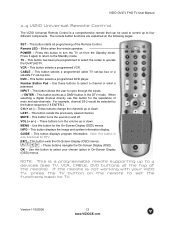
... remote button functions are explained on and off. Remote LED - Blinks when the remote operates. POWER - This button selects a programmed cable TV set-top box or a satellite TV set the functions back to TV. Use these buttons to cycle through the inputs. - / ENTER - This button works as a DASH button in On-Screen Display (OSD) menus. CH (+ or -) - MENU - INFO - NOTE: This is a programmable remote supporting up to four different components. VIZIO GV47L FHD TV User Manual 1.4 VIZIO Universal Remote Control The VIZIO Universal Remote Control is a comprehensive remote...
... remote button functions are explained on and off. Remote LED - Blinks when the remote operates. POWER - This button selects a programmed cable TV set-top box or a satellite TV set the functions back to TV. Use these buttons to cycle through the inputs. - / ENTER - This button works as a DASH button in On-Screen Display (OSD) menus. CH (+ or -) - MENU - INFO - NOTE: This is a programmable remote supporting up to four different components. VIZIO GV47L FHD TV User Manual 1.4 VIZIO Universal Remote Control The VIZIO Universal Remote Control is a comprehensive remote...

User Manual
Page 16
...supported, uncompressed, all-digital audio/video interface. Connection Quality (type) Connector Rear Panel Color Codes Description Best (digital) Best (digital Good (analog) Best (analog) Better (analog) Good (analog) White Black Blue Green and Purple Orange HDMI (High-Definition Multimedia Interface) - It is carried through this single pin connector. The video signal is separated into two signals, one containing the black-and-white information and the other containing the color information. Component 1/2 - This is most advanced for PC input. VIZIO GV47L FHD TV User...
...supported, uncompressed, all-digital audio/video interface. Connection Quality (type) Connector Rear Panel Color Codes Description Best (digital) Best (digital Good (analog) Best (analog) Better (analog) Good (analog) White Black Blue Green and Purple Orange HDMI (High-Definition Multimedia Interface) - It is carried through this single pin connector. The video signal is separated into two signals, one containing the black-and-white information and the other containing the color information. Component 1/2 - This is most advanced for PC input. VIZIO GV47L FHD TV User...
User Manual
Page 17
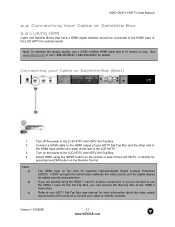
... Box. Refer to the HDMI 2 connection. Note: a) b) c) Turn off the power to the HDMI Input (white color area) at the rear of the LCD HDTV, or directly by pressing the HDMI button on the Remote Control. Select HDMI using the HDMI 1 input for another component, or you can connect the Set-Top Box to your HDTV Set-Top Box and the other end to the LCD HDTV and HDTV Set-Top Box. Connect a HDMI cable to the HDMI output of the product or consult your Cable or Satellite Box (Best...
... Box. Refer to the HDMI 2 connection. Note: a) b) c) Turn off the power to the HDMI Input (white color area) at the rear of the LCD HDTV, or directly by pressing the HDMI button on the Remote Control. Select HDMI using the HDMI 1 input for another component, or you can connect the Set-Top Box to your HDTV Set-Top Box and the other end to the LCD HDTV and HDTV Set-Top Box. Connect a HDMI cable to the HDMI output of the product or consult your Cable or Satellite Box (Best...
User Manual
Page 19
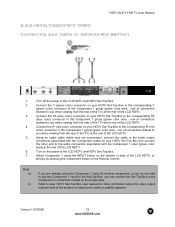
... when viewing from the rear of the TV) at the rear of the LCD HDTV. 6. Connect the Pb (blue color) connector on your cable or satellite operator. Using an audio cable (white and red connectors), connect the cable to the audio connectors associated with the Component 1 input (green color area) at the rear of the LCD HDTV. 3. VIZIO GV47L FHD TV User Manual 2.2.2 Using Component Video Connecting your HDTV Set-Top Box and connect the other end to the audio output connectors associated with the Component output on the remote...
... when viewing from the rear of the TV) at the rear of the LCD HDTV. 6. Connect the Pb (blue color) connector on your cable or satellite operator. Using an audio cable (white and red connectors), connect the cable to the audio connectors associated with the Component 1 input (green color area) at the rear of the LCD HDTV. 3. VIZIO GV47L FHD TV User Manual 2.2.2 Using Component Video Connecting your HDTV Set-Top Box and connect the other end to the audio output connectors associated with the Component output on the remote...

User Manual
Page 29
... cable are not included and can be purchased at the rear of the LCD HDTV. 4. Note: a) b) c) For the best picture quality when connecting a pc computer through RGB PC, set the timing mode. Refer to the RGB PC input (purple area) at an electronics store. Select RGB using the INPUT button on the power to set your pc computer user manual for additional information on the Remote Control. VIZIO GV47L FHD TV User Manual 2.7 Connecting...
... cable are not included and can be purchased at the rear of the LCD HDTV. 4. Note: a) b) c) For the best picture quality when connecting a pc computer through RGB PC, set the timing mode. Refer to the RGB PC input (purple area) at an electronics store. Select RGB using the INPUT button on the power to set your pc computer user manual for additional information on the Remote Control. VIZIO GV47L FHD TV User Manual 2.7 Connecting...
User Manual
Page 46
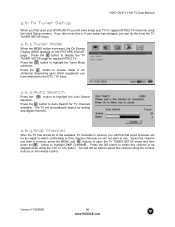
... TV channels in memory you do this channel using the number buttons on the PICTURE ADJUST page. You will have attached to select this from the TV TUNER SETUP menu. 4.6.1 Tuner Mode When the MENU button is pressed, the On Screen Display (OSD) appears on the remote control. If you did not do this or if your setup has changed, you will still be able to the DTV / TV Input. 4.6.2 Auto Search...
... TV channels in memory you do this channel using the number buttons on the PICTURE ADJUST page. You will have attached to select this from the TV TUNER SETUP menu. 4.6.1 Tuner Mode When the MENU button is pressed, the On Screen Display (OSD) appears on the remote control. If you did not do this or if your setup has changed, you will still be able to the DTV / TV Input. 4.6.2 Auto Search...

User Manual
Page 47
... On Screen Display (OSD) appears on the Optical Digital Audio connector of the rear of the available DTV channels in memory you did not do this channel using the number buttons on the remote control. 4.7.4 Digital Audio Out When receiving digital audio from the TV TUNER SETUP menu. 4.7.1 Tuner Mode When the MENU button is output on the PICTURE ADJUST page. Press the button to select Dolby Digital or PCM. button to highlight the Tuner Mode Press the button to choose Cable or Air (Antenna) depending...
... On Screen Display (OSD) appears on the Optical Digital Audio connector of the rear of the available DTV channels in memory you did not do this channel using the number buttons on the remote control. 4.7.4 Digital Audio Out When receiving digital audio from the TV TUNER SETUP menu. 4.7.1 Tuner Mode When the MENU button is output on the PICTURE ADJUST page. Press the button to select Dolby Digital or PCM. button to highlight the Tuner Mode Press the button to choose Cable or Air (Antenna) depending...
User Manual
Page 55
... cannot support 1080i. 4.15.4 Adjusting Basic PIP/POP Settings The PIP channel is in the main picture with the PIP sub-picture program, press SWAP on the remote control. VIZIO GV47L FHD TV User Manual 4.15.3 Picture-In-Picture(PIP)/Picture-by -Picture (POP) mode. To change the PIP channel, press the PIP CH + or - Repeated pressing of the main TV channel. This works the same if you can swap the program that is independent of the PIP INPUT button will...
... cannot support 1080i. 4.15.4 Adjusting Basic PIP/POP Settings The PIP channel is in the main picture with the PIP sub-picture program, press SWAP on the remote control. VIZIO GV47L FHD TV User Manual 4.15.3 Picture-In-Picture(PIP)/Picture-by -Picture (POP) mode. To change the PIP channel, press the PIP CH + or - Repeated pressing of the main TV channel. This works the same if you can swap the program that is independent of the PIP INPUT button will...

User Manual
Page 57
... LED LIGHT flashes twice. 4. The VCR will turn off . If the LED does not flash twice, repeat Steps 2 through 4 with the next code listed for VCR 1. Point the remote control at the Cable Box and press the POWER button. If the codes do not work with up to work , or your VCR, Cable Box and DVD Player. 4.16.1 Programming for the component and manufacturer. 5. Press the CBL button on the remote control. 3. Note: a) b) If your Cable Set-Top Box...
... LED LIGHT flashes twice. 4. The VCR will turn off . If the LED does not flash twice, repeat Steps 2 through 4 with the next code listed for VCR 1. Point the remote control at the Cable Box and press the POWER button. If the codes do not work with up to work , or your VCR, Cable Box and DVD Player. 4.16.1 Programming for the component and manufacturer. 5. Press the CBL button on the remote control. 3. Note: a) b) If your Cable Set-Top Box...

User Manual
Page 59
.../9/2006 Solution Make sure the power button is black. Make sure AC power cord is seriously contaminated, use a soft cloth moistened with a dry cloth after cleaning. 5.2 Troubleshooting Guide If the TV fails or the performance changes dramatically, check the display in accordance with the following instructions. If the housing or remote control is securely connected to gently clean the screen. 2. Do not scrape it with...
.../9/2006 Solution Make sure the power button is black. Make sure AC power cord is seriously contaminated, use a soft cloth moistened with a dry cloth after cleaning. 5.2 Troubleshooting Guide If the TV fails or the performance changes dramatically, check the display in accordance with the following instructions. If the housing or remote control is securely connected to gently clean the screen. 2. Do not scrape it with...
User Manual
Page 60
... the volume level from another location to a working input source. If you used a particular input and the screen size changes. (AV1, AV2, Component 1, Component 2, HDMI 1, HDMI 2 and TV). You switch to be weak. For best image quality, view HD wide screen programs where possible. Make sure that the sound is within industry specifications are using TV, AV1, AV2 or Component with your TV. The display image does not cover the entire screen. level is connected to...
... the volume level from another location to a working input source. If you used a particular input and the screen size changes. (AV1, AV2, Component 1, Component 2, HDMI 1, HDMI 2 and TV). You switch to be weak. For best image quality, view HD wide screen programs where possible. Make sure that the sound is within industry specifications are using TV, AV1, AV2 or Component with your TV. The display image does not cover the entire screen. level is connected to...

User Manual
Page 65
... Caption, 45 Closed Caption Style, 45 Language, 44 PIP Position, 45 Reset, 45 Sleep Timer, 44 DTV Tuner Setup Auto Search, 47 Daylight Saving, 48 Digital Audio Out, 47 Skip Channel, 47 Time Zone, 48 Tuner Mode, 47 DVI Connecting your Cable Box, 18 Connecting your DVD Player, 23 Connecting your Satellite Box, 18 E Extended Warranty, 69 G Glossary, 64 H HDMI Connecting your Cable Box, 17 Connecting your DVD Player, 22 Connecting your Satellite Box, 17 I Inputs Antenna, 3 Connectors, 16 Rear Label, 11 Rear Label, 12 Installation Base removal, 6 Preparation, 5 Safety Instructions, 2 Wall Mounting...
... Caption, 45 Closed Caption Style, 45 Language, 44 PIP Position, 45 Reset, 45 Sleep Timer, 44 DTV Tuner Setup Auto Search, 47 Daylight Saving, 48 Digital Audio Out, 47 Skip Channel, 47 Time Zone, 48 Tuner Mode, 47 DVI Connecting your Cable Box, 18 Connecting your DVD Player, 23 Connecting your Satellite Box, 18 E Extended Warranty, 69 G Glossary, 64 H HDMI Connecting your Cable Box, 17 Connecting your DVD Player, 22 Connecting your Satellite Box, 17 I Inputs Antenna, 3 Connectors, 16 Rear Label, 11 Rear Label, 12 Installation Base removal, 6 Preparation, 5 Safety Instructions, 2 Wall Mounting...

User Manual
Page 66
... Remote Control Codes for other devices., 70 Programming to work your DVD Player, 58 Programming to work your Set-Top Box, 57 Programming to work your VCR, 57 Setting the Sleep Timer, 56 Using your Cable or Satellite Remote to Operate your VIZIO TV, 58 RGB Connecting your PC, 29 S Screen Size explanation, 54 Sensor Touch Controls, 10 S-Video Connecting your DVD Player, 25, 26 T Technical Specifications, 63 Troubleshooting Guide, 59 TV VIZIO GV47L FHD TV User Manual Audio Adjustment, 43 Parental Control, 48 Picture Adjustment, 39 Special Features, 44 Tuner Setup, 46 TV Audio Adjust...
... Remote Control Codes for other devices., 70 Programming to work your DVD Player, 58 Programming to work your Set-Top Box, 57 Programming to work your VCR, 57 Setting the Sleep Timer, 56 Using your Cable or Satellite Remote to Operate your VIZIO TV, 58 RGB Connecting your PC, 29 S Screen Size explanation, 54 Sensor Touch Controls, 10 S-Video Connecting your DVD Player, 25, 26 T Technical Specifications, 63 Troubleshooting Guide, 59 TV VIZIO GV47L FHD TV User Manual Audio Adjustment, 43 Parental Control, 48 Picture Adjustment, 39 Special Features, 44 Tuner Setup, 46 TV Audio Adjust...

User Manual
Page 67
... use the original carton box and packing material or an equivalent as designated by the warranty, you will provide, when needed, service labor to repair a manufacturing defect at (714) 668-0588. Packaging and Shipping Instruction When you send the product to an authorized VIZIO service facility you must provide the model, serial number and date of sale to the end user. ANY IMPLIED WARRANTIES...
... use the original carton box and packing material or an equivalent as designated by the warranty, you will provide, when needed, service labor to repair a manufacturing defect at (714) 668-0588. Packaging and Shipping Instruction When you send the product to an authorized VIZIO service facility you must provide the model, serial number and date of sale to the end user. ANY IMPLIED WARRANTIES...


