Download
Page 1
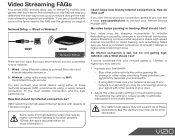
...known as Wi-Fi, transmitted through a router. These activities can be stopping momentarily to re-buffer. Video Streaming FAQs Your smart VIZIO devices allow you to stream TV, movies, and games over the Internet.The information in this FAQ, see the glossary on the streaming app. Wired vs Wireless?... My Internet connection is secure. Your VIZIO smart device may need to: 1. Network Setup - Re-buffering is , you can connect your network ...
...known as Wi-Fi, transmitted through a router. These activities can be stopping momentarily to re-buffer. Video Streaming FAQs Your smart VIZIO devices allow you to stream TV, movies, and games over the Internet.The information in this FAQ, see the glossary on the streaming app. Wired vs Wireless?... My Internet connection is secure. Your VIZIO smart device may need to: 1. Network Setup - Re-buffering is , you can connect your network ...

Download
Page 3
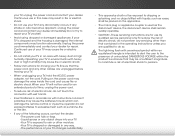
... alert you either: • Register your VIZIO product at plugs, convenience receptacles, and the point where they exit from the apparatus. • Only use , and maintenance of important operating instructions. Important Safety Instructions Your TV is intended to operate within defined design limits... as radiators, heat registers, stoves, or other apparatus (including amplifiers) that you to the presence of your TV. To purchase an extended warranty service plan, visit www.VIZIO.com. Be sure to inspect the package contents to protect your investment beyond the standard warranty...
... alert you either: • Register your VIZIO product at plugs, convenience receptacles, and the point where they exit from the apparatus. • Only use , and maintenance of important operating instructions. Important Safety Instructions Your TV is intended to operate within defined design limits... as radiators, heat registers, stoves, or other apparatus (including amplifiers) that you to the presence of your TV. To purchase an extended warranty service plan, visit www.VIZIO.com. Be sure to inspect the package contents to protect your investment beyond the standard warranty...

Download
Page 4
... to constitute a risk of electric shock to persons. • Do not overload power strips and extension cords. Do not expose your TV. Operating your TV close to smoke. If you to high voltages, electric shock, and other voltage than the voltage specified. Doing so could short circuit ... electric shock. • The wall socket should be used for ventilation. If water penetrates into the slots and openings on the top of your TV in the housing. • Use only with the cart, stand, tripod, bracket, or table specified by the manufacturer, or sold ...
... to constitute a risk of electric shock to persons. • Do not overload power strips and extension cords. Do not expose your TV. Operating your TV close to smoke. If you to high voltages, electric shock, and other voltage than the voltage specified. Doing so could short circuit ... electric shock. • The wall socket should be used for ventilation. If water penetrates into the slots and openings on the top of your TV in the housing. • Use only with the cart, stand, tripod, bracket, or table specified by the manufacturer, or sold ...
Download
Page 5
... that contained in fire or electric shock. • Do not use by qualified service personnel only. Unplug the power cord immediately and contact your TV yourself. • Avoid using dropped or damaged appliances. Ensure that may be placed on the power cord may cause fire or electric shock. &#..., fire or the like. • If any smoke or odor becomes apparent, unplug the power cord and contact your dealer. your TV, unplug the power cord and contact your dealer immediately. If any of electrical shock to excessive heat such as vases, shall be of sufficient magnitude...
... that contained in fire or electric shock. • Do not use by qualified service personnel only. Unplug the power cord immediately and contact your TV yourself. • Avoid using dropped or damaged appliances. Ensure that may be placed on the power cord may cause fire or electric shock. &#..., fire or the like. • If any smoke or odor becomes apparent, unplug the power cord and contact your dealer. your TV, unplug the power cord and contact your dealer immediately. If any of electrical shock to excessive heat such as vases, shall be of sufficient magnitude...
Download
Page 6
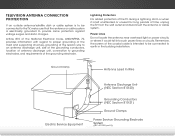
...outside antenna/satellite dish or cable system is to be connected to earth in the building installation. Lightning Protection For added protection of the TV during a lightning storm or when it could fall into such power lines or circuits. Ground Clamp Antenna Lead In Wire Electric Service ... wire to an antenna discharge unit, size of the grounding conductors, location of the coaxial cable is intended to be connected to the TV, make sure that the antenna or cable system is electrically grounded to grounding electrodes, and requirements of the grounding electrode. Remember, the ...
...outside antenna/satellite dish or cable system is to be connected to earth in the building installation. Lightning Protection For added protection of the TV during a lightning storm or when it could fall into such power lines or circuits. Ground Clamp Antenna Lead In Wire Electric Service ... wire to an antenna discharge unit, size of the grounding conductors, location of the coaxial cable is intended to be connected to the TV, make sure that the antenna or cable system is electrically grounded to grounding electrodes, and requirements of the grounding electrode. Remember, the ...

Download
Page 7
Audio and Video Cable Types.... 12 Connecting an Audio Device 14 Connecting an Audio Device - Table of Contents Installing the TV 3 Inspecting the Package Contents 3 Installing the TV 3 Installing the TV Stand 3 Installing the TV on a Wall 5 Controls and Connections 6 Back Panel 6 Side Panel 7 Front Panel 8 Remote Control 9 Replacing the Batteries 10 Connecting Your Devices...
Audio and Video Cable Types.... 12 Connecting an Audio Device 14 Connecting an Audio Device - Table of Contents Installing the TV 3 Inspecting the Package Contents 3 Installing the TV 3 Installing the TV Stand 3 Installing the TV on a Wall 5 Controls and Connections 6 Back Panel 6 Side Panel 7 Front Panel 8 Remote Control 9 Replacing the Batteries 10 Connecting Your Devices...
Download
Page 8
... V.I .A. Plus)....... 54 Using the V.I .A. Changing the Appearance of Digital Closed Captions.. 40 Renaming Devices on the Input Menu 42 Changing the TV Settings 43 Viewing System Information 43 Changing the On-Screen Menu Language 44 Setting the Time & Local Settings 44 Using the Parental Controls 45 Accessing...Media Player 50 Using the USB Media Player 50 Preparing Your USB Drive to the My Apps Tab 57 Deleting an App from the TV 50 Using VIZIO Internet Apps Plus® (V.I.A. Plus Apps Window 57 Adding an App to Play USB Media 50 Playing USB Media 50 Removing the...
... V.I .A. Plus)....... 54 Using the V.I .A. Changing the Appearance of Digital Closed Captions.. 40 Renaming Devices on the Input Menu 42 Changing the TV Settings 43 Viewing System Information 43 Changing the On-Screen Menu Language 44 Setting the Time & Local Settings 44 Using the Parental Controls 45 Accessing...Media Player 50 Using the USB Media Player 50 Preparing Your USB Drive to the My Apps Tab 57 Deleting an App from the TV 50 Using VIZIO Internet Apps Plus® (V.I.A. Plus Apps Window 57 Adding an App to Play USB Media 50 Playing USB Media 50 Removing the...

Download
Page 9
... box and inspecting the package contents you can still fall over . Installing the TV 1 Inspecting the Package Contents Before installing your new TV, take a moment to ensure nothing is not properly secured VIZIO LED HDTV with Stand Remote Control with Batteries Quick Start Guide Power Cord 3... x M5 14mm Phillips Screws Package Contents 3 TV on an uneven, unstable, or non-level surface ...
... box and inspecting the package contents you can still fall over . Installing the TV 1 Inspecting the Package Contents Before installing your new TV, take a moment to ensure nothing is not properly secured VIZIO LED HDTV with Stand Remote Control with Batteries Quick Start Guide Power Cord 3... x M5 14mm Phillips Screws Package Contents 3 TV on an uneven, unstable, or non-level surface ...

Download
Page 10
Remove any other object, such as a blanket. 1. When you are finished, place the TV on a clean, flat surface. To prevent scratches or damage to the TV. 2. 1 To install the base: It is recommended that two people take part in the base installation. Insert the three (3) included M5 14mm Phillips screws ...and tighten them using a Phillips screwdriver to secure the base to the screen, place the TV on a soft surface such as a wall. 4 To ensure proper ventilation, leave at least 1" of space between the back of the...
Remove any other object, such as a blanket. 1. When you are finished, place the TV on a clean, flat surface. To prevent scratches or damage to the TV. 2. 1 To install the base: It is recommended that two people take part in the base installation. Insert the three (3) included M5 14mm Phillips screws ...and tighten them using a Phillips screwdriver to secure the base to the screen, place the TV on a soft surface such as a wall. 4 To ensure proper ventilation, leave at least 1" of space between the back of the...

Download
Page 11
... someone to help you may want to use cables with right-angle connectors. To install your TV on a wall, you choose is clear of the TV. Remove the base by loosening and removing the screws. 4. E600i-B3 Screw Size: Hole Pattern: Weight w/o Stand: M6 400mm (V) x 400mm (H) 46.30 lbs Be ...sure the mount you will need a wall mount. This allows the TV to rest closer to the wall, carefully ...
... someone to help you may want to use cables with right-angle connectors. To install your TV on a wall, you choose is clear of the TV. Remove the base by loosening and removing the screws. 4. E600i-B3 Screw Size: Hole Pattern: Weight w/o Stand: M6 400mm (V) x 400mm (H) 46.30 lbs Be ...sure the mount you will need a wall mount. This allows the TV to rest closer to the wall, carefully ...

Download
Page 13
Controls and Connections 2 Power/Input - Press once to turn off the TV. 7 Side Panel Press once to turn on the TV. Press and hold to access the Input menu.
Controls and Connections 2 Power/Input - Press once to turn off the TV. 7 Side Panel Press once to turn on the TV. Press and hold to access the Input menu.

Download
Page 14
The power indicator flashes on when the TV turns on page 42. 8 Front Panel 2 Front Panel REMOTE SENSOR & POWER INDICATOR When using the remote, aim it directly at this sensor. To keep the power indicator on as long as the TV is on, see "Turning the Power Indicator On or Off" on , then goes out after several seconds.
The power indicator flashes on when the TV turns on page 42. 8 Front Panel 2 Front Panel REMOTE SENSOR & POWER INDICATOR When using the remote, aim it directly at this sensor. To keep the power indicator on as long as the TV is on, see "Turning the Power Indicator On or Off" on , then goes out after several seconds.

Download
Page 15
Closed Captions Turn closed captions on . Number Pad Manually enter a channel. V Button Open the VIZIO Internet Apps Plus® dock. Channel Up/Down Change the channel. Ok Select the highlighted menu option. Mute Turn the audio off or on and ... example, 18-4 or 18-5.) Remote Control 9 Exit Close the on -screen menu. Menu Display the on -screen menu. A/V Controls Control USB media player. Power Turn TV on -screen menu. Back Go to the previous on or off . 2 Remote Control Input Change the currently-displayed input. Info Display the info window. Dash...
Closed Captions Turn closed captions on . Number Pad Manually enter a channel. V Button Open the VIZIO Internet Apps Plus® dock. Channel Up/Down Change the channel. Ok Select the highlighted menu option. Mute Turn the audio off or on and ... example, 18-4 or 18-5.) Remote Control 9 Exit Close the on -screen menu. Menu Display the on -screen menu. A/V Controls Control USB media player. Power Turn TV on -screen menu. Back Go to the previous on or off . 2 Remote Control Input Change the currently-displayed input. Info Display the info window. Dash...
Download
Page 17
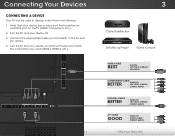
... (not included) to match the connection you used to display output from most devices. 1. Turn the TV and your device off. 3. Set the TV's input to the TV and the device. 4. Connecting Your Devices Connecting A Device Your TV can be used (HDMI-1, HDMI-2, etc.). 11 3 Cable/Satellite Box DVD/Blu-ray Player Game Console...
... (not included) to match the connection you used to display output from most devices. 1. Turn the TV and your device off. 3. Set the TV's input to the TV and the device. 4. Connecting Your Devices Connecting A Device Your TV can be used (HDMI-1, HDMI-2, etc.). 11 3 Cable/Satellite Box DVD/Blu-ray Player Game Console...

Download
Page 18
... CABLE AV cables (or Composite cables) are the traditional way of connecting antennas and cable television signals to your TV. Video signals are the traditional way of connecting your devices to your TV. COAXIAL CABLE Coaxial cables are sent over the yellow connector while audio is sent over the red and white...
... CABLE AV cables (or Composite cables) are the traditional way of connecting antennas and cable television signals to your TV. Video signals are the traditional way of connecting your devices to your TV. COAXIAL CABLE Coaxial cables are sent over the yellow connector while audio is sent over the red and white...

Download
Page 20
Connecting an Audio Device Your TV can output sound to the TV and the device. 4. Verify that matches an available port on . 3 Home Audio Receiver VIZIO Sound Bar HDMI CABLE BEST • CEC 2-WAY COMMUNICATION • 2.0-5.1 DIGITAL AUDIO • PCM, DTS, DOLBY DIGITAL OPTICAL/SPDIF CABLE BETTER • PCM STREAM • ...
Connecting an Audio Device Your TV can output sound to the TV and the device. 4. Verify that matches an available port on . 3 Home Audio Receiver VIZIO Sound Bar HDMI CABLE BEST • CEC 2-WAY COMMUNICATION • 2.0-5.1 DIGITAL AUDIO • PCM, DTS, DOLBY DIGITAL OPTICAL/SPDIF CABLE BETTER • PCM STREAM • ...

Download
Page 21
3 Connecting an Audio Device - Audio Return Channel-enabled (ARC) TVs allow audio to your audio device. ARC on page 16. Audio signals are sent over an already connected HDMI cable, eliminating the need for a separate ...
3 Connecting an Audio Device - Audio Return Channel-enabled (ARC) TVs allow audio to your audio device. ARC on page 16. Audio signals are sent over an already connected HDMI cable, eliminating the need for a separate ...

Download
Page 22
...With HDMI ARC Built-in Tuner Built-in tuner and VIA apps to and from your TV with an all-digital audio/video connection. RCA (Audio) Your TV HDMI Your Home Audio Receiver HDMI Your TV HDMI VIZIO Internet Apps With an HDMI ARC setup, the audio connection between your home audio receiver... through a separate audio connection. 3 Connecting an Audio Device - The HDMI cable will transmit audio signals from the built-in Tuner VIZIO Internet Apps Without an HDMI ARC setup, your TV will transmit audio signal to your TV and home audio receiver can be removed.
...With HDMI ARC Built-in Tuner Built-in tuner and VIA apps to and from your TV with an all-digital audio/video connection. RCA (Audio) Your TV HDMI Your Home Audio Receiver HDMI Your TV HDMI VIZIO Internet Apps With an HDMI ARC setup, the audio connection between your home audio receiver... through a separate audio connection. 3 Connecting an Audio Device - The HDMI cable will transmit audio signals from the built-in Tuner VIZIO Internet Apps Without an HDMI ARC setup, your TV will transmit audio signal to your TV and home audio receiver can be removed.

Download
Page 23
Use the Guided Network Setup to a Wireless Network 1. Connecting to configure the TV. See below. 2. See Connecting to the Ethernet port on the back of the TV. It can be connected to your router and to a Wireless Network on page 44. Connect an Ethernet cable to a Wired Network (Best) 1.... Use the Guided Network Setup to your Network Your TV is internet-ready. See Using Guided Setup on page 29. Ethernet Cable Router / Modem 17 Ensure you have a router or modem broadcasting as high-...
Use the Guided Network Setup to a Wireless Network 1. Connecting to configure the TV. See below. 2. See Connecting to the Ethernet port on the back of the TV. It can be connected to your router and to a Wireless Network on page 44. Connect an Ethernet cable to a Wired Network (Best) 1.... Use the Guided Network Setup to your Network Your TV is internet-ready. See Using Guided Setup on page 29. Ethernet Cable Router / Modem 17 Ensure you have a router or modem broadcasting as high-...
Download
Page 24
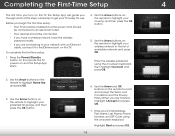
...and press OK. 2. Use the Arrow buttons on the remote to highlight your wireless network in . When you are connecting to highlight your TV ready for use. Highlight Next and press OK. 18 4 Use the Arrow buttons on the remote to highlight your network with an Ethernet ...to your preferred language, and then press the OK button. 6. SeSleecletcHt oHmomeeUUsseefoforriinn--hhoommee uussee.. Before you begin the first-time setup: • Your TV should be installed and the power cord should be connected to an electrical outlet. • Your devices should be connected. • If you have...
...and press OK. 2. Use the Arrow buttons on the remote to highlight your wireless network in . When you are connecting to highlight your TV ready for use. Highlight Next and press OK. 18 4 Use the Arrow buttons on the remote to highlight your network with an Ethernet ...to your preferred language, and then press the OK button. 6. SeSleecletcHt oHmomeeUUsseefoforriinn--hhoommee uussee.. Before you begin the first-time setup: • Your TV should be installed and the power cord should be connected to an electrical outlet. • Your devices should be connected. • If you have...


