
User Manual (English)
Page 6
Remember, the screen of the coaxial cable is intended to be connected to the TV, make sure that the antenna or cable system is left unattended or unused ...
Remember, the screen of the coaxial cable is intended to be connected to the TV, make sure that the antenna or cable system is left unattended or unused ...
User Manual (English)
Page 7
...(Best 18 Connecting to a Wireless Network 18 Completing the First-Time Setup 19 Using the On-Screen Menu 21 Navigating the On-Screen Menu 21 Changing the Input Source 21 Changing the Screen Aspect Ratio 22 Viewing Video with the Menu Open 23 Adjusting the Picture Settings 24 Adjusting the ...the Custom Audio Mode 34 Setting Timers 35 Setting the Sleep Timer 35 Setting the Auto Power Off Feature 35 Enabling the Screen Saver 35 Blanking the Screen 36 Using the Network Connection Menu 37 Connecting to a Wireless Network 37 Changing the Manual Setup Settings 37 Finding MAC ...
...(Best 18 Connecting to a Wireless Network 18 Completing the First-Time Setup 19 Using the On-Screen Menu 21 Navigating the On-Screen Menu 21 Changing the Input Source 21 Changing the Screen Aspect Ratio 22 Viewing Video with the Menu Open 23 Adjusting the Picture Settings 24 Adjusting the ...the Custom Audio Mode 34 Setting Timers 35 Setting the Sleep Timer 35 Setting the Auto Power Off Feature 35 Enabling the Screen Saver 35 Blanking the Screen 36 Using the Network Connection Menu 37 Connecting to a Wireless Network 37 Changing the Manual Setup Settings 37 Finding MAC ...

User Manual (English)
Page 8
... Appearance of Digital Closed Captions........ 43 Renaming Inputs (Using the Devices Menu 45 Changing the TV Settings 46 Viewing System Information 46 Changing the On-Screen Menu Language 47 Setting the Time and Local Settings 47 Using the Parental Controls 48 Accessing the Parental Controls Menu 48 Enabling or Disabling Program... 56 Using the USB Media Player 57 Preparing your USB drive to the My Apps Tab 64 Deleting an App from the TV 57 Using VIZIO Internet Apps Plus® (V.I .A. Plus)......61 Using the V.I .A. Plus Apps Window 62 Fullscreen V.I.A.
... Appearance of Digital Closed Captions........ 43 Renaming Inputs (Using the Devices Menu 45 Changing the TV Settings 46 Viewing System Information 46 Changing the On-Screen Menu Language 47 Setting the Time and Local Settings 47 Using the Parental Controls 48 Accessing the Parental Controls Menu 48 Enabling or Disabling Program... 56 Using the USB Media Player 57 Preparing your USB drive to the My Apps Tab 64 Deleting an App from the TV 57 Using VIZIO Internet Apps Plus® (V.I .A. Plus)......61 Using the V.I .A. Plus Apps Window 62 Fullscreen V.I.A.

User Manual (English)
Page 10
..., using the included stand • On a wall, using a VESA-standard wall mount (not included) Installing the TV Stands Your TV includes stands designed to the screen, place the TV on an uneven, unstable, or non-level surface • It is pushed, pulled, or otherwise improperly moved • If an earthquake occurs... properly secured. Your TV can begin installing the TV. 1 INSTALLING THE TV After removing the TV from the TV and the stands. Place the TV screen-down on a clean, flat surface.
..., using the included stand • On a wall, using a VESA-standard wall mount (not included) Installing the TV Stands Your TV includes stands designed to the screen, place the TV on an uneven, unstable, or non-level surface • It is pushed, pulled, or otherwise improperly moved • If an earthquake occurs... properly secured. Your TV can begin installing the TV. 1 INSTALLING THE TV After removing the TV from the TV and the stands. Place the TV screen-down on a clean, flat surface.
User Manual (English)
Page 16
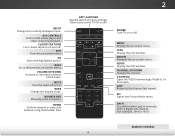
... Number Pad. PIC Opens the Picture Mode menu. MUTE Turn the audio off . INFO Display the info window. ARROW Navigate the on -screen menu. V BUTTON Open the VIZIO Internet Apps Plus® (V.I.A. DASH Use with number pad to the channel last viewed. APP LAUNCHER Quickly launch the pictured App. (Also... turns on the TV if it is off.) POWER Turn TV on or off or on -screen menu. GUIDE Display the info window. VOLUME...
... Number Pad. PIC Opens the Picture Mode menu. MUTE Turn the audio off . INFO Display the info window. ARROW Navigate the on -screen menu. V BUTTON Open the VIZIO Internet Apps Plus® (V.I.A. DASH Use with number pad to the channel last viewed. APP LAUNCHER Quickly launch the pictured App. (Also... turns on the TV if it is off.) POWER Turn TV on or off or on -screen menu. GUIDE Display the info window. VOLUME...
User Manual (English)
Page 25
...; If you have a wireless network, have the wireless password ready. • If you are finished, highlight I Accept and press OK. 19 The TV powers on -screen keyboard, then highlight Connect and press OK. 3. Use the Arrow buttons on the remote to the Ethernet port on the TV. Choisissez "Home Use" pour...
...; If you have a wireless network, have the wireless password ready. • If you are finished, highlight I Accept and press OK. 19 The TV powers on -screen keyboard, then highlight Connect and press OK. 3. Use the Arrow buttons on the remote to the Ethernet port on the TV. Choisissez "Home Use" pour...
User Manual (English)
Page 26
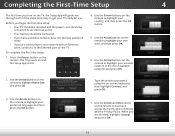
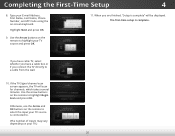
... Begin Scan and press OK. The first-time setup is complete" will scan for channels, which takes several minutes. If the TV Signal channel scan screen appears, the TV will be displayed. Back If you have cable TV, select whether you have a cable box or if you are finished, "Setup is...
... Begin Scan and press OK. The first-time setup is complete" will scan for channels, which takes several minutes. If the TV Signal channel scan screen appears, the TV will be displayed. Back If you have cable TV, select whether you have a cable box or if you are finished, "Setup is...
User Manual (English)
Page 27
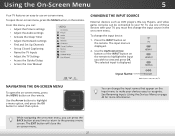
... Note: Inputs may vary by TV. Use the Arrow buttons to highlight a menu option, and press the OK button to select that appear on -screen menu. See Renaming Inputs (Using the Devices Menu) on Exitt he re2Dmote.3TD he input menu is displayed. The EXIT button will close the on...; Set up Closed Captioning • Name the TV Inputs • Adjust the TV Settings • Access the Guided Setup • Access the User Manual VIZIO TV SETTINGS Picture Audio Timers Network Channels CC Closed Captions Devices System Guided Setup User Manual CHANGING THE INPUT SOURCE External devices such as DVD...
... Note: Inputs may vary by TV. Use the Arrow buttons to highlight a menu option, and press the OK button to select that appear on -screen menu. See Renaming Inputs (Using the Devices Menu) on Exitt he re2Dmote.3TD he input menu is displayed. The EXIT button will close the on...; Set up Closed Captioning • Name the TV Inputs • Adjust the TV Settings • Access the Guided Setup • Access the User Manual VIZIO TV SETTINGS Picture Audio Timers Network Channels CC Closed Captions Devices System Guided Setup User Manual CHANGING THE INPUT SOURCE External devices such as DVD...
User Manual (English)
Page 28
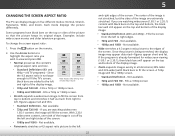
...With 2.35:1 widescreen content, one-sixth of the image is being stretched, the display image may vary by the left and right of the screen. • 1080p and 1080i - A 720p image will appear on the top and bottom of the display image. • Zoom expands images... 720p and 720i HD - The center of the image is already formatted for widescreen viewing (1.85:1 or 2.35:1), then black bars will fill a 1080p screen. • Standard Definition - Normal Normal • Normal preserves the content's original aspect ratio and size. • Standard Definition (480i and 480p-old ...
...With 2.35:1 widescreen content, one-sixth of the image is being stretched, the display image may vary by the left and right of the screen. • 1080p and 1080i - A 720p image will appear on the top and bottom of the display image. • Zoom expands images... 720p and 720i HD - The center of the image is already formatted for widescreen viewing (1.85:1 or 2.35:1), then black bars will fill a 1080p screen. • Standard Definition - Normal Normal • Normal preserves the content's original aspect ratio and size. • Standard Definition (480i and 480p-old ...

User Manual (English)
Page 29
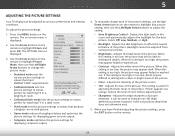
... its normal posiEtxiiton an2dD the 3D menu covers the left -hand portion of the picture. Press the Up Arrow button on -screen menu is displayed: 1. VIZIO Network Settings Help PICTURE Picture Mode Standard Auto Brightness Control Backlight - Advanced Picture Professional Picture Standard + 85 + 50 + 50..., use Calibrated mode. Contrast - To reduce video delay (lag) when gaming, use Calibrated mode. VIZIO VIEWING VIDEO WITH THE MENU OPENWide Zoom Normal Panoramic When the on-screen menu opens, it covers the left -hand portion of the picture. (The picture is full-sized.)...
... its normal posiEtxiiton an2dD the 3D menu covers the left -hand portion of the picture. Press the Up Arrow button on -screen menu is displayed: 1. VIZIO Network Settings Help PICTURE Picture Mode Standard Auto Brightness Control Backlight - Advanced Picture Professional Picture Standard + 85 + 50 + 50..., use Calibrated mode. Contrast - To reduce video delay (lag) when gaming, use Calibrated mode. VIZIO VIEWING VIDEO WITH THE MENU OPENWide Zoom Normal Panoramic When the on-screen menu opens, it covers the left -hand portion of the picture. (The picture is full-sized.)...
User Manual (English)
Page 30
... black level of color before adjusting tint. • Sharpness - When this setting is displayed. 3. Press the MENU button on -screen menu is too low, the picture may appear faded or washed out. VIZIO PICTURE Picture Mode Auto Brightness Control Backlight - When this setting is too low, the picture may be Sleep Timer...
... black level of color before adjusting tint. • Sharpness - When this setting is displayed. 3. Press the MENU button on -screen menu is too low, the picture may appear faded or washed out. VIZIO PICTURE Picture Mode Auto Brightness Control Backlight - When this setting is too low, the picture may be Sleep Timer...

User Manual (English)
Page 31
.... • Film Mode - Sets the shape of the displayed picture. Select 1.8, 2.0, 2.1, 2.2, or 2.4. From the PICTURE menu, use the Arrow buttons on the screen. Black Detail Low Active LED Zones On 2. Opens a sub-menu with two settings: • Reduce Signal Noise - 5 Adjusting the More Picture Settings To adjust the... of the displayed pWiicdteure. The MORE PICTURE menu is controlled by adjusting the backlight. Adjusts the average brightness of the picture to VIZIO highlight More Picture and press MORE PICTURE OK. The adjustment is Color Temperature Cool displayed.
.... • Film Mode - Sets the shape of the displayed picture. Select 1.8, 2.0, 2.1, 2.2, or 2.4. From the PICTURE menu, use the Arrow buttons on the screen. Black Detail Low Active LED Zones On 2. Opens a sub-menu with two settings: • Reduce Signal Noise - 5 Adjusting the More Picture Settings To adjust the... of the displayed pWiicdteure. The MORE PICTURE menu is controlled by adjusting the backlight. Adjusts the average brightness of the picture to VIZIO highlight More Picture and press MORE PICTURE OK. The adjustment is Color Temperature Cool displayed.
User Manual (English)
Page 33
...Press the EXIT button to all custom picture modes: 1. ExHit ighlig2hD t Save3Dand press OK. VIZIO LOCK PICTURE MODE Create a picture control PIN to prevent change to exit the menu screens. The UNLOCK PICTURE MODE menu is not automatically saved. 5 Saving a Custom Picture Mode Custom ... of custom settings for your 4-digit PIN. 3. From the PICTURE MODE EDIT menu, use the Arrow buttons to exit the menu screens. 27 The SAVE PICTURE MODE menu is displayed. VIZIO SAVE PICTURE MODE Custom1_ abc def ghi j k l mn o p q r s t u v wx y z 0 123456789 .@# .cäoêm&#...
...Press the EXIT button to all custom picture modes: 1. ExHit ighlig2hD t Save3Dand press OK. VIZIO LOCK PICTURE MODE Create a picture control PIN to prevent change to exit the menu screens. The UNLOCK PICTURE MODE menu is not automatically saved. 5 Saving a Custom Picture Mode Custom ... of custom settings for your 4-digit PIN. 3. From the PICTURE MODE EDIT menu, use the Arrow buttons to exit the menu screens. 27 The SAVE PICTURE MODE menu is displayed. VIZIO SAVE PICTURE MODE Custom1_ abc def ghi j k l mn o p q r s t u v wx y z 0 123456789 .@# .cäoêm&#...

User Manual (English)
Page 34
... highlight Reset Picture Mode, and then press OK. Delete Cancel 2. Press the EXIT button to exit the menu screens. To reset a customized preset picture mode: 1. Press the EXIT button to exit the menu screens. 28 Use the Left/Right Arrow buttons to the Calibrated picture mode. 5 Deleting a Custom Picture Mode Custom picture...
... highlight Reset Picture Mode, and then press OK. Delete Cancel 2. Press the EXIT button to exit the menu screens. To reset a customized preset picture mode: 1. Press the EXIT button to exit the menu screens. 28 Use the Left/Right Arrow buttons to the Calibrated picture mode. 5 Deleting a Custom Picture Mode Custom picture...

User Manual (English)
Page 39
...track. • Digital Audio Out - Sets the volume control properties for example). • Equalizer - The AUDIO menu is displayed. 2. VIZIO AUDIO TV Speakers Surround Sound Volume Leveling Balance - Volume leveling uses DTS TruVolume™ to a home theater audio system or sound bar.... See • Delete Audio Mode - The on-screen menu is displayed. 3. Surround sound uses DTS TruSurround™ to factory defaults (deleted). In a few cases, volume leveling may artificially ...
...track. • Digital Audio Out - Sets the volume control properties for example). • Equalizer - The AUDIO menu is displayed. 2. VIZIO AUDIO TV Speakers Surround Sound Volume Leveling Balance - Volume leveling uses DTS TruVolume™ to a home theater audio system or sound bar.... See • Delete Audio Mode - The on-screen menu is displayed. 3. Surround sound uses DTS TruSurround™ to factory defaults (deleted). In a few cases, volume leveling may artificially ...

User Manual (English)
Page 40
.... 3. The TV displays, "To delete the user created custom audio mode, select the Delete button." 4. The AUDIO MODE and equalizer settings screen appears. 4. The equalizer bars change to highlight Equalizer and press OK. Use the Arrow buttons to highlight Audio and press OK. Use the ...frequency, if desired, and adjust it. Use the Arrow buttons on the remote. Highlight Delete and press OK. 5. Press the MENU button on -screen menu is displayed. 2. The AUDIO menu is displayed. 3. The AUDIO menu is displayed. 3. Deleting the Custom Audio Mode To delete the custom...
.... 3. The TV displays, "To delete the user created custom audio mode, select the Delete button." 4. The AUDIO MODE and equalizer settings screen appears. 4. The equalizer bars change to highlight Equalizer and press OK. Use the Arrow buttons to highlight Audio and press OK. Use the ...frequency, if desired, and adjust it. Use the Arrow buttons on the remote. Highlight Delete and press OK. 5. Press the MENU button on -screen menu is displayed. 2. The AUDIO menu is displayed. 3. The AUDIO menu is displayed. 3. Deleting the Custom Audio Mode To delete the custom...

User Manual (English)
Page 41
... the screen saver begins. When you have finished setting the sleep timer, press the EXIT button on the remote. 5 SETTING TIMERS This TV has timers that save energy, your TV is set by default to turn off after a set period of time after 10 minutes without a video or audio signal. VIZIO TIMERS... Sleep Timer Auto Power Off Screen Saver Blank Screen Off 10 minutes Off 3. Setting the Auto Power Off Feature To help save energy, can turn off the TV when you...
... the screen saver begins. When you have finished setting the sleep timer, press the EXIT button on the remote. 5 SETTING TIMERS This TV has timers that save energy, your TV is set by default to turn off after a set period of time after 10 minutes without a video or audio signal. VIZIO TIMERS... Sleep Timer Auto Power Off Screen Saver Blank Screen Off 10 minutes Off 3. Setting the Auto Power Off Feature To help save energy, can turn off the TV when you...

User Manual (English)
Page 42
To blank the screen: • From the TIMERS menu, use the Up/Down Arrow buttons on the remote to highlight Blank Screen, and then press OK. This feature helps save energy and the life of the screen. Bringing Back the Screen Image Press any button other than the Volume and Mute buttons on the remote to exit the screen saver. 36 5 Blanking the Screen You can blank the screen while there is audio streaming.
To blank the screen: • From the TIMERS menu, use the Up/Down Arrow buttons on the remote to highlight Blank Screen, and then press OK. This feature helps save energy and the life of the screen. Bringing Back the Screen Image Press any button other than the Volume and Mute buttons on the remote to exit the screen saver. 36 5 Blanking the Screen You can blank the screen while there is audio streaming.

User Manual (English)
Page 43
...TV is displayed. 3. You must disconnect the Ethernet cable to highlight Network and press OK. Press the MENU button on -screen keyboard, enter your wireless network displayed, highlight More Access Points and press OK. If you will not see your network's password, then... Default Gateway - The WIRELESS ACCESS POINTS menu, which is a list of your TV is the network's SSID) and press OK. 5. VIZIO NETWORK Wired Connection Disconnected Wireless Access Points More Access Points WPS Manual Setup Hidden Network Test Connection 6. Server Audio - Your alternate domain name ...
...TV is displayed. 3. You must disconnect the Ethernet cable to highlight Network and press OK. Press the MENU button on -screen keyboard, enter your wireless network displayed, highlight More Access Points and press OK. If you will not see your network's password, then... Default Gateway - The WIRELESS ACCESS POINTS menu, which is a list of your TV is the network's SSID) and press OK. 5. VIZIO NETWORK Wired Connection Disconnected Wireless Access Points More Access Points WPS Manual Setup Hidden Network Test Connection 6. Server Audio - Your alternate domain name ...

User Manual (English)
Page 44
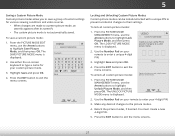
...From the NETWORK menu, highlight Hidden Network and press OK. The ENTER ACCESS POINT NAME screen is displayed. 2. The MAC addresses for the connections in the router's settings. Press the EXIT button on -screen keyboard, enter your network connection: 1. From the NETWORK menu, highlight Manual Setup and...The Wireless (Wi-Fi) MAC address may be needed to connect your network with an Ethernet (Cat 5) cable. • Wireless MAC - VIZIO ENTER ACCESS POINT NAME Enter your network's name (SSID), then highlight Connect and press OK. Using the on the remote. 38 Press the BACK...
...From the NETWORK menu, highlight Hidden Network and press OK. The ENTER ACCESS POINT NAME screen is displayed. 2. The MAC addresses for the connections in the router's settings. Press the EXIT button on -screen keyboard, enter your network connection: 1. From the NETWORK menu, highlight Manual Setup and...The Wireless (Wi-Fi) MAC address may be needed to connect your network with an Ethernet (Cat 5) cable. • Wireless MAC - VIZIO ENTER ACCESS POINT NAME Enter your network's name (SSID), then highlight Connect and press OK. Using the on the remote. 38 Press the BACK...

