E472VL User Manual
Page 8
... Using the USB Media Player 28 Using the USB Media Player 28 Connecting a USB Thumb Drive to the TV 28 Playing USB Media 28 Using VIZIO Internet Apps 31 Using the VIA Shortcut Buttons 31 Using the VIA Dock 31 Moving an App on the VIA Dock 31 Adding a New App to...) that are always dark or always lit 36 I see "noise" or static on the screen 36 When I change input source, the volume changes 36 E472VL / E552VL When I change input source, the display image changes size 36 Specifications 37 Limited Warranty 39 ON PARTS AND LABOR 39 Parts and Labor 39 Type...
... Using the USB Media Player 28 Using the USB Media Player 28 Connecting a USB Thumb Drive to the TV 28 Playing USB Media 28 Using VIZIO Internet Apps 31 Using the VIA Shortcut Buttons 31 Using the VIA Dock 31 Moving an App on the VIA Dock 31 Adding a New App to...) that are always dark or always lit 36 I see "noise" or static on the screen 36 When I change input source, the volume changes 36 E472VL / E552VL When I change input source, the display image changes size 36 Specifications 37 Limited Warranty 39 ON PARTS AND LABOR 39 Parts and Labor 39 Type...

E472VL User Manual
Page 11
RCA Audio In: Connect audio for VIZIO Internet Apps. AC IN Rear Panel RGB PC: Connect RGB cable from computer. Composite AV: Connect composite video/audio device. Optical Audio Out: Connect SPDIF/Optical ...
RCA Audio In: Connect audio for VIZIO Internet Apps. AC IN Rear Panel RGB PC: Connect RGB cable from computer. Composite AV: Connect composite video/audio device. Optical Audio Out: Connect SPDIF/Optical ...
E472VL User Manual
Page 13
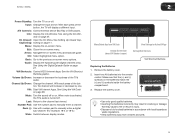
... highlighted menu option. Back: Go to manually enter a digital sub-channel. (For example, 18-4 or 18-5.) Wide: Switch between display modes. VIA Shortcuts: Control VIZIO Internet Apps. Channel Up/Down: Change the channel. See Using the VIA Dock on -screen menu options. When mute is activated, the TV's audio is open... each press of the TV's audio. Number Pad: Use the number pad to the channel last viewed. See the VIA Shortcut Buttons graphic. E472VL / E552VL 2 Power/Standby: Turn the TV on -screen menu. VIA: Start VIA Internet Apps. Info: Display the Info Window.
... highlighted menu option. Back: Go to manually enter a digital sub-channel. (For example, 18-4 or 18-5.) Wide: Switch between display modes. VIA Shortcuts: Control VIZIO Internet Apps. Channel Up/Down: Change the channel. See Using the VIA Dock on -screen menu options. When mute is activated, the TV's audio is open... each press of the TV's audio. Number Pad: Use the number pad to the channel last viewed. See the VIA Shortcut Buttons graphic. E472VL / E552VL 2 Power/Standby: Turn the TV on -screen menu. VIA: Start VIA Internet Apps. Info: Display the Info Window.

E472VL User Manual
Page 16
...RJ45 (ethernet) connector on the back panel • Wirelessly, using your home wireless network Once you have connected to your home network and the Internet, you can use VIA apps to deliver popular online content to the ethernet port on the back of the TV. 3. Connect your ethernet cable ... Guided Network Setup to a wired network: 1. Use the Guided Network Setup to reach your TV. See Using Guided Setup on page 26. 8 E472VL / E552VL Ensure you have : • An ethernet cable long enough to configure the TV. Connecting to a Wireless Network To connect to a wireless network: 1.
...RJ45 (ethernet) connector on the back panel • Wirelessly, using your home wireless network Once you have connected to your home network and the Internet, you can use VIA apps to deliver popular online content to the ethernet port on the back of the TV. 3. Connect your ethernet cable ... Guided Network Setup to a wired network: 1. Use the Guided Network Setup to reach your TV. See Using Guided Setup on page 26. 8 E472VL / E552VL Ensure you have : • An ethernet cable long enough to configure the TV. Connecting to a Wireless Network To connect to a wireless network: 1.
E472VL User Manual
Page 25
...screen keyboard, enter your network's password, then highlight Connect and press OK. 6. If you will not see your wireless network (this is internet-ready, featuring both an ethernet port and built-in high-speed wireless-N. Using the on -screen menu is displayed. 2. The Network Connection ... Use the Arrow buttons on the remote. Connecting to a Wireless Network To connect to highlight the Network icon and press OK. E472VL / E552VL 5 Using the Network Connection Menu Your TV is the network's SSID) and press OK. 5. Highlight the name of available wireless networks, is...
...screen keyboard, enter your network's password, then highlight Connect and press OK. 6. If you will not see your wireless network (this is internet-ready, featuring both an ethernet port and built-in high-speed wireless-N. Using the on -screen menu is displayed. 2. The Network Connection ... Use the Arrow buttons on the remote. Connecting to a Wireless Network To connect to highlight the Network icon and press OK. E472VL / E552VL 5 Using the Network Connection Menu Your TV is the network's SSID) and press OK. 5. Highlight the name of available wireless networks, is...
E472VL User Manual
Page 32
.... 2. Choose On if daylight savings is in different languages. Press the EXIT button on the remote. Use the Arrow buttons on the remote to the internet via an Ethernet cable or a wireless network. 1. The on-screen menu is displayed. 4. Use the Arrow buttons on the remote to highlight Time & Local Settings...ZIP code using the keypad on the remote to highlight the Settings icon and press OK. Press the MENU button on the remote. 24 E472VL / E552VL Setting the Time Zone To ensure the correct time is displayed when you press the INFO button, set the TV's time zone: To have the...
.... 2. Choose On if daylight savings is in different languages. Press the EXIT button on the remote. Use the Arrow buttons on the remote to the internet via an Ethernet cable or a wireless network. 1. The on-screen menu is displayed. 4. Use the Arrow buttons on the remote to highlight Time & Local Settings...ZIP code using the keypad on the remote to highlight the Settings icon and press OK. Press the MENU button on the remote. 24 E472VL / E552VL Setting the Time Zone To ensure the correct time is displayed when you press the INFO button, set the TV's time zone: To have the...

E472VL User Manual
Page 39
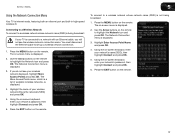
...VIA Dock and launch an App: 1. To move the App to music, get weather and news information, and more-all of the screen.) 3. Using VIZIO Internet Apps 7 VIZIO Internet Apps (VIA) delivers popular online content to create a "snippet". Using the VIA Dock The VIA Dock is in the sidebar. • Red - ...using the Left/Right Arrow buttons on the remote. (The highlighted App is also used to your VIA Apps are accessed. A high-speed internet connection is open App or to access online content. View settings for Active VIA App Change Screen Size (when VIA Sidebar is required to ...
...VIA Dock and launch an App: 1. To move the App to music, get weather and news information, and more-all of the screen.) 3. Using VIZIO Internet Apps 7 VIZIO Internet Apps (VIA) delivers popular online content to create a "snippet". Using the VIA Dock The VIA Dock is in the sidebar. • Red - ...using the Left/Right Arrow buttons on the remote. (The highlighted App is also used to your VIA Apps are accessed. A high-speed internet connection is open App or to access online content. View settings for Active VIA App Change Screen Size (when VIA Sidebar is required to ...

Quick Start Guide
Page 1
VIZIO LCD HDTV WITH VIZIO INTERNET APPS® MODELS E422VL • E472VL • E552VL QUICK START GUIDE FOR FULVLIZUIOSE.CROMMA/SNUUPAPLORT TO GO
VIZIO LCD HDTV WITH VIZIO INTERNET APPS® MODELS E422VL • E472VL • E552VL QUICK START GUIDE FOR FULVLIZUIOSE.CROMMA/SNUUPAPLORT TO GO
Quick Start Guide
Page 9
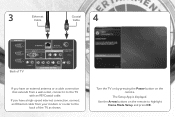
Turn the TV on by pressing the Power button on the remote to the back of TV If you have an external antenna or a cable connection that extends from your modem or router to highlight Home Mode Setup and press OK. The Setup App is displayed. 3 Ethernet Cable Coaxial Cable 4 Back of the TV as shown. Use the Arrow buttons on the remote. If you have a high-speed internet connection, connect an Ethernet cable from a wall outlet, connect it to the TV with an RF/Coaxial cable.
Turn the TV on by pressing the Power button on the remote to the back of TV If you have an external antenna or a cable connection that extends from your modem or router to highlight Home Mode Setup and press OK. The Setup App is displayed. 3 Ethernet Cable Coaxial Cable 4 Back of the TV as shown. Use the Arrow buttons on the remote. If you have a high-speed internet connection, connect an Ethernet cable from a wall outlet, connect it to the TV with an RF/Coaxial cable.
Quick Start Guide
Page 14
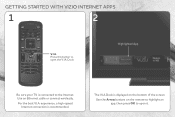
Press this button to open it. The V.I .A. Dock. For the best V.I .A. experience, a high-speed Internet connection is displayed on the remote to highlight an app, then press OK to the Internet. Use the Arrow buttons on the bottom of the screen. GETTING STARTED WITH VIZIO INTERNET APPS 1 2 V.I .A. Highlighted App Be sure your TV is connected to open the V.I .A Dock is recommended. Use an Ethernet cable or connect wirelessly.
Press this button to open it. The V.I .A. Dock. For the best V.I .A. experience, a high-speed Internet connection is displayed on the remote to highlight an app, then press OK to the Internet. Use the Arrow buttons on the bottom of the screen. GETTING STARTED WITH VIZIO INTERNET APPS 1 2 V.I .A. Highlighted App Be sure your TV is connected to open the V.I .A Dock is recommended. Use an Ethernet cable or connect wirelessly.
Quick Start Guide
Page 18
...and only to any fonts accompanying this License Agreement whether on disk, in read only memory, on your VIZIO VIA device. VIZIO Internet Applications Disclaimer VIZIO Internet Applications ("VIA") affords the opportunity to change , interruption, suspension (including termination) at the same time. ...the "Open Source Software"), to install upgrades thereto. FCC warning Changes or modifications not expressly approved by the VIZIO Internet Applications Software License Agreement ("VIA Software License Agreement"), the terms of that are subject to access VIA Services...
...and only to any fonts accompanying this License Agreement whether on disk, in read only memory, on your VIZIO VIA device. VIZIO Internet Applications Disclaimer VIZIO Internet Applications ("VIA") affords the opportunity to change , interruption, suspension (including termination) at the same time. ...the "Open Source Software"), to install upgrades thereto. FCC warning Changes or modifications not expressly approved by the VIZIO Internet Applications Software License Agreement ("VIA Software License Agreement"), the terms of that are subject to access VIA Services...
Quick Start Guide
Page 19
... would infringe or violate the rights of service or end user license agreements which will be presented to Content on VIA Services. Internet Access Required. VIZIO or its third party providers of VIA Services and/ or other services to you, including additional or different VIA Services related to...you for a period of ninety (90) days from their servers, or prevent access to their servers or to the Internet including a modem or other Services. Moreover, VIZIO or its third party providers reserve the right to charge you are subject to certain VIA Services, in accordance with such...
... would infringe or violate the rights of service or end user license agreements which will be presented to Content on VIA Services. Internet Access Required. VIZIO or its third party providers of VIA Services and/ or other services to you, including additional or different VIA Services related to...you for a period of ninety (90) days from their servers, or prevent access to their servers or to the Internet including a modem or other Services. Moreover, VIZIO or its third party providers reserve the right to charge you are subject to certain VIA Services, in accordance with such...


