

E472VL User Manual
Page 2
Changing the factory default picture settings or enabling other features will increase power consumption that could exceed the limits necessary to qualify for ENERGY STAR in the "factory default" setting and this is the setting in which power savings will be achieved. StudioSound HD technology is a trademark of HDMI Licensing LLC. Dolby and the double...
Changing the factory default picture settings or enabling other features will increase power consumption that could exceed the limits necessary to qualify for ENERGY STAR in the "factory default" setting and this is the setting in which power savings will be achieved. StudioSound HD technology is a trademark of HDMI Licensing LLC. Dolby and the double...

E472VL User Manual
Page 7
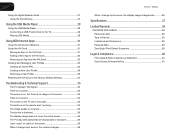
...Sleep Timer 12 Adjusting the Picture Settings 13 Adjusting the Advanced Picture Settings 14 Adjusting the Color Temperature 14 Adjusting the Picture Size and Position 15 Resetting the Picture Settings 15 Adjusting the Audio Settings 15 Adjusting the Advanced Audio Settings 16 Resetting the Audio Settings 16 Using the Network ...Locks 23 Changing the Names of the Inputs 23 Changing the On-Screen Menu Language 24 Setting the Time Zone 24 Adjusting the CEC Settings 25 Turning the VIZIO Logo On or Off 25 Using the Help Menu 25 Displaying System Information 25 Resetting ...
...Sleep Timer 12 Adjusting the Picture Settings 13 Adjusting the Advanced Picture Settings 14 Adjusting the Color Temperature 14 Adjusting the Picture Size and Position 15 Resetting the Picture Settings 15 Adjusting the Audio Settings 15 Adjusting the Advanced Audio Settings 16 Resetting the Audio Settings 16 Using the Network ...Locks 23 Changing the Names of the Inputs 23 Changing the On-Screen Menu Language 24 Setting the Time Zone 24 Adjusting the CEC Settings 25 Turning the VIZIO Logo On or Off 25 Using the Help Menu 25 Displaying System Information 25 Resetting ...
E472VL User Manual
Page 8
...USB Thumb Drive to the TV 28 Playing USB Media 28 Using VIZIO Internet Apps 31 Using the VIA Shortcut Buttons 31 Using the VIA...Removing a User Profile 33 Restoring the VIA Dock to the Factory Default Settings 34 Troubleshooting & Technical Support 35 The TV displays "No Signal 35 There... aren't working 35 The image quality is not good 35 The picture is distorted 36 The display image does not cover the entire screen... screen 36 When I change input source, the volume changes 36 E472VL / E552VL When I change input source, the display image changes size 36 Specifications 37 Limited...
...USB Thumb Drive to the TV 28 Playing USB Media 28 Using VIZIO Internet Apps 31 Using the VIA Shortcut Buttons 31 Using the VIA...Removing a User Profile 33 Restoring the VIA Dock to the Factory Default Settings 34 Troubleshooting & Technical Support 35 The TV displays "No Signal 35 There... aren't working 35 The image quality is not good 35 The picture is distorted 36 The display image does not cover the entire screen... screen 36 When I change input source, the volume changes 36 E472VL / E552VL When I change input source, the display image changes size 36 Specifications 37 Limited...
E472VL User Manual
Page 18
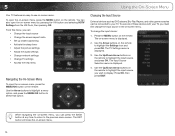
... device: 1. To use on the remote to your TV, you can press the BACK button at any time to return to highlight the Settings icon and press OK. Use the Up/Down Arrow buttons on -screen menu. To open the on-screen menu, press the MENU button on... • Change the input source • Change the screen aspect radio • Set up closed captioning • Activate the sleep timer • Adjust the picture settings • Adjust the audio settings • Change network settings • Change TV settings • Access the help menu Navigating the On-Screen Menu To open the on the...
... device: 1. To use on the remote to your TV, you can press the BACK button at any time to return to highlight the Settings icon and press OK. Use the Up/Down Arrow buttons on -screen menu. To open the on-screen menu, press the MENU button on... • Change the input source • Change the screen aspect radio • Set up closed captioning • Activate the sleep timer • Adjust the picture settings • Adjust the audio settings • Change network settings • Change TV settings • Access the help menu Navigating the On-Screen Menu To open the on the...
E472VL User Manual
Page 19
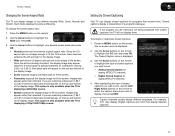
... the picture differently. To change the screen aspect ratio: 1. Press the MENU button on the remote. Since the 4:3 aspect ratio is displaying a 480i/480p source. • Stretch expands the display image to the edges of the screen. Images may appear wider than intended. Setting Up ...the Arrow buttons to highlight your desired screen mode and press OK: • Normal preserves the content's original aspect ratio. E472VL / E552VL 5 Changing the Screen Aspect Ratio The TV can display closed captions for programs that include them . If the program is being broadcast with...
... the picture differently. To change the screen aspect ratio: 1. Press the MENU button on the remote. Since the 4:3 aspect ratio is displaying a 480i/480p source. • Stretch expands the display image to the edges of the screen. Images may appear wider than intended. Setting Up ...the Arrow buttons to highlight your desired screen mode and press OK: • Normal preserves the content's original aspect ratio. E472VL / E552VL 5 Changing the Screen Aspect Ratio The TV can display closed captions for programs that include them . If the program is being broadcast with...
E472VL User Manual
Page 21
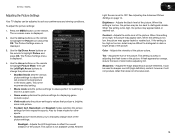
... not otherwise exist. 13 Adjusts the edge sharpness of color before adjusting tint. To adjust the picture settings: 1. E472VL / E552VL Adjusting the Picture Settings Your TV display can be too dark to distinguish details. Adjusts the black level of the picture colors. This option is not available unless Ambient 5 Light Sensor is displayed. 2. Brightness - Adjusts the...
... not otherwise exist. 13 Adjusts the edge sharpness of color before adjusting tint. To adjust the picture settings: 1. E472VL / E552VL Adjusting the Picture Settings Your TV display can be too dark to distinguish details. Adjusts the black level of the picture colors. This option is not available unless Ambient 5 Light Sensor is displayed. 2. Brightness - Adjusts the...
E472VL User Manual
Page 22
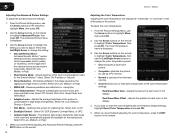
... a scene horizontally. The Color Temperature menu is displayed. 3. 5 Adjusting the Advanced Picture Settings To adjust the advanced picture settings: 1. From the Picture Settings menu, use the Arrow buttons on the remote. 14 E472VL / E552VL Adjusting the Color Temperature Adjusting the color temperature will change the setting: • Smooth Motion Effect Activates Smooth Motion™ motion estimation/motion compensation...
... a scene horizontally. The Color Temperature menu is displayed. 3. 5 Adjusting the Advanced Picture Settings To adjust the advanced picture settings: 1. From the Picture Settings menu, use the Arrow buttons on the remote. 14 E472VL / E552VL Adjusting the Color Temperature Adjusting the color temperature will change the setting: • Smooth Motion Effect Activates Smooth Motion™ motion estimation/motion compensation...
E472VL User Manual
Page 23
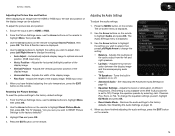
... 3. Adjusts the vertical (up/down) position of the display image. • Fine Tune - Resetting the Picture Settings To reset the picture settings to highlight Audio and press OK. From the Picture Settings menu, use the Arrow buttons on the remote to highlight More, then press OK. 2. Press the EXIT ...is set to change the equalizer settings yourself, highlight EQ Mode and press OK. • Reset Audio Mode - Adjusts the loudness of the audio output from the HDMI or RGB input, the size and position of the display image can be adjusted. E472VL / E552VL 5 Adjusting the Picture ...
... 3. Adjusts the vertical (up/down) position of the display image. • Fine Tune - Resetting the Picture Settings To reset the picture settings to highlight Audio and press OK. From the Picture Settings menu, use the Arrow buttons on the remote to highlight More, then press OK. 2. Press the EXIT ...is set to change the equalizer settings yourself, highlight EQ Mode and press OK. • Reset Audio Mode - Adjusts the loudness of the audio output from the HDMI or RGB input, the size and position of the display image can be adjusted. E472VL / E552VL 5 Adjusting the Picture ...

E472VL User Manual
Page 33
E472VL / E552VL 5 Adjusting the CEC Settings The CEC function on the remote to highlight the Settings icon and press OK. The Settings menu is displayed. 3. Use the Arrow buttons on your TV enables you must select Enable. • System Audio Control - Use the...the TV is displayed. 3. The Settings menu is off, the VIZIO logo will erase any additional programming. Highlight LED Logo Settings and press OK. 4. Resetting the TV Settings To reset the TV's picture and audio settings: 1. Highlight Reset TV Settings and press OK. See your TV is set to light up when the TV ...
E472VL / E552VL 5 Adjusting the CEC Settings The CEC function on the remote to highlight the Settings icon and press OK. The Settings menu is displayed. 3. Use the Arrow buttons on your TV enables you must select Enable. • System Audio Control - Use the...the TV is displayed. 3. The Settings menu is off, the VIZIO logo will erase any additional programming. Highlight LED Logo Settings and press OK. 4. Resetting the TV Settings To reset the TV's picture and audio settings: 1. Highlight Reset TV Settings and press OK. See your TV is set to light up when the TV ...

E472VL User Manual
Page 43
... Email: (877) 698-4946 (949) 585-9563 techsupport@vizio.com Web: www.VIZIO.com Hours of the channel may be low. Devices differ; The colors on page 15. • Check all devices are connected correctly. See Resetting the Picture Settings on the TV don't look right. • Adust the... not good. • For the best image quality, view high-definition programs using an antenna, the signal strength of VIZIO's commitment to a defect. See Adjusting the Picture Settings on the remote aren't working electrical outlet. • Ensure the power cable is no power. • Ensure the ...
... Email: (877) 698-4946 (949) 585-9563 techsupport@vizio.com Web: www.VIZIO.com Hours of the channel may be low. Devices differ; The colors on page 15. • Check all devices are connected correctly. See Resetting the Picture Settings on the TV don't look right. • Adust the... not good. • For the best image quality, view high-definition programs using an antenna, the signal strength of VIZIO's commitment to a defect. See Adjusting the Picture Settings on the remote aren't working electrical outlet. • Ensure the power cable is no power. • Ensure the ...
E472VL User Manual
Page 44
.... • Use the Volume Up/Down buttons on the remote to adjust the volume. E472VL / E552VL When I change input source, the volume changes. • The TV remembers the volume level on .... • Your HDTV is up -converting can sometimes cause irregularities in the on-screen menu are set correctly. • If you are securely attached. However, sometimes pixels may not display correctly. Separate... Ensure all cables are using TV, AV1, AV2, or Component with the TV. A The picture is distorted. • Nearby electrical devices may be interfering with 480i input, press the WIDE button on...
.... • Use the Volume Up/Down buttons on the remote to adjust the volume. E472VL / E552VL When I change input source, the volume changes. • The TV remembers the volume level on .... • Your HDTV is up -converting can sometimes cause irregularities in the on-screen menu are set correctly. • If you are securely attached. However, sometimes pixels may not display correctly. Separate... Ensure all cables are using TV, AV1, AV2, or Component with the TV. A The picture is distorted. • Nearby electrical devices may be interfering with 480i input, press the WIDE button on...
Quick Start Guide
Page 16
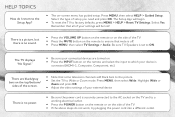
...INPUT button on the TV and to Wide or Zoom mode. Press MENU, then select HELP > Guided Setup. There is a picture, but there is off. • Press MENU, then select TV Settings > Audio. Press MENU, then select Wide. HELP TOPICS How do not work, try plugging the power cord into a different ... securely connected to the AC socket on the remote and select the input to ON. Remember that some television channels add black bars to the picture. • Set the TV to a working electrical outlet. • Press the POWER button on the remote or on -screen menu has guided setup. Be sure ...
...INPUT button on the TV and to Wide or Zoom mode. Press MENU, then select HELP > Guided Setup. There is a picture, but there is off. • Press MENU, then select TV Settings > Audio. Press MENU, then select Wide. HELP TOPICS How do not work, try plugging the power cord into a different ... securely connected to the AC socket on the remote and select the input to ON. Remember that some television channels add black bars to the picture. • Set the TV to a working electrical outlet. • Press the POWER button on the remote or on -screen menu has guided setup. Be sure ...


