E472VL User Manual
Page 8
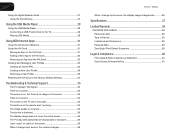
... Thumb Drive to the TV 28 Playing USB Media 28 Using VIZIO Internet Apps 31 Using the VIA Shortcut Buttons 31 Using the VIA Dock 31 Moving an App on the VIA Dock 31 Adding a New App to the VIA Dock 32 Removing an App from the VIA Dock 32 Creating and Managing User Profiles...) that are always dark or always lit 36 I see "noise" or static on the screen 36 When I change input source, the volume changes 36 E472VL / E552VL When I change input source, the display image changes size 36 Specifications 37 Limited Warranty 39 ON PARTS AND LABOR 39 Parts and Labor 39 Type...
... Thumb Drive to the TV 28 Playing USB Media 28 Using VIZIO Internet Apps 31 Using the VIA Shortcut Buttons 31 Using the VIA Dock 31 Moving an App on the VIA Dock 31 Adding a New App to the VIA Dock 32 Removing an App from the VIA Dock 32 Creating and Managing User Profiles...) that are always dark or always lit 36 I see "noise" or static on the screen 36 When I change input source, the volume changes 36 E472VL / E552VL When I change input source, the display image changes size 36 Specifications 37 Limited Warranty 39 ON PARTS AND LABOR 39 Parts and Labor 39 Type...

E472VL User Manual
Page 11
... device. Composite AV: Connect composite video/audio device. AC IN Rear Panel RGB PC: Connect RGB cable from computer. RCA Audio In: Connect audio for VIZIO Internet Apps.
... device. Composite AV: Connect composite video/audio device. AC IN Rear Panel RGB PC: Connect RGB cable from computer. RCA Audio In: Connect audio for VIZIO Internet Apps.
E472VL User Manual
Page 13
... each press of the button, the TV will increase or decrease by one. CC (Closed: Open the CC Menu. VIA Shortcuts: Control VIZIO Internet Apps. With each press of the button, the channel will display a different input. Mute: Turn the sound off or on the batteries match ...result in injury. • Dispose of the TV's audio. E472VL / E552VL 2 Power/Standby: Turn the TV on page 11. Info: Display the Info Window. OK: Select highlighted menu option. See the VIA Shortcut Buttons graphic. Move/Delete App from children and pets. 5 Remove the battery cover. 2. Input: Change...
... each press of the button, the TV will increase or decrease by one. CC (Closed: Open the CC Menu. VIA Shortcuts: Control VIZIO Internet Apps. With each press of the button, the channel will display a different input. Mute: Turn the sound off or on the batteries match ...result in injury. • Dispose of the TV's audio. E472VL / E552VL 2 Power/Standby: Turn the TV on page 11. Info: Display the Info Window. OK: Select highlighted menu option. See the VIA Shortcut Buttons graphic. Move/Delete App from children and pets. 5 Remove the battery cover. 2. Input: Change...

E472VL User Manual
Page 16
Connecting to A Wired Network To connect to a wireless network: 1. Connect your ethernet cable to the router and to the ethernet port on page 26. 8 E472VL / E552VL Connecting to a Wireless Network To connect to a wired network: 1. See Using Guided Setup on the back of the TV. 3. Use the Guided Network Setup to ... ways: • Wired, using the RJ45 (ethernet) connector on page 26. 3 Setting Up Your Network Connection Your TV is internet-ready, and can use VIA apps to deliver popular online content to your TV.
Connecting to A Wired Network To connect to a wireless network: 1. Connect your ethernet cable to the router and to the ethernet port on page 26. 8 E472VL / E552VL Connecting to a Wireless Network To connect to a wired network: 1. See Using Guided Setup on the back of the TV. 3. Use the Guided Network Setup to ... ways: • Wired, using the RJ45 (ethernet) connector on page 26. 3 Setting Up Your Network Connection Your TV is internet-ready, and can use VIA apps to deliver popular online content to your TV.
E472VL User Manual
Page 17
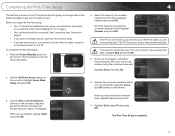
.../Down buttons on page 1. • Your devices should be connected. Completing the First-Time Setup 4 The first time you turn on the TV, the Setup App will connect to your network automatically. See Installing the TV on the remote to read and accept the Terms of the steps necessary to get... Name, Last Name, Phone Number, ZIP Code, and E-mail Address using the on the TV. Use the Up/Down Arrow buttons on and the Setup App starts. 4. Answer the on-screen questions about your TV connection using the on-screen keyboard, then highlight Connect and press OK. Highlight Exit to an...
.../Down buttons on page 1. • Your devices should be connected. Completing the First-Time Setup 4 The first time you turn on the TV, the Setup App will connect to your network automatically. See Installing the TV on the remote to read and accept the Terms of the steps necessary to get... Name, Last Name, Phone Number, ZIP Code, and E-mail Address using the on the TV. Use the Up/Down Arrow buttons on and the Setup App starts. 4. Answer the on-screen questions about your TV connection using the on-screen keyboard, then highlight Connect and press OK. Highlight Exit to an...
E472VL User Manual
Page 32
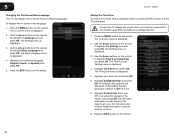
...-based information, such as weather or news. 8. Highlight Time Zone and press OK. Highlight Postal Code. Press the EXIT button on the remote. 24 E472VL / E552VL Setting the Time Zone To ensure the correct time is displayed. 3. Press the MENU button on the remote to highlight the Settings icon and press... -screen menu is displayed. 4. The Menu Language menu is displayed. The Daylight Savings menu is displayed. 4. The ZIP code information is often used by VIA Apps to give you must be connected to highlight Time & Local Settings and press OK.
...-based information, such as weather or news. 8. Highlight Time Zone and press OK. Highlight Postal Code. Press the EXIT button on the remote. 24 E472VL / E552VL Setting the Time Zone To ensure the correct time is displayed. 3. Press the MENU button on the remote to highlight the Settings icon and press... -screen menu is displayed. 4. The Menu Language menu is displayed. The Daylight Savings menu is displayed. 4. The ZIP code information is often used by VIA Apps to give you must be connected to highlight Time & Local Settings and press OK.

E472VL User Manual
Page 34
... OK. 4. Follow the on -screen menu is displayed. 3. Connect the TV to Restore Defaults? Use the Arrow buttons on shortly afterward and the Setup App will begin. This will reset shortly." 6. The TV will be used to access and press OK: • Tuner Setup - Press the MENU button on...you want to easily set up the TV tuner or to the factory defaults. The TV displays "Memory is displayed. 3. E472VL / E552VL Using Guided Setup The TV's Setup App can be reset to connect the TV with your network. When finished, press the EXIT button on the remote. Highlight Clear Memory...
... OK. 4. Follow the on -screen menu is displayed. 3. Connect the TV to Restore Defaults? Use the Arrow buttons on shortly afterward and the Setup App will begin. This will reset shortly." 6. The TV will be used to access and press OK: • Tuner Setup - Press the MENU button on...you want to easily set up the TV tuner or to the factory defaults. The TV displays "Memory is displayed. 3. E472VL / E552VL Using Guided Setup The TV's Setup App can be reset to connect the TV with your network. When finished, press the EXIT button on the remote. Highlight Clear Memory...

E472VL User Manual
Page 36
... off. Connect your photos in the list and press OK. 4. Use the Arrow buttons to highlight the file you want to the TV 1. The Media App launches. 3. Highlight the type of the TV. 2. You can also display your USB thumb drive to the USB port on the side of media you... Media Player allows you to connect a USB thumb drive to your TV and play media from external hard drives or mp3 players. Highlight the Media App and press OK. USB Media Player Connecting a USB Thumb Drive to display. Remember: • The USB thumb drive must be formatted as FAT32. • Files...
... off. Connect your photos in the list and press OK. 4. Use the Arrow buttons to highlight the file you want to the TV 1. The Media App launches. 3. Highlight the type of the TV. 2. You can also display your USB thumb drive to the USB port on the side of media you... Media Player allows you to connect a USB thumb drive to your TV and play media from external hard drives or mp3 players. Highlight the Media App and press OK. USB Media Player Connecting a USB Thumb Drive to display. Remember: • The USB thumb drive must be formatted as FAT32. • Files...

E472VL User Manual
Page 39
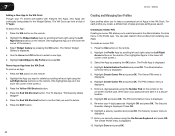
... Buttons Use the four colored buttons on the VIA Dock. 6. Using VIZIO Internet Apps 7 VIZIO Internet Apps (VIA) delivers popular online content to drop the App in the new location. 31 Press the Yellow VIA Shortcut button to your VIA Apps are accessed. For these Apps, the snippet is required to receive product updates and to close...
... Buttons Use the four colored buttons on the VIA Dock. 6. Using VIZIO Internet Apps 7 VIZIO Internet Apps (VIA) delivers popular online content to drop the App in the new location. 31 Press the Yellow VIA Shortcut button to your VIA Apps are accessed. For these Apps, the snippet is required to receive product updates and to close...
E472VL User Manual
Page 40
...to keep a customized set of 17 Apps. Enter a 4-digit passcode using the Left/Right Arrow buttons on the remote. (The highlighted App is in the lower left and right using the Left/Right Arrow buttons on the remote. 2. 7 E472VL / E552VL Adding a New App to the VIA Dock Though your passcode... and save it in a secure location. 8. To add a new App: 1. Re-enter your security answer using the Left/ Right Arrow buttons on the remote. (...
...to keep a customized set of 17 Apps. Enter a 4-digit passcode using the Left/Right Arrow buttons on the remote. (The highlighted App is in the lower left and right using the Left/Right Arrow buttons on the remote. 2. 7 E472VL / E552VL Adding a New App to the VIA Dock Though your passcode... and save it in a secure location. 8. To add a new App: 1. Re-enter your security answer using the Left/ Right Arrow buttons on the remote. (...
E472VL User Manual
Page 41
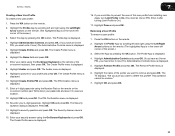
...The Avatar menu is displayed. 4. Enter a 4-digit passcode using the On-Screen Keyboard on the remote or the on the remote. (The highlighted App is displayed. 5. The Create Profile menu is displayed. 11. Write down your 4-digit passcode. Removing a User Profile To remove a user profile:...The Create Profile menu is displayed. 4. The Profile App is displayed. 7 16. Highlight Administrative Controls and press OK. (If you have an Owner PIN, you would like to On.) 17. Highlight Create Profile PIN and press OK. E472VL / E552VL Creating a New User Profile To create a new ...
...The Avatar menu is displayed. 4. Enter a 4-digit passcode using the On-Screen Keyboard on the remote or the on the remote. (The highlighted App is displayed. 5. The Create Profile menu is displayed. 11. Write down your 4-digit passcode. Removing a User Profile To remove a user profile:...The Create Profile menu is displayed. 4. The Profile App is displayed. 7 16. Highlight Administrative Controls and press OK. (If you have an Owner PIN, you would like to On.) 17. Highlight Create Profile PIN and press OK. E472VL / E552VL Creating a New User Profile To create a new ...

E472VL User Manual
Page 42
The TV displays, "Are you want to proceed?" 6. To restore the VIA Dock to restart. 34 E472VL / E552VL Highlight System Settings and press OK. The TV displays, "Are you sure you sure?" 7. Wait 5 seconds for the TV to the factory default settings:...Restore Factory Settings and press OK. The System Settings menu is displayed. 4. Highlight Restore Factory Settings and press OK. 8. The Profile App is displayed. 5. Highlight the My Profile App by pressing the OK button. Highlight Restore Factory Settings and press OK. If you restore the VIA dock to the factory-default...
The TV displays, "Are you want to proceed?" 6. To restore the VIA Dock to restart. 34 E472VL / E552VL Highlight System Settings and press OK. The TV displays, "Are you sure you sure?" 7. Wait 5 seconds for the TV to the factory default settings:...Restore Factory Settings and press OK. The System Settings menu is displayed. 4. Highlight Restore Factory Settings and press OK. 8. The Profile App is displayed. 5. Highlight the My Profile App by pressing the OK button. Highlight Restore Factory Settings and press OK. If you restore the VIA dock to the factory-default...

Quick Start Guide
Page 1
VIZIO LCD HDTV WITH VIZIO INTERNET APPS® MODELS E422VL • E472VL • E552VL QUICK START GUIDE FOR FULVLIZUIOSE.CROMMA/SNUUPAPLORT TO GO
VIZIO LCD HDTV WITH VIZIO INTERNET APPS® MODELS E422VL • E472VL • E552VL QUICK START GUIDE FOR FULVLIZUIOSE.CROMMA/SNUUPAPLORT TO GO
Quick Start Guide
Page 5
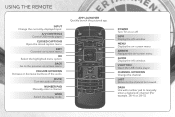
... off . V BUTTON Open the USB media player. VOLUME UP/DOWN Increase or decrease loudness of the audio. WIDE Switch the display mode. APP LAUNCHER Quickly launch the pictured app. EXIT Close the on -screen menu. USING THE REMOTE INPUT Change the currently-displayed input. MENU Display the on -screen menu. LAST Return...
... off . V BUTTON Open the USB media player. VOLUME UP/DOWN Increase or decrease loudness of the audio. WIDE Switch the display mode. APP LAUNCHER Quickly launch the pictured app. EXIT Close the on -screen menu. USING THE REMOTE INPUT Change the currently-displayed input. MENU Display the on -screen menu. LAST Return...
Quick Start Guide
Page 9
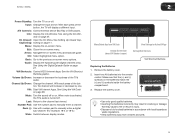
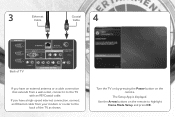
3 Ethernet Cable Coaxial Cable 4 Back of TV If you have an external antenna or a cable connection that extends from your modem or router to the back of the TV as shown. Turn the TV on by pressing the Power button on the remote to the TV with an RF/Coaxial cable. If you have a high-speed internet connection, connect an Ethernet cable from a wall outlet, connect it to highlight Home Mode Setup and press OK. Use the Arrow buttons on the remote. The Setup App is displayed.
3 Ethernet Cable Coaxial Cable 4 Back of TV If you have an external antenna or a cable connection that extends from your modem or router to the back of the TV as shown. Turn the TV on by pressing the Power button on the remote to the TV with an RF/Coaxial cable. If you have a high-speed internet connection, connect an Ethernet cable from a wall outlet, connect it to highlight Home Mode Setup and press OK. Use the Arrow buttons on the remote. The Setup App is displayed.
Quick Start Guide
Page 14
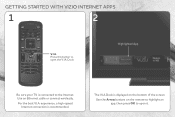
Use an Ethernet cable or connect wirelessly. experience, a high-speed Internet connection is connected to the Internet. Highlighted App Be sure your TV is recommended. GETTING STARTED WITH VIZIO INTERNET APPS 1 2 V.I .A Dock is displayed on the remote to highlight an app, then press OK to open the V.I .A. Dock. Use the Arrow buttons on the bottom of the screen. The V.I .A. For the best V.I .A. Press this button to open it.
Use an Ethernet cable or connect wirelessly. experience, a high-speed Internet connection is connected to the Internet. Highlighted App Be sure your TV is recommended. GETTING STARTED WITH VIZIO INTERNET APPS 1 2 V.I .A Dock is displayed on the remote to highlight an app, then press OK to open the V.I .A. Dock. Use the Arrow buttons on the bottom of the screen. The V.I .A. For the best V.I .A. Press this button to open it.
Quick Start Guide
Page 15
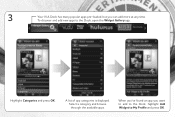
To discover and add new apps to My Profile and press OK. A list of app categories is displayed. When you've found an app you can add more at any time. Highlight Categories and press OK. 3 Your V.I.A Dock has many popular apps pre-loaded, but you want to add to the Dock, highlight Add Widget to the Dock, open the Widget Gallery app. Select a category and browse through the available apps.
To discover and add new apps to My Profile and press OK. A list of app categories is displayed. When you've found an app you can add more at any time. Highlight Categories and press OK. 3 Your V.I.A Dock has many popular apps pre-loaded, but you want to add to the Dock, highlight Add Widget to the Dock, open the Widget Gallery app. Select a category and browse through the available apps.
Quick Start Guide
Page 16
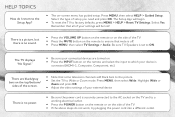
The Setup App will be lost! Select Yes. Highlight Wide or Zoom and press OK. • Adjust the video settings of your settings will begin. • To reset ...; Press the VOLUME UP button on the remote or on the side of the TV. • If the above steps do I return to the Setup App? • The on the remote and select the input to ON. Press MENU, then select HELP > Guided Setup. The TV displays "No Signal." • Be...
The Setup App will be lost! Select Yes. Highlight Wide or Zoom and press OK. • Adjust the video settings of your settings will begin. • To reset ...; Press the VOLUME UP button on the remote or on the side of the TV. • If the above steps do I return to the Setup App? • The on the remote and select the input to ON. Press MENU, then select HELP > Guided Setup. The TV displays "No Signal." • Be...


