
Download
Page 5
Do not try to leak which can damage the remote control or injure the operator. Pulling on the apparatus. • The mains plug or appliance coupler is used for an extended period of time, unplug ...
Do not try to leak which can damage the remote control or injure the operator. Pulling on the apparatus. • The mains plug or appliance coupler is used for an extended period of time, unplug ...
Download
Page 7
... Contents Installing the TV 3 Inspecting the Package Contents 3 Installing the TV 3 Installing the TV Stand 3 Installing the TV on a Wall 6 Controls and Connections 7 Front Panel 9 Remote Control 10 Replacing the Batteries 11 Connecting Your Devices 12 Connecting A Device 12 Connecting a Device - Table of the Inputs 37 1
... Contents Installing the TV 3 Inspecting the Package Contents 3 Installing the TV 3 Installing the TV Stand 3 Installing the TV on a Wall 6 Controls and Connections 7 Front Panel 9 Remote Control 10 Replacing the Batteries 11 Connecting Your Devices 12 Connecting A Device 12 Connecting a Device - Table of the Inputs 37 1

Download
Page 9
... begin installing the TV. Installing the TV 1 Inspecting the Package Contents Before installing your new TV, take a moment to ensure nothing is not properly secured VIZIO LED HDTV with Stand Remote Control with Batteries Quick Start Guide Power Cord 7 x Philips Screws Package Contents 3 TV on Stand
... begin installing the TV. Installing the TV 1 Inspecting the Package Contents Before installing your new TV, take a moment to ensure nothing is not properly secured VIZIO LED HDTV with Stand Remote Control with Batteries Quick Start Guide Power Cord 7 x Philips Screws Package Contents 3 TV on Stand
Download
Page 15
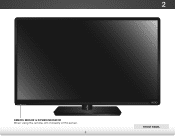
2 Front Panel REMOTE SENSOR & POWER INDICATOR When using the remote, aim it directly at this sensor. 9 Front Panel
2 Front Panel REMOTE SENSOR & POWER INDICATOR When using the remote, aim it directly at this sensor. 9 Front Panel
Download
Page 16
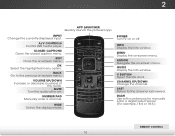
Back Go to the channel last viewed. Wide Switch the display mode. V Button Open the VIA dock. 2 Remote Control App launcher Quickly launch the pictured app. Closed Captions Open the closed caption menu. Guide Display the info window. Exit Close the on -.... Last Return to the previous on-screen menu. Dash Use with number pad to manually enter a digital sub-channel. (For example, 18-4 or 18-5.) Remote Control 10 Input Change the currently-displayed input. Number Pad Manually enter a channel. Info Display the info window. Volume Up/Down Increase or decrease loudness...
Back Go to the channel last viewed. Wide Switch the display mode. V Button Open the VIA dock. 2 Remote Control App launcher Quickly launch the pictured app. Closed Captions Open the closed caption menu. Guide Display the info window. Exit Close the on -.... Last Return to the previous on-screen menu. Dash Use with number pad to manually enter a digital sub-channel. (For example, 18-4 or 18-5.) Remote Control 10 Input Change the currently-displayed input. Number Pad Manually enter a channel. Info Display the info window. Volume Up/Down Increase or decrease loudness...
Download
Page 17
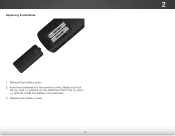
Replace the battery cover. 11 2 Replacing the Batteries 1. Make sure that the (+) and (-) symbols on the batteries match the (+) and (-) symbols inside the battery compartment. 3. Insert two batteries into the remote control. Remove the battery cover. 2.
Replace the battery cover. 11 2 Replacing the Batteries 1. Make sure that the (+) and (-) symbols on the batteries match the (+) and (-) symbols inside the battery compartment. 3. Insert two batteries into the remote control. Remove the battery cover. 2.
Download
Page 24
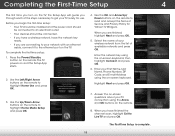
...Use the Up/Down Arrow buttons on the TV. When you are connecting to the ethernet port on the remote to highlight Home Use and press OK. 3. Press the Power/Standby button on and the Setup App starts...ZIP Code, and E-mail Address using the on the remote. 8. Use the Left/Right Arrow buttons on the remote to Live TV and press OK. The TV powers on the remote. The First-Time Setup is complete. 18 TV Widgets.... Use the OK and Arrow Up/ Down buttons on the remote to highlight Home Mode Setup and press OK. 4. Before you begin the first-time setup...
...Use the Up/Down Arrow buttons on the TV. When you are connecting to the ethernet port on the remote to highlight Home Use and press OK. 3. Press the Power/Standby button on and the Setup App starts...ZIP Code, and E-mail Address using the on the remote. 8. Use the Left/Right Arrow buttons on the remote to Live TV and press OK. The TV powers on the remote. The First-Time Setup is complete. 18 TV Widgets.... Use the OK and Arrow Up/ Down buttons on the remote to highlight Home Mode Setup and press OK. 4. Before you begin the first-time setup...
Download
Page 25
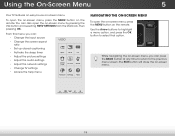
...VIA button and selecting HDTV Settings from the VIA Dock, then pressing OK. To open the on-screen menu, press the MENU button on the remote. Wide Zoom Normal Panoramic While navigating the on-screen menu, you can: • Change the input source • Change the screen aspect ratio...Adjust the picture settings • Adjust the audio settings • Adjust the network settings • Change TV settings • Access the help menu VIZIO ABC Input Wide CC Sleep Timer Picture Audio Network Settings Help Navigating the On-Screen Menu To open the on-screen menu, press the MENU...
...VIA button and selecting HDTV Settings from the VIA Dock, then pressing OK. To open the on-screen menu, press the MENU button on the remote. Wide Zoom Normal Panoramic While navigating the on-screen menu, you can: • Change the input source • Change the screen aspect ratio...Adjust the picture settings • Adjust the audio settings • Adjust the network settings • Change TV settings • Access the help menu VIZIO ABC Input Wide CC Sleep Timer Picture Audio Network Settings Help Navigating the On-Screen Menu To open the on-screen menu, press the MENU...

Download
Page 26
...the Arrow buttons on -screen menu. Images may appear distorted. VIZIO Input Source Selection TV AV Component HDMI-1 HDMI-2 HDMI-3 HDMI-4...the screen. • Panoramic expands the display image to the edges of the screen. The on the remote. Use the Up/Down Arrow buttons on the top and bottom of the display image. • Sleep... devices such as DVD players, Blu-Ray Players, and video game consoles can display images in the on the remote to display and press OK. Press OK. 3.WiUdese thZoeomArroNwormbaul ttPoannosratmoichighlight your TV, you are added to the left ...
...the Arrow buttons on -screen menu. Images may appear distorted. VIZIO Input Source Selection TV AV Component HDMI-1 HDMI-2 HDMI-3 HDMI-4...the screen. • Panoramic expands the display image to the edges of the screen. The on the remote. Use the Up/Down Arrow buttons on the top and bottom of the display image. • Sleep... devices such as DVD players, Blu-Ray Players, and video game consoles can display images in the on the remote to display and press OK. Press OK. 3.WiUdese thZoeomArroNwormbaul ttPoannosratmoichighlight your TV, you are added to the left ...
Download
Page 27
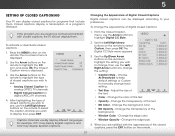
...Caption Off Digital CC Style As Broadcast Caption channels usually display different languages. Use the Left/Right Arrow buttons on the remote. Choose As BroadcAaBCst to keep default settings or Custom to select Custom, then press OK. Ne•tworkBGSetOtinpgsaciHtyelp- To activate... Color - The Digital CC Style menu appears. The on the remote. To change Extiht e se2ttDing: 3D • Caption Style - Closed captions display a transcription of the text. • Sleep Timer CoPlicotur re- VIZIO Digital CC Style Caption Style Custom Text Size As Broadcast Color As...
...Caption Off Digital CC Style As Broadcast Caption channels usually display different languages. Use the Left/Right Arrow buttons on the remote. Choose As BroadcAaBCst to keep default settings or Custom to select Custom, then press OK. Ne•tworkBGSetOtinpgsaciHtyelp- To activate... Color - The Digital CC Style menu appears. The on the remote. To change Extiht e se2ttDing: 3D • Caption Style - Closed captions display a transcription of the text. • Sleep Timer CoPlicotur re- VIZIO Digital CC Style Caption Style Custom Text Size As Broadcast Color As...
Download
Page 28
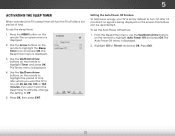
...remote. Press OK, then press EXIT. To set period of time after which you don't want the TV to highlight Timer and press OK. Highlight Off or 10 min and press OK. The on-screen menu is displayed. 3. The Sleep Timer menu is VIZIO... displayed. The Timers menu is being displayed on the remote to turn off: 30, 60, 90, 120, or 180 ...Sleep Timer Picture Audio Network Settings Help 22 Use the Up/Down Arrow buttons on the remote to turn off after 10 minutes if no signal is displayed. 4. 5 Activating the ...
...remote. Press OK, then press EXIT. To set period of time after which you don't want the TV to highlight Timer and press OK. Highlight Off or 10 min and press OK. The on-screen menu is displayed. 3. The Sleep Timer menu is VIZIO... displayed. The Timers menu is being displayed on the remote to turn off: 30, 60, 90, 120, or 180 ...Sleep Timer Picture Audio Network Settings Help 22 Use the Up/Down Arrow buttons on the remote to turn off after 10 minutes if no signal is displayed. 4. 5 Activating the ...
Download
Page 29
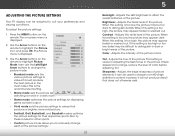
... then use the Left/Right Arrow buttons to change each of the picture settings: 23 Backlight - Use the Arrow buttons on the remote. Brightness - Adjusts the black level of the picture. Wide ZooWmhenNotrhmiasl sePattnionragmiics too high, the picture may appear faded or washed out... LED brightness to suit your preferences and viewing conditions. 5 Adjusting the Picture Settings Your TV display can be used to manually change the picture mode: VIZIO Picture Picture Mode Backlight Brightness Contrast Color Tint Sharpness Custom - + 50 - + 50 - + 50 - + 50 - +0 - +0 More ...
... then use the Left/Right Arrow buttons to change each of the picture settings: 23 Backlight - Use the Arrow buttons on the remote. Brightness - Adjusts the black level of the picture. Wide ZooWmhenNotrhmiasl sePattnionragmiics too high, the picture may appear faded or washed out... LED brightness to suit your preferences and viewing conditions. 5 Adjusting the Picture Settings Your TV display can be used to manually change the picture mode: VIZIO Picture Picture Mode Backlight Brightness Contrast Color Tint Sharpness Custom - + 50 - + 50 - + 50 - + 50 - +0 - +0 More ...
Download
Page 30
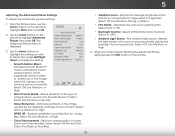
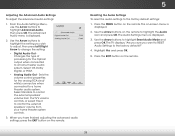
Use the Arrow buttons to highlight the setting you havAeBCfinished adjusting the Advanced Picture Settings, press the EXIT button on the remote. Select Off, Precision or Smooth. • Noise Reduction - Diminishes artifacts in the room and automatically adjusts the Exit ...Right Arrow to compensate for the Smooth Motion™ effect. 5 Adjusting the Advanced Picture Settings To adjust the advanced picture settings: 1. VIZIO Advanced Picture Smooth Motion Effect Medium Real Cinema Mode Smooth Noise Reduction Low MPEG NR Low Color Enhancement Normal 3. Allows selection of the...
Use the Arrow buttons to highlight the setting you havAeBCfinished adjusting the Advanced Picture Settings, press the EXIT button on the remote. Select Off, Precision or Smooth. • Noise Reduction - Diminishes artifacts in the room and automatically adjusts the Exit ...Right Arrow to compensate for the Smooth Motion™ effect. 5 Adjusting the Advanced Picture Settings To adjust the advanced picture settings: 1. VIZIO Advanced Picture Smooth Motion Effect Medium Real Cinema Mode Smooth Noise Reduction Low MPEG NR Low Color Enhancement Normal 3. Allows selection of the...

Download
Page 31
... displayed. Red Offset - - If you have finished adjusting the color temperature, press the EXIT button on the remote to highlight More, then press OK. 2. From the Picture menu, use the VIZIO Arrow buttons on the remote. 25 Adjusting the Picture Size and Position When displaying an image, the size and position of the...
... displayed. Red Offset - - If you have finished adjusting the color temperature, press the EXIT button on the remote to highlight More, then press OK. 2. From the Picture menu, use the VIZIO Arrow buttons on the remote. 25 Adjusting the Picture Size and Position When displaying an image, the size and position of the...

Download
Page 32
From the Picture menu, use the Arrow buttons to the factory defaults?" 3. Highlight Yes and press OK. 4. Press the EXIT button on the remote to the factory default settings: 1. The TV displays, "Are you sure you want to RESET Picture Settings to highlight More, then press OK. 2. 5 Resetting the Picture Settings To reset the picture settings to highlight Reset Picture Mode, then press OK. Use the Arrow buttons on the remote. 26
From the Picture menu, use the Arrow buttons to the factory defaults?" 3. Highlight Yes and press OK. 4. Press the EXIT button on the remote to the factory default settings: 1. The TV displays, "Are you sure you want to RESET Picture Settings to highlight More, then press OK. 2. 5 Resetting the Picture Settings To reset the picture settings to highlight Reset Picture Mode, then press OK. Use the Arrow buttons on the remote. 26
Download
Page 33
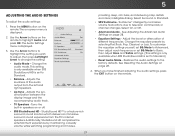
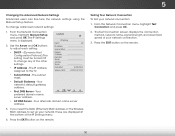
...Adjusting the Advanced Audio Wide SeZottoimngs Noonrmpal agPaeno2ra8m.ic • Equalizer Settings - See Resetting the Audio Settings on the remote. Network Settings Help 27 SRS StudioSound HD SRS TruVolume Advanced Audio Equalizer Settings Reset Audio Mode Standard On • ... • Input ResWeidteAudiCoC Mode - 5 Adjusting the Audio Settings To adjust the audio settings: 1. TV Speakers Flat +0 +0 Off 3. VIZIO Audio Settings Audio Mode Balance - Lip Sync - The on or off. • SRS StudioSound HD - STliWm eeephr enPiycotuure haAvuediofinished adjusting ...
...Adjusting the Advanced Audio Wide SeZottoimngs Noonrmpal agPaeno2ra8m.ic • Equalizer Settings - See Resetting the Audio Settings on the remote. Network Settings Help 27 SRS StudioSound HD SRS TruVolume Advanced Audio Equalizer Settings Reset Audio Mode Standard On • ... • Input ResWeidteAudiCoC Mode - 5 Adjusting the Audio Settings To adjust the audio settings: 1. TV Speakers Flat +0 +0 Off 3. VIZIO Audio Settings Audio Mode Balance - Lip Sync - The on or off. • SRS StudioSound HD - STliWm eeephr enPiycotuure haAvuediofinished adjusting ...
Download
Page 34
... press the EXIT button on -screen menu is displayed. 3. VIZIO Advanced Audio Digital Audio Out Analog Audio Out PCM Fixed 3. The Audio Settings menu is displayed. 2. InPpruet ss thWeideEXIT CbCutton on the remote. Select Off, Dolby Digital, or PCM. • Analog ...Advanced Audio Settings To adjust the advanced audio settings: 1. Sleep Timer Picture Audio Network Settings Help 28 WiUdese thZoeomArroNwormbaul ttPoannosraomnic the remote to highlight Advanced Audio, then press OK. Highlight Yes aABnCd press OK. 5. From the Audio Settings Menu, use the ...
... press the EXIT button on -screen menu is displayed. 3. VIZIO Advanced Audio Digital Audio Out Analog Audio Out PCM Fixed 3. The Audio Settings menu is displayed. 2. InPpruet ss thWeideEXIT CbCutton on the remote. Select Off, Dolby Digital, or PCM. • Analog ...Advanced Audio Settings To adjust the advanced audio settings: 1. Sleep Timer Picture Audio Network Settings Help 28 WiUdese thZoeomArroNwormbaul ttPoannosraomnic the remote to highlight Advanced Audio, then press OK. Highlight Yes aABnCd press OK. 5. From the Audio Settings Menu, use the ...
Download
Page 35
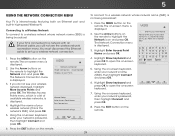
...ready, featuring both an Ethernet port and built-in high-speed Wireless-N. The Network Connection menu is displayed. 3. Using the on the remote. Press the EXIT button on -screen keyboard, enter your network's password, then highlight Connect and Slpeerpess Timer OK. Connecting to a...Access Point Name Test Connection Advanced network settings 6. Using the on the remote. 29 To connect to opABeCn the on -screen keyboard. Highlight Enter Access Point Name and press OK. 4. VIZIO Enter Access Point Name Please enter your wireless network displayed, highlight More ...
...ready, featuring both an Ethernet port and built-in high-speed Wireless-N. The Network Connection menu is displayed. 3. Using the on the remote. Press the EXIT button on -screen keyboard, enter your network's password, then highlight Connect and Slpeerpess Timer OK. Connecting to a...Access Point Name Test Connection Advanced network settings 6. Using the on the remote. 29 To connect to opABeCn the on -screen keyboard. Highlight Enter Access Point Name and press OK. 4. VIZIO Enter Access Point Name Please enter your wireless network displayed, highlight More ...
Download
Page 36
... to set up your network, these are displayed at the bottom of the IP Settings menu. 4. Press the EXIT button on the remote. Exit 2D 3D ABC Input Wide CC Sleep Timer Picture Audio Network Settings Help 30 The subnet mask. • Default Gateway - ...Your preferred domain name server address. • Alt DNS Server - Wide Zoom Normal Panoramic 3. VIZIO IP Setting DHCP Off IP Address Subnet Mask Default Gateway Pref. DNS Server - From the Network Connection menu, highlight Test Connection and press OK....
... to set up your network, these are displayed at the bottom of the IP Settings menu. 4. Press the EXIT button on the remote. Exit 2D 3D ABC Input Wide CC Sleep Timer Picture Audio Network Settings Help 30 The subnet mask. • Default Gateway - ...Your preferred domain name server address. • Alt DNS Server - Wide Zoom Normal Panoramic 3. VIZIO IP Setting DHCP Off IP Address Subnet Mask Default Gateway Pref. DNS Server - From the Network Connection menu, highlight Test Connection and press OK....
Download
Page 37
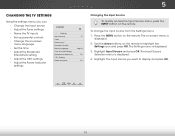
... OK. The Input Source Selection menu is displayed. 3. Sleep Timer Picture Audio Network Settings Help 31 Use the Arrow buttons on the remote. InHpuigt hligWhidtethe iCnCput source you can: • Change the input source • Adjust the Tuner settings • Name the TV inputs... Set the time • Adjust the Broadcast Interactivity setting • Adjust the CEC settings • Adjust the Power Indicator settings VIZIO Settings Input Source Tuner Name Input Parental Controls Menu Language Time & Local Settings Broadcast Interactivity CEC Settings Power Indicator TV English On ...
... OK. The Input Source Selection menu is displayed. 3. Sleep Timer Picture Audio Network Settings Help 31 Use the Arrow buttons on the remote. InHpuigt hligWhidtethe iCnCput source you can: • Change the input source • Adjust the Tuner settings • Name the TV inputs... Set the time • Adjust the Broadcast Interactivity setting • Adjust the CEC settings • Adjust the Power Indicator settings VIZIO Settings Input Source Tuner Name Input Parental Controls Menu Language Time & Local Settings Broadcast Interactivity CEC Settings Power Indicator TV English On ...


