
E551VA User Manual
Page 9
... images below to ensure nothing is not properly secured To install the TV stand for model: 1. However, the TV can still fall over . VIZIO LCD HDTV with Batteries Cleaning Cloth User Manual and Quick Start Guide Package Contents 1 To prevent scratches or damage to inspect the package contents. Your... stand • On a wall, using a VESA-standard wall mount (not included) Installing the TV Stand Your TV includes a stand designed to support the weight of the TV and keep it from the box and inspecting the package contents you have completed your new TV, take a moment to the screen...
... images below to ensure nothing is not properly secured To install the TV stand for model: 1. However, the TV can still fall over . VIZIO LCD HDTV with Batteries Cleaning Cloth User Manual and Quick Start Guide Package Contents 1 To prevent scratches or damage to inspect the package contents. Your... stand • On a wall, using a VESA-standard wall mount (not included) Installing the TV Stand Your TV includes a stand designed to support the weight of the TV and keep it from the box and inspecting the package contents you have completed your new TV, take a moment to the screen...
E551VA User Manual
Page 10
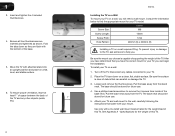
... can begin the installation. Place the TV face-down so they are inserted and tightened as shown. The base neck should be stored for the weight of the TV and any cables connected to find the appropriate mount for future use . 5. See Appendix A - Move the TV with your TV. ...2. To ensure proper ventilation, leave at least 1" of space between the back of this TV. Be sure the mount you . Attach your TV model: E551VA Screw Size: M6 Screw Length: 15mm Screw Pitch: 1mm Hole Pattern: 400mm (V) x 200mm (H) Installing a TV on a wall, you have the correct mount ...
... can begin the installation. Place the TV face-down so they are inserted and tightened as shown. The base neck should be stored for the weight of the TV and any cables connected to find the appropriate mount for future use . 5. See Appendix A - Move the TV with your TV. ...2. To ensure proper ventilation, leave at least 1" of space between the back of this TV. Be sure the mount you . Attach your TV model: E551VA Screw Size: M6 Screw Length: 15mm Screw Pitch: 1mm Hole Pattern: 400mm (V) x 200mm (H) Installing a TV on a wall, you have the correct mount ...
E551VA User Manual
Page 48
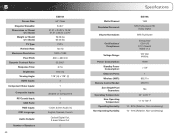
... w/o Stand: Weight w/ Stand: w/o Stand: TV Type: Refresh Rate: Maximum Resolution: Pixel Pitch: Dynamic Contrast Ratio: Response Time: Brightness: Viewing Angle: HDMI Inputs: Component Video Inputs: Composite Inputs: RF/Coaxial Input: USB Ports: RGB Inputs: OSD Language: Audio Outputs: Number of Speakers 40 E551VA 55" Class 54...WiFi): Remote Control Model: Zero Bright Pixel Guarantee: Operating Temperature: Non-Operating Temperature: Operating Humidity: Non-Operating Humidity: E551VA 15W SRS TruSurround HD Dolby Digital SRS TruVolume Energy Star CSA-US FCC Class B HDMI v1.4 120 VAC @ 60Hz 170W
... w/o Stand: Weight w/ Stand: w/o Stand: TV Type: Refresh Rate: Maximum Resolution: Pixel Pitch: Dynamic Contrast Ratio: Response Time: Brightness: Viewing Angle: HDMI Inputs: Component Video Inputs: Composite Inputs: RF/Coaxial Input: USB Ports: RGB Inputs: OSD Language: Audio Outputs: Number of Speakers 40 E551VA 55" Class 54...WiFi): Remote Control Model: Zero Bright Pixel Guarantee: Operating Temperature: Non-Operating Temperature: Operating Humidity: Non-Operating Humidity: E551VA 15W SRS TruSurround HD Dolby Digital SRS TruVolume Energy Star CSA-US FCC Class B HDMI v1.4 120 VAC @ 60Hz 170W


