Download
Page 3
... coverage during the standard warranty period. It is designed and manufactured to your TV. • Read these instructions. • Keep these instructions before operating your TV. To get the most out of your new VIZIO product, read these instructions. • Heed all warnings. • Follow all...this symbol, please read the accompanying helpful tip. When you either: • Register your TV. We recommend that produce heat. • Do not defeat the safety purpose of your VIZIO product at (877) 878-4946. Product Registration To purchase or inquire about accessories and ...
... coverage during the standard warranty period. It is designed and manufactured to your TV. • Read these instructions. • Keep these instructions before operating your TV. To get the most out of your new VIZIO product, read these instructions. • Heed all warnings. • Follow all...this symbol, please read the accompanying helpful tip. When you either: • Register your TV. We recommend that produce heat. • Do not defeat the safety purpose of your VIZIO product at (877) 878-4946. Product Registration To purchase or inquire about accessories and ...

Download
Page 4
... company. • Do not apply pressure or throw objects at least three feet should be used for ventilation. For more information, contact your TV. This is equipped with a three-pronged grounded plug (a plug with a third grounding pin). The manufacturer's warranty does not cover user abuse ...the voltage specified. Servicing is intended to alert the user to the presence of un-isolated, dangerous voltage within the inside of your TV that may compromise the integrity of the grounded plug. • When connected to power surges. To avoid electric shock, avoid handling...
... company. • Do not apply pressure or throw objects at least three feet should be used for ventilation. For more information, contact your TV. This is equipped with a three-pronged grounded plug (a plug with a third grounding pin). The manufacturer's warranty does not cover user abuse ...the voltage specified. Servicing is intended to alert the user to the presence of un-isolated, dangerous voltage within the inside of your TV that may compromise the integrity of the grounded plug. • When connected to power surges. To avoid electric shock, avoid handling...
Download
Page 5
... cord. Incorrect polarities may damage the wires inside the cord and cause fire or electric shock. Your TV is used for moving your TV. • When unplugging your TV. Your TV is damaged, the internal components may expose you are for repair. Opening or removing the back cover ...batteries in fire or electric shock. • Do not use your dealer. • Do not attempt to repair or service your TV yourself. • Avoid using dropped or damaged appliances. Continued use by qualified service personnel only. Do not expose batteries to excessive heat such ...
... cord. Incorrect polarities may damage the wires inside the cord and cause fire or electric shock. Your TV is used for moving your TV. • When unplugging your TV. Your TV is damaged, the internal components may expose you are for repair. Opening or removing the back cover ...batteries in fire or electric shock. • Do not use your dealer. • Do not attempt to repair or service your TV yourself. • Avoid using dropped or damaged appliances. Continued use by qualified service personnel only. Do not expose batteries to excessive heat such ...
Download
Page 6
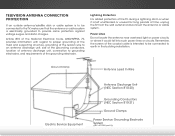
...H) Power Lines Do not locate the antenna near overhead light or power circuits, or where it is intended to be connected to the TV, make sure that the antenna or cable system is electrically grounded to provide some protection against voltage surges and static charges. Lightning Protection For... added protection of the TV during a lightning storm or when it could fall into such power lines or circuits. Remember, the screen of the coaxial cable is left...
...H) Power Lines Do not locate the antenna near overhead light or power circuits, or where it is intended to be connected to the TV, make sure that the antenna or cable system is electrically grounded to provide some protection against voltage surges and static charges. Lightning Protection For... added protection of the TV during a lightning storm or when it could fall into such power lines or circuits. Remember, the screen of the coaxial cable is left...
Download
Page 7
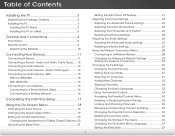
...Menu 28 Connecting to a Wireless Network 28 Changing the Advanced Network Settings 29 Testing Your Network Connection 29 Changing the TV Settings 30 Changing the Input Source 30 Setting the Tuner Mode 31 Scanning for Channels 31 Adding New Channels 32 Skipping...Changing the Parental Control Passcode 36 Resetting the Content Locks 36 Changing the Names of Contents Installing the TV 3 Inspecting the Package Contents 3 Installing the TV 3 Installing the TV Stand 3 Installing the TV on a Wall 5 Controls and Connections 6 Front Panel 8 Remote Control 9 Replacing the Batteries 10...
...Menu 28 Connecting to a Wireless Network 28 Changing the Advanced Network Settings 29 Testing Your Network Connection 29 Changing the TV Settings 30 Changing the Input Source 30 Setting the Tuner Mode 31 Scanning for Channels 31 Adding New Channels 32 Skipping...Changing the Parental Control Passcode 36 Resetting the Content Locks 36 Changing the Names of Contents Installing the TV 3 Inspecting the Package Contents 3 Installing the TV 3 Installing the TV Stand 3 Installing the TV on a Wall 5 Controls and Connections 6 Front Panel 8 Remote Control 9 Replacing the Batteries 10...

Download
Page 8
... the CEC Settings 38 Turning the Power Indicator On or Off 38 Using the Help Menu 39 Displaying System Information 39 Resetting the TV Settings 40 Restoring the TV to Factory Default Settings 40 Using Guided Setup 41 Using the Info Window 42 Using the USB Media Player 43 Using the USB... Media Player 43 Connecting a USB Thumb Drive to the TV 43 Playing USB Media 43 Using VIZIO Internet Apps 45 Using the VIA Shortcut Buttons 45 Using the VIA Dock 45 Moving an App on the VIA Dock 45...
... the CEC Settings 38 Turning the Power Indicator On or Off 38 Using the Help Menu 39 Displaying System Information 39 Resetting the TV Settings 40 Restoring the TV to Factory Default Settings 40 Using Guided Setup 41 Using the Info Window 42 Using the USB Media Player 43 Using the USB... Media Player 43 Connecting a USB Thumb Drive to the TV 43 Playing USB Media 43 Using VIZIO Internet Apps 45 Using the VIA Shortcut Buttons 45 Using the VIA Dock 45 Moving an App on the VIA Dock 45...
Download
Page 9
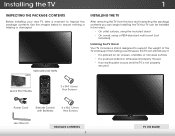
VIZIO LED LCD HDTV VIZIO Installing the TV After removing the TV from falling over if: • It is placed on Stand Installing the TV 1 Inspecting the Package Contents Before installing your new TV, take a moment to support the weight of the TV and keep it from the box and inspecting the package contents you can begin installing...
VIZIO LED LCD HDTV VIZIO Installing the TV After removing the TV from falling over if: • It is placed on Stand Installing the TV 1 Inspecting the Package Contents Before installing your new TV, take a moment to support the weight of the TV and keep it from the box and inspecting the package contents you can begin installing...
Download
Page 10
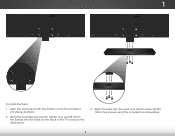
Align the neck piece with the neck and tighten three (3) M4 16mm hex screws using the included hex screwdriver. 4 Align the base with the bottom of the TV to secure the neck piece. 3. 1 To install the base: 1. Using the included hex wrench, tighten four (4) M4 12mm hex screws into the holes on the back of the TV and slide it into place as shown. 2.
Align the neck piece with the neck and tighten three (3) M4 16mm hex screws using the included hex screwdriver. 4 Align the base with the bottom of the TV to secure the neck piece. 3. 1 To install the base: 1. Using the included hex wrench, tighten four (4) M4 12mm hex screws into the holes on the back of the TV and slide it into place as shown. 2.
Download
Page 11
... requires lifting. Use only with your mount. See Appendix A - Consult the information below to help you choose is clear of the TV. Screw Size: Screw Pitch: Screw Length: Hole Pattern: E550i-A0 M6 1.0mm 20mm 400mm (V) x 400mm (H) Be sure the mount you . Disconnect any cables connected to the wall, carefully following the instructions...
... requires lifting. Use only with your mount. See Appendix A - Consult the information below to help you choose is clear of the TV. Screw Size: Screw Pitch: Screw Length: Hole Pattern: E550i-A0 M6 1.0mm 20mm 400mm (V) x 400mm (H) Be sure the mount you . Disconnect any cables connected to the wall, carefully following the instructions...

Download
Page 13
Change input source. Side Panel 7 Open the on . MENU - CHANNEL UP/DOWN - INPUT - Increase or decrease volume level. Change the channel. VOLUME UP/DOWN - Turn TV off or on -screen menu. 2 INPUT MENU CH ^ CH VOL ^ VOL ^ ^ POWER -
Change input source. Side Panel 7 Open the on . MENU - CHANNEL UP/DOWN - INPUT - Increase or decrease volume level. Change the channel. VOLUME UP/DOWN - Turn TV off or on -screen menu. 2 INPUT MENU CH ^ CH VOL ^ VOL ^ ^ POWER -

Download
Page 15
... enter a channel. Wide Switch the display mode. Last Return to the channel last viewed. Menu Display the on . Mute Turn the audio off . Power Turn TV on -screen menu. Info Display the info window. Guide Display the info window.
... enter a channel. Wide Switch the display mode. Last Return to the channel last viewed. Menu Display the on . Mute Turn the audio off . Power Turn TV on -screen menu. Info Display the info window. Guide Display the info window.
Download
Page 17
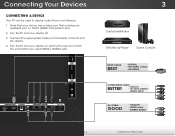
Verify that matches an available port on . Turn the TV and your device has a video port that your device on the TV (HDMI, Component, etc). 2. Set the TV's input to the TV and the device. 4. Connect the appropriate cable (not included) to match the connection you used to ...display output from most devices. 1. Connecting Your Devices Connecting A Device Your TV can be used (HDMI-1, HDMI-2, etc). 1 2 (ARC) CABLE / ANTENNA 3 Cable/Satellite Box DVD/Blu-ray Player Game Console HDMI CABLE BEST...
Verify that matches an available port on . Turn the TV and your device has a video port that your device on the TV (HDMI, Component, etc). 2. Set the TV's input to the TV and the device. 4. Connect the appropriate cable (not included) to match the connection you used to ...display output from most devices. 1. Connecting Your Devices Connecting A Device Your TV can be used (HDMI-1, HDMI-2, etc). 1 2 (ARC) CABLE / ANTENNA 3 Cable/Satellite Box DVD/Blu-ray Player Game Console HDMI CABLE BEST...

Download
Page 18
... the yellow connector while audio is the intelligent, all-digital interface that delivers both dazzling quality and unmatched ease of connecting your devices to your TV. HDMI CABLE HDMI is sent over three connectors for optimal viewing. • Video Resolutions up to 480i • Analog Connection • Audio and Video Signals...
... the yellow connector while audio is the intelligent, all-digital interface that delivers both dazzling quality and unmatched ease of connecting your devices to your TV. HDMI CABLE HDMI is sent over three connectors for optimal viewing. • Video Resolutions up to 480i • Analog Connection • Audio and Video Signals...

Download
Page 19
Verify that your device has a video port that matches an available port on . 3 Home Audio Receiver VIZIO Sound Bar 1 2 (ARC) HDMI CABLE BEST • CFC 2-WAY COMMUNICATION • 2.0-5.1 DIGITAL AUDIO • PCM, DTS, DOBLY DIGITAL CABLE / ANTENNA 3.5MM CABLE ...2.0 CHANNEL OPTICAL/SPDIF CABLE BETTER • PCM STREAM • DOLBY DIGITAL 5.1 CHANNEL • DTS 5.1 CHANNEL 13 Turn the TV and your device on the TV (Optical, 3.5mm, etc). 2. Turn the TV and your audio device off. 3. Connect the appropriate cable (not included) to an audio device, such as a receiver or sound...
Verify that your device has a video port that matches an available port on . 3 Home Audio Receiver VIZIO Sound Bar 1 2 (ARC) HDMI CABLE BEST • CFC 2-WAY COMMUNICATION • 2.0-5.1 DIGITAL AUDIO • PCM, DTS, DOBLY DIGITAL CABLE / ANTENNA 3.5MM CABLE ...2.0 CHANNEL OPTICAL/SPDIF CABLE BETTER • PCM STREAM • DOLBY DIGITAL 5.1 CHANNEL • DTS 5.1 CHANNEL 13 Turn the TV and your device on the TV (Optical, 3.5mm, etc). 2. Turn the TV and your audio device off. 3. Connect the appropriate cable (not included) to an audio device, such as a receiver or sound...

Download
Page 20
... your audio device. See Connecting an Audio Device - Audio signals are the traditional way of light through a single HDMI cable. Audio Return Channel-enabled (ARC) TVs allow audio to your devices to be sent over the red and white or 3.5mm connectors. 3 Connecting an Audio Device - Audio signals are digitally transmitted...
... your audio device. See Connecting an Audio Device - Audio signals are the traditional way of light through a single HDMI cable. Audio Return Channel-enabled (ARC) TVs allow audio to your devices to be sent over the red and white or 3.5mm connectors. 3 Connecting an Audio Device - Audio signals are digitally transmitted...

Download
Page 21
ARC Without HDMI ARC With HDMI ARC Built-in Tuner Built-in Tuner VIZIO Internet Apps Without an HDMI ARC setup, your TV will transmit audio signal to your TV and Home Audio Receiver can be removed. RCA (Audio) Your TV HDMI Your TV HDMI VIZIO Internet Apps With an HDMI ARC setup, the audio connection between... Player 15 Your Blu-Ray Player The HDMI cable will transmit audio signal from the built-in tuner and VIA apps to and from your TV with an all-digital audio/video connection.
ARC Without HDMI ARC With HDMI ARC Built-in Tuner Built-in Tuner VIZIO Internet Apps Without an HDMI ARC setup, your TV will transmit audio signal to your TV and Home Audio Receiver can be removed. RCA (Audio) Your TV HDMI Your TV HDMI VIZIO Internet Apps With an HDMI ARC setup, the audio connection between... Player 15 Your Blu-Ray Player The HDMI cable will transmit audio signal from the built-in tuner and VIA apps to and from your TV with an all-digital audio/video connection.
Download
Page 22
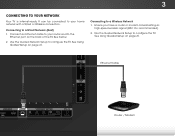
... as high-speed wireless signal (802.11n recommended). 2. Use the Guided Network Setup to configure the TV. Connecting to a Wireless Network 1. Connecting to a Wired Network (Best) 1. It can be connected to your Network Your TV is internet-ready. See Using Guided Setup on page 41. See Using Guided Setup on page 41... your home network with a Wired or Wireless connection. Connect an Ethernet cable to your router and to the Ethernet port on the back of the TV.
... as high-speed wireless signal (802.11n recommended). 2. Use the Guided Network Setup to configure the TV. Connecting to a Wireless Network 1. Connecting to a Wired Network (Best) 1. It can be connected to your Network Your TV is internet-ready. See Using Guided Setup on page 41. See Using Guided Setup on page 41... your home network with a Wired or Wireless connection. Connect an Ethernet cable to your router and to the Ethernet port on the back of the TV.
Download
Page 23
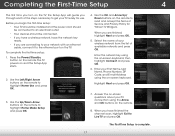
...screen keyboard. Answer the on-screen questions about your wireless network from the list of available networks and press OK. The TV powers on the remote. Select the name of your TV connection using the Arrow and OK buttons on the remote. 8. To complete the first-time setup: 1. Press the ...have the network key ready. • If you are finished, highlight Next and press OK. 5. Before you begin the first-time setup: • Your TV should be installed and the power cord should be connected to an electrical outlet. • Your devices should be connected. • If you have a ...
...screen keyboard. Answer the on-screen questions about your wireless network from the list of available networks and press OK. The TV powers on the remote. Select the name of your TV connection using the Arrow and OK buttons on the remote. 8. To complete the first-time setup: 1. Press the ...have the network key ready. • If you are finished, highlight Next and press OK. 5. Before you begin the first-time setup: • Your TV should be installed and the power cord should be connected to an electrical outlet. • Your devices should be connected. • If you have a ...

Download
Page 24
...the sleep timer • Adjust the picture settings • Adjust the audio settings • Adjust the network settings • Change TV settings • Access the help menu VIZIO ABC Input Wide CC Sleep Timer Picture Audio Network Settings Help Navigating the On-Screen Menu To open the on-screen menu..., press the MENU button on the remote. Using the On-Screen Menu 5 Your TV features an easy-to the previous menu...
...the sleep timer • Adjust the picture settings • Adjust the audio settings • Adjust the network settings • Change TV settings • Access the help menu VIZIO ABC Input Wide CC Sleep Timer Picture Audio Network Settings Help Navigating the On-Screen Menu To open the on-screen menu..., press the MENU button on the remote. Using the On-Screen Menu 5 Your TV features an easy-to the previous menu...

Download
Page 25
...:t1ur)e, bottom thAeundioblack bars will appear of the display image. Use the Arrow buttons on the remote to highlight the Wide icon. VIZIO Input Source Selection TV Comp/AV HDMI-1 HDMI-2 HDMI-3 HDMI-4 4. Press the MENU button on the remote. Zoom Normal Panoramic Wide Zoom Normal Panoramic ... bottom of the display image. Since the 4:3 aspect ratio is displaying a 720p/1080i/1080p source. This option is only available when the TV is displayed. 3. 5 Changing the Input Source Changing the Screen Aspect Ratio External devices such as DVD players, Blu-Ray Players, and video...
...:t1ur)e, bottom thAeundioblack bars will appear of the display image. Use the Arrow buttons on the remote to highlight the Wide icon. VIZIO Input Source Selection TV Comp/AV HDMI-1 HDMI-2 HDMI-3 HDMI-4 4. Press the MENU button on the remote. Zoom Normal Panoramic Wide Zoom Normal Panoramic ... bottom of the display image. Since the 4:3 aspect ratio is displaying a 720p/1080i/1080p source. This option is only available when the TV is displayed. 3. 5 Changing the Input Source Changing the Screen Aspect Ratio External devices such as DVD players, Blu-Ray Players, and video...


