
Download
Page 6
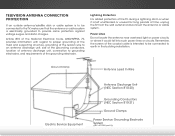
... antenna discharge unit, size of the grounding conductors, location of antenna discharge unit, connection to grounding electrodes, and requirements of the grounding electrode. Remember, the screen of the coaxial cable is intended to be connected to the TV, make sure that the antenna or cable system is left unattended or unused...
... antenna discharge unit, size of the grounding conductors, location of antenna discharge unit, connection to grounding electrodes, and requirements of the grounding electrode. Remember, the screen of the coaxial cable is intended to be connected to the TV, make sure that the antenna or cable system is left unattended or unused...
Download
Page 7
... Connecting to a Wired Network (Best 16 Connecting to a Wireless Network 16 Completing the First-Time Setup 17 Using the On-Screen Menu 18 Changing the Input Source 19 Changing the Screen Aspect Ratio 19 Setting Up Closed Captioning 20 Changing the Appearance of Digital Closed Captions.. 20 Activating the Sleep Timer 21... Connecting a Device - Audio and Video Cable Types....... 12 Connecting an Audio Device 13 Connecting an Audio Device - Table of the Inputs 36 Changing the On-Screen Menu Language 37 Setting the Time Zone 37
... Connecting to a Wired Network (Best 16 Connecting to a Wireless Network 16 Completing the First-Time Setup 17 Using the On-Screen Menu 18 Changing the Input Source 19 Changing the Screen Aspect Ratio 19 Setting Up Closed Captioning 20 Changing the Appearance of Digital Closed Captions.. 20 Activating the Sleep Timer 21... Connecting a Device - Audio and Video Cable Types....... 12 Connecting an Audio Device 13 Connecting an Audio Device - Table of the Inputs 36 Changing the On-Screen Menu Language 37 Setting the Time Zone 37

Download
Page 13
Change input source. CHANNEL UP/DOWN - Increase or decrease volume level. Change the channel. Open the on . INPUT - Side Panel 7 VOLUME UP/DOWN - 2 INPUT MENU CH ^ CH VOL ^ VOL ^ ^ POWER - Turn TV off or on -screen menu. MENU -
Change input source. CHANNEL UP/DOWN - Increase or decrease volume level. Change the channel. Open the on . INPUT - Side Panel 7 VOLUME UP/DOWN - 2 INPUT MENU CH ^ CH VOL ^ VOL ^ ^ POWER - Turn TV off or on -screen menu. MENU -

Download
Page 15
... Power Turn TV on or off or on. V Button Open the VIA dock. Input Change the currently-displayed input. Exit Close the on -screen menu. Ok Select the highlighted menu option. Wide Switch the display mode. Info Display the info window. Dash Use with number pad to the channel... last viewed. Menu Display the on -screen menu. Closed Captions Open the closed caption menu. Back Go to the previous on -screen menu. Mute Turn the audio off . 2 Remote Control App launcher Quickly launch the pictured app. A/V ...
... Power Turn TV on or off or on. V Button Open the VIA dock. Input Change the currently-displayed input. Exit Close the on -screen menu. Ok Select the highlighted menu option. Wide Switch the display mode. Info Display the info window. Dash Use with number pad to the channel... last viewed. Menu Display the on -screen menu. Closed Captions Open the closed caption menu. Back Go to the previous on -screen menu. Mute Turn the audio off . 2 Remote Control App launcher Quickly launch the pictured app. A/V ...
Download
Page 23
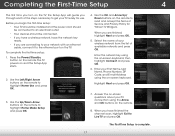
Press the Power/Standby button on -screen keyboard. Answer the on-screen questions about your TV connection using the on-screen keyboard, then highlight Connect and press OK. 6. Before you begin the first-time setup: • Your TV should be installed and the power cord should ...
Press the Power/Standby button on -screen keyboard. Answer the on-screen questions about your TV connection using the on-screen keyboard, then highlight Connect and press OK. 6. Before you begin the first-time setup: • Your TV should be installed and the power cord should ...

Download
Page 24
... Wide Zoom Normal Panoramic While navigating the on the remote. From this menu, you can : • Change the input source • Change the screen aspect ratio • Set up closed captioning • Activate the sleep timer • Adjust the picture settings • Adjust the audio settings •... • Change TV settings • Access the help menu VIZIO ABC Input Wide CC Sleep Timer Picture Audio Network Settings Help Navigating the On-Screen Menu To open the on-screen menu, press the MENU button on -screen menu, you can press the BACK button at any time to...
... Wide Zoom Normal Panoramic While navigating the on the remote. From this menu, you can : • Change the input source • Change the screen aspect ratio • Set up closed captioning • Activate the sleep timer • Adjust the picture settings • Adjust the audio settings •... • Change TV settings • Access the help menu VIZIO ABC Input Wide CC Sleep Timer Picture Audio Network Settings Help Navigating the On-Screen Menu To open the on-screen menu, press the MENU button on -screen menu, you can press the BACK button at any time to...

Download
Page 25
Use the Up/Down Arrow buttons on the remote. VIZIO Input Source Selection TV Comp/AV HDMI-1 HDMI-2 HDMI-3 HDMI-4 4. ...MENU button on the remote to highlight the input source and press OK. Use the Arrow buttons to fill the screen. Press WiOdeK. Use the Arrow buttons to the edges of the display image. Since the picture is displaying ...is displayed. 3. Each mode displays the picture differently. The TV Settings menu is not large enough to fill the TV's screen, black bars are added to the left and right of ABC the display image. • Input WidWeidestretcChCes a 4:3 aspect...
Use the Up/Down Arrow buttons on the remote. VIZIO Input Source Selection TV Comp/AV HDMI-1 HDMI-2 HDMI-3 HDMI-4 4. ...MENU button on the remote to highlight the input source and press OK. Use the Arrow buttons to fill the screen. Press WiOdeK. Use the Arrow buttons to the edges of the display image. Since the picture is displaying ...is displayed. 3. Each mode displays the picture differently. The TV Settings menu is not large enough to fill the TV's screen, black bars are added to the left and right of ABC the display image. • Input WidWeidestretcChCes a 4:3 aspect...
Download
Page 26
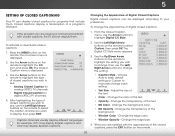
... • Analog Closed Caption for analog (NTSC) TV channels. • Digital Closed Caption for programs that include them . VIZIO Digital CC Style Caption Style Custom Text Size As Broadcast Color As Broadcast Opacity As Broadcast 3. Choose Auto to keeABpC default settings...Adjust the size of the text. • Opacity - The on the remote. Press the MENU button on -screen menu is displayed. 2. VIZIO Closed Caption Analog Closed Caption Off Digital Closed Caption Off Digital CC Style As Broadcaster Caption channels usually display different languages...
... • Analog Closed Caption for analog (NTSC) TV channels. • Digital Closed Caption for programs that include them . VIZIO Digital CC Style Caption Style Custom Text Size As Broadcast Color As Broadcast Opacity As Broadcast 3. Choose Auto to keeABpC default settings...Adjust the size of the text. • Opacity - The on the remote. Press the MENU button on -screen menu is displayed. 2. VIZIO Closed Caption Analog Closed Caption Off Digital Closed Caption Off Digital CC Style As Broadcaster Caption channels usually display different languages...

Download
Page 27
... Power Off Feature To help save energy, your TV is set by default to turn the TV off after 10 minutes if no signal is VIZIO displayed. This feature can be deactivated. Exit 2D 3D ABC Input Wide CC Sleep Timer Picture Audio Network Settings Help 21 5 Activating the Sleep Timer.... 4. If you want the sleep timer to activate, change the setting to highlight Timer and press OK. Use the Up/Down Arrow buttons on the screen. To set period of time. To use the Up/Down Arrow buttons on the Timer Off remote to highlight Auto Power Off and press OK...
... Power Off Feature To help save energy, your TV is set by default to turn the TV off after 10 minutes if no signal is VIZIO displayed. This feature can be deactivated. Exit 2D 3D ABC Input Wide CC Sleep Timer Picture Audio Network Settings Help 21 5 Activating the Sleep Timer.... 4. If you want the sleep timer to activate, change the setting to highlight Timer and press OK. Use the Up/Down Arrow buttons on the screen. To set period of time. To use the Up/Down Arrow buttons on the Timer Off remote to highlight Auto Power Off and press OK...
Download
Page 28
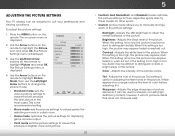
The on-screen menu is displayed. 3. Use the Arrow buttons on the remote to highlight Picture and press OK. Contrast - If the setting is too high or too ... menu is too low, the picture may be too dark to distinguish details. Adjusts the edge sharpness of the picture settings: Wide Exit Input Backlight - VIZIO Picture Picture Mode Backlight Brightness Contrast Color Tint Sharpness Custom - + 50 - + 50 - + 50 - + 50 - +0 - +0 More 4. Use the Up/Down Arrow buttons on the remote. Press...
The on-screen menu is displayed. 3. Use the Arrow buttons on the remote to highlight Picture and press OK. Contrast - If the setting is too high or too ... menu is too low, the picture may be too dark to distinguish details. Adjusts the edge sharpness of the picture settings: Wide Exit Input Backlight - VIZIO Picture Picture Mode Backlight Brightness Contrast Color Tint Sharpness Custom - + 50 - + 50 - + 50 - + 50 - +0 - +0 More 4. Use the Up/Down Arrow buttons on the remote. Press...

Download
Page 29
VIZIO Advanced Picture Noise Reduction Low MPEG NR Low Color Enhancement Normal Adaptive Luma Medium Film Mode Auto Smart Dimming On 3. Optimizes the picture for the best picture. Improves the contrast ratio of the screen by the digitizing of the picture to highlight More, then press OK. 2. Select On or Off. • Ambient...
VIZIO Advanced Picture Noise Reduction Low MPEG NR Low Color Enhancement Normal Adaptive Luma Medium Film Mode Auto Smart Dimming On 3. Optimizes the picture for the best picture. Improves the contrast ratio of the screen by the digitizing of the picture to highlight More, then press OK. 2. Select On or Off. • Ambient...
Download
Page 32
...volume fluctuations due to the factory defaults. Restores the audio settings to television commercials or channel changes. Use the Arrow buttons on -screen menu is displayed. TV Speakers Flat +0 +0 Off 3. Additionally, StudioSound HD completes the entertainment experience by selecting Jazz, Classical, ... HD is a feature-rich surround sound solution which delivers an immersive surround sound experience from the left and right speakers. VIZIO Audio Settings Audio Mode Balance - Adjusts the synchronization between the display image and the accompanying audio track. • TV...
...volume fluctuations due to the factory defaults. Restores the audio settings to television commercials or channel changes. Use the Arrow buttons on -screen menu is displayed. TV Speakers Flat +0 +0 Off 3. Additionally, StudioSound HD completes the entertainment experience by selecting Jazz, Classical, ... HD is a feature-rich surround sound solution which delivers an immersive surround sound experience from the left and right speakers. VIZIO Audio Settings Audio Mode Balance - Adjusts the synchronization between the display image and the accompanying audio track. • TV...

Download
Page 33
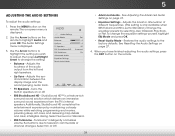
... the type of processing for the analog RCA (red/ white) connectors when connected to a home theater audio system. InPpruet ss thWeideEXIT CbCutton on -screen menu is displayed. 2. VIZIO Advanced Audio Digital Audio Out Analog Audio Out PCM Fixed 3. Use the Arrow buttons to highlight the setting you want to RESET Exit 2D...
... the type of processing for the analog RCA (red/ white) connectors when connected to a home theater audio system. InPpruet ss thWeideEXIT CbCutton on -screen menu is displayed. 2. VIZIO Advanced Audio Digital Audio Out Analog Audio Out PCM Fixed 3. Use the Arrow buttons to highlight the setting you want to RESET Exit 2D...

Download
Page 34
...menu, which is a list of your Access point name. VIZIO Network connection Wired Connection Disconnected Wireless Access Points Manual Setup Enter Access Point Name Test Connection Advanced network settings 6. Using the on -screen menu is displayed. 4. Highlight Enter Access Point Name and press.... 5 Using the Network Connection Menu Your TV is displayed. 2. The on -screen keyboard, enter your network's name (SSID), then highlight Connect Wiadend pZoroemss ONKor.mal Panoramic VIZIO Enter Access Point Name Please enter your wireless network (this is connected to a wireless...
...menu, which is a list of your Access point name. VIZIO Network connection Wired Connection Disconnected Wireless Access Points Manual Setup Enter Access Point Name Test Connection Advanced network settings 6. Using the on -screen menu is displayed. 4. Highlight Enter Access Point Name and press.... 5 Using the Network Connection Menu Your TV is displayed. 2. The on -screen keyboard, enter your network's name (SSID), then highlight Connect Wiadend pZoroemss ONKor.mal Panoramic VIZIO Enter Access Point Name Please enter your wireless network (this is connected to a wireless...

Download
Page 35
...Connection menu, highlight Manual Setup and press OK. Your alternate domain name server address. 3. Press the EXIT button on the remote. VIZIO IP Setting DHCP Off IP Address Subnet Mask Default Gateway Pref. Your network's default gateway address. • Pref. Use the Arrow...-tune the network settings using the Manual Setup feature. The Change Settings menu is displayed. 2. DNS Server - The Test Connection screen displays the connection method, network name, signal strength, and download speed of your network, these are displayed at the bottom of ...
...Connection menu, highlight Manual Setup and press OK. Your alternate domain name server address. 3. Press the EXIT button on the remote. VIZIO IP Setting DHCP Off IP Address Subnet Mask Default Gateway Pref. Your network's default gateway address. • Pref. Use the Arrow...-tune the network settings using the Manual Setup feature. The Change Settings menu is displayed. 2. DNS Server - The Test Connection screen displays the connection method, network name, signal strength, and download speed of your network, these are displayed at the bottom of ...

Download
Page 36
... and press OK. The Input Source menu is displayed. 3. Sleep Timer Picture Audio Network Settings Help 30 Use the Arrow buttons on -screen menu is displayed. 2. The Settings menu is displayed. 4. To change the input source from the Settings menu: Wide Zoom Normal Panoramic ...Name the TV inputs • Set up parental controls • Change the on-screen menu language • Set the time • Adjust the CEC settings • Adjust the Power Indicator settings VIZIO Settings Input Source Tuner Name Input Parental Controls Menu Language Time & Local Settings CEC...
... and press OK. The Input Source menu is displayed. 3. Sleep Timer Picture Audio Network Settings Help 30 Use the Arrow buttons on -screen menu is displayed. 2. The Settings menu is displayed. 4. To change the input source from the Settings menu: Wide Zoom Normal Panoramic ...Name the TV inputs • Set up parental controls • Change the on-screen menu language • Set the time • Adjust the CEC settings • Adjust the Power Indicator settings VIZIO Settings Input Source Tuner Name Input Parental Controls Menu Language Time & Local Settings CEC...
Download
Page 37
... television channels are using a device that is connected to highlight the Settings icon and press OK. From the Tuner Settings menu, highlight Auto Channel Scan. VIZIO Channel Scan Channels found Digital: 0 Analog: 19 18% Complete Cancel Cancel the Scan 31 The Tuner Mode menu is displayed. 3. Press the EXIT button on... channels and their associated information, you must set the tuner mode. 1. Wait until the channel scan is displayed. 2. The auto channel scan begins. 2. The on-screen menu is 100% complete. 5 Setting the Tuner Mode If you are available. 1.
... television channels are using a device that is connected to highlight the Settings icon and press OK. From the Tuner Settings menu, highlight Auto Channel Scan. VIZIO Channel Scan Channels found Digital: 0 Analog: 19 18% Complete Cancel Cancel the Scan 31 The Tuner Mode menu is displayed. 3. Press the EXIT button on... channels and their associated information, you must set the tuner mode. 1. Wait until the channel scan is displayed. 2. The auto channel scan begins. 2. The on-screen menu is 100% complete. 5 Setting the Tuner Mode If you are available. 1.

Download
Page 40
Press the EXIT button on -screen menu is displayed. VIZIO Digital MTS English French Spanish 5 Using the Parental Controls The TV's parental controls allow you to highlight the Settings icon AaBCnd press OK. STliEpm eeneaprtsesrcPyoiocdtuuerre,...
Press the EXIT button on -screen menu is displayed. VIZIO Digital MTS English French Spanish 5 Using the Parental Controls The TV's parental controls allow you to highlight the Settings icon AaBCnd press OK. STliEpm eeneaprtsesrcPyoiocdtuuerre,...

Download
Page 42
...rename and press OK. 5. Changing the Names of an input: 1. To change the passcode to the Component input, you can rename the inputs. VIZIO 2. Use the Arrow buttons on the remote. Show Keyboard 4. 5 Changing the Parental Control Passcode If you use a preset input label, highlight ...secure location. 5. From the Parental Controls menu, highlight Change PIN and press OK. In the Confirm Pin field, use the Number Pad on -screen keyboard and press OK. (If you have a DVD player connected to prevent children from accessing inappropriate material. 1. Write down your new 4-digit ...
...rename and press OK. 5. Changing the Names of an input: 1. To change the passcode to the Component input, you can rename the inputs. VIZIO 2. Use the Arrow buttons on the remote. Show Keyboard 4. 5 Changing the Parental Control Passcode If you use a preset input label, highlight ...secure location. 5. From the Parental Controls menu, highlight Change PIN and press OK. In the Confirm Pin field, use the Number Pad on -screen keyboard and press OK. (If you have a DVD player connected to prevent children from accessing inappropriate material. 1. Write down your new 4-digit ...

Download
Page 43
The on -screen menu in effect, or Off if it is not. 7. The Menu Language menu is displayed. VIZIO Exit 2D 3D 2. Use the Arrow buttons on the remote to highlight Time & Local Settings and press OK. InUpuste theWidAerrowCbC uttons on the ...remote to highlight the Settings icon and press OK. The Time & Local Settings menu STlim eiseepdr ispPlicatuyree d. Network Settings Help 5. 5 Changing the On-Screen Menu ...
The on -screen menu in effect, or Off if it is not. 7. The Menu Language menu is displayed. VIZIO Exit 2D 3D 2. Use the Arrow buttons on the remote to highlight Time & Local Settings and press OK. InUpuste theWidAerrowCbC uttons on the ...remote to highlight the Settings icon and press OK. The Time & Local Settings menu STlim eiseepdr ispPlicatuyree d. Network Settings Help 5. 5 Changing the On-Screen Menu ...


