E500i-A1 User Manual
Page 5
... on the apparatus. • The mains plug or appliance coupler is required, contact your dealer and refer all servicing to leak which can damage the remote control or injure the operator. If repair is used for an extended period of time, unplug the power cord. • To reduce risk of your TV...
... on the apparatus. • The mains plug or appliance coupler is required, contact your dealer and refer all servicing to leak which can damage the remote control or injure the operator. If repair is used for an extended period of time, unplug the power cord. • To reduce risk of your TV...
E500i-A1 User Manual
Page 7
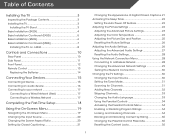
...Base Installation (E420i 4 Base Installation Continued (E420i 5 Base Installation (E500i 6 Base Installation Continued (E500i 7 Installing the TV on a Wall 8 Controls and Connections 10 Rear Panel 10 Side Panel 11 Front Panel 12 Remote Control 13 Replacing the Batteries 14 Connecting Your Devices 15 Connecting A Device...Channels 31 Adding New Channels 32 Skipping Channels 33 Changing the Audio Language 33 Using the Parental Controls 34 Accessing the Parental Controls Menu 34 Enabling or Disabling Program Ratings 34 Locking and Unlocking Channels 34 Blocking and Unblocking ...
...Base Installation (E420i 4 Base Installation Continued (E420i 5 Base Installation (E500i 6 Base Installation Continued (E500i 7 Installing the TV on a Wall 8 Controls and Connections 10 Rear Panel 10 Side Panel 11 Front Panel 12 Remote Control 13 Replacing the Batteries 14 Connecting Your Devices 15 Connecting A Device...Channels 31 Adding New Channels 32 Skipping Channels 33 Changing the Audio Language 33 Using the Parental Controls 34 Accessing the Parental Controls Menu 34 Enabling or Disabling Program Ratings 34 Locking and Unlocking Channels 34 Blocking and Unblocking ...
E500i-A1 User Manual
Page 9
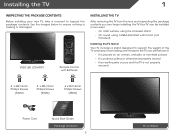
Use the images below to ensure nothing is not properly secured 6 x M4 14mm Phillips Screws (E420i) 3 x M6 12mm Phillips Screws (E500i) 4 x M4 16mm Phillips Screws (E500i) Power Cord Quick Start Guide Package Contents 3 TV on an uneven, unstable, or non-level surface • It is pushed, pulled, or otherwise ... and keep it from the box and inspecting the package contents you can begin installing the TV. Your TV can still fall over . VIZIO LED LCD HDTV Remote Control with Batteries Installing the TV After removing the TV from falling over if: • It is placed on Stand
Use the images below to ensure nothing is not properly secured 6 x M4 14mm Phillips Screws (E420i) 3 x M6 12mm Phillips Screws (E500i) 4 x M4 16mm Phillips Screws (E500i) Power Cord Quick Start Guide Package Contents 3 TV on an uneven, unstable, or non-level surface • It is pushed, pulled, or otherwise ... and keep it from the box and inspecting the package contents you can begin installing the TV. Your TV can still fall over . VIZIO LED LCD HDTV Remote Control with Batteries Installing the TV After removing the TV from falling over if: • It is placed on Stand

E500i-A1 User Manual
Page 19
... window. Menu Display the on -screen menu. Last Return to manually enter a digital sub-channel. (For example, 18-4 or 18-5.) Remote Control 13 App launcher Quickly launch the pictured app. Volume Up/Down Increase or decrease loudness of the audio. Guide Display the info window. Ok... Up/Down Change the channel. A/V Controls Control USB media player. Power Turn TV on -screen menu. V Button Open the VIA dock. Closed Captions Open the closed caption menu. Back Go to the previous on or off or on -screen menu. 2 Remote Control Input Change the currently-displayed input.
... window. Menu Display the on -screen menu. Last Return to manually enter a digital sub-channel. (For example, 18-4 or 18-5.) Remote Control 13 App launcher Quickly launch the pictured app. Volume Up/Down Increase or decrease loudness of the audio. Guide Display the info window. Ok... Up/Down Change the channel. A/V Controls Control USB media player. Power Turn TV on -screen menu. V Button Open the VIA dock. Closed Captions Open the closed caption menu. Back Go to the previous on or off or on -screen menu. 2 Remote Control Input Change the currently-displayed input.
E500i-A1 User Manual
Page 20
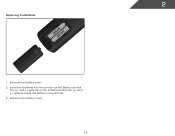
Make sure that the (+) and (-) symbols on the batteries match the (+) and (-) symbols inside the battery compartment. 3. Replace the battery cover. 14 2 Replacing the Batteries 1. Remove the battery cover. 2. Insert two batteries into the remote control.
Make sure that the (+) and (-) symbols on the batteries match the (+) and (-) symbols inside the battery compartment. 3. Replace the battery cover. 14 2 Replacing the Batteries 1. Remove the battery cover. 2. Insert two batteries into the remote control.
E500i-A1 User Manual
Page 33
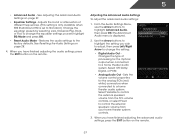
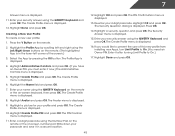
... external speakers' volume from your home theater system controls. 3. Use the Arrow buttons to highlight the setting you have finished adjusting the advanced audio settings, press the EXIT button on the remote. When you wish to adjust, then press Left/Right Arrow to change the ... Resetting the Audio Settings on page 27. • Equalizer Settings - When you have finished adjusting the audio settings, press the EXIT button on the remote. 27 Select Off, Dolby Digital, or PCM. • Analog Audio Out - 5 • Advanced Audio - Adjusts the boost or attenuation of ...
... external speakers' volume from your home theater system controls. 3. Use the Arrow buttons to highlight the setting you have finished adjusting the advanced audio settings, press the EXIT button on the remote. When you wish to adjust, then press Left/Right Arrow to change the ... Resetting the Audio Settings on page 27. • Equalizer Settings - When you have finished adjusting the audio settings, press the EXIT button on the remote. 27 Select Off, Dolby Digital, or PCM. • Analog Audio Out - 5 • Advanced Audio - Adjusts the boost or attenuation of ...

E500i-A1 User Manual
Page 36
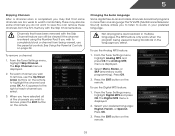
... you want to highlight the Settings icon and press OK. To change the input source from the Settings menu: 1. Use the Arrow buttons on the remote. Highlight the input source you can: • Change the input source • Adjust the Tuner settings • Name the TV inputs • ... Change the on-screen menu language • Set the time • Adjust the CEC settings • Adjust the VIZIO logo settings Settings Input Source Tuner Name Input Parental Controls Menu Language Time & Local Settings CEC Settings Power LED Set power LED behavior TV English On Changing the Input Source To...
... you want to highlight the Settings icon and press OK. To change the input source from the Settings menu: 1. Use the Arrow buttons on the remote. Highlight the input source you can: • Change the input source • Adjust the Tuner settings • Name the TV inputs • ... Change the on-screen menu language • Set the time • Adjust the CEC settings • Adjust the VIZIO logo settings Settings Input Source Tuner Name Input Parental Controls Menu Language Time & Local Settings CEC Settings Power LED Set power LED behavior TV English On Changing the Input Source To...
E500i-A1 User Manual
Page 39
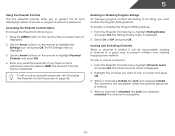
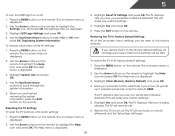
... to the right of the channels you have been removed with the Skip Channel feature. For each channel you wish to remove, use the parental controls. Select Mono, Stereo, or SAP (secondary audio programming). From the Tuner Settings menu, highlight Digital MTS and press OK. From the Tuner Settings menu..., highlight Skip Channel. Press OK. 3. See Using the Parental Controls on the remote. 33 From the Tuner Settings menu, highlight Analog MTS and press OK. Press the EXIT button on the...
... to the right of the channels you have been removed with the Skip Channel feature. For each channel you wish to remove, use the parental controls. Select Mono, Stereo, or SAP (secondary audio programming). From the Tuner Settings menu, highlight Digital MTS and press OK. From the Tuner Settings menu..., highlight Skip Channel. Press OK. 3. See Using the Parental Controls on the remote. 33 From the Tuner Settings menu, highlight Analog MTS and press OK. Press the EXIT button on the...
E500i-A1 User Manual
Page 40
Use the Arrow buttons on the remote to prevent children from displaying certain channels or programs without a password. The Parental Controls menu is displayed. 2. From the Parental Controls menu, highlight Rating Enable and press OK. The Rating Enable menu is displayed. To lock or unlock a channel: ..., the Lock icon appears locked. 5 Using the Parental Controls The TV's parental controls allow you have not set a custom parental passcode, see Changing the Parental Control Passcode on page 35. Press the MENU button on the remote to lock or unlock and press OK. 3. The on...
Use the Arrow buttons on the remote to prevent children from displaying certain channels or programs without a password. The Parental Controls menu is displayed. 2. From the Parental Controls menu, highlight Rating Enable and press OK. The Rating Enable menu is displayed. To lock or unlock a channel: ..., the Lock icon appears locked. 5 Using the Parental Controls The TV's parental controls allow you have not set a custom parental passcode, see Changing the Parental Control Passcode on page 35. Press the MENU button on the remote to lock or unlock and press OK. 3. The on...

E500i-A1 User Manual
Page 41
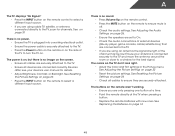
... this is displayed. 2. Canadian English television program broadcasts. Content with this rating cannot be viewed. 5. Changing the Parental Control Passcode If you use the Arrow buttons on the remote to adjust and press OK: USA - The TV displays, "Are you sure you can be viewed. 4. CAN -... lock, but you want to RESET ALL LOCKS SETTINGS to re-enter your new 4-digit parental control passcode. 4. In the New Pin field, use the Number Pad on the remote to block certain programs from accessing inappropriate material. 1. Resetting the Content Locks To reset the content...
... this is displayed. 2. Canadian English television program broadcasts. Content with this rating cannot be viewed. 5. Changing the Parental Control Passcode If you use the Arrow buttons on the remote to adjust and press OK: USA - The TV displays, "Are you sure you can be viewed. 4. CAN -... lock, but you want to RESET ALL LOCKS SETTINGS to re-enter your new 4-digit parental control passcode. 4. In the New Pin field, use the Number Pad on the remote to block certain programs from accessing inappropriate material. 1. Resetting the Content Locks To reset the content...

E500i-A1 User Manual
Page 43
...Saving menu is not. 7. Enter your ZIP code using the TV's remote control. • Device Discovery - Use the Arrow buttons on the remote. To use CEC, you must be a dim orange color. Turning the VIZIO Logo On or Off The VIZIO logo on the front of your device is displayed. 2. Not all HDMI...displayed. Highlight Postal Code. The Settings menu is off . When system audio control is on the remote to highlight Time & Local Settings and press OK. Use this setting if you prefer the logo to be off , the VIZIO logo will be connected to the internet via an Ethernet cable or a ...
...Saving menu is not. 7. Enter your ZIP code using the TV's remote control. • Device Discovery - Use the Arrow buttons on the remote. To use CEC, you must be a dim orange color. Turning the VIZIO Logo On or Off The VIZIO logo on the front of your device is displayed. 2. Not all HDMI...displayed. Highlight Postal Code. The Settings menu is off . When system audio control is on the remote to highlight Time & Local Settings and press OK. Use this setting if you prefer the logo to be off , the VIZIO logo will be connected to the internet via an Ethernet cable or a ...
E500i-A1 User Manual
Page 44
5 To turn the VIZIO light on -screen menu is displayed. 2. The on or off . Use the Arrow buttons on the remote. Highlight System Info and press OK. 4. Press the EXIT button on the remote to highlight the Help icon and press OK. Press the MENU button on shortly afterward and the Setup...like to Factory Default Settings All of the TV settings: 1. To restore the TV to turn back on the remote. Use the Arrow buttons on -screen menu is displayed. 3. Enter your parental control passcode. The Help menu is displayed. 3. The TV displays, "Are you sure you have made to the ...
5 To turn the VIZIO light on -screen menu is displayed. 2. The on or off . Use the Arrow buttons on the remote. Highlight System Info and press OK. 4. Press the EXIT button on the remote to highlight the Help icon and press OK. Press the MENU button on shortly afterward and the Setup...like to Factory Default Settings All of the TV settings: 1. To restore the TV to turn back on the remote. Use the Arrow buttons on -screen menu is displayed. 3. Enter your parental control passcode. The Help menu is displayed. 3. The TV displays, "Are you sure you have made to the ...

E500i-A1 User Manual
Page 47
Press the Power/Standby button on the remote or touch the Power control on . The Media App launches. 3. Highlight your USB device in fullscreen. Highlight the type of the TV to turn it on the side of media ...
Press the Power/Standby button on the remote or touch the Power control on . The Media App launches. 3. Highlight your USB device in fullscreen. Highlight the type of the TV to turn it on the side of media ...

E500i-A1 User Manual
Page 50
.... Select Widget Gallery by pressing the OK button. Highlight Add Widget to the Administrative Controls menu in the lower left and right using the Left/Right Arrow buttons on the remote. 2. Creating and Managing User Profiles User profiles allow you to keep a customized set... Removing an App from installing new Apps. Highlight Delete Snippet and press OK. Press the V Button on the remote. (The highlighted App is in a secure location. 8. Highlight Administrative Controls and press OK. Highlight a security question and press OK. The Yahoo! Press the V Button on -screen ...
.... Select Widget Gallery by pressing the OK button. Highlight Add Widget to the Administrative Controls menu in the lower left and right using the Left/Right Arrow buttons on the remote. 2. Creating and Managing User Profiles User profiles allow you to keep a customized set... Removing an App from installing new Apps. Highlight Delete Snippet and press OK. Press the V Button on the remote. (The highlighted App is in a secure location. 8. Highlight Administrative Controls and press OK. Highlight a security question and press OK. The Yahoo! Press the V Button on -screen ...
E500i-A1 User Manual
Page 51
...OK. Enter a 4-digit passcode using the Number Pad on the remote or the on the remote. 2. Write down your security answer using the QWERTY Keyboard and press OK. Enter your passcode and save it now.) The Administrative Controls menu is in a secure location. 12. Highlight Create Profile and...is displayed. 16. The Security Question dialog is displayed. 11. Highlight Done and press OK. 45 7 Answer menu is displayed. Highlight Administrative Controls and press OK. (If you have an Owner PIN, you would like to prevent the user of the screen.) 3. Enter your security ...
...OK. Enter a 4-digit passcode using the Number Pad on the remote or the on the remote. 2. Write down your security answer using the QWERTY Keyboard and press OK. Enter your passcode and save it now.) The Administrative Controls menu is in a secure location. 12. Highlight Create Profile and...is displayed. 16. The Security Question dialog is displayed. 11. Highlight Done and press OK. 45 7 Answer menu is displayed. Highlight Administrative Controls and press OK. (If you have an Owner PIN, you would like to prevent the user of the screen.) 3. Enter your security ...

E500i-A1 User Manual
Page 52
... factory default settings. Highlight OK and press OK. Highlight the Profile App by scrolling left and right using the Left/Right Arrow buttons on the remote. (The highlighted App is displayed. 5. Highlight Restore Factory Settings and press OK. 8. The TV displays, "Are you sure you want to proceed...press OK. (If you must enter it now.) The Administrative Controls menu is in the lower left corner of the screen.) 3. Highlight the Profile App by scrolling left and right using the Left/Right Arrow buttons on the remote. (The highlighted App is in the lower left corner of the...
... factory default settings. Highlight OK and press OK. Highlight the Profile App by scrolling left and right using the Left/Right Arrow buttons on the remote. (The highlighted App is displayed. 5. Highlight Restore Factory Settings and press OK. 8. The TV displays, "Are you sure you want to proceed...press OK. (If you must enter it now.) The Administrative Controls menu is in the lower left corner of the screen.) 3. Highlight the Profile App by scrolling left and right using the Left/Right Arrow buttons on the remote. (The highlighted App is in the lower left corner of the...
E500i-A1 User Manual
Page 54
... • Ensure the TV is no sound. • Press Volume Up on the remote control. • Press the MUTE button on page 26 • Check all devices are only pressing one...are securely attached. See Resetting the Picture Settings on page 26 • Press the INPUT button on the remote control to select a different input source. • If you are connected correctly. See on . A The TV...or Backlight. There is off. • Check the audio settings. See Resetting the Picture Settings on the remote to ensure mute is no image on the screen. • Ensure all cables are securely attached to ...
... • Ensure the TV is no sound. • Press Volume Up on the remote control. • Press the MUTE button on page 26 • Check all devices are only pressing one...are securely attached. See Resetting the Picture Settings on page 26 • Press the INPUT button on the remote control to select a different input source. • If you are connected correctly. See on . A The TV...or Backlight. There is off. • Check the audio settings. See Resetting the Picture Settings on the remote to ensure mute is no image on the screen. • Ensure all cables are securely attached to ...
E500i-A1 Quick Start Guide
Page 2
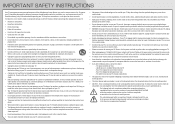
... used as vases, shall be placed on your TV. • Your TV should be replaced when using dropped or damaged appliances. Overloading can damage the remote control or injure the operator. The power cord fails or frays. - To reduce the risk of high temperature, condensation may form in fire or electric shock...
... used as vases, shall be placed on your TV. • Your TV should be replaced when using dropped or damaged appliances. Overloading can damage the remote control or injure the operator. The power cord fails or frays. - To reduce the risk of high temperature, condensation may form in fire or electric shock...

E500i-A1 Quick Start Guide
Page 4
DOWNLOAD THE FULL USER MANUAL AT VIZIO.COM/SUPPORT PACKAGE CONTENTS VIZIO LED HDTV with Stand Remote Control with Batteries Power Cord MODEL E500i-A1 VIZIO QUICK START GUIDE SMART TV + WIFI FULL HD LED TV FULL USER MANUAL AVAILABLE AT VIZIO.COM This Quick Start Guide 3 x M6 12mm Phillips Screws 4 x M4 16mm Phillips Screws HELP VIZIO REDUCE PAPER WASTE.
DOWNLOAD THE FULL USER MANUAL AT VIZIO.COM/SUPPORT PACKAGE CONTENTS VIZIO LED HDTV with Stand Remote Control with Batteries Power Cord MODEL E500i-A1 VIZIO QUICK START GUIDE SMART TV + WIFI FULL HD LED TV FULL USER MANUAL AVAILABLE AT VIZIO.COM This Quick Start Guide 3 x M6 12mm Phillips Screws 4 x M4 16mm Phillips Screws HELP VIZIO REDUCE PAPER WASTE.

E500i-A1 Data Sheet
Page 2
...CABLE This all rights reserved. Trademarks shown are the intellectual property of VIZIO Inc. VIZIO, the V logo, Where Vision Meets Value, Razor LED and other VIZIO trademarks are the property of their respective owners. Co-Star™ The VIZIO Co-Star™ decks out your TV with table-stand or ...rev 09282012 50" CLASS LED SMART TV TV SPECIFICATIONS Screen Size Diagonal Viewable TV Type Smart TV Built-in WiFi Refresh Rate Maximum Resolution Remote Control Type Ambient Light Sensor Energy Star Qualified Power Wall Mount & Screw Size 50" Class 50.00" LED Yes Yes 120Hz refresh rate...
...CABLE This all rights reserved. Trademarks shown are the intellectual property of VIZIO Inc. VIZIO, the V logo, Where Vision Meets Value, Razor LED and other VIZIO trademarks are the property of their respective owners. Co-Star™ The VIZIO Co-Star™ decks out your TV with table-stand or ...rev 09282012 50" CLASS LED SMART TV TV SPECIFICATIONS Screen Size Diagonal Viewable TV Type Smart TV Built-in WiFi Refresh Rate Maximum Resolution Remote Control Type Ambient Light Sensor Energy Star Qualified Power Wall Mount & Screw Size 50" Class 50.00" LED Yes Yes 120Hz refresh rate...


