E500i-A0 User Manual
Page 7
... Connecting an Audio Device 12 Connecting to your Network 13 Connecting to a Wired Network (Best 13 Connecting to a Wireless Network 13 Completing the First-Time Setup 14 Using the On-Screen Menu 15 Navigating the On-Screen Menu 15 Changing the Input Source 16 Changing the Screen Aspect Ratio 16 Setting...
... Connecting an Audio Device 12 Connecting to your Network 13 Connecting to a Wired Network (Best 13 Connecting to a Wireless Network 13 Completing the First-Time Setup 14 Using the On-Screen Menu 15 Navigating the On-Screen Menu 15 Changing the Input Source 16 Changing the Screen Aspect Ratio 16 Setting...
E500i-A0 User Manual
Page 8
... 33 Using the Help Menu 33 Displaying System Information 34 Resetting the TV Settings 34 Restoring the TV to Factory Default Settings 34 Using Guided Setup 35 Using the Info Window 36 Using the USB Media Player 37 Using the USB Media Player 37 Connecting a USB Thumb Drive to the TV... 37 Playing USB Media 37 Using VIZIO Internet Apps 39 Using the VIA Shortcut Buttons 39 Using the VIA Dock 39 Moving an App on the VIA Dock 39 Adding a New App...
... 33 Using the Help Menu 33 Displaying System Information 34 Resetting the TV Settings 34 Restoring the TV to Factory Default Settings 34 Using Guided Setup 35 Using the Info Window 36 Using the USB Media Player 37 Using the USB Media Player 37 Connecting a USB Thumb Drive to the TV... 37 Playing USB Media 37 Using VIZIO Internet Apps 39 Using the VIA Shortcut Buttons 39 Using the VIA Dock 39 Moving an App on the VIA Dock 39 Adding a New App...

E500i-A0 User Manual
Page 19
... broadcasting as high-speed wireless signal (802.11n recommended). 2. 3 Connecting to a Wired Network (Best) 1. Connecting to configure the TV. See below. 2. Use the Guided Network Setup to your network Your TV is internet-ready. BACK OF TV Ethernet Cable Router / Modem CONNECTING TO A WIRED NETWORK 13 Use the Guided Network...
... broadcasting as high-speed wireless signal (802.11n recommended). 2. 3 Connecting to a Wired Network (Best) 1. Connecting to configure the TV. See below. 2. Use the Guided Network Setup to your network Your TV is internet-ready. BACK OF TV Ethernet Cable Router / Modem CONNECTING TO A WIRED NETWORK 13 Use the Guided Network...
E500i-A0 User Manual
Page 20
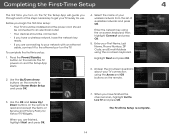
...questions about your First Name, Last Name, Phone Number, ZIP Code, and E-mail Address using the on-screen keyboard. Before you begin the first-time setup: • Your TV should be installed and the power cord should be connected to an electrical outlet. • Your devices should be connected. •...have the network key ready. • If you are connecting to get your TV ready for Yahoo! Press the Power/Standby button on and the Setup App starts. 2. Enter your TV connection using the on the remote. 7. Enter the network key using the Arrow and OK buttons on -screen ...
...questions about your First Name, Last Name, Phone Number, ZIP Code, and E-mail Address using the on-screen keyboard. Before you begin the first-time setup: • Your TV should be installed and the power cord should be connected to an electrical outlet. • Your devices should be connected. •...have the network key ready. • If you are connecting to get your TV ready for Yahoo! Press the Power/Standby button on and the Setup App starts. 2. Enter your TV connection using the on the remote. 7. Enter the network key using the Arrow and OK buttons on -screen ...

E500i-A0 User Manual
Page 31
... - Testing Your Network Connection To test your network connection: 1. 5 Changing the Advanced Network Settings Advanced users can fine-tune the network settings using the Manual Setup feature. From the Network Connection menu, highlight Manual Setup and press OK. From the Network Connection menu, highlight Test Connection and press OK. 2.
... - Testing Your Network Connection To test your network connection: 1. 5 Changing the Advanced Network Settings Advanced users can fine-tune the network settings using the Manual Setup feature. From the Network Connection menu, highlight Manual Setup and press OK. From the Network Connection menu, highlight Test Connection and press OK. 2.

E500i-A0 User Manual
Page 39
...; Display the User Manual • Display system information • Reset the TV settings • Restore the TV to its factory default settings • Get guided setup help for the tuner and network 33 5 Turning the Power Indicator Light On or Off The Power Indicator Light on the front of your TV...
...; Display the User Manual • Display system information • Reset the TV settings • Restore the TV to its factory default settings • Get guided setup help for the tuner and network 33 5 Turning the Power Indicator Light On or Off The Power Indicator Light on the front of your TV...

E500i-A0 User Manual
Page 40
... turn off. Use the Arrow buttons on the remote to Restore Defaults? This will begin. 34 Press the MENU button on shortly afterward and the Setup App will erase any custom settings." 4. The Help menu is displayed. 2. Press the MENU button on -screen menu is displayed. 6. Highlight Yes and press OK...
... turn off. Use the Arrow buttons on the remote to Restore Defaults? This will begin. 34 Press the MENU button on shortly afterward and the Setup App will erase any custom settings." 4. The Help menu is displayed. 2. Press the MENU button on -screen menu is displayed. 6. Highlight Yes and press OK...

E500i-A0 User Manual
Page 41
... Connect the TV to your network. When finished, press the EXIT button on the remote to highlight the Help icon and press OK. Highlight Guided Setup and press OK. 4. The on -screen instructions. Set up the TV tuner or to connect the TV with your network. 5. Follow the on -screen menu... is displayed. 3. 5 Using Guided Setup The TV's Setup App can be used to easily set up the TV tuner. • Network Setup - Press the MENU button on the remote. The Help menu is displayed. 2.
... Connect the TV to your network. When finished, press the EXIT button on the remote to highlight the Help icon and press OK. Highlight Guided Setup and press OK. 4. The on -screen instructions. Set up the TV tuner or to connect the TV with your network. 5. Follow the on -screen menu... is displayed. 3. 5 Using Guided Setup The TV's Setup App can be used to easily set up the TV tuner. • Network Setup - Press the MENU button on the remote. The Help menu is displayed. 2.

E500i-A0 User Manual
Page 49
YOUR PRODUCT INCLUDES FREE LIFETIME TECH SUPPORT The VIZIO support team is highly trained and is based in the United States. Friday: 5 am to 9 pm (PST) Saturday - LET US HELP! Troubleshooting & Technical Support A do ... 4 pm (PST) We speak English • Se habla Español • Nous parlons Français 43 We can help with: • New Product Setup • Connecting Your Devices • Technical Problems • And More Phone: (877) 878-4946 (TOLL-FREE) Email: techsupport...
YOUR PRODUCT INCLUDES FREE LIFETIME TECH SUPPORT The VIZIO support team is highly trained and is based in the United States. Friday: 5 am to 9 pm (PST) Saturday - LET US HELP! Troubleshooting & Technical Support A do ... 4 pm (PST) We speak English • Se habla Español • Nous parlons Français 43 We can help with: • New Product Setup • Connecting Your Devices • Technical Problems • And More Phone: (877) 878-4946 (TOLL-FREE) Email: techsupport...

E500i-A0 Quick Start Guide
Page 3
DO YOU HAVE QUESTIONS? Sunday: 8 am to 4 pm (PST) We speak English • Se habla Español • Nous parlons Français Friday: 5 am to 9 pm (PST) Saturday - YOUR PRODUCT INCLUDES FREE LIFETIME TECH SUPPORT The VIZIO support team is highly trained and is based in the United States. LET US HELP! We can help with: • New Product Setup • Connecting Your Devices • Technical Problems • And More Phone: (877) 878-4946 (TOLL-FREE) Email: techsupport@VIZIO.com Web: www.VIZIO.com/support Hours of operation: Monday -
DO YOU HAVE QUESTIONS? Sunday: 8 am to 4 pm (PST) We speak English • Se habla Español • Nous parlons Français Friday: 5 am to 9 pm (PST) Saturday - YOUR PRODUCT INCLUDES FREE LIFETIME TECH SUPPORT The VIZIO support team is highly trained and is based in the United States. LET US HELP! We can help with: • New Product Setup • Connecting Your Devices • Technical Problems • And More Phone: (877) 878-4946 (TOLL-FREE) Email: techsupport@VIZIO.com Web: www.VIZIO.com/support Hours of operation: Monday -
E500i-A0 Quick Start Guide
Page 8
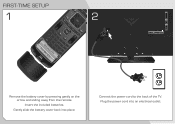
Insert the included batteries. Connect the power cord to the back of the TV. Plug the power cord into place. Gently slide the battery cover back into an electrical outlet. FIRST-TIME SETUP 1AAA BATTERY AAA BATTERY 2 2 AAA BATTERY AAA BATTERY Remove the battery cover by pressing gently on the arrow and sliding away from the remote.
Insert the included batteries. Connect the power cord to the back of the TV. Plug the power cord into place. Gently slide the battery cover back into an electrical outlet. FIRST-TIME SETUP 1AAA BATTERY AAA BATTERY 2 2 AAA BATTERY AAA BATTERY Remove the battery cover by pressing gently on the arrow and sliding away from the remote.

E500i-A0 Quick Start Guide
Page 9
Use the Arrow buttons on the remote. The Setup App is displayed. If you have a high-speed internet connection, connect an Ethernet cable from a wall outlet, connect it to the TV with an RF/Coaxial cable. 3 4 Back of TV 2 Ethernet Cable Coaxial Cable If you have an external antenna or a cable connection that extends from your modem or router to the back of the TV as shown. Turn the TV on by pressing the Power button on the remote to highlight Home Mode Setup and press OK.
Use the Arrow buttons on the remote. The Setup App is displayed. If you have a high-speed internet connection, connect an Ethernet cable from a wall outlet, connect it to the TV with an RF/Coaxial cable. 3 4 Back of TV 2 Ethernet Cable Coaxial Cable If you have an external antenna or a cable connection that extends from your modem or router to the back of the TV as shown. Turn the TV on by pressing the Power button on the remote to highlight Home Mode Setup and press OK.

E500i-A0 Quick Start Guide
Page 11
The First-Time Setup is complete. When you have finished the channel scan, highlight Exit to Live TV and press OK. Answer the on-screen questions about your First Name, Last Name, Phone Number, ZIP Code, and E-mail Address using the Arrow and OK buttons on -screen keyboard. Highlight Next and press OK. 7 8 Enter your TV connection using the on the remote.
The First-Time Setup is complete. When you have finished the channel scan, highlight Exit to Live TV and press OK. Answer the on-screen questions about your First Name, Last Name, Phone Number, ZIP Code, and E-mail Address using the Arrow and OK buttons on -screen keyboard. Highlight Next and press OK. 7 8 Enter your TV connection using the on the remote.
E500i-A0 Quick Start Guide
Page 17
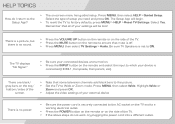
...select TV Settings > Audio. The TV displays "No Signal." • Be sure your external device There is set to the Setup App? • The on the top/ bottom/sides of setup you need and press OK. Select Yes. Remember that mute is connected (HDMI-1, Composite, Component, etc). Highlight Wide or ...Zoom and press OK. • Adjust the video settings of your connected devices are black/ gray bars on -screen menu has guided setup. Press MENU, then select Wide. There is a picture, but there is no power. • Be sure the power cord is securely connected to ...
...select TV Settings > Audio. The TV displays "No Signal." • Be sure your external device There is set to the Setup App? • The on the top/ bottom/sides of setup you need and press OK. Select Yes. Remember that mute is connected (HDMI-1, Composite, Component, etc). Highlight Wide or ...Zoom and press OK. • Adjust the video settings of your connected devices are black/ gray bars on -screen menu has guided setup. Press MENU, then select Wide. There is a picture, but there is no power. • Be sure the power cord is securely connected to ...


