

User Manual (English)
Page 15
... Number Pad. EXIT Close the on -screen menu. MENU Display the on -screen menu. INFO Display the info window. GUIDE Display the info window. V BUTTON Open the VIZIO Internet Apps Plus® (V.I.A. PIC Opens the Picture Mode menu. A/V CONTROLS Control USB media player and video streaming playback. BACK Go to the previous...
... Number Pad. EXIT Close the on -screen menu. MENU Display the on -screen menu. INFO Display the info window. GUIDE Display the info window. V BUTTON Open the VIZIO Internet Apps Plus® (V.I.A. PIC Opens the Picture Mode menu. A/V CONTROLS Control USB media player and video streaming playback. BACK Go to the previous...
User Manual (English)
Page 24
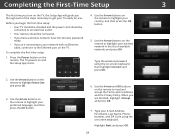
... password ready. • If you are finished, highlight I Accept and press OK. 7. Select Store Demo for in-home use . Use the Arrow buttons on the TV. Choose your wireless network in -store display. Completing the First-Time Setup 3 The first time you turn on the remote to highlight... with an Ethernet cable, connect it to the Ethernet port on the remote to highlight your preferred language, and then press the OK button. Use the Arrow buttons on the remote to highlight your mode. Seleccione "Home Use" por Modo de Casa o "Store Demo" por Demostración de Tienda...
... password ready. • If you are finished, highlight I Accept and press OK. 7. Select Store Demo for in-home use . Use the Arrow buttons on the TV. Choose your wireless network in -store display. Completing the First-Time Setup 3 The first time you turn on the remote to highlight... with an Ethernet cable, connect it to the Ethernet port on the remote to highlight your preferred language, and then press the OK button. Use the Arrow buttons on the remote to highlight your mode. Seleccione "Home Use" por Modo de Casa o "Store Demo" por Demostración de Tienda...

User Manual (English)
Page 25
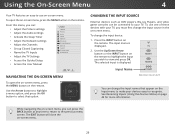
If you have cable TV, select whether you have a cable box or if you connect the TV directly to scan for channels, which takes several minutes. Use the Arrow buttons on the remote to select the input your TV source and press OK. Use the Arrow and OK buttons on the remote to highlight your TV source is complete. 25 If the TV Signal screen appears, the TV will need to a cable from the wall. 9. Use the arrow buttons on the remote to . The First-Time Setup is connected to highlight Begin Scan and press OK. 10. 3 8.
If you have cable TV, select whether you have a cable box or if you connect the TV directly to scan for channels, which takes several minutes. Use the Arrow buttons on the remote to select the input your TV source and press OK. Use the Arrow and OK buttons on the remote to highlight your TV source is complete. 25 If the TV Signal screen appears, the TV will need to a cable from the wall. 9. Use the arrow buttons on the remote to . The First-Time Setup is connected to highlight Begin Scan and press OK. 10. 3 8.
User Manual (English)
Page 26
... ON-SCREEN MENU Note: Inputs may vary by TV. To use on the remote. You can change the input device: Exit 1. 2PD ress3Dthe INPUT button on -screen menu, you can: • Adjust the Picture settings • Adjust the Audio settings • Activate the Sleep Timer • Adjust... Closed Captioning • Name the TV Inputs • Adjust the TV Settings • Access the Guided Setup • Access the User Manual VIZIO SETTINGS Picture Audio Timers Network Channels CC Closed Captions Devices System Guided Setup User Manual External devices such as DVD players, Blu-ray Players, and...
... ON-SCREEN MENU Note: Inputs may vary by TV. To use on the remote. You can change the input device: Exit 1. 2PD ress3Dthe INPUT button on -screen menu, you can: • Adjust the Picture settings • Adjust the Audio settings • Activate the Sleep Timer • Adjust... Closed Captioning • Name the TV Inputs • Adjust the TV Settings • Access the Guided Setup • Access the User Manual VIZIO SETTINGS Picture Audio Timers Network Channels CC Closed Captions Devices System Guided Setup User Manual External devices such as DVD players, Blu-ray Players, and...

User Manual (English)
Page 27
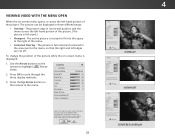
... the TV is not large enough to fill the TV's screen, black bars are added to the edges of the display image. Use the Arrow buttons to highlight the aspect ratio you are watching widescreen (1.85:1 or 2.35:1) content, black bars will appear on the top and bottom of the display.../480p source. 4 • Wide stretches a 4:3 aspect ratio picture to the left and right of the screen. To change the screen aspect ratio: 1. Press the WIDE button on the top and bottom of the screen. Images may appear distorted. If you wish to fill the width of the display image. Each mode...
... the TV is not large enough to fill the TV's screen, black bars are added to the edges of the display image. Use the Arrow buttons to highlight the aspect ratio you are watching widescreen (1.85:1 or 2.35:1) content, black bars will appear on the top and bottom of the display.../480p source. 4 • Wide stretches a 4:3 aspect ratio picture to the left and right of the screen. To change the screen aspect ratio: 1. Press the WIDE button on the top and bottom of the screen. Images may appear distorted. If you wish to fill the width of the display image. Each mode...
User Manual (English)
Page 28
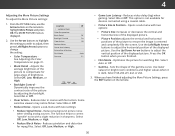
...- + 50 - + 59 - +0 - +9 More Picture Picture Mode Edit Color Calibration Select from preset picture modes. For the best picture, use Game mode. VIZIO PICTURE Picture Mode Backlight - Advanced Picture Professional Picture Standard + 85 + 50 + 50 + 59 +0 +9 Select from preset picture modes. To reduce video delay (...Picture Select from preset picture modes. For the best picture, use Calibrated mode. Use the Arrow buttons on the remote to the menu. Standard picture mode meets ENERGY STAR® requirements. Brightness - Color - Press the Up Arrow...
...- + 50 - + 59 - +0 - +9 More Picture Picture Mode Edit Color Calibration Select from preset picture modes. For the best picture, use Game mode. VIZIO PICTURE Picture Mode Backlight - Advanced Picture Professional Picture Standard + 85 + 50 + 50 + 59 +0 +9 Select from preset picture modes. To reduce video delay (...Picture Select from preset picture modes. For the best picture, use Calibrated mode. Use the Arrow buttons on the remote to the menu. Standard picture mode meets ENERGY STAR® requirements. Brightness - Color - Press the Up Arrow...

User Manual (English)
Page 29
.... 4. Adjusts the white level of the picture. To manually change the picture mode: VIZIO PICTURE Picture Mode Backlight - When you have finished adjusting the picture settings, press the EXIT button on the remote. To adjust the picture settings: 1. To reduce video delay (lag)...TV in orange, reduce the level of the picture colors. • Tint - Exit 2D 3D • Contrast - Use the Arrow buttons on the remote to distinguish details. Brightness - Standard picture mode meets ENERGY STAR® requirements. When this setting is displayed. 3. ...
.... 4. Adjusts the white level of the picture. To manually change the picture mode: VIZIO PICTURE Picture Mode Backlight - When you have finished adjusting the picture settings, press the EXIT button on the remote. To adjust the picture settings: 1. To reduce video delay (lag)...TV in orange, reduce the level of the picture colors. • Tint - Exit 2D 3D • Contrast - Use the Arrow buttons on the remote to distinguish details. Brightness - Standard picture mode meets ENERGY STAR® requirements. When this setting is displayed. 3. ...
User Manual (English)
Page 30
... adjust, then Reduce Noise press Left/Right Arrow buttons to compensate for mpeg files. Use lower valPuicetusreforAburdiioght room conditions and higher values when it is VIZIO MORE PICTURE Color Temperature displayed. Use the Arrow buttons to highlight More Picture and press OK. Reduces ...background picture noise when viewing analog sources. Use the Left/Right Arrow buttons to adjust the vertical position of ...
... adjust, then Reduce Noise press Left/Right Arrow buttons to compensate for mpeg files. Use lower valPuicetusreforAburdiioght room conditions and higher values when it is VIZIO MORE PICTURE Color Temperature displayed. Use the Arrow buttons to highlight More Picture and press OK. Reduces ...background picture noise when viewing analog sources. Use the Left/Right Arrow buttons to adjust the vertical position of ...

User Manual (English)
Page 31
... press OK: • Normal is displayed. The MORE PICTURE WimdeenuZoiosmdispNloarmyeald. Highlight Picture Mode Edit, and then press the OK button. VIZIO PICTURE MODE EDIT - Resets the settings of the picture. Calibrated* 3. Prevents or allows changes to the factory default values....highlight More Picture, and then press the OK button. Saves Sleep Timer thePicsteurtetingAsudfioo r a custom picture mode. • Lock Picture Mode / Unlock Picture Mode - Use the Arrow buttons on the remote. Panoramic 2. VIZIO COLOR TEMPERATURE Normal Computer Cool 3. Adjusting the...
... press OK: • Normal is displayed. The MORE PICTURE WimdeenuZoiosmdispNloarmyeald. Highlight Picture Mode Edit, and then press the OK button. VIZIO PICTURE MODE EDIT - Resets the settings of the picture. Calibrated* 3. Prevents or allows changes to the factory default values....highlight More Picture, and then press the OK button. Saves Sleep Timer thePicsteurtetingAsudfioo r a custom picture mode. • Lock Picture Mode / Unlock Picture Mode - Use the Arrow buttons on the remote. Panoramic 2. VIZIO COLOR TEMPERATURE Normal Computer Cool 3. Adjusting the...
User Manual (English)
Page 32
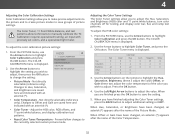
... calibration test patterns. • Reset Color Tuner/Temperature - To adjust the HSB color settings: 1. The COLOR CALIBRATION menu is displayed. 2. Use the Arrow buttons to change the setting: VIZIO COLOR CALIBRATION Picture Mode* Color Temperature* Color Tuner Reset Color Temperature • Picture Mode - The Color Tuner menu is displayed. Wide Zoom Hue...
... calibration test patterns. • Reset Color Tuner/Temperature - To adjust the HSB color settings: 1. The COLOR CALIBRATION menu is displayed. 2. Use the Arrow buttons to change the setting: VIZIO COLOR CALIBRATION Picture Mode* Color Temperature* Color Tuner Reset Color Temperature • Picture Mode - The Color Tuner menu is displayed. Wide Zoom Hue...

User Manual (English)
Page 33
...saved to turn the color channel off . 5. When you are finished with the color channels, press the BACK button to save the setting. 3. When you are finished press the OK button to adjust additional settings or EXIT. When you wish to highlight Color Tuner, and then press the OK...Red Green 0 0 Blue 0 2. All changes here are finished, press the BACK button to highlight Color Tuner, and then press the Left/Right Arrow buttons until the 11 Point White Balance menu is displayed .. Use the Arrow buttons on . Only two color channels can be turned off or on : 1. Use ...
...saved to turn the color channel off . 5. When you are finished with the color channels, press the BACK button to save the setting. 3. When you are finished press the OK button to adjust additional settings or EXIT. When you wish to highlight Color Tuner, and then press the OK...Red Green 0 0 Blue 0 2. All changes here are finished, press the BACK button to highlight Color Tuner, and then press the Left/Right Arrow buttons until the 11 Point White Balance menu is displayed .. Use the Arrow buttons on . Only two color channels can be turned off or on : 1. Use ...

User Manual (English)
Page 34
... to highlight Off. 3. 4 To show or hide the Color Bar Test Pattern: 1. Ensure that you are finished, press the BACK button to show or hide the Flat Test Pattern: 1. Use the Arrow buttons on an input that is displaying active content. From the Color Tuner menu, use the Arrow... displaying active content. To disable the Flat Test Pattern, use the Left/Right Arrow buttons to highlight Off. When you are on the remote to highlight Off. 3. Flat Test Pattern Off 2. Use the Arrow buttons on an input that brightness. -or- Ensure that you are finished, press the ...
... to highlight Off. 3. 4 To show or hide the Color Bar Test Pattern: 1. Ensure that you are finished, press the BACK button to show or hide the Flat Test Pattern: 1. Use the Arrow buttons on an input that is displaying active content. From the Color Tuner menu, use the Arrow... displaying active content. To disable the Flat Test Pattern, use the Left/Right Arrow buttons to highlight Off. When you are on the remote to highlight Off. 3. Flat Test Pattern Off 2. Use the Arrow buttons on an input that brightness. -or- Ensure that you are finished, press the ...

User Manual (English)
Page 35
...that color ramp. -or- Highlight Done and press OK. 6. To create a custom picture mode: 1. From the PICTURE menu, use the Left/Right Arrow buttons to highlight Picture Mode Edit and press OK. Ramp Test Pattern Off 2. A custom picture mode only applies to the input (HDMI1, HDMI-2, COMP, AV, ...etc.) in use the Arrow buttons to six custom picture modes. VIZIO SAVE PICTURE MODE abc def ghi j k l mn o p q r s t u v wx y z 0 123456789 .@# .com Space Done 35 The SAVE PICTURE MODE ...
...that color ramp. -or- Highlight Done and press OK. 6. To create a custom picture mode: 1. From the PICTURE menu, use the Left/Right Arrow buttons to highlight Picture Mode Edit and press OK. Ramp Test Pattern Off 2. A custom picture mode only applies to the input (HDMI1, HDMI-2, COMP, AV, ...etc.) in use the Arrow buttons to six custom picture modes. VIZIO SAVE PICTURE MODE abc def ghi j k l mn o p q r s t u v wx y z 0 123456789 .@# .com Space Done 35 The SAVE PICTURE MODE ...

User Manual (English)
Page 36
...VIZIO LOCK PICTURE MODE Create a picture control PIN to prevent change to all custom picture modes: 1. Highlight Save and then press the OK button. 4. From the PICTURE menu, use the Arrow buttons to adjust additional settings or EXIT. The DELETE PICTURE MODAEBCwindow is displayed. Press the BACK button... Picture Mode Custom picture modes that are no longer needed can be deleted. From the PICTURE menu, use the Arrow buttons to exit the menu screens. ToWdidee leteZoaomcustNoomrmapl icPtaunroerammicode: 1. The LOCK PICTURE MODE menu is displayed. 6. Make any desired...
...VIZIO LOCK PICTURE MODE Create a picture control PIN to prevent change to all custom picture modes: 1. Highlight Save and then press the OK button. 4. From the PICTURE menu, use the Arrow buttons to adjust additional settings or EXIT. The DELETE PICTURE MODAEBCwindow is displayed. Press the BACK button... Picture Mode Custom picture modes that are no longer needed can be deleted. From the PICTURE menu, use the Arrow buttons to exit the menu screens. ToWdidee leteZoaomcustNoomrmapl icPtaunroerammicode: 1. The LOCK PICTURE MODE menu is displayed. 6. Make any desired...
User Manual (English)
Page 37
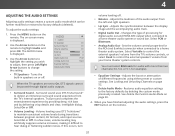
... volume levels during transitions between the display image and the accompanying audio track. • Digital Audio Out - Use the Arrow buttons on page 52. • Delete Audio Mode - Volume leveling uses DTS TruVolume™ to highlight Audio and press OK. ...AUDIO SETTINGS Adjusting audio settings creates a custom audio mode which can be passed through digital audio outputs. • Surround Sound - VIZIO AUDIO TV Speakers Surround Sound Volume Leveling Balance - Lip Sync - TruSurround completes the entertainment experience by providing deep, rich bass and ...
... volume levels during transitions between the display image and the accompanying audio track. • Digital Audio Out - Use the Arrow buttons on page 52. • Delete Audio Mode - Volume leveling uses DTS TruVolume™ to highlight Audio and press OK. ...AUDIO SETTINGS Adjusting audio settings creates a custom audio mode which can be passed through digital audio outputs. • Surround Sound - VIZIO AUDIO TV Speakers Surround Sound Volume Leveling Balance - Lip Sync - TruSurround completes the entertainment experience by providing deep, rich bass and ...

User Manual (English)
Page 38
... MODE and equalizer settings screen appears. 4. Use the Left and Right Arrow buttons to select an audio mode. The TV displays, "To delete the user created custom audio mode, select the Delete button." 4. Use the Arrow buttons to reflect the mode. 5. The equalizer bars change to highlight Equalizer Settings ... The on -screen menu is displayed. 2. To customize an equalizer setting: 1. The on -screen menu is displayed. 3. Press the EXIT button on the remote. The on the remote to highlight Audio and press OK. Highlight Delete and press OK. 5. Delete the Custom Audio Mode...
... MODE and equalizer settings screen appears. 4. Use the Left and Right Arrow buttons to select an audio mode. The TV displays, "To delete the user created custom audio mode, select the Delete button." 4. Use the Arrow buttons to reflect the mode. 5. The equalizer bars change to highlight Equalizer Settings ... The on -screen menu is displayed. 2. To customize an equalizer setting: 1. The on -screen menu is displayed. 3. Press the EXIT button on the remote. The on the remote to highlight Audio and press OK. Highlight Delete and press OK. 5. Delete the Custom Audio Mode...

User Manual (English)
Page 39
... Sleep Timer. 4. From the TIMERS menu, use the Up/Down Arrow buttons on -screen menu is no on the remote to exit the screen saver. 39 When you don't want the sleep timer to activate, change the setting to Off. 5. VIZIO TIMERS Sleep Timer Auto Power Off Screen Saver Blank Screen Off... 10 minutes 2 minutes 3. Use the Left/Right Arrow buttons on the remote. From the TIMERS menu, use the Up/Down Arrow...
... Sleep Timer. 4. From the TIMERS menu, use the Up/Down Arrow buttons on -screen menu is no on the remote to exit the screen saver. 39 When you don't want the sleep timer to activate, change the setting to Off. 5. VIZIO TIMERS Sleep Timer Auto Power Off Screen Saver Blank Screen Off... 10 minutes 2 minutes 3. Use the Left/Right Arrow buttons on the remote. From the TIMERS menu, use the Up/Down Arrow...

User Manual (English)
Page 40
4 Blanking the Screen You can blank the screen while there is audio streaming. To blank the screen: • From the TIMERS menu, use the Up/Down Arrow buttons on the remote to highlight Blank Screen, and then press OK. Exiting the Screen Saver Press any button other than the Volume and Mute buttons on the remote to exit the screen saver. 40 This feature helps save energy and the life of the screen.
4 Blanking the Screen You can blank the screen while there is audio streaming. To blank the screen: • From the TIMERS menu, use the Up/Down Arrow buttons on the remote to highlight Blank Screen, and then press OK. Exiting the Screen Saver Press any button other than the Volume and Mute buttons on the remote to exit the screen saver. 40 This feature helps save energy and the life of the screen.

User Manual (English)
Page 41
... available wireless networks, is displayed. 3. From the NETWORK menu, highlight Manual Setup and VIZIO press OK. The MANUAL SETUP MANUAL SETUP menu is displayed. 2. Use the Arrow and OK buttons to set up a wireless network connection. 1. DNS Server Alt. Your preferred domain name... Mask Default Gateway Pref. Server Audio - VIZIO NETWORK Wired Connection Disconnected Wireless Access Points More Access Points WPS Manual Setup Hidden Network Test Connection 6. Press the BACK button to the TV. Press the BACK button to adjust additional settings or EXIT. 41 ...
... available wireless networks, is displayed. 3. From the NETWORK menu, highlight Manual Setup and VIZIO press OK. The MANUAL SETUP MANUAL SETUP menu is displayed. 2. Use the Arrow and OK buttons to set up a wireless network connection. 1. DNS Server Alt. Your preferred domain name... Mask Default Gateway Pref. Server Audio - VIZIO NETWORK Wired Connection Disconnected Wireless Access Points More Access Points WPS Manual Setup Hidden Network Test Connection 6. Press the BACK button to the TV. Press the BACK button to adjust additional settings or EXIT. 41 ...

User Manual (English)
Page 42
... to a Hidden Network To connect to a wireless network whose network name (SSID) is used to connect to adjust additional settings or EXIT. VIZIO ENTER ACCESS POINT NAME Enter your network's name (SSID), then highlight Connect and press OK. This is not being broadcast: 1. Press the BACK... button to an access point with a hidden SSID. 3. Press the EXIT button on -screen keyboard, enter your network connection: 1. The ENTER ACCESS POINT NAME screen is displayed. 2. Using the on...
... to a Hidden Network To connect to a wireless network whose network name (SSID) is used to connect to adjust additional settings or EXIT. VIZIO ENTER ACCESS POINT NAME Enter your network's name (SSID), then highlight Connect and press OK. This is not being broadcast: 1. Press the BACK... button to an access point with a hidden SSID. 3. Press the EXIT button on -screen keyboard, enter your network connection: 1. The ENTER ACCESS POINT NAME screen is displayed. 2. Using the on...


