
User Manual
Page 7
... Advanced Audio Settings 16 Resetting the Audio Settings 16 Changing the TV Settings 17 Setting the Tuner Mode 17 Scanning for Channels 17 Adding New Channels 18 Skipping Channels 18 Changing the Audio Language 19 Using the Parental Controls 19 Accessing the Parental Controls Menu 19 Enabling or... Disabling Program Ratings 20 Locking and Unlocking Channels 20 Blocking and Unblocking Content by Rating 20 Changing the Parental Control Passcode 21 Resetting the Content Locks 21 Changing the ...
... Advanced Audio Settings 16 Resetting the Audio Settings 16 Changing the TV Settings 17 Setting the Tuner Mode 17 Scanning for Channels 17 Adding New Channels 18 Skipping Channels 18 Changing the Audio Language 19 Using the Parental Controls 19 Accessing the Parental Controls Menu 19 Enabling or... Disabling Program Ratings 20 Locking and Unlocking Channels 20 Blocking and Unblocking Content by Rating 20 Changing the Parental Control Passcode 21 Resetting the Content Locks 21 Changing the ...
User Manual
Page 14
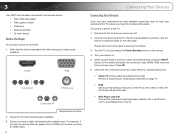
Connect the device and the TV. Turn your device on the remote. 4. Check the list of devices/connection types below for Channels on page 17. • RGB Make sure the desktop resolution on the PC is securely connected. 3. Ensure the TV has a matching port available. 3. Ensure you ... a device to use your newly connected device, press the INPUT button on the remote and select the connection type (HDMI, RGB, etc) from wall) Perform a channel scan. Set the Screen Mode to Normal. • DVD Player with an HDMI port, be easily connected to an external device: • DVD or Blu-Ray...
Connect the device and the TV. Turn your device on the remote. 4. Check the list of devices/connection types below for Channels on page 17. • RGB Make sure the desktop resolution on the PC is securely connected. 3. Ensure the TV has a matching port available. 3. Ensure you ... a device to use your newly connected device, press the INPUT button on the remote and select the connection type (HDMI, RGB, etc) from wall) Perform a channel scan. Set the Screen Mode to Normal. • DVD Player with an HDMI port, be easily connected to an external device: • DVD or Blu-Ray...
User Manual
Page 16
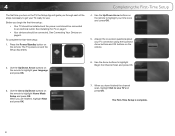
... press OK. 3. Use the Arrow buttons to highlight your TV ready for use. The TV powers on page 6. When you have finished the channel scan, highlight Exit to Live TV and press OK. The First-Time Setup is complete. 8 4 Completing the First-Time Setup The first time you turn on ...
... press OK. 3. Use the Arrow buttons to highlight your TV ready for use. The TV powers on page 6. When you have finished the channel scan, highlight Exit to Live TV and press OK. The First-Time Setup is complete. 8 4 Completing the First-Time Setup The first time you turn on ...

User Manual
Page 25
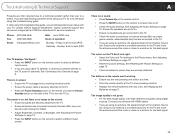
...the remote to highlight the TV Settings icon and press OK. E470VLE 5 Changing the TV Settings Using the TV settings menu, you can detect and display channels and their associated information, you must scan for Channels Before the TV can : • Set up the TV ...Settings menu is displayed. 3. Highlight Auto Channel Scan and press OK. Press the EXIT button on the remote. Scanning for channels. Wait until the channel scan is displayed. 2. The auto channel scan begins. 4. Press the MENU button on the remote. 17 A channel scan may also be necessary when the TV has...
...the remote to highlight the TV Settings icon and press OK. E470VLE 5 Changing the TV Settings Using the TV settings menu, you can detect and display channels and their associated information, you must scan for Channels Before the TV can : • Set up the TV ...Settings menu is displayed. 3. Highlight Auto Channel Scan and press OK. Press the EXIT button on the remote. Scanning for channels. Wait until the channel scan is displayed. 2. The auto channel scan begins. 4. Press the MENU button on the remote. 17 A channel scan may also be necessary when the TV has...

User Manual
Page 26
... add a single new analog channel: 1. Skipping Channels After a channel scan is done scanning for the channel. 4. From the Settings menu, highlight Skip Channel. The Add Analog Channel menu is displayed. 2. To remove a channel: 1. From the Settings menu, highlight Partial Channel Search. The Partial Channel Search menu is 100% complete. For each channel you select. 3. Wait until the partial channel search is displayed. 2. Highlight...
... add a single new analog channel: 1. Skipping Channels After a channel scan is done scanning for the channel. 4. From the Settings menu, highlight Skip Channel. The Add Analog Channel menu is displayed. 2. To remove a channel: 1. From the Settings menu, highlight Partial Channel Search. The Partial Channel Search menu is 100% complete. For each channel you select. 3. Wait until the partial channel search is displayed. 2. Highlight...
User Manual
Page 37
If, after using an antenna, the signal strength of the channel may be low. Phone: Fax: Email: (877) 698-4946 (949) 585-9563 techsupport@vizio.com Web: www.VIZIO.com Hours of operation: Monday - The power is on, but there is no power. • Ensure the TV is connected securely to the TV ..., cable/satellite box) that are connected to the TV. • If you are using cable TV, satellite, or antenna connected directly to the TV, scan for the best signal. 29 The buttons on page 13. • Reset the picture settings. Quality customer support and service are often returned due to...
If, after using an antenna, the signal strength of the channel may be low. Phone: Fax: Email: (877) 698-4946 (949) 585-9563 techsupport@vizio.com Web: www.VIZIO.com Hours of operation: Monday - The power is on, but there is no power. • Ensure the TV is connected securely to the TV ..., cable/satellite box) that are connected to the TV. • If you are using cable TV, satellite, or antenna connected directly to the TV, scan for the best signal. 29 The buttons on page 13. • Reset the picture settings. Quality customer support and service are often returned due to...


