
Brochure
Page 1
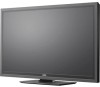
... don't worry about your way. FULL HD 1080P resolution delivers ultimate detail. E422AR A SCREEN TO FIT YOUR LIFE VIZIO 42" CLASS LCD HDTV WITH VIZIO INTERNET APPS® VIZIO's 42" Class LCD HDTV with VIZIO Internet Apps® brings you can easily connect to the Internet and stream your favorite movies and TV shows, listen to...
... don't worry about your way. FULL HD 1080P resolution delivers ultimate detail. E422AR A SCREEN TO FIT YOUR LIFE VIZIO 42" CLASS LCD HDTV WITH VIZIO INTERNET APPS® VIZIO's 42" Class LCD HDTV with VIZIO Internet Apps® brings you can easily connect to the Internet and stream your favorite movies and TV shows, listen to...

Brochure
Page 2
CEC/ARC, App certificates, Vizio AQ, Vizio PQ, Dolby Digital 300mm [V] x 300mm [H] CONNECTIONS HDMI Inputs Component Video Inputs Composite Inputs RF Antenna Input USB Ports PC Input Audio Outputs Number of vizio inc. all rights reserved. rev 10262010 product features and specifications are... x 3.8" Product Weight without notice. © 2012 vizio inc. 42" CLASS LCD HDTV WITH VIZIO INTERNET APPS® E422AR TV SPECIFICATIONS Screen Size Viewable TV Type Refresh Rate Maximum Resolution Internet Connectivity Remote Control Type Ambient Light Sensor Energy Star Qualified Certifications...
CEC/ARC, App certificates, Vizio AQ, Vizio PQ, Dolby Digital 300mm [V] x 300mm [H] CONNECTIONS HDMI Inputs Component Video Inputs Composite Inputs RF Antenna Input USB Ports PC Input Audio Outputs Number of vizio inc. all rights reserved. rev 10262010 product features and specifications are... x 3.8" Product Weight without notice. © 2012 vizio inc. 42" CLASS LCD HDTV WITH VIZIO INTERNET APPS® E422AR TV SPECIFICATIONS Screen Size Viewable TV Type Refresh Rate Maximum Resolution Internet Connectivity Remote Control Type Ambient Light Sensor Energy Star Qualified Certifications...

User Manual
Page 1
USER GUIDE MOMDODEELLSS // E3D320VX // E3DE43202VX2AR // E3DE44702VX2AR INSTALLING YOUR new TV CONTROLS & CONNECTIONS CONNECTING YOUR DEVICES USING THE ON-SCREEN MENU USING THE USB MEDIA PLAYER USING VIZIO INTERNET APPS TROUBLESHOOTING & SUPPORT Help, SPECs, warranty & LEGAL
USER GUIDE MOMDODEELLSS // E3D320VX // E3DE43202VX2AR // E3DE44702VX2AR INSTALLING YOUR new TV CONTROLS & CONNECTIONS CONNECTING YOUR DEVICES USING THE ON-SCREEN MENU USING THE USB MEDIA PLAYER USING VIZIO INTERNET APPS TROUBLESHOOTING & SUPPORT Help, SPECs, warranty & LEGAL
User Manual
Page 3
...instructions. • Keep these instructions in electric shock or fire.To prevent your TV from being damaged, the following safety instructions before connecting other apparatus (including amplifiers) that you see this symbol, please read the accompanying helpful tip. Keep these instructions. • Heed ...for replacement of the obsolete outlet. • Protect the power cord from being walked on or pinched, particularly at www.VIZIO.com • Complete and mail the enclosed registration card Extended Warranties For peace of important operating instructions. To purchase an ...
...instructions. • Keep these instructions in electric shock or fire.To prevent your TV from being damaged, the following safety instructions before connecting other apparatus (including amplifiers) that you see this symbol, please read the accompanying helpful tip. Keep these instructions. • Heed ...for replacement of the obsolete outlet. • Protect the power cord from being walked on or pinched, particularly at www.VIZIO.com • Complete and mail the enclosed registration card Extended Warranties For peace of important operating instructions. To purchase an ...

User Manual
Page 4
... type of your TV and to protect it will fit only into your TV that may compromise the integrity of the grounded plug. • When connected to ground your TV yourself. This is used for your dealer or local power company. • Do not apply pressure or throw objects at least...
... type of your TV and to protect it will fit only into your TV that may compromise the integrity of the grounded plug. • When connected to ground your TV yourself. This is used for your dealer or local power company. • Do not apply pressure or throw objects at least...
User Manual
Page 7
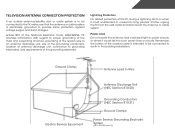
...mast and supporting structure, grounding of the lead-in the building installation. Remember, the screen of the coaxial cable is intended to be connected to the TV, make sure that the antenna or cable system is left unattended or unused for long periods of time, unplug the...21) Ground Clamps Power Service Grounding Electrode System (NEC ART 250, part H) Television Antenna Connection Protection If an outside antenna/satellite dish or cable system is to be connected to earth in wire to an antenna discharge unit, size of the grounding conductors, location of antenna discharge...
...mast and supporting structure, grounding of the lead-in the building installation. Remember, the screen of the coaxial cable is intended to be connected to the TV, make sure that the antenna or cable system is left unattended or unused for long periods of time, unplug the...21) Ground Clamps Power Service Grounding Electrode System (NEC ART 250, part H) Television Antenna Connection Protection If an outside antenna/satellite dish or cable system is to be connected to earth in wire to an antenna discharge unit, size of the grounding conductors, location of antenna discharge...
User Manual
Page 8
...a Wall 4 Controls and Connections 5 Rear Panel 5 Side Panel 6 Front Panel 7 Remote Control 8 Replacing the Batteries 9 Connecting Your Devices 10 Connecting A Device 10 Connecting A PC 11 Connecting an audio device 12 Connecting to your network 13 Connecting to a Wired Network (Best 13 Connecting to a Wireless Network 13...Audio Settings 23 Resetting the Audio Settings 23 Using the Network Connection Menu 24 Connecting to a Wireless Network 24 Changing the Advanced Network Settings 25 Testing Your Network Connection 25 Changing the TV Settings 26 Changing the Input Source 26...
...a Wall 4 Controls and Connections 5 Rear Panel 5 Side Panel 6 Front Panel 7 Remote Control 8 Replacing the Batteries 9 Connecting Your Devices 10 Connecting A Device 10 Connecting A PC 11 Connecting an audio device 12 Connecting to your network 13 Connecting to a Wired Network (Best 13 Connecting to a Wireless Network 13...Audio Settings 23 Resetting the Audio Settings 23 Using the Network Connection Menu 24 Connecting to a Wireless Network 24 Changing the Advanced Network Settings 25 Testing Your Network Connection 25 Changing the TV Settings 26 Changing the Input Source 26...
User Manual
Page 9
... the VIZIO Logo On or Off 33 Using the Help Menu 33 Displaying System Information 34 Resetting the TV Settings 34 Restoring the TV to Factory Default Settings 34 Using Guided Setup 35 Using the Info Window 36 Using the USB Media Player 37 Using the USB Media Player 37 Connecting a USB... Thumb Drive to the TV 37 Playing USB Media 37 Using VIZIO Internet Apps 40 Using the VIA Shortcut Buttons 40 Using the VIA Dock 40 Moving an App on the...
... the VIZIO Logo On or Off 33 Using the Help Menu 33 Displaying System Information 34 Resetting the TV Settings 34 Restoring the TV to Factory Default Settings 34 Using Guided Setup 35 Using the Info Window 36 Using the USB Media Player 37 Using the USB Media Player 37 Connecting a USB... Thumb Drive to the TV 37 Playing USB Media 37 Using VIZIO Internet Apps 40 Using the VIA Shortcut Buttons 40 Using the VIA Dock 40 Moving an App on the...
User Manual
Page 11
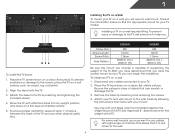
... a UL-listed wall mount bracket rated for the weight/load of the TV and any cables connected to find the appropriate mount for the weight of debris that you can scratch or damage the TV. 3. E322AR E422AR Screw Size: Screw Length: Screw Pitch: Hole Pattern: M6 12mm 1.0mm 200mm (V) x 200mm (H) M6 12mm...
... a UL-listed wall mount bracket rated for the weight/load of the TV and any cables connected to find the appropriate mount for the weight of debris that you can scratch or damage the TV. 3. E322AR E422AR Screw Size: Screw Length: Screw Pitch: Hole Pattern: M6 12mm 1.0mm 200mm (V) x 200mm (H) M6 12mm...
User Manual
Page 12
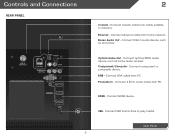
Ethernet - Component/Compsite - PC Audio In - Connect coaxial cable from home network. Connect optical/SPDIF audio device, such as sound bar. HDMI - USB - Connect ethernet cable from cable, satellite, or antenna. Connect 3.5mm audio device, such as home audio receiver. Connect VGA cable from PC. Stereo Audio Out - Optical Audio Out - RGB - Connect 3.5mm audio cable from PC. Connect component or composite device. Connect USB thumb drive to play media. Connect HDMI device. Controls and Connections Rear Panel 2 Coaxial - Rear Panel 5
Ethernet - Component/Compsite - PC Audio In - Connect coaxial cable from home network. Connect optical/SPDIF audio device, such as sound bar. HDMI - USB - Connect ethernet cable from cable, satellite, or antenna. Connect 3.5mm audio device, such as home audio receiver. Connect VGA cable from PC. Stereo Audio Out - Optical Audio Out - RGB - Connect 3.5mm audio cable from PC. Connect component or composite device. Connect USB thumb drive to play media. Connect HDMI device. Controls and Connections Rear Panel 2 Coaxial - Rear Panel 5
User Manual
Page 17
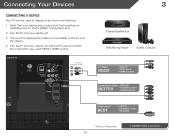
...your device off. 3. Turn the TV and your device on the TV (HDMI, Component, etc). 2. BACK OF TV Connect to the TV and the device. 4. Connect the appropriate cable (not included) to component inputs: 3 Cable/Satellite Box DVD/Blu-ray Player Game Console AV CABLE ...• HD VIDEO (1080p)* • HD AUDIO * Maximum Resolution 10 CONNECTING A DEVICE Set the TV's input to display output from most devices. 1. Connecting Your Devices Connecting A Device Your TV can be used to match the connection you used (HDMI-1, HDM1-2, etc). Verify that matches an available port on...
...your device off. 3. Turn the TV and your device on the TV (HDMI, Component, etc). 2. BACK OF TV Connect to the TV and the device. 4. Connect the appropriate cable (not included) to component inputs: 3 Cable/Satellite Box DVD/Blu-ray Player Game Console AV CABLE ...• HD VIDEO (1080p)* • HD AUDIO * Maximum Resolution 10 CONNECTING A DEVICE Set the TV's input to display output from most devices. 1. Connecting Your Devices Connecting A Device Your TV can be used to match the connection you used (HDMI-1, HDM1-2, etc). Verify that matches an available port on...

User Manual
Page 18
Connect a 3.5mm cable (not included) to your PC and the RGB port on the back of the TV. Connect an RGB cable (not included) to your PC and the PC Audio In port on the back of the TV. This cable transmits video. 2. Specifications. 3 Personal Computer RGB Cable (For Video) 3.5mm Cable (For Audio) CONNECTING A PC 11 This cable transmits audio. 3. Set your PC's resolution to display output from a personal computer. See Appendix B - To use your TV as a PC display: 1. Connecting A PC Your TV can be used to match the resolution of your TV.
Connect a 3.5mm cable (not included) to your PC and the RGB port on the back of the TV. Connect an RGB cable (not included) to your PC and the PC Audio In port on the back of the TV. This cable transmits video. 2. Specifications. 3 Personal Computer RGB Cable (For Video) 3.5mm Cable (For Audio) CONNECTING A PC 11 This cable transmits audio. 3. Set your PC's resolution to display output from a personal computer. See Appendix B - To use your TV as a PC display: 1. Connecting A PC Your TV can be used to match the resolution of your TV.

User Manual
Page 19
Verify that your device has a audio port that matches an available port on . 3 Home Audio Receiver VIZIO Sound Bar GOOD 3.5mm Cable BETTER Optical/SPDIF Cable CONNECTING AUDIO DEVICE 12 Turn the TV and your audio device off. 3. Turn the TV and your device on the TV (Optical, 3.5mm, etc). 2. Connecting an audio device Your TV can output sound to the TV and the device. 4. Connect the appropriate cable (not included) to an audio device, such as a receiver or sound bar. 1.
Verify that your device has a audio port that matches an available port on . 3 Home Audio Receiver VIZIO Sound Bar GOOD 3.5mm Cable BETTER Optical/SPDIF Cable CONNECTING AUDIO DEVICE 12 Turn the TV and your audio device off. 3. Turn the TV and your device on the TV (Optical, 3.5mm, etc). 2. Connecting an audio device Your TV can output sound to the TV and the device. 4. Connect the appropriate cable (not included) to an audio device, such as a receiver or sound bar. 1.

User Manual
Page 20
... configure the TV. See Using Guided Setup on page 35. Use the Guided Network Setup to a Wired Network (Best) 1. Connect an ethernet cable to the ethernet port on the back of the TV. Ensure you have a router or modem broadcasting as high-speed wireless... signal (802.11n recommended). 2. It can be connected to your router and to your home network with a Wired or Wireless connection. See below. 2. Ethernet Cable Router / Modem CONNECTING TO A WIRED NETWORK 13 Use the Guided Network Setup to your network Your TV is internet...
... configure the TV. See Using Guided Setup on page 35. Use the Guided Network Setup to a Wired Network (Best) 1. Connect an ethernet cable to the ethernet port on the back of the TV. Ensure you have a router or modem broadcasting as high-speed wireless... signal (802.11n recommended). 2. It can be connected to your router and to your home network with a Wired or Wireless connection. See below. 2. Ethernet Cable Router / Modem CONNECTING TO A WIRED NETWORK 13 Use the Guided Network Setup to your network Your TV is internet...
User Manual
Page 21
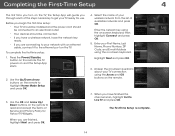
... networks and press OK. Enter your First Name, Last Name, Phone Number, ZIP Code, and E-mail Address using the on-screen keyboard, then highlight Connect and press OK. 5. When you through each of the steps necessary to get your TV ready for Yahoo! Completing the First-Time Setup 4 The first..., highlight Next and press OK. 4. Highlight Next and press OK. 6. To complete the first-time setup: 1. TV Widgets. Select the name of your TV connection using the Arrow and OK buttons on and the Setup App starts. 2. Enter the network key using the on-screen keyboard. Answer the on-screen...
... networks and press OK. Enter your First Name, Last Name, Phone Number, ZIP Code, and E-mail Address using the on-screen keyboard, then highlight Connect and press OK. 5. When you through each of the steps necessary to get your TV ready for Yahoo! Completing the First-Time Setup 4 The first..., highlight Next and press OK. 4. Highlight Next and press OK. 6. To complete the first-time setup: 1. TV Widgets. Select the name of your TV connection using the Arrow and OK buttons on and the Setup App starts. 2. Enter the network key using the on-screen keyboard. Answer the on-screen...
User Manual
Page 23
... External devices such as DVD players, Blu-Ray Players, and video game consoles can display images in the on-screen menu. The TV can be connected to your TV.To use one of these devices with black bars to fit the screen. • Panoramic expands the display image to fill the...
... External devices such as DVD players, Blu-Ray Players, and video game consoles can display images in the on-screen menu. The TV can be connected to your TV.To use one of these devices with black bars to fit the screen. • Panoramic expands the display image to fill the...

User Manual
Page 30
... then press Left/Right Arrow to change the setting: • Digital Audio Out Changes the type of processing for the analog 3.5mm connector when connected to the factory defaults?" 4. Highlight Yes and press OK. 5. Use the Arrow buttons on -screen menu is displayed. 2. From the Audio ...the remote to a home theater audio system. The Advanced Audio menu is displayed. 3. Sets the volume control properties for the Optical output when connected to highlight the Audio icon and press OK. Use the Arrow buttons to the factory default settings: 1. Press the EXIT button on the ...
... then press Left/Right Arrow to change the setting: • Digital Audio Out Changes the type of processing for the analog 3.5mm connector when connected to the factory defaults?" 4. Highlight Yes and press OK. 5. Use the Arrow buttons on -screen menu is displayed. 2. From the Audio ...the remote to a home theater audio system. The Advanced Audio menu is displayed. 3. Sets the volume control properties for the Optical output when connected to highlight the Audio icon and press OK. Use the Arrow buttons to the factory default settings: 1. Press the EXIT button on the ...
User Manual
Page 31
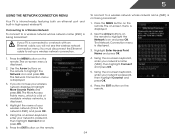
... is displayed. 4. Using the on-screen keyboard, enter your wireless network (this is not being broadcast: If your network's name (SSID), then highlight Connect and press OK. 5. You must disconnect the Ethernet cable to a wireless network whose network name (SSID) is the network's SSID) and press OK... Access Points menu, which is displayed. 2. Use the Arrow buttons on -screen menu is a list of your network's password, then highlight Connect and press OK. 6. The on the remote to a wireless network whose network name (SSID) is displayed. 3. Highlight Enter Access Point Name and...
... is displayed. 4. Using the on-screen keyboard, enter your wireless network (this is not being broadcast: If your network's name (SSID), then highlight Connect and press OK. 5. You must disconnect the Ethernet cable to a wireless network whose network name (SSID) is the network's SSID) and press OK... Access Points menu, which is displayed. 2. Use the Arrow buttons on -screen menu is a list of your network's password, then highlight Connect and press OK. 6. The on the remote to a wireless network whose network name (SSID) is displayed. 3. Highlight Enter Access Point Name and...
User Manual
Page 32
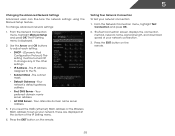
...server address. 3. If you need the RJ45 (ethernet) MAC address or the Wireless MAC address to set up your network connection: 1. Testing Your Network Connection To test your network, these are displayed at the bottom of the IP Setting menu. 4. DNS Server - From the Network...• DHCP - (Dynamic Host Configuration Protocol) This setting must be turned Off to the TV. • Subnet Mask - The Test Connection screen displays the connection method, network name, signal strength, and download speed of the other settings. • IP Address - The IP address assigned to change ...
...server address. 3. If you need the RJ45 (ethernet) MAC address or the Wireless MAC address to set up your network connection: 1. Testing Your Network Connection To test your network, these are displayed at the bottom of the IP Setting menu. 4. DNS Server - From the Network...• DHCP - (Dynamic Host Configuration Protocol) This setting must be turned Off to the TV. • Subnet Mask - The Test Connection screen displays the connection method, network name, signal strength, and download speed of the other settings. • IP Address - The IP address assigned to change ...
User Manual
Page 33
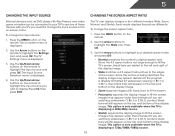
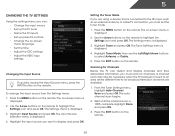
...; Set up parental controls • Change the on-screen menu language • Set the time • Adjust the CEC settings • Adjust the VIZIO logo settings Changing the Input Source To quickly access the Input Source menu, press the INPUT button on the remote. To change the input source... from the Settings menu: 1. Scanning for channels. The Input Source Selection menu is connected to highlight the Settings icon and press OK. The on the remote. From the Tuner Settings menu, highlight Auto Channel Scan and press OK. ...
...; Set up parental controls • Change the on-screen menu language • Set the time • Adjust the CEC settings • Adjust the VIZIO logo settings Changing the Input Source To quickly access the Input Source menu, press the INPUT button on the remote. To change the input source... from the Settings menu: 1. Scanning for channels. The Input Source Selection menu is connected to highlight the Settings icon and press OK. The on the remote. From the Tuner Settings menu, highlight Auto Channel Scan and press OK. ...


