Download
Page 4
... the apparatus, the apparatus has been exposed to rain or moisture, does not operate normally or has been dropped. • Unplug the power cord before turning on your TV and easily accessible. • Only power of at your TV cabinet. Wait before cleaning your TV. • When moving the cart/apparatus...
... the apparatus, the apparatus has been exposed to rain or moisture, does not operate normally or has been dropped. • Unplug the power cord before turning on your TV and easily accessible. • Only power of at your TV cabinet. Wait before cleaning your TV. • When moving the cart/apparatus...
Download
Page 8
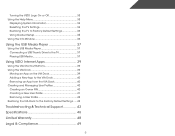
Turning the VIZIO Logo On or Off 33 Using the Help Menu 33 Displaying System Information 34 Resetting the TV Settings 34 Restoring the TV to Factory Default ... Using the USB Media Player 37 Using the USB Media Player 37 Connecting a USB Thumb Drive to the TV 37 Playing USB Media 37 Using VIZIO Internet Apps 39 Using the VIA Shortcut Buttons 39 Using the VIA Dock 39 Moving an App on the VIA Dock 39 Adding a New App...
Turning the VIZIO Logo On or Off 33 Using the Help Menu 33 Displaying System Information 34 Resetting the TV Settings 34 Restoring the TV to Factory Default ... Using the USB Media Player 37 Using the USB Media Player 37 Connecting a USB Thumb Drive to the TV 37 Playing USB Media 37 Using VIZIO Internet Apps 39 Using the VIA Shortcut Buttons 39 Using the VIA Dock 39 Moving an App on the VIA Dock 39 Adding a New App...

Download
Page 13
Change the channel. VOLUME UP/DOWN - MENU - Change input source. INPUT - Open the on . Increase or decrease volume level. Side Panel 2 INPUT MENU CH ^ CH VOL ^ VOL ^ ^ POWER - Side Panel 7 Turn TV off or on -screen menu. CHANNEL UP/DOWN -
Change the channel. VOLUME UP/DOWN - MENU - Change input source. INPUT - Open the on . Increase or decrease volume level. Side Panel 2 INPUT MENU CH ^ CH VOL ^ VOL ^ ^ POWER - Side Panel 7 Turn TV off or on -screen menu. CHANNEL UP/DOWN -

Download
Page 15
Closed Captions Open the closed caption menu. Volume Up/Down Increase or decrease loudness of the audio. Mute Turn the audio off . Wide Switch the display mode. Menu Display the on . Arrow Navigate the on -screen menu. Info Display the info window. V Button Open .... Back Go to the channel last viewed. Guide Display the info window. Last Return to the previous on or off or on -screen menu. Power Turn TV on -screen menu. Number Pad Manually enter a channel. Dash Use with number pad to manually enter a digital sub-channel. (For example, 18-4 or 18...
Closed Captions Open the closed caption menu. Volume Up/Down Increase or decrease loudness of the audio. Mute Turn the audio off . Wide Switch the display mode. Menu Display the on . Arrow Navigate the on -screen menu. Info Display the info window. V Button Open .... Back Go to the channel last viewed. Guide Display the info window. Last Return to the previous on or off or on -screen menu. Power Turn TV on -screen menu. Number Pad Manually enter a channel. Dash Use with number pad to manually enter a digital sub-channel. (For example, 18-4 or 18...

Download
Page 17
... HD VIDEO (1080p)* • STEREO AUDIO AV CABLE GOOD * Maximum Resolution 11 • ANALOG • VIDEO (480i)* • STEREO AUDIO CONNECTING A DEVICE Turn the TV and your device has a video port that your device off. 3. Set the TV's input to display output from most devices. 1. Connecting Your Devices... Connecting A Device Your TV can be used to match the connection you used (HDMI-1, HDMI-2, etc). Turn the TV and your device on the TV (HDMI, Component, etc). 2. BACK OF TV 3 Cable/Satellite Box DVD/Blu-ray Player Game Console...
... HD VIDEO (1080p)* • STEREO AUDIO AV CABLE GOOD * Maximum Resolution 11 • ANALOG • VIDEO (480i)* • STEREO AUDIO CONNECTING A DEVICE Turn the TV and your device has a video port that your device off. 3. Set the TV's input to display output from most devices. 1. Connecting Your Devices... Connecting A Device Your TV can be used to match the connection you used (HDMI-1, HDMI-2, etc). Turn the TV and your device on the TV (HDMI, Component, etc). 2. BACK OF TV 3 Cable/Satellite Box DVD/Blu-ray Player Game Console...

Download
Page 18
Connect the appropriate cable (not included) to an audio device, such as a receiver or sound bar. 1. Turn the TV and your audio device off. 3. Connecting an audio device Your TV can output sound to the TV and the device. 4. Turn the TV and your device on the TV (Optical, RCA, etc). 2. Verify that your device has a video port that matches an available port on . BACK OF TV 3 Home Audio Receiver VIZIO Sound Bar GOOD RCA Stereo Cable BETTER Optical/SPDIF Cable CONNECTING AUDIO DEVICE 12
Connect the appropriate cable (not included) to an audio device, such as a receiver or sound bar. 1. Turn the TV and your audio device off. 3. Connecting an audio device Your TV can output sound to the TV and the device. 4. Turn the TV and your device on the TV (Optical, RCA, etc). 2. Verify that your device has a video port that matches an available port on . BACK OF TV 3 Home Audio Receiver VIZIO Sound Bar GOOD RCA Stereo Cable BETTER Optical/SPDIF Cable CONNECTING AUDIO DEVICE 12

Download
Page 20
... on-screen keyboard. Enter your TV ready for Yahoo! The First-Time Setup is complete. 14 Completing the First-Time Setup 4 The first time you turn on the TV, the Setup App will guide you have the network key ready. • If you are connecting to your wireless network from the...
... on-screen keyboard. Enter your TV ready for Yahoo! The First-Time Setup is complete. 14 Completing the First-Time Setup 4 The first time you turn on the TV, the Setup App will guide you have the network key ready. • If you are connecting to your wireless network from the...

Download
Page 24
...• Window Opacity - Activating the Sleep Timer When activated, the TV's sleep timer will turn the TV off after 10 minutes if no signal is displayed. 2. Use the Up/Down ...icon and press OK. The Timers menu is displayed. 2. Use the Arrow buttons on the remote to turn off after which you are satisfied with the appearance of time. Adjusting the Picture Settings Your TV display can... Auto Power Off feature: 1. 5 • Window Color - To use the Up/Down Arrow buttons on the remote to turn off: 30, 60, 90, 120, or 180 minutes. 5. The on the remote. Use the Up/Down Arrow buttons ...
...• Window Opacity - Activating the Sleep Timer When activated, the TV's sleep timer will turn the TV off after 10 minutes if no signal is displayed. 2. Use the Up/Down ...icon and press OK. The Timers menu is displayed. 2. Use the Arrow buttons on the remote to turn off after which you are satisfied with the appearance of time. Adjusting the Picture Settings Your TV display can... Auto Power Off feature: 1. 5 • Window Color - To use the Up/Down Arrow buttons on the remote to turn off: 30, 60, 90, 120, or 180 minutes. 5. The on the remote. Use the Up/Down Arrow buttons ...

Download
Page 28
... volume fluctuations due to highlight the setting you have finished adjusting the audio settings, press the EXIT button on the remote to the factory defaults. Turns the built-in speakers on page 23. • Equalizer Settings - Adjusts the boost or attenuation of the audio output from the TV's internal speakers...
... volume fluctuations due to highlight the setting you have finished adjusting the audio settings, press the EXIT button on the remote to the factory defaults. Turns the built-in speakers on page 23. • Equalizer Settings - Adjusts the boost or attenuation of the audio output from the TV's internal speakers...

Download
Page 31
Use the Arrow and OK buttons to adjust each setting: • DHCP - (Dynamic Host Configuration Protocol) This setting must be turned Off to change advanced network settings: 1. The IP address assigned to set up your network connection. 3. If you need the RJ45 (ethernet) MAC address or ...
Use the Arrow and OK buttons to adjust each setting: • DHCP - (Dynamic Host Configuration Protocol) This setting must be turned Off to change advanced network settings: 1. The IP address assigned to set up your network connection. 3. If you need the RJ45 (ethernet) MAC address or ...
Download
Page 39
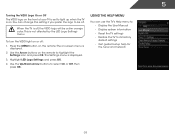
This is off, the VIZIO logo will be off : 1. Press the MENU button on or off . When the TV is not affected by the LED Logo Settings menu. The .... 2. Use the Up/Down Arrow buttons to light up when the TV is on. Highlight LED Logo Settings and press OK. 4. 5 Turning the VIZIO Logo On or Off The VIZIO logo on the front of your TV is set to select On or Off, then press OK. You can use the TV... User Manual • Display system information • Reset the TV settings • Restore the TV to highlight the Settings icon and press OK. To turn the VIZIO light on the remote.
This is off, the VIZIO logo will be off : 1. Press the MENU button on or off . When the TV is not affected by the LED Logo Settings menu. The .... 2. Use the Up/Down Arrow buttons to light up when the TV is on. Highlight LED Logo Settings and press OK. 4. 5 Turning the VIZIO Logo On or Off The VIZIO logo on the front of your TV is set to select On or Off, then press OK. You can use the TV... User Manual • Display system information • Reset the TV settings • Restore the TV to highlight the Settings icon and press OK. To turn the VIZIO light on the remote.

Download
Page 40
... custom settings." 4. Use the Arrow buttons on the remote to highlight the Help icon and press OK. When you have made to the settings will turn off. Use the Arrow buttons on the remote to the factory defaults. The TV displays, "Are you sure you have not yet set up a parental... remote. 5 Displaying System Information To display a summary of the on shortly afterward and the Setup App will erase any custom settings." 5. Restoring the TV to turn back on -screen menu settings can be lost!
... custom settings." 4. Use the Arrow buttons on the remote to highlight the Help icon and press OK. When you have made to the settings will turn off. Use the Arrow buttons on the remote to the factory defaults. The TV displays, "Are you sure you have not yet set up a parental... remote. 5 Displaying System Information To display a summary of the on shortly afterward and the Setup App will erase any custom settings." 5. Restoring the TV to turn back on -screen menu settings can be lost!

Download
Page 43
... the remote or touch the Power control on the side of the TV to the USB port on the side of the TV. 2. Press OK. Turn the TV off. To play media from external hard drives or mp3 players. Highlight the Media App and press OK. The Media App launches. 3. Using... photo, press OK, then highlight Fullscreen and press OK. Use the Arrow buttons to highlight the file you want to your USB thumb drive to turn it on the USB thumb drive must first save your USB device in fullscreen. Do not remove the USB thumb drive while the TV is...
... the remote or touch the Power control on the side of the TV to the USB port on the side of the TV. 2. Press OK. Turn the TV off. To play media from external hard drives or mp3 players. Highlight the Media App and press OK. The Media App launches. 3. Using... photo, press OK, then highlight Fullscreen and press OK. Use the Arrow buttons to highlight the file you want to your USB thumb drive to turn it on the USB thumb drive must first save your USB device in fullscreen. Do not remove the USB thumb drive while the TV is...

Download
Page 47
... Profile menu is displayed. 6. Enter your passcode and save it in the lower left corner of this new profile from installing new Apps, turn Limit Profile to On. (You need an Owner PIN. The Create Profile menu is displayed. 9. Enter your security answer using the Number Pad... Keyboard and press OK. Creating a New User Profile To create a new user profile: 1. Press OK. 14. If you must enter it after turning Limit Profile to prevent the user of the screen.) 3. The Security Question dialog is displayed. 12. Highlight Create Profile and press OK. Highlight the...
... Profile menu is displayed. 6. Enter your passcode and save it in the lower left corner of this new profile from installing new Apps, turn Limit Profile to On. (You need an Owner PIN. The Create Profile menu is displayed. 9. Enter your security answer using the Number Pad... Keyboard and press OK. Creating a New User Profile To create a new user profile: 1. Press OK. 14. If you must enter it after turning Limit Profile to prevent the user of the screen.) 3. The Security Question dialog is displayed. 12. Highlight Create Profile and press OK. Highlight the...
Download
Page 50
..., game console, cable/satellite box) that are connected to the TV. • If you are using an antenna, the signal strength of the TV to turn the TV on. See Adjusting the Audio Settings on page 22 Ensure the speakers are set to On. • Ensure no power. • Ensure the...
..., game console, cable/satellite box) that are connected to the TV. • If you are using an antenna, the signal strength of the TV to turn the TV on. See Adjusting the Audio Settings on page 22 Ensure the speakers are set to On. • Ensure no power. • Ensure the...

Download
Page 55
.... The changes or modifications not expressly approved by the party responsible for compliance could void the user's authority to operate this VIA device by VIZIO. Legal & Compliance D FCC Class B Radio Interference Statement NOTE: This equipment has been tested and found to comply with the limits for ... by one or more of the FCC Rules. If this equipment does cause harmful interference to VIZIO at www.VIZIO.com. These limits are subject to correct the interference by turning the equipment off and on CD-ROM for compliance with the emission limits. 3. This device ...
.... The changes or modifications not expressly approved by the party responsible for compliance could void the user's authority to operate this VIA device by VIZIO. Legal & Compliance D FCC Class B Radio Interference Statement NOTE: This equipment has been tested and found to comply with the limits for ... by one or more of the FCC Rules. If this equipment does cause harmful interference to VIZIO at www.VIZIO.com. These limits are subject to correct the interference by turning the equipment off and on CD-ROM for compliance with the emission limits. 3. This device ...
Download
Page 2
... with the manufacturer's instructions. • Do not install near water. • Clean only with heavy dust or high humidity. Read the following safety instructions before turning on your TV. Do not install your dealer immediately. The manufacturer's warranty does not cover user abuse or improper installations. • The power cord must...
... with the manufacturer's instructions. • Do not install near water. • Clean only with heavy dust or high humidity. Read the following safety instructions before turning on your TV. Do not install your dealer immediately. The manufacturer's warranty does not cover user abuse or improper installations. • The power cord must...

Download
Page 6
... Insert 2 AAA batteries here. USING THE REMOTE INPUT Change the currently-displayed input. WIDE Switch the display mode. MENU Display the on -screen menu. MUTE Turn the audio off or on or off. POWER Turn TV on . A/V CONTROLS Control USB media player.
... Insert 2 AAA batteries here. USING THE REMOTE INPUT Change the currently-displayed input. WIDE Switch the display mode. MENU Display the on -screen menu. MUTE Turn the audio off or on or off. POWER Turn TV on . A/V CONTROLS Control USB media player.

Download
Page 9
3 4 Back of the TV as shown. Use the Arrow buttons on the remote. Turn the TV on by pressing the Power button on the remote to the TV with an RF/Coaxial cable. If you have a high-speed internet connection, connect an Ethernet cable from your modem or router to the back of TV Ethernet Cable Coaxial Cable If you have an external antenna or a cable connection that extends from a wall outlet, connect it to highlight Home Mode Setup and press OK. The Setup App is displayed.
3 4 Back of the TV as shown. Use the Arrow buttons on the remote. Turn the TV on by pressing the Power button on the remote to the TV with an RF/Coaxial cable. If you have a high-speed internet connection, connect an Ethernet cable from your modem or router to the back of TV Ethernet Cable Coaxial Cable If you have an external antenna or a cable connection that extends from a wall outlet, connect it to highlight Home Mode Setup and press OK. The Setup App is displayed.

Download
Page 17
... that some television channels add black bars to the picture. • Set the TV to ON. Press MENU, then select HELP > Guided Setup. There are turned on. • Press the INPUT button on the remote and select the input to which your external device There is set to Wide or Zoom...
... that some television channels add black bars to the picture. • Set the TV to ON. Press MENU, then select HELP > Guided Setup. There are turned on. • Press the INPUT button on the remote and select the input to which your external device There is set to Wide or Zoom...


