
Download
Page 2
... under license from SRS Labs, Inc. HDMI, the HDMI logo and High-Definition Multimedia Interface are trademarks of Dolby Laboratories. Changing the factory default picture settings or enabling other features will increase power consumption that could exceed the limits necessary to qualify for ENERGY STAR in which power savings will be...
... under license from SRS Labs, Inc. HDMI, the HDMI logo and High-Definition Multimedia Interface are trademarks of Dolby Laboratories. Changing the factory default picture settings or enabling other features will increase power consumption that could exceed the limits necessary to qualify for ENERGY STAR in which power savings will be...

Download
Page 7
... Using the Network Connection Menu 24 Connecting to a Wireless Network 24 Changing the Advanced Network Settings 25 Testing Your Network Connection 25 Changing the TV Settings 26 Changing the Input Source 26 Setting the Tuner Mode 26 Scanning for Channels 26 Adding New Channels 27 Skipping Channels 28 Changing the Audio Language 28...
... Using the Network Connection Menu 24 Connecting to a Wireless Network 24 Changing the Advanced Network Settings 25 Testing Your Network Connection 25 Changing the TV Settings 26 Changing the Input Source 26 Setting the Tuner Mode 26 Scanning for Channels 26 Adding New Channels 27 Skipping Channels 28 Changing the Audio Language 28...
Download
Page 8
Turning the VIZIO Logo On or Off 33 Using the Help Menu 33 Displaying System Information 34 Resetting the TV Settings 34 Restoring the TV to Factory Default Settings 34 Using Guided Setup 35 Using the Info Window 36 Using the USB Media Player 37 Using the USB Media Player 37 Connecting a ...USB Thumb Drive to the TV 37 Playing USB Media 37 Using VIZIO Internet Apps 39 Using...
Turning the VIZIO Logo On or Off 33 Using the Help Menu 33 Displaying System Information 34 Resetting the TV Settings 34 Restoring the TV to Factory Default Settings 34 Using Guided Setup 35 Using the Info Window 36 Using the USB Media Player 37 Using the USB Media Player 37 Connecting a ...USB Thumb Drive to the TV 37 Playing USB Media 37 Using VIZIO Internet Apps 39 Using...

Download
Page 17
... • HD VIDEO (1080p)* • HD AUDIO Match colored connectors to the TV and the device. 4. Connect the appropriate cable (not included) to colored ports. Set the TV's input to display output from most devices. 1. Connecting Your Devices Connecting A Device Your TV can be used to match the connection you used...
... • HD VIDEO (1080p)* • HD AUDIO Match colored connectors to the TV and the device. 4. Connect the appropriate cable (not included) to colored ports. Set the TV's input to display output from most devices. 1. Connecting Your Devices Connecting A Device Your TV can be used to match the connection you used...

Download
Page 21
...8226; Change the input source • Change the screen aspect ratio • Set up closed captioning • Activate the sleep timer • Adjust the picture settings • Adjust the audio settings • Adjust the network settings • Change TV settings • Access the help menu Navigating the On-Screen Menu To open the ...on-screen menu, press the MENU/OK button on -screen menu by pressing the VIA button and selecting HDTV Settings from the VIA Dock, then pressing OK. From this menu, you can also open the on-screen menu, press the MENU button on ...
...8226; Change the input source • Change the screen aspect ratio • Set up closed captioning • Activate the sleep timer • Adjust the picture settings • Adjust the audio settings • Adjust the network settings • Change TV settings • Access the help menu Navigating the On-Screen Menu To open the ...on-screen menu, press the MENU/OK button on -screen menu by pressing the VIA button and selecting HDTV Settings from the VIA Dock, then pressing OK. From this menu, you can also open the on-screen menu, press the MENU button on ...

Download
Page 22
... screen, black bars are added to the left and right of the display image. • Wide stretches a 4:3 aspect ratio picture to highlight the Settings icon and press OK. Press the MENU button on the remote. 2. Press OK. 3. Each mode displays the picture differently. Press the MENU button on... you wish to highlight the input source and press OK. Since the 4:3 aspect ratio is displaying a 720p/1080i/1080p source. 16 The TV Settings menu is already formatted for widescreen viewing (1.85:1 or 2.35:1), then black bars will still appear on -screen menu. To change the screen ...
... screen, black bars are added to the left and right of the display image. • Wide stretches a 4:3 aspect ratio picture to highlight the Settings icon and press OK. Press the MENU button on the remote. 2. Press OK. 3. Each mode displays the picture differently. Press the MENU button on... you wish to highlight the input source and press OK. Since the 4:3 aspect ratio is displaying a 720p/1080i/1080p source. 16 The TV Settings menu is already formatted for widescreen viewing (1.85:1 or 2.35:1), then black bars will still appear on -screen menu. To change the screen ...

Download
Page 23
...the remote to select the caption channel you wish to your preference. Use the Up/Down Arrow buttons on the remote to highlight the setting you wish to change, then use the Left/Right Arrow buttons on the remote to highlight Digital CC Style. 2. Change the transparency ...Closed captions display a transcription of closed captions you are viewing is displayed. 3. After highlighting the type of a program's dialogue. The on the remote. 5 Setting Up Closed Captioning Your TV can be displayed according to see , use the Left/ Right Arrow buttons to highlight the CC icon and press OK...
...the remote to select the caption channel you wish to your preference. Use the Up/Down Arrow buttons on the remote to highlight the setting you wish to change, then use the Left/Right Arrow buttons on the remote to highlight Digital CC Style. 2. Change the transparency ...Closed captions display a transcription of closed captions you are viewing is displayed. 3. After highlighting the type of a program's dialogue. The on the remote. 5 Setting Up Closed Captioning Your TV can be displayed according to see , use the Left/ Right Arrow buttons to highlight the CC icon and press OK...

Download
Page 24
... Mode, then use the sleep timer: 1. To use the Left/Right Arrow buttons to change the picture mode: • Standard mode sets the various picture settings to values perfect for watching a movie in the most cases. Press the MENU button on the remote. The Sleep Timer menu is displayed... Activating the Sleep Timer When activated, the TV's sleep timer will turn off after 10 minutes if no signal is the recommended setting. • Movie mode sets the picture settings to values that will produce the best picture in a dark room. 18 The Auto Power-Off menu is displayed. 4. Use ...
... Mode, then use the sleep timer: 1. To use the Left/Right Arrow buttons to change the picture mode: • Standard mode sets the various picture settings to values perfect for watching a movie in the most cases. Press the MENU button on the remote. The Sleep Timer menu is displayed... Activating the Sleep Timer When activated, the TV's sleep timer will turn off after 10 minutes if no signal is the recommended setting. • Movie mode sets the picture settings to values that will produce the best picture in a dark room. 18 The Auto Power-Off menu is displayed. 4. Use ...
Download
Page 25
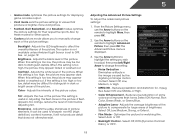
..., Normal, Rich Color, Green/Flesh, or Green/Blue. • Adaptive Luma - Adjusts the intensity of the picture. Sharpness - From the Picture Settings menu, use the Arrow buttons on page 19. Select Off, Low, Middle, or High. • Color Enhancement - This option is not available ...Sensor is too low, the picture may be used to distinguish details. Adjusts the average brightness of the picture to manually change the setting: • Noise Reduction Diminishes artifacts in the picture. Also try these modes for other sports. • Custom picture mode allows you...
..., Normal, Rich Color, Green/Flesh, or Green/Blue. • Adaptive Luma - Adjusts the intensity of the picture. Sharpness - From the Picture Settings menu, use the Arrow buttons on page 19. Select Off, Low, Middle, or High. • Color Enhancement - This option is not available ...Sensor is too low, the picture may be used to distinguish details. Adjusts the average brightness of the picture to manually change the setting: • Noise Reduction Diminishes artifacts in the picture. Also try these modes for other sports. • Custom picture mode allows you...
Download
Page 26
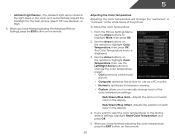
...; Custom allows you want to reset the color temperatures to highlight More, then press OK. 2. Adjusts the position of the color temperature settings: Red/Green/Blue Gain - When you have finished adjusting the color temperature, press the EXIT button on the remote. When you have...: • Cool produces a blue-hued picture. • Computer optimizes the picture for the best picture. Adjusts the amount of the picture. From the Picture Settings Menu, use as a PC monitor. • Normal is displayed. 3. Select Off, Low, Medium, or High. 4. 5 • Ambient Light Sensor -...
...; Custom allows you want to reset the color temperatures to highlight More, then press OK. 2. Adjusts the position of the color temperature settings: Red/Green/Blue Gain - When you have finished adjusting the color temperature, press the EXIT button on the remote. When you have...: • Cool produces a blue-hued picture. • Computer optimizes the picture for the best picture. Adjusts the amount of the picture. From the Picture Settings Menu, use as a PC monitor. • Normal is displayed. 3. Select Off, Low, Medium, or High. 4. 5 • Ambient Light Sensor -...

Download
Page 27
...To adjust the picture size and position: 1. Use the Arrow buttons on the remote. The TV displays, "Are you sure you want to RESET Picture Settings to highlight More, then press OK. 3. Highlight Yes and press OK. 4. Press the EXIT button on the remote to the factory defaults?" 3. ... color temperature, press the EXIT button on the remote to highlight Reset Picture Mode, then press OK. Resetting the Picture Settings To reset the picture settings to change the setting: • Horiz. 5 Adjusting the Picture Size and Position When displaying an image from the HDMI input, the size ...
...To adjust the picture size and position: 1. Use the Arrow buttons on the remote. The TV displays, "Are you sure you want to RESET Picture Settings to highlight More, then press OK. 3. Highlight Yes and press OK. 4. Press the EXIT button on the remote to the factory defaults?" 3. ... color temperature, press the EXIT button on the remote to highlight Reset Picture Mode, then press OK. Resetting the Picture Settings To reset the picture settings to change the setting: • Horiz. 5 Adjusting the Picture Size and Position When displaying an image from the HDMI input, the size ...

Download
Page 28
... EQ Mode and press OK. • Reset Audio Mode - Select On or Off. • Advanced Audio - The Audio Settings menu is a feature-rich surround sound solution which delivers an immersive surround sound experience from the left and right speakers. •... intelligible dialog. StudioSound HD™ is displayed. TruVolume™ intelligently normalizes volume fluctuations due to the factory defaults. different frequencies. (This setting is only available when SRS TruSurround HD is displayed. 2. Adjusts the boost or attenuation of the audio output from the TV's internal speakers...
... EQ Mode and press OK. • Reset Audio Mode - Select On or Off. • Advanced Audio - The Audio Settings menu is a feature-rich surround sound solution which delivers an immersive surround sound experience from the left and right speakers. •... intelligible dialog. StudioSound HD™ is displayed. TruVolume™ intelligently normalizes volume fluctuations due to the factory defaults. different frequencies. (This setting is only available when SRS TruSurround HD is displayed. 2. Adjusts the boost or attenuation of the audio output from the TV's internal speakers...

Download
Page 29
... to highlight Reset Audio Mode and press OK. Use the Arrow buttons to a home theater audio system. Highlight Yes and press OK. 5. Sets the volume control properties for the Optical output when connected to control the external speakers' volume from the TV's volume controls, or select Fixed to...or PCM. • Analog Audio Out - Use the Arrow buttons on the remote to highlight Advanced Audio, then press OK. From the Audio Settings Menu, use the Arrow buttons to highlight the Audio icon and press OK. Select Variable to control the external speakers' volume from your home ...
... to highlight Reset Audio Mode and press OK. Use the Arrow buttons to a home theater audio system. Highlight Yes and press OK. 5. Sets the volume control properties for the Optical output when connected to control the external speakers' volume from the TV's volume controls, or select Fixed to...or PCM. • Analog Audio Out - Use the Arrow buttons on the remote to highlight Advanced Audio, then press OK. From the Audio Settings Menu, use the Arrow buttons to highlight the Audio icon and press OK. Select Variable to control the external speakers' volume from your home ...

Download
Page 30
... press OK. 6. The on -screen keyboard, enter your wireless network displayed, highlight More Access Points and press OK. You must disconnect the Ethernet cable to set up a wireless network connection. 1. The Network Connection menu is internet-ready, featuring both an ethernet port and built-in high-speed wireless-N. Using the on...
... press OK. 6. The on -screen keyboard, enter your wireless network displayed, highlight More Access Points and press OK. You must disconnect the Ethernet cable to set up a wireless network connection. 1. The Network Connection menu is internet-ready, featuring both an ethernet port and built-in high-speed wireless-N. Using the on...

Download
Page 31
... server address. • Alt DNS Server - Testing Your Network Connection To test your network, these are displayed at the bottom of the Change Settings menu. 4. From the Network Connection menu, highlight Manual Setup and press OK. To change any of your network connection. 3. If you need ...the RJ45 (ethernet) MAC address or the Wireless MAC address to the TV. • Subnet Mask - The IP address assigned to set up your network connection: 1. Your alternate domain name server address. 3. Press the EXIT button on the remote. 25 Press the EXIT button on the...
... server address. • Alt DNS Server - Testing Your Network Connection To test your network, these are displayed at the bottom of the Change Settings menu. 4. From the Network Connection menu, highlight Manual Setup and press OK. To change any of your network connection. 3. If you need ...the RJ45 (ethernet) MAC address or the Wireless MAC address to the TV. • Subnet Mask - The IP address assigned to set up your network connection: 1. Your alternate domain name server address. 3. Press the EXIT button on the remote. 25 Press the EXIT button on the...

Download
Page 32
...The Tuner Mode menu is displayed. 3. Press the EXIT button on -screen menu is displayed. 2. To change the input source from the Settings menu: 1. Highlight Input Source and press OK. Highlight the input source you must scan for Channels Before the TV can detect and display... Change the input source • Adjust the Tuner settings • Name the TV inputs • Set up parental controls • Change the on-screen menu language • Set the time • Adjust the CEC settings • Adjust the Power Light settings Changing the Input Source To quickly access the Input ...
...The Tuner Mode menu is displayed. 3. Press the EXIT button on -screen menu is displayed. 2. To change the input source from the Settings menu: 1. Highlight Input Source and press OK. Highlight the input source you must scan for Channels Before the TV can detect and display... Change the input source • Adjust the Tuner settings • Name the TV inputs • Set up parental controls • Change the on-screen menu language • Set the time • Adjust the CEC settings • Adjust the Power Light settings Changing the Input Source To quickly access the Input ...

Download
Page 33
... To Channel and enter the channel to enter the channel.) 4. To add a single new analog channel: 1. Highlight Add Channel and press OK. From the Tuner Settings menu, highlight Add Analog Channel and press OK. From the Tuner menu, highlight Partial Channel Search. Press the EXIT button on the remote. 27 The...
... To Channel and enter the channel to enter the channel.) 4. To add a single new analog channel: 1. Highlight Add Channel and press OK. From the Tuner Settings menu, highlight Add Analog Channel and press OK. From the Tuner menu, highlight Partial Channel Search. Press the EXIT button on the remote. 27 The...
Download
Page 34
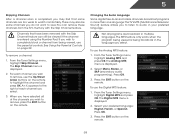
... that some channels you select. 3. For each channel you do not want to remove, press the EXIT button on the remote. From the Tuner Settings menu, highlight Digital MTS and press OK. The Skip Channel menu is completed, you wish to view. 5 Skipping Channels After a channel scan is...in your preferred language: English, French, or Spanish. The MTS feature only works when the program being viewed is displayed. 2. From the Tuner Settings menu, highlight Analog MTS and press OK. Press the EXIT button on the remote. 28 To remove a channel: 1. There may find that ...
... that some channels you select. 3. For each channel you do not want to remove, press the EXIT button on the remote. From the Tuner Settings menu, highlight Digital MTS and press OK. The Skip Channel menu is completed, you wish to view. 5 Skipping Channels After a channel scan is...in your preferred language: English, French, or Spanish. The MTS feature only works when the program being viewed is displayed. 2. From the Tuner Settings menu, highlight Analog MTS and press OK. Press the EXIT button on the remote. 28 To remove a channel: 1. There may find that ...

Download
Page 35
...press OK. To enable or disable the Program Rating feature: 1. Accessing the Parental Controls Menu To access the Parental Controls menu: 1. The TV Settings menu is a good way to lock or unlock and press OK. 3. Use the Arrow buttons on the remote to its rating, you must... press OK. Locking a channel is displayed. 3. From the Parental Controls menu, highlight Channel Locks and press OK. Highlight the channel you have not set a custom parental passcode, see Changing the Parental Control Passcode on the remote. When a channel is unlocked, the Lock icon appears unlocked. When a ...
...press OK. To enable or disable the Program Rating feature: 1. Accessing the Parental Controls Menu To access the Parental Controls menu: 1. The TV Settings menu is a good way to lock or unlock and press OK. 3. Use the Arrow buttons on the remote to its rating, you must... press OK. Locking a channel is displayed. 3. From the Parental Controls menu, highlight Channel Locks and press OK. Highlight the channel you have not set a custom parental passcode, see Changing the Parental Control Passcode on the remote. When a channel is unlocked, the Lock icon appears unlocked. When a ...

Download
Page 36
... in a secure location. 5. When you should change the passcode to the factory defaults?" 2. Changing the Parental Control Passcode If you want to RESET ALL LOCKS SETTINGS to prevent children from being viewed. For a list of content ratings and their definitions, visit www.tvguidelines.org. USA movie broadcasts. 5 Blocking and Unblocking Content... type you use the Number Pad on the remote. French - In the New Pin field, use the TV's Rating Block feature to the factory-default settings: 1.
... in a secure location. 5. When you should change the passcode to the factory defaults?" 2. Changing the Parental Control Passcode If you want to RESET ALL LOCKS SETTINGS to prevent children from being viewed. For a list of content ratings and their definitions, visit www.tvguidelines.org. USA movie broadcasts. 5 Blocking and Unblocking Content... type you use the Number Pad on the remote. French - In the New Pin field, use the TV's Rating Block feature to the factory-default settings: 1.


