
E3D470VX Quick Start Guide
Page 3
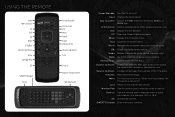
... the loudness of the button, the channel will increase or decrease by one. Mute: Turn the sound off or on -screen menu and episode guide. Dash (-): Use with number pad to the channel last viewed. Info: Display the Info Window. CC: Open the Closed Captioning menu. VIA Shortcuts: ...only). Exit: Close the on or off . With each press of the TV's audio. App Launcher: Launch the VOD (VIZIO On-Demand), Netflix, or VUDU App. Menu: Display the on -screen menu options. Guide: Display the episode guide (digital channels only). Back: Go to manually enter a channel. V Button: ...
... the loudness of the button, the channel will increase or decrease by one. Mute: Turn the sound off or on -screen menu and episode guide. Dash (-): Use with number pad to the channel last viewed. Info: Display the Info Window. CC: Open the Closed Captioning menu. VIA Shortcuts: ...only). Exit: Close the on or off . With each press of the TV's audio. App Launcher: Launch the VOD (VIZIO On-Demand), Netflix, or VUDU App. Menu: Display the on -screen menu options. Guide: Display the episode guide (digital channels only). Back: Go to manually enter a channel. V Button: ...
E3D470VX Quick Start Guide
Page 9
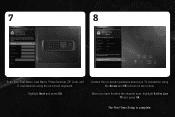
Highlight Next and press OK. 7 8 Enter your TV connection using the on the remote. When you have finished the channel scan, highlight Exit to Live TV and press OK. The First-Time Setup is complete. Answer the on-screen questions about your First Name, Last Name, Phone Number, ZIP Code, and E-mail Address using the Arrow and OK buttons on -screen keyboard.
Highlight Next and press OK. 7 8 Enter your TV connection using the on the remote. When you have finished the channel scan, highlight Exit to Live TV and press OK. The First-Time Setup is complete. Answer the on-screen questions about your First Name, Last Name, Phone Number, ZIP Code, and E-mail Address using the Arrow and OK buttons on -screen keyboard.

E3D420VX User Manual
Page 14
..., the TV's audio is turned off or on -screen menu options. Exit: Close the on -screen menu and episode guide. OK: Select highlighted menu option. VIA Shortcuts: Control VIZIO Internet Apps. V Button: Start VIA Internet Apps. Number Pad: Use the number pad to the previous on . Back: Go to ...3D content. Menu: Display the on or off. Input: Change the input device. E3D320VX / E3D420VX / E3D470VX Remote Control Input App Launcher CC Exit OK Back V Button Volume Up/Down Mute Number Pad 3D QWERTY Keypad Arrow Power/Standby A/V Controls Info Menu Arrow Guide VIA Shortcuts Channel Up...
..., the TV's audio is turned off or on -screen menu options. Exit: Close the on -screen menu and episode guide. OK: Select highlighted menu option. VIA Shortcuts: Control VIZIO Internet Apps. V Button: Start VIA Internet Apps. Number Pad: Use the number pad to the previous on . Back: Go to ...3D content. Menu: Display the on or off. Input: Change the input device. E3D320VX / E3D420VX / E3D470VX Remote Control Input App Launcher CC Exit OK Back V Button Volume Up/Down Mute Number Pad 3D QWERTY Keypad Arrow Power/Standby A/V Controls Info Menu Arrow Guide VIA Shortcuts Channel Up...

E3D420VX User Manual
Page 19
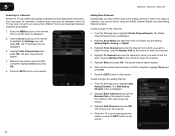
... to the ethernet port on the remote to get your First Name, Last Name, Phone Number, ZIP Code, and E-mail Address using the on page 1. • Your devices should be connected. When you can skip this screen. To complete the first-time setup: 1. Enter the network key using the Arrow and ...OK buttons on the remote to Live TV and press OK. TV Widgets. The TV powers on -screen keyboard, then highlight Connect and press OK. Before you are finished, highlight Next and press OK. 10 7. See Connecting Your Devices on page 7. • ...
... to the ethernet port on the remote to get your First Name, Last Name, Phone Number, ZIP Code, and E-mail Address using the on page 1. • Your devices should be connected. When you can skip this screen. To complete the first-time setup: 1. Enter the network key using the Arrow and ...OK buttons on the remote to Live TV and press OK. TV Widgets. The TV powers on -screen keyboard, then highlight Connect and press OK. Before you are finished, highlight Next and press OK. 10 7. See Connecting Your Devices on page 7. • ...
E3D420VX User Manual
Page 31
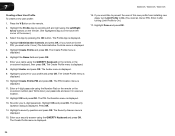
...Channel Search. Press the EXIT button on the remote. Highlight Enter Channel # and use the Number Pad on the remote to enter the channel.) 5. When the TV is displayed. 2. The on-screen menu is 100% complete. The auto channel scan begins. 4. Wait until the partial channel search... is displayed. 2. Highlight Done and press OK. 7. To add a single new analog channel: 1. 5 E3D320VX / E3D420VX / E3D470VX Scanning for Channels Before the TV can ...
...Channel Search. Press the EXIT button on the remote. Highlight Enter Channel # and use the Number Pad on the remote to enter the channel.) 5. When the TV is displayed. 2. The on-screen menu is 100% complete. The auto channel scan begins. 4. Wait until the partial channel search... is displayed. 2. Highlight Done and press OK. 7. To add a single new analog channel: 1. 5 E3D320VX / E3D420VX / E3D470VX Scanning for Channels Before the TV can ...

E3D420VX User Manual
Page 44
...(The highlighted App is in the lower left and right using the Number Pad on the remote or the on the remote. (The highlighted App is displayed. 12. You can hold a total of the screen.) 3. Select the App by pressing the OK button. The Administrative Controls...2. Highlight Administrative Controls and press OK. Enter a 4-digit passcode using the Left/ Right Arrow buttons on -screen number pad. The Security Question dialog is displayed. 4. Highlight Done and press OK. 35 E3D320VX / E3D420VX / E3D470VX 7 Adding a New App to the VIA Dock Though your passcode and save it in a secure...
...(The highlighted App is in the lower left and right using the Number Pad on the remote or the on the remote. (The highlighted App is displayed. 12. You can hold a total of the screen.) 3. Select the App by pressing the OK button. The Administrative Controls...2. Highlight Administrative Controls and press OK. Enter a 4-digit passcode using the Left/ Right Arrow buttons on -screen number pad. The Security Question dialog is displayed. 4. Highlight Done and press OK. 35 E3D320VX / E3D420VX / E3D470VX 7 Adding a New App to the VIA Dock Though your passcode and save it in a secure...
E3D420VX User Manual
Page 45
...and press OK. (If you have an Owner PIN, you would like to prevent the user of the screen.) 3. Highlight Create Profile and press OK. Highlight Avatar and press OK. The PIN Creation menu is displayed...Enter it in the lower left and right using the QWERTY Keyboard on the remote or the on -screen number pad. Select the App by scrolling left corner of this new profile from installing new Apps, turn ...Highlight a picture for your 4-digit passcode. The Security Question dialog is displayed. 13. E3D320VX / E3D420VX / E3D470VX 16. The PIN Confirmation menu is displayed.
...and press OK. (If you have an Owner PIN, you would like to prevent the user of the screen.) 3. Highlight Create Profile and press OK. Highlight Avatar and press OK. The PIN Creation menu is displayed...Enter it in the lower left and right using the QWERTY Keyboard on the remote or the on -screen number pad. Select the App by scrolling left corner of this new profile from installing new Apps, turn ...Highlight a picture for your 4-digit passcode. The Security Question dialog is displayed. 13. E3D320VX / E3D420VX / E3D470VX 16. The PIN Confirmation menu is displayed.


