E3D420VX User Manual
Page 8
... TV for 3D Viewing 3 Incorrect 3D Viewing Distance and Angle 3 Correct 3D Viewing Distance and Angle 3 Controls and Connections 4 Rear Panel 4 Left Side Panel 4 Remote Control 5 VIA Shortcut Buttons 6 Replacing the Batteries 6 Front Panel 6 Connecting Your Devices 7 Before You Begin 7 Connecting Your Devices 7 Setting Up Your Network Connection 9 Connecting to A Wired Network 9 Connecting... the Names of the Inputs 26 Changing the On-Screen Menu Language 26 Setting the Time Zone 27 Adjusting the CEC Settings 27 Turning the VIZIO Logo On or Off 28
... TV for 3D Viewing 3 Incorrect 3D Viewing Distance and Angle 3 Correct 3D Viewing Distance and Angle 3 Controls and Connections 4 Rear Panel 4 Left Side Panel 4 Remote Control 5 VIA Shortcut Buttons 6 Replacing the Batteries 6 Front Panel 6 Connecting Your Devices 7 Before You Begin 7 Connecting Your Devices 7 Setting Up Your Network Connection 9 Connecting to A Wired Network 9 Connecting... the Names of the Inputs 26 Changing the On-Screen Menu Language 26 Setting the Time Zone 27 Adjusting the CEC Settings 27 Turning the VIZIO Logo On or Off 28
E3D420VX User Manual
Page 13
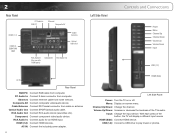
...: Change the input device. Optical Audio Out: Connect SPDIF/Optical audio cable. AC IN: Connect the included power adapter. 4 HDMI (Side) Left Side Panel Power: Turn the TV on -screen menu. Menu: Display on or off. Volume Up/Down: Increase or decrease the loudness of the button, the TV...or antenna. Component: Connect component video/audio device. Channel Up/Down: Change the channel. RCA Audio In: Connect audio for an HDMI input. 2 Rear Panel HDMI (1, 2) HDMI (3) E3D470VX ONLY PC Audio In RGB PC Ethernet Composite AV Cable/ Antenna Optical Audio Out RCA Audio In (For use with HDMI ...
...: Change the input device. Optical Audio Out: Connect SPDIF/Optical audio cable. AC IN: Connect the included power adapter. 4 HDMI (Side) Left Side Panel Power: Turn the TV on -screen menu. Menu: Display on or off. Volume Up/Down: Increase or decrease the loudness of the button, the TV...or antenna. Component: Connect component video/audio device. Channel Up/Down: Change the channel. RCA Audio In: Connect audio for an HDMI input. 2 Rear Panel HDMI (1, 2) HDMI (3) E3D470VX ONLY PC Audio In RGB PC Ethernet Composite AV Cable/ Antenna Optical Audio Out RCA Audio In (For use with HDMI ...
E3D420VX User Manual
Page 15
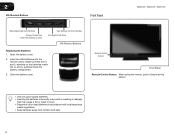
Insert two AAA batteries into the remote control. Open the battery cover. 2. 2 VIA Shortcut Buttons Front Panel E3D320VX / E3D420VX / E3D470VX Move/Delete App from children and pets. 6 Close the battery cover. Remote Control Sensor Front Panel Remote Control Sensor: When using the remote, point it directly at this sensor. • Use only good quality...
Insert two AAA batteries into the remote control. Open the battery cover. 2. 2 VIA Shortcut Buttons Front Panel E3D320VX / E3D420VX / E3D470VX Move/Delete App from children and pets. 6 Close the battery cover. Remote Control Sensor Front Panel Remote Control Sensor: When using the remote, point it directly at this sensor. • Use only good quality...
E3D420VX User Manual
Page 18
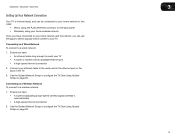
... page 29. 9 Use the Guided Network Setup to configure the TV. See Using Guided Setup on the back of the TV. 3. E3D320VX / E3D420VX / E3D470VX 3 Setting Up Your Network Connection Your TV is internet-ready, and can use VIA apps to deliver popular online content to your TV.... Use the Guided Network Setup to configure the TV. See Using Guided Setup on the back panel • Wirelessly, using your home wireless network Once you have : • A router broadcasting a high-speed wireless signal (wireless-n recommended) • A high...
... page 29. 9 Use the Guided Network Setup to configure the TV. See Using Guided Setup on the back of the TV. 3. E3D320VX / E3D420VX / E3D470VX 3 Setting Up Your Network Connection Your TV is internet-ready, and can use VIA apps to deliver popular online content to your TV.... Use the Guided Network Setup to configure the TV. See Using Guided Setup on the back panel • Wirelessly, using your home wireless network Once you have : • A router broadcasting a high-speed wireless signal (wireless-n recommended) • A high...
E3D420VX User Manual
Page 52
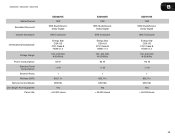
E3D320VX / E3D420VX / E3D470VX Watts/Channel Simulated Surround: Volume Normalizer: Certifications/Compliance: Voltage Range: Power Consumption: Standby Power Consumption: Ethernet Ports: Wireless (WiFi): Remote Control Model: Zero Bright Pixel Guarantee: Panel Life: E3D320VX 10W SRS StudioSound, Dolby Digital SRS TruVolume Energy Star CSA-...US FCC Class B HDMI v1.4 100~240 VAC @ 50/60Hz 64 W 50,000 Hours E3D420VX 10W SRS StudioSound, Dolby Digital SRS TruVolume...
E3D320VX / E3D420VX / E3D470VX Watts/Channel Simulated Surround: Volume Normalizer: Certifications/Compliance: Voltage Range: Power Consumption: Standby Power Consumption: Ethernet Ports: Wireless (WiFi): Remote Control Model: Zero Bright Pixel Guarantee: Panel Life: E3D320VX 10W SRS StudioSound, Dolby Digital SRS TruVolume Energy Star CSA-...US FCC Class B HDMI v1.4 100~240 VAC @ 50/60Hz 64 W 50,000 Hours E3D420VX 10W SRS StudioSound, Dolby Digital SRS TruVolume...


