E420VO QSG
Page 1
... XMF1300 XMT1200 / XMT500 *Tested and certified by pressing the Power button on a soft, flat surface. ® E320VL / E370VL / E420VL / E420VO / E470VL / E550VL LCD HDTV 1 BEFORE YOU BEGIN What's In the Box • VIZIO HDTV • VIZIO Remote Control (VR15 includes 2 AA batteries) (VUR13 includes 2 AAA batteries) • Power Cord • User Manual (read Safety...
... XMF1300 XMT1200 / XMT500 *Tested and certified by pressing the Power button on a soft, flat surface. ® E320VL / E370VL / E420VL / E420VO / E470VL / E550VL LCD HDTV 1 BEFORE YOU BEGIN What's In the Box • VIZIO HDTV • VIZIO Remote Control (VR15 includes 2 AA batteries) (VUR13 includes 2 AAA batteries) • Power Cord • User Manual (read Safety...

E420VO QSG
Page 2
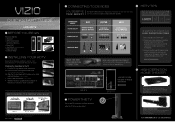
... Fig. 5 Please be noticeably inferior to HD because your Cable or Satellite provider to match your HDTV. 3. www.VIZIO.com HELP TOPICS PROGRAM YOUR CABLE OR SATELLITE REMOTE Call your digital flat panel TV has video that is supplying power. Make sure the AC power cord is ON ..., called Tuner Mode. it a second time but all of the image the TV is receiving. Enjoy the show. Press the MENU button. ® E320VL / E370VL / E420VL / E420VO / E470VL / E550VL LCD HDTV QUICKSTART GUIDE 5 SETUP (Cont.) Fig. 1 1. Once the scan is correct, highlight "AutoSearch", then press...
... Fig. 5 Please be noticeably inferior to HD because your Cable or Satellite provider to match your HDTV. 3. www.VIZIO.com HELP TOPICS PROGRAM YOUR CABLE OR SATELLITE REMOTE Call your digital flat panel TV has video that is supplying power. Make sure the AC power cord is ON ..., called Tuner Mode. it a second time but all of the image the TV is receiving. Enjoy the show. Press the MENU button. ® E320VL / E370VL / E420VL / E420VO / E470VL / E550VL LCD HDTV QUICKSTART GUIDE 5 SETUP (Cont.) Fig. 1 1. Once the scan is correct, highlight "AutoSearch", then press...
E320VL User Manual
Page 3
... wet hands. • Insert batteries in any way. This will not be used for long period of time. Do not expose your HDTV. VIZIO E320VL and E370VL User Manual • The wall socket should be installed near your HDTV and easily accessible. • Only power of the marked voltage can damage... the remote control or injure the operator. • If any of the following occurs, contact the dealer: o The power cord fails or frays. Any ...
... wet hands. • Insert batteries in any way. This will not be used for long period of time. Do not expose your HDTV. VIZIO E320VL and E370VL User Manual • The wall socket should be installed near your HDTV and easily accessible. • Only power of the marked voltage can damage... the remote control or injure the operator. • If any of the following occurs, contact the dealer: o The power cord fails or frays. Any ...
E320VL User Manual
Page 6
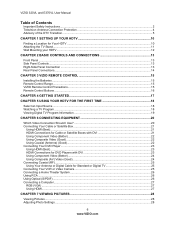
VIZIO 320VL and E370VL User Manual Table of Contents Important Safety Instructions...2 Television Antenna Connection Protection 4 Advisory of the DTV Transition...5 CHAPTER 1 SETTING UP YOUR HDTV 10 Finding a Location ... CONNECTIONS 13 Front Panel ...13 Side Panel Controls...13 Right-Side Panel Connection ...13 Rear Panel Connections...14 CHAPTER 3 VIZIO REMOTE CONTROL 15 Installing the Batteries ...15 Remote Control Range...15 VIZIO Remote Control Precautions...15 Remote Control Buttons ...16 CHAPTER 4 GETTING STARTED 17 CHAPTER 5 USING YOUR HDTV FOR THE FIRST TIME 18 Select an Input...
VIZIO 320VL and E370VL User Manual Table of Contents Important Safety Instructions...2 Television Antenna Connection Protection 4 Advisory of the DTV Transition...5 CHAPTER 1 SETTING UP YOUR HDTV 10 Finding a Location ... CONNECTIONS 13 Front Panel ...13 Side Panel Controls...13 Right-Side Panel Connection ...13 Rear Panel Connections...14 CHAPTER 3 VIZIO REMOTE CONTROL 15 Installing the Batteries ...15 Remote Control Range...15 VIZIO Remote Control Precautions...15 Remote Control Buttons ...16 CHAPTER 4 GETTING STARTED 17 CHAPTER 5 USING YOUR HDTV FOR THE FIRST TIME 18 Select an Input...

E320VL User Manual
Page 8
... AND TROUBLESHOOTING 43 Cleaning the TV and Remote Control ...43 Troubleshooting Guide ...43 Telephone & Technical Support ...46 Compliance...46 FCC Class B Radio Interference Statement 46 CHAPTER 10 SPECIFICATIONS 47 E320VL Specifications...47 E370VL Specifications...48 Preset PC Resolutions - E370VL 51 WARRANTY ...52 Index ...53 8 www.VIZIO.com E370VL ...51 Resolution through RGB Input - E320VL ...50...
... AND TROUBLESHOOTING 43 Cleaning the TV and Remote Control ...43 Troubleshooting Guide ...43 Telephone & Technical Support ...46 Compliance...46 FCC Class B Radio Interference Statement 46 CHAPTER 10 SPECIFICATIONS 47 E320VL Specifications...47 E370VL Specifications...48 Preset PC Resolutions - E370VL 51 WARRANTY ...52 Index ...53 8 www.VIZIO.com E370VL ...51 Resolution through RGB Input - E320VL ...50...
E320VL User Manual
Page 9
...or inquire about additional accessories and services for future shipping. Version 2/10/2010 9 www.VIZIO.com Package Contents • VIZIO E320VL or E370VL • VIZIO remote control VR15 • AA batteries for the remote control (2) • Power cord • Detachable base with the glass facing downwards ... separately, including: • Wall mounts • High Definition cables • Extra or replacement remote controls • Sound Bars • Blu-ray DVD Players VIZIO also offers installation services and extended warranty services for your HDTV is in a cardboard carton that...
...or inquire about additional accessories and services for future shipping. Version 2/10/2010 9 www.VIZIO.com Package Contents • VIZIO E320VL or E370VL • VIZIO remote control VR15 • AA batteries for the remote control (2) • Power cord • Detachable base with the glass facing downwards ... separately, including: • Wall mounts • High Definition cables • Extra or replacement remote controls • Sound Bars • Blu-ray DVD Players VIZIO also offers installation services and extended warranty services for your HDTV is in a cardboard carton that...
E320VL User Manual
Page 11
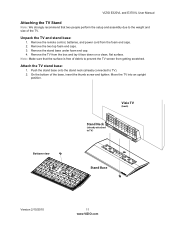
VIZIO E320VL and E370VL User Manual Attaching the TV Stand Note: We strongly recommend that the surface is free of debris to TV). 2. Remove the stand base under foam end cap. 4. Remove the TV from the foam end caps. 2. Remove the remote control, batteries, and power cord from the box and lay it face... the stand base onto the stand neck (already connected to prevent the TV screen from getting scratched. Unpack the TV and stand base: 1. Bottom view Vizio TV (back) Stand Neck (already attached to TV) Stand Base Version 2/10/2010 11 www...
VIZIO E320VL and E370VL User Manual Attaching the TV Stand Note: We strongly recommend that the surface is free of debris to TV). 2. Remove the stand base under foam end cap. 4. Remove the TV from the foam end caps. 2. Remove the remote control, batteries, and power cord from the box and lay it face... the stand base onto the stand neck (already connected to prevent the TV screen from getting scratched. Unpack the TV and stand base: 1. Bottom view Vizio TV (back) Stand Neck (already attached to TV) Stand Base Version 2/10/2010 11 www...
E320VL User Manual
Page 13
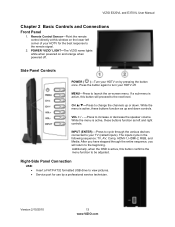
... various devices connected to launch the on the lower left and right controls. POWER 'VIZIO' LIGHT-The VIZIO name lights white when powered on by a professional service technician. The inputs cycle in..., you will proceed to be adjusted. Version 2/10/2010 13 www.VIZIO.com Remote Control Sensor-Point the remote control directly at this button confirms the menu function to the next level... the button again to change the channels up and down . VOL + / - -Press to the remote signal. 2. Right-Side Panel Connection USB: • Insert a FAT/FAT32 formatted USB drive to view...
... various devices connected to launch the on the lower left and right controls. POWER 'VIZIO' LIGHT-The VIZIO name lights white when powered on by a professional service technician. The inputs cycle in..., you will proceed to be adjusted. Version 2/10/2010 13 www.VIZIO.com Remote Control Sensor-Point the remote control directly at this button confirms the menu function to the next level... the button again to change the channels up and down . VOL + / - -Press to the remote signal. 2. Right-Side Panel Connection USB: • Insert a FAT/FAT32 formatted USB drive to view...
E320VL User Manual
Page 15
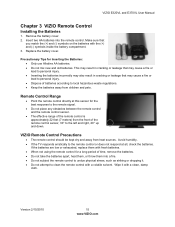
... and old batteries. Wipe it . • Do not attempt to local hazardous waste regulations. • Keep the batteries away from heat sources. VIZIO E320VL and E370VL User Manual Chapter 3 VIZIO Remote Control Installing the Batteries 1. Avoid humidity. • If the TV responds erratically to the left and right, 20° up and down. This...
... and old batteries. Wipe it . • Do not attempt to local hazardous waste regulations. • Keep the batteries away from heat sources. VIZIO E320VL and E370VL User Manual Chapter 3 VIZIO Remote Control Installing the Batteries 1. Avoid humidity. • If the TV responds erratically to the left and right, 20° up and down. This...
E320VL User Manual
Page 16
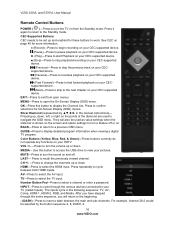
... off or on the screen and option settings to your CEC-supported device. Silver Diamond (represented by the button sequence 2, 8, DASH, 2. 16 www.VIZIO.com They will return to the beginning. - (DASH)-Press to work. GUIDE-Press to turn a feature off . MUTE-Press to display detailed program ... the On-Screen Display (OSD) menu. VOL +/- -Press to select the AV input. AV-Press to turn the TV on your pictures. VIZIO 320VL and E370VL User Manual Remote Control Buttons POWER ( )-Press to select a channel or enter a password. Number Button Pad-Press to turn the volume up , down . ...
... off or on the screen and option settings to your CEC-supported device. Silver Diamond (represented by the button sequence 2, 8, DASH, 2. 16 www.VIZIO.com They will return to the beginning. - (DASH)-Press to work. GUIDE-Press to turn a feature off . MUTE-Press to display detailed program ... the On-Screen Display (OSD) menu. VOL +/- -Press to select the AV input. AV-Press to turn the TV on your pictures. VIZIO 320VL and E370VL User Manual Remote Control Buttons POWER ( )-Press to select a channel or enter a password. Number Button Pad-Press to turn the volume up , down . ...
E320VL User Manual
Page 17
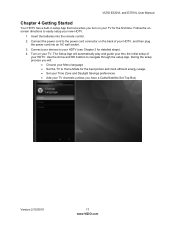
Connect the power cord to the power cord connector on the back of your HDTV. Connect your devices to navigate through the setup App. VIZIO E320VL and E370VL User Manual Chapter 4 Getting Started Your HDTV has a built-in setup App that runs when you will automatically play and guide your thru the ... cord into the remote control. 2. The Setup App will : • Choose your Menu language • Set the TV to easily setup your new HDTV. 1. Use the Arrow and OK buttons to your TV channels (unless you have a Cable/Satellite Set-Top Box) Version 2/10/2010 17 www.VIZIO.com Turn on...
Connect the power cord to the power cord connector on the back of your HDTV. Connect your devices to navigate through the setup App. VIZIO E320VL and E370VL User Manual Chapter 4 Getting Started Your HDTV has a built-in setup App that runs when you will automatically play and guide your thru the ... cord into the remote control. 2. The Setup App will : • Choose your Menu language • Set the TV to easily setup your new HDTV. 1. Use the Arrow and OK buttons to your TV channels (unless you have a Cable/Satellite Set-Top Box) Version 2/10/2010 17 www.VIZIO.com Turn on...
E320VL User Manual
Page 18
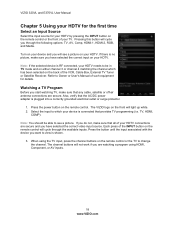
VIZIO 320VL and E370VL User Manual Chapter 5 Using your HDTV for the first time Select an Input Source Select the input source for details. The channel buttons will not work if you are secure and you have selected the correct input on the remote control will light up white. 2. Note: ...you want to which has been selected on your HDTV needs to change the channel. Refer to see a picture on the remote control. The VIZIO logo on the remote control or the front of your HDTV. Each press of such equipment for your HDTV by pressing the INPUT button on the ...
VIZIO 320VL and E370VL User Manual Chapter 5 Using your HDTV for the first time Select an Input Source Select the input source for details. The channel buttons will not work if you are secure and you have selected the correct input on the remote control will light up white. 2. Note: ...you want to which has been selected on your HDTV needs to change the channel. Refer to see a picture on the remote control. The VIZIO logo on the remote control or the front of your HDTV. Each press of such equipment for your HDTV by pressing the INPUT button on the ...
E320VL User Manual
Page 21
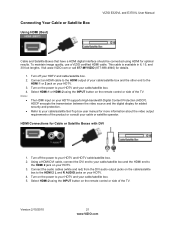
... your HDTV supports High-bandwidth Digital Content Protection (HDCP). Using a HDMI-DVI cable, connect the DVI end to the HDMI 2 jack on the remote control or side of the TV. Connect an HDMI cable to the HDMI output of your cable/satellite box and the other end to the... or call 877-MYVIZIO (877-698-4946) for optimal results. Turn off your HDTV. Connecting Your Cable or Satellite Box Using HDMI (Best) VIZIO E320VL and E370VL User Manual Cable and Satellite Boxes that have a HDMI digital interface should be connected using HDMI for details. 1. 2. 3. 4. Note: • • Turn off...
... your HDTV supports High-bandwidth Digital Content Protection (HDCP). Using a HDMI-DVI cable, connect the DVI end to the HDMI 2 jack on the remote control or side of the TV. Connect an HDMI cable to the HDMI output of your cable/satellite box and the other end to the... or call 877-MYVIZIO (877-698-4946) for optimal results. Turn off your HDTV. Connecting Your Cable or Satellite Box Using HDMI (Best) VIZIO E320VL and E370VL User Manual Cable and Satellite Boxes that have a HDMI digital interface should be connected using HDMI for details. 1. 2. 3. 4. Note: • • Turn off...
E320VL User Manual
Page 22
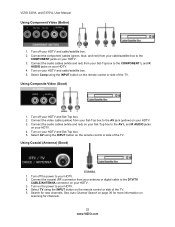
...and Set-Top box. 2. Turn off the power to the AV L and R AUDIO jacks on the remote control or side of the TV. 5. Select TV using the INPUT button on your HDTV. 4. VIZIO 320VL and E370VL User Manual Using Component Video (Better) 1. Connect the audio cables (white and red) from your Set-...Top box to your HDTV. 4. Turn on your HDTV. 3. See Auto Channel Search on page 36 for more information on the remote control or side of the TV...
...and Set-Top box. 2. Turn off the power to the AV L and R AUDIO jacks on the remote control or side of the TV. 5. Select TV using the INPUT button on your HDTV. 4. VIZIO 320VL and E370VL User Manual Using Component Video (Better) 1. Connect the audio cables (white and red) from your Set-...Top box to your HDTV. 4. Turn on your HDTV. 3. See Auto Channel Search on page 36 for more information on the remote control or side of the TV...
E320VL User Manual
Page 23
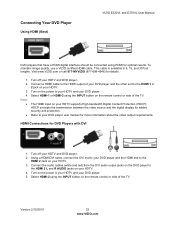
...off your DVD player. Select HDMI-2 using the INPUT button on the remote control or side of the TV. Select HDMI-1 or HDMI-2 using the INPUT button on the remote control or side of the TV. Visit www.VIZIO.com or call 877-MYVIZIO (877-698-4946) for DVD Players with ...DVI 1. HDMI Connections for details. 1. 2. 3. 4. Connecting Your DVD Player Using HDMI (Best) VIZIO E320VL and E370VL User Manual DVD players that have a ...
...off your DVD player. Select HDMI-2 using the INPUT button on the remote control or side of the TV. Select HDMI-1 or HDMI-2 using the INPUT button on the remote control or side of the TV. Visit www.VIZIO.com or call 877-MYVIZIO (877-698-4946) for DVD Players with ...DVI 1. HDMI Connections for details. 1. 2. 3. 4. Connecting Your DVD Player Using HDMI (Best) VIZIO E320VL and E370VL User Manual DVD players that have a ...
E320VL User Manual
Page 24
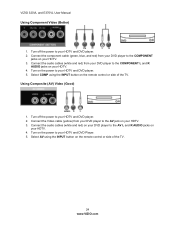
... using the INPUT button on your DVD player to the AV L and R AUDIO jacks on the remote control or side of the TV. 24 www.VIZIO.com Connect the Video cable (yellow) from your HDTV. 4. VIZIO 320VL and E370VL User Manual Using Component Video (Better) 1. Connect the component cable (green, blue, and red) from...
... using the INPUT button on your DVD player to the AV L and R AUDIO jacks on the remote control or side of the TV. 24 www.VIZIO.com Connect the Video cable (yellow) from your HDTV. 4. VIZIO 320VL and E370VL User Manual Using Component Video (Better) 1. Connect the component cable (green, blue, and red) from...
E320VL User Manual
Page 25
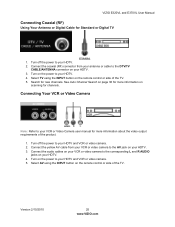
... INPUT button on your HDTV. 3. Connect the yellow AV cable from your antenna or cable to the DTV/TV CABLE/ANTENNA connector on the remote control or side of the TV. Select AV using the INPUT button on your HDTV. 4. Turn off the power to the corresponding L and... Standard or Digital TV 1. Turn on your HDTV. 4. Turn on scanning for more information about the video output requirements of the product. 1. VIZIO E320VL and E370VL User Manual Connecting Coaxial (RF) Using Your Antenna or Digital Cable for new channels. Connecting Your VCR or Video Camera Note: Refer to your...
... INPUT button on your HDTV. 3. Connect the yellow AV cable from your antenna or cable to the DTV/TV CABLE/ANTENNA connector on the remote control or side of the TV. Select AV using the INPUT button on your HDTV. 4. Turn off the power to the corresponding L and... Standard or Digital TV 1. Turn on your HDTV. 4. Turn on scanning for more information about the video output requirements of the product. 1. VIZIO E320VL and E370VL User Manual Connecting Coaxial (RF) Using Your Antenna or Digital Cable for new channels. Connecting Your VCR or Video Camera Note: Refer to your...
E320VL User Manual
Page 26
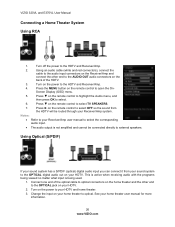
... matter what input is not amplified and cannot be routed through your HDTV. Turn on the power to the OPTICAL digital audio out on the remote control to select TV SPEAKERS. 7. Using Optical (S/PDIF) If your sound system has a S/PDIF (optical) digital audio input you can connect... the other end to the HDTV and Receiver/Amp. 2. Press the MENU button on the remote control to highlight the Audio menu, and then press OK to open the On- Press ▼ on the remote control to select. 6. VIZIO 320VL and E370VL User Manual Connecting a Home Theater System Using RCA 1.
... matter what input is not amplified and cannot be routed through your HDTV. Turn on the power to the OPTICAL digital audio out on the remote control to select TV SPEAKERS. 7. Using Optical (S/PDIF) If your sound system has a S/PDIF (optical) digital audio input you can connect... the other end to the HDTV and Receiver/Amp. 2. Press the MENU button on the remote control to highlight the Audio menu, and then press OK to open the On- Press ▼ on the remote control to select. 6. VIZIO 320VL and E370VL User Manual Connecting a Home Theater System Using RCA 1.
E320VL User Manual
Page 27
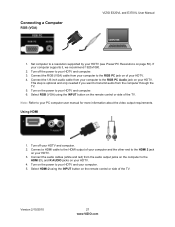
... your HDTV (see Preset PC Resolutions on the remote control or side of the TV. Note: Refer to a resolution supported by your HDTV and computer. 3. Turn off your computer. 5. Connecting a Computer RGB (VGA) VIZIO E320VL and E370VL User Manual COMPUTER 1. Using HDMI 1. Version 2/...10/2010 27 www.VIZIO.com Set computer to your HDTV. Connect the RGB (VGA) cable from the computer through the TV. ...
... your HDTV (see Preset PC Resolutions on the remote control or side of the TV. Note: Refer to a resolution supported by your HDTV and computer. 3. Turn off your computer. 5. Connecting a Computer RGB (VGA) VIZIO E320VL and E370VL User Manual COMPUTER 1. Using HDMI 1. Version 2/...10/2010 27 www.VIZIO.com Set computer to your HDTV. Connect the RGB (VGA) cable from the computer through the TV. ...
E320VL User Manual
Page 28
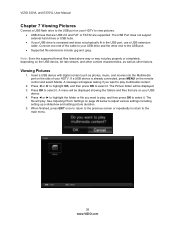
...EXIT once to return to the previous screen or repeatedly to return to adjust various settings including setting up a slideshow and setting picture duration. 5. VIZIO 320VL and E370VL User Manual Chapter 7 Viewing Pictures Connect a USB flash drive to the USB port on your HDTV to view pictures. • USB drives that... on your USB drive is already connected, press MENU on page 29 below to the main menu. 28 www.VIZIO.com Press OK to play . See Adjusting Photo Settings on the remote control and select Media. Press ◄ or ► to highlight the folder or file you want to your...
...EXIT once to return to the previous screen or repeatedly to return to adjust various settings including setting up a slideshow and setting picture duration. 5. VIZIO 320VL and E370VL User Manual Chapter 7 Viewing Pictures Connect a USB flash drive to the USB port on your HDTV to view pictures. • USB drives that... on your USB drive is already connected, press MENU on page 29 below to the main menu. 28 www.VIZIO.com Press OK to play . See Adjusting Photo Settings on the remote control and select Media. Press ◄ or ► to highlight the folder or file you want to your...


