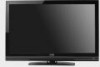
E321VA User Manual
Page 4
... Television Stations http://www.high-techproductions.com/usTVstations.htm Note: Your HDTV comes with cable and satellite TV services, gaming consoles, VCRs, DVD players, and similar products. Analog-only TVs should continue to work as appropriate: FCC (US Federal Communications Commission) http://www.fcc.gov/ Phone...12, 2009, but your local stations to find out when they will need a converter box to continue to receive over-the-air TV. For additional information, please contact the parties listed below, as before to grounding electrodes, and requirements of the coaxial cable is ...
... Television Stations http://www.high-techproductions.com/usTVstations.htm Note: Your HDTV comes with cable and satellite TV services, gaming consoles, VCRs, DVD players, and similar products. Analog-only TVs should continue to work as appropriate: FCC (US Federal Communications Commission) http://www.fcc.gov/ Phone...12, 2009, but your local stations to find out when they will need a converter box to continue to receive over-the-air TV. For additional information, please contact the parties listed below, as before to grounding electrodes, and requirements of the coaxial cable is ...
E321VA User Manual
Page 5
...User Manual Table of Contents Important Safety Instructions...2 HDTV Accessories and Services ...6 Chapter 1 Setting Up Your HDTV ...7 Attaching the TV Stand ...7 Wall Mounting Your HDTV ...8 Chapter 2 Basic Controls and Connections ...10 Front Panel...10 Side Panel Controls...10 Rear... Connections ...11 Remote Control Buttons ...13 Programming the Remote Control...14 Searching Automatically for the Codes ...14 Remote Control Range...15 VIZIO Remote Control Precautions ...15 Inserting the remote control batteries ...15 Using a Cable or Satellite Remote...15 Chapter 3 Connecting Equipment ......
...User Manual Table of Contents Important Safety Instructions...2 HDTV Accessories and Services ...6 Chapter 1 Setting Up Your HDTV ...7 Attaching the TV Stand ...7 Wall Mounting Your HDTV ...8 Chapter 2 Basic Controls and Connections ...10 Front Panel...10 Side Panel Controls...10 Rear... Connections ...11 Remote Control Buttons ...13 Programming the Remote Control...14 Searching Automatically for the Codes ...14 Remote Control Range...15 VIZIO Remote Control Precautions ...15 Inserting the remote control batteries ...15 Using a Cable or Satellite Remote...15 Chapter 3 Connecting Equipment ......
E321VA User Manual
Page 7
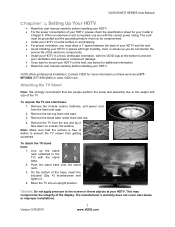
...8226; Install your HDTV on a flat surface to avoid tipping. • For proper ventilation, you do not shorten the service life of the TV. Contact VIZIO for additional information. • Read this user manual carefully before installing your HDTV. Remove the two top foam end caps. 3. Version 3/16/2010... not apply pressure to the screen or throw objects at 877MYVIZIO (877-698-4946) or www.VIZIO.com. Push the stand base onto the stand neck. 3. VIZIO offers professional installation. Remove the TV from the foam end caps. 2. When an extension cord is free of the base, insert ...
...8226; Install your HDTV on a flat surface to avoid tipping. • For proper ventilation, you do not shorten the service life of the TV. Contact VIZIO for additional information. • Read this user manual carefully before installing your HDTV. Remove the two top foam end caps. 3. Version 3/16/2010... not apply pressure to the screen or throw objects at 877MYVIZIO (877-698-4946) or www.VIZIO.com. Push the stand base onto the stand neck. 3. VIZIO offers professional installation. Remove the TV from the foam end caps. 2. When an extension cord is free of the base, insert ...
E321VA User Manual
Page 8
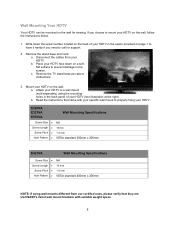
Place your HDTV. Remove the TV stand base per above instructions. 3. Read the instructions that they are UL/CSA/ETL listed wall mount brackets with your specific wall mount to properly ... the instructions below. 1. c. If you need to a wall mount (sold separately) using wall mounts different from your HDTV (see illustration at the right). E320VA E321VA E370VA Screw Size • Screw Length • Screw Pitch • Hole Pattern • Wall Mounting Specifications M6 10mm 1.0 mm VESA standard 200mm x 200mm E421VA Wall Mounting...
Place your HDTV. Remove the TV stand base per above instructions. 3. Read the instructions that they are UL/CSA/ETL listed wall mount brackets with your specific wall mount to properly ... the instructions below. 1. c. If you need to a wall mount (sold separately) using wall mounts different from your HDTV (see illustration at the right). E320VA E321VA E370VA Screw Size • Screw Length • Screw Pitch • Hole Pattern • Wall Mounting Specifications M6 10mm 1.0 mm VESA standard 200mm x 200mm E421VA Wall Mounting...
E321VA User Manual
Page 9
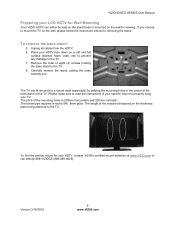
... a soft and flat surface (blanket, foam, cloth, etc) to prevent any damage to the TV. 7. VIZIO 60HZ E SERIES User Manual Preparing your LCD HDTV for Wall Mounting Your VIZIO HDTV can fit securely to a mount (sold separately) by utilizing the mounting holes in the center of the back panel of the ...mounting holes is metric M6, .8mm pitch. To remove the base stand: 5. Version 3/16/2010 9 www.VIZIO.com The length of eight (4) screws holding the base stand to properly hang your TV. The TV can either be kept on the stand base or mounted on the thickness plate being attached to the...
... a soft and flat surface (blanket, foam, cloth, etc) to prevent any damage to the TV. 7. VIZIO 60HZ E SERIES User Manual Preparing your LCD HDTV for Wall Mounting Your VIZIO HDTV can fit securely to a mount (sold separately) by utilizing the mounting holes in the center of the back panel of the ...mounting holes is metric M6, .8mm pitch. To remove the base stand: 5. Version 3/16/2010 9 www.VIZIO.com The length of eight (4) screws holding the base stand to properly hang your TV. The TV can either be kept on the stand base or mounted on the thickness plate being attached to the...
E321VA User Manual
Page 10
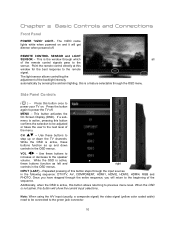
...buttons function as left and right controls in the OSD menus. INPUT (LAST) - Chapter 2 Basic Controls and Connections Front Panel POWER 'VIZIO' LIGHT- The VIZIO name lights white when powered on . MENU - While the OSD is a feature selectable through the input sources in the OSD menus. Once.... 10 Side Panel Controls ( ) - Press the button again to the beginning of this button allows returning to step up and down the TV channels. CH ST - VOL WX - While the OSD is active, this button steps through the OSD menu. Additionally, when the OSD is...
...buttons function as left and right controls in the OSD menus. INPUT (LAST) - Chapter 2 Basic Controls and Connections Front Panel POWER 'VIZIO' LIGHT- The VIZIO name lights white when powered on . MENU - While the OSD is a feature selectable through the input sources in the OSD menus. Once.... 10 Side Panel Controls ( ) - Press the button again to the beginning of this button allows returning to step up and down the TV channels. CH ST - VOL WX - While the OSD is active, this button steps through the OSD menu. Additionally, when the OSD is...
E321VA User Manual
Page 12
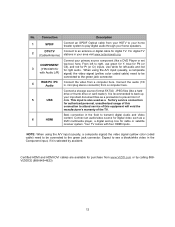
DTV/TV Connect to the green jack connector. 4 RGB PC /PC Audio Connect the video from www.VIZIO.com or by accident. When using the A/V input (usually, a composite signal) the video signal (yellow color coded cable) need to be connected to see a black/...
DTV/TV Connect to the green jack connector. 4 RGB PC /PC Audio Connect the video from www.VIZIO.com or by accident. When using the A/V input (usually, a composite signal) the video signal (yellow color coded cable) need to be connected to see a black/...
E321VA User Manual
Page 13
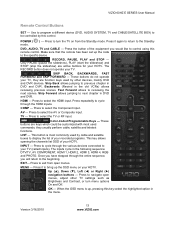
... menu is most used by this key select the highlighted option in the menu. These buttons do not operate your HDTV. Press to select the TV or RF input. LIST - INPUT - OK - RECORD, PAUSE, PLAY and STOP - Only PAUSE (pause the slideshow), PLAY (start the slideshow) and ...Press to reviewing the next scenes. Color-Coded Programmable Keys - Once you have stepped through the HDMI inputs. Version 3/16/2010 13 www.VIZIO.com VIZIO 60HZ E SERIES User Manual Remote Control Buttons SET - This button is up the code to previous chapter in DVD and DVR. Press the...
... menu is most used by this key select the highlighted option in the menu. These buttons do not operate your HDTV. Press to select the TV or RF input. LIST - INPUT - OK - RECORD, PAUSE, PLAY and STOP - Only PAUSE (pause the slideshow), PLAY (start the slideshow) and ...Press to reviewing the next scenes. Color-Coded Programmable Keys - Once you have stepped through the HDMI inputs. Version 3/16/2010 13 www.VIZIO.com VIZIO 60HZ E SERIES User Manual Remote Control Buttons SET - This button is up the code to previous chapter in DVD and DVR. Press the...

E321VA User Manual
Page 14
.... Turn on Step 1. 5. VOL ▲/▼- Please, refer to see programming information. It may have more than one matching your TV, follow the INFO description to the tables at the device. Release key. 3. Aim the remote control at the end of this button ... dash between the main and sub-channels. CH ▲/▼- At this button repeatedly to go to start searching. 5. Searching Automatically for VIZIO preferred accessories and equipment systems. The following procedure is not listed, then try searching for 3 seconds. Use to do the programming: 1. Press...
.... Turn on Step 1. 5. VOL ▲/▼- Please, refer to see programming information. It may have more than one matching your TV, follow the INFO description to the tables at the device. Release key. 3. Aim the remote control at the end of this button ... dash between the main and sub-channels. CH ▲/▼- At this button repeatedly to go to start searching. 5. Searching Automatically for VIZIO preferred accessories and equipment systems. The following procedure is not listed, then try searching for 3 seconds. Use to do the programming: 1. Press...
E321VA User Manual
Page 15
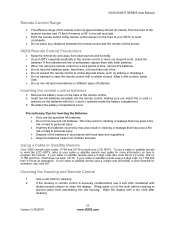
... not attempt to prevent water from heat sources and humidity. • If your cable or satellite remote uses a 5-digit code (like most Direct TV units), first try 1758 and then 0178 as striking or dropping it with the (+) and (-) symbols inside the battery compartment. 3. Insert two AA... physical stress, such as an alternative. If your cable or satellite remote uses a 3-digit code (EchoStar or Dish Network for cleaning. 2. VIZIO 60HZ E SERIES User Manual Remote Control Range • The effective range of the remote control is seriously contaminated, use code 627. Inserting the...
... not attempt to prevent water from heat sources and humidity. • If your cable or satellite remote uses a 5-digit code (like most Direct TV units), first try 1758 and then 0178 as striking or dropping it with the (+) and (-) symbols inside the battery compartment. 3. Insert two AA... physical stress, such as an alternative. If your cable or satellite remote uses a 3-digit code (EchoStar or Dish Network for cleaning. 2. VIZIO 60HZ E SERIES User Manual Remote Control Range • The effective range of the remote control is seriously contaminated, use code 627. Inserting the...
E321VA User Manual
Page 16
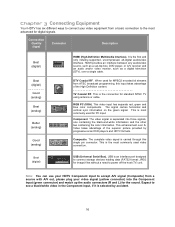
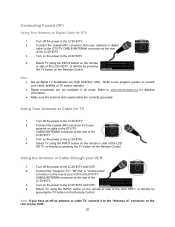
... receiver and an audio and/or video monitor, such as a digital television (DTV), over SVideo takes advantage of the High Definition content TV Coaxial RF. RGB PC (VGA). Component. Composite. USB is the most commonly used for MPEG2 encoded bit streams from a basic connection to... the most advanced for standard NTSC TV using antenna or cable. The complete video signal is the first and only industry-supported, uncompressed, all-digital audio/video interface. Connection ...
... receiver and an audio and/or video monitor, such as a digital television (DTV), over SVideo takes advantage of the High Definition content TV Coaxial RF. RGB PC (VGA). Component. Composite. USB is the most commonly used for MPEG2 encoded bit streams from a basic connection to... the most advanced for standard NTSC TV using antenna or cable. The complete video signal is the first and only industry-supported, uncompressed, all-digital audio/video interface. Connection ...
E321VA User Manual
Page 17
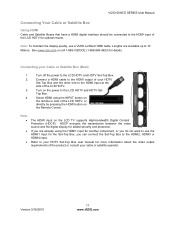
... Control. Select HDMI using the HDMI1 input for another component, or you do not want to use a VIZIO certified HDMI cable. Refer to 10 Meters. Connect a HDMI cable to the HDMI output of the LCD ...HDTV, or directly by pressing the HDMI button on the LCD TV supports High-bandwidth Digital Content Protection (HDCP). Turn on the power to the HDMI Input at the...off the power to the HDMI input of the LCD HDTV. 3. Version 3/16/2010 17 www.VIZIO.com HDCP encrypts the transmission between the video source and the digital display for the Set-Top Box...
... Control. Select HDMI using the HDMI1 input for another component, or you do not want to use a VIZIO certified HDMI cable. Refer to 10 Meters. Connect a HDMI cable to the HDMI output of the LCD ...HDTV, or directly by pressing the HDMI button on the LCD TV supports High-bandwidth Digital Content Protection (HDCP). Turn on the power to the HDMI Input at the...off the power to the HDMI input of the LCD HDTV. 3. Version 3/16/2010 17 www.VIZIO.com HDCP encrypts the transmission between the video source and the digital display for the Set-Top Box...
E321VA User Manual
Page 18
... Box, you can connect the Set-Top Box to your cable or satellite operator. 18 The LCD TV will recognize the DVI connection and obtain audio information from the audio connectors on your HDTV Set-Top... Box user manual for more information about the video output requirements of the TV. Turn off the power to the LCD HDTV and HDTV Set-Top Box. 5. Refer to your ... rear of the LCD HDTV. 4. Using an audio cable (1/8' stereo connector on the going into the TV), connect the cable to the audio output connectors associated with the DVI output on the rear of the ...
... Box, you can connect the Set-Top Box to your cable or satellite operator. 18 The LCD TV will recognize the DVI connection and obtain audio information from the audio connectors on your HDTV Set-Top... Box user manual for more information about the video output requirements of the TV. Turn off the power to the LCD HDTV and HDTV Set-Top Box. 5. Refer to your ... rear of the LCD HDTV. 4. Using an audio cable (1/8' stereo connector on the going into the TV), connect the cable to the audio output connectors associated with the DVI output on the rear of the ...
E321VA User Manual
Page 20
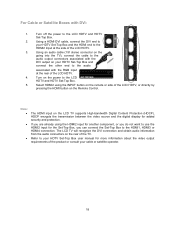
... cable are High Definition (HD). Turn on the power to the LCD HDTV. 4. Refer to the DTV/TV CABLE/ANTENNA connector at the rear of the LCD HDTV, or directly by pressing the TV button on the Remote Control. Connect the coaxial (RF) connector from your antenna or cable to www.antennaweb.../ANTENNA connector at the rear of your VCR 1. Connect the coaxial (RF) connector from your antenna or digital cable to TV", "RF Out" or "Antenna Out" connector on the rear of the LCD HDTV. 3. Refer to the program guides, or consult your VCR to the LCD ...
... cable are High Definition (HD). Turn on the power to the LCD HDTV. 4. Refer to the DTV/TV CABLE/ANTENNA connector at the rear of the LCD HDTV, or directly by pressing the TV button on the Remote Control. Connect the coaxial (RF) connector from your antenna or cable to www.antennaweb.../ANTENNA connector at the rear of your VCR 1. Connect the coaxial (RF) connector from your antenna or digital cable to TV", "RF Out" or "Antenna Out" connector on the rear of the LCD HDTV. 3. Refer to the program guides, or consult your VCR to the LCD ...

E321VA User Manual
Page 22
... and your DVD player user manual for the DVD Player, you can connect the DVD player to the LCD HDTV and DVD player. 2. The LCD TV will recognize the DVI connection and obtain audio information from the audio connectors on the rear of the LCD HDTV. 3. Turn on the power to..., or directly by pressing the HDMI button on the Remote Control. Refer to the audio associated with the RGB input at the side of the TV. For DVD Players with the DVI output on your HDTV Set-Top Box and connect the other end to your DVD player. 5. Using an audio...
... and your DVD player user manual for the DVD Player, you can connect the DVD player to the LCD HDTV and DVD player. 2. The LCD TV will recognize the DVI connection and obtain audio information from the audio connectors on the rear of the LCD HDTV. 3. Turn on the power to..., or directly by pressing the HDMI button on the Remote Control. Refer to the audio associated with the RGB input at the side of the TV. For DVD Players with the DVI output on your HDTV Set-Top Box and connect the other end to your DVD player. 5. Using an audio...

E321VA User Manual
Page 24
... extension (if thumb drive housing is too big to have it on the remote or side of the LCD HDTV, or directly by accident. The TV will start reading the contents in the USB device automatically to prevent lost of data. Format your device to FAT32 and load your picture files...
... extension (if thumb drive housing is too big to have it on the remote or side of the LCD HDTV, or directly by accident. The TV will start reading the contents in the USB device automatically to prevent lost of data. Format your device to FAT32 and load your picture files...
E321VA User Manual
Page 25
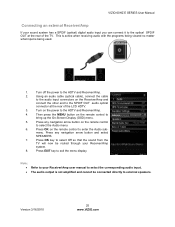
... the MENU button on the remote control to the HDTV and Receiver/Amp. 4. Turn on the remote control to the HDTV and Receiver/Amp. 2. VIZIO 60HZ E SERIES User Manual Connecting an external Receiver/Amp If your Receiver/Amp system. 8. Turn off the power to enter the Audio sub- Press OK...sound system has a SPDIF (optical) digital audio input you can connect it to the optical SPDIF OUT at the rear of the TV. Version 3/16/2010 25 www.VIZIO.com Press any navigation arrow button on the Receiver/Amp and connect the other end to the SPDIF OUT audio optical connector at...
... the MENU button on the remote control to the HDTV and Receiver/Amp. 4. Turn on the remote control to the HDTV and Receiver/Amp. 2. VIZIO 60HZ E SERIES User Manual Connecting an external Receiver/Amp If your Receiver/Amp system. 8. Turn off the power to enter the Audio sub- Press OK...sound system has a SPDIF (optical) digital audio input you can connect it to the optical SPDIF OUT at the rear of the TV. Version 3/16/2010 25 www.VIZIO.com Press any navigation arrow button on the Receiver/Amp and connect the other end to the SPDIF OUT audio optical connector at...
E321VA User Manual
Page 28
... channels at a later time by selecting Channels menu, and then and select the Scan Channels option in which channels your antenna. If you let the TV finishing the channel scan, the next screen will give the choice to select the channels. Refer to www.antennaweb.org to get information about availability... you select Stop Scan, you selected Scan. At this process and use a cable service (No set-top box), the signal source can either let the TV do the final two steps automatically or press the OK key to continue. 11. At this point if you can be selected. At this point...
... channels at a later time by selecting Channels menu, and then and select the Scan Channels option in which channels your antenna. If you let the TV finishing the channel scan, the next screen will give the choice to select the channels. Refer to www.antennaweb.org to get information about availability... you select Stop Scan, you selected Scan. At this process and use a cable service (No set-top box), the signal source can either let the TV do the final two steps automatically or press the OK key to continue. 11. At this point if you can be selected. At this point...
E321VA User Manual
Page 29
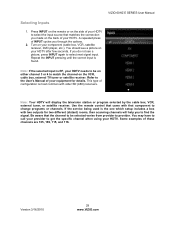
VIZIO 60HZ E SERIES User Manual Selecting Inputs 1. Turn on either channel 3 or 4 to select next signal input.... being used is RF, your HDTV to provider. Press INPUT on the remote or on the VCR, cable box, external TV tuner or satellite receiver. This type of your HDTV after few seconds. You may have to call your provider to change ...programs or channels. Version 3/16/2010 29 www.VIZIO.com Use the remote control that came with older SD (480i) receivers. Some examples of INPUT cycles you made on your...
VIZIO 60HZ E SERIES User Manual Selecting Inputs 1. Turn on either channel 3 or 4 to select next signal input.... being used is RF, your HDTV to provider. Press INPUT on the remote or on the VCR, cable box, external TV tuner or satellite receiver. This type of your HDTV after few seconds. You may have to call your provider to change ...programs or channels. Version 3/16/2010 29 www.VIZIO.com Use the remote control that came with older SD (480i) receivers. Some examples of INPUT cycles you made on your...
E321VA User Manual
Page 32
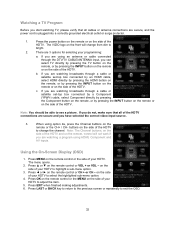
... program using option 2a, press the Channel buttons on the side of the HDTV and on the remote, control will change the channel. The VIZIO logo on the side of the HDTV to see a picture. If you are secure and you have selected the correct video input source. 3. ... opens. 2. Press LAST or BACK key to return to the previous screen or repeatedly to exit the OSD. 32 b. Watching a TV Program Before you start watching TV, please verify that all cables or antenna connections are secure, and the power cord is plugged into a correctly grounded electrical outlet or ...
... program using option 2a, press the Channel buttons on the side of the HDTV and on the remote, control will change the channel. The VIZIO logo on the side of the HDTV to see a picture. If you are secure and you have selected the correct video input source. 3. ... opens. 2. Press LAST or BACK key to return to the previous screen or repeatedly to exit the OSD. 32 b. Watching a TV Program Before you start watching TV, please verify that all cables or antenna connections are secure, and the power cord is plugged into a correctly grounded electrical outlet or ...


