
E320i-A0 User Manual
Page 2
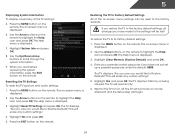
StudioSound HD and TruVolume technologies are trademarks of Dolby Laboratories. Changing the factory default picture settings or enabling other features will be achieved. Dolby and the double-D symbol are incorporated under license from SRS Labs, Inc. Manufactured under license from ...
StudioSound HD and TruVolume technologies are trademarks of Dolby Laboratories. Changing the factory default picture settings or enabling other features will be achieved. Dolby and the double-D symbol are incorporated under license from SRS Labs, Inc. Manufactured under license from ...
E320i-A0 User Manual
Page 7
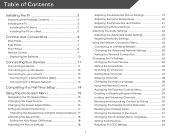
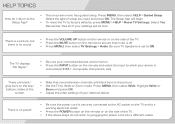
..... 17 Activating the Sleep Timer 18 Setting the Auto Power Off Feature 18 Adjusting the Picture Settings 18 Adjusting the Advanced Picture Settings 19 Adjusting the Color Temperature 20 Adjusting the Picture Size and Position 21 Resetting the Picture Settings 21 Adjusting the Audio Settings 22 Adjusting the Advanced Audio Settings 23 Resetting the...
..... 17 Activating the Sleep Timer 18 Setting the Auto Power Off Feature 18 Adjusting the Picture Settings 18 Adjusting the Advanced Picture Settings 19 Adjusting the Color Temperature 20 Adjusting the Picture Size and Position 21 Resetting the Picture Settings 21 Adjusting the Audio Settings 22 Adjusting the Advanced Audio Settings 23 Resetting the...
E320i-A0 User Manual
Page 15
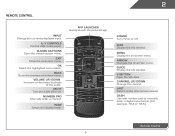
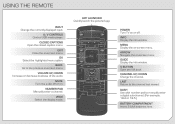
A/V Controls Control USB media player. Ok Select the highlighted menu option. App launcher Quickly launch the pictured app. Menu Display the on or off or on -screen menu. Guide Display the info window. Volume Up/Down Increase or decrease loudness of the ...
A/V Controls Control USB media player. Ok Select the highlighted menu option. App launcher Quickly launch the pictured app. Menu Display the on or off or on -screen menu. Guide Display the info window. Volume Up/Down Increase or decrease loudness of the ...
E320i-A0 User Manual
Page 21
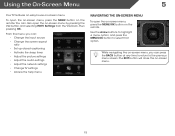
... can : • Change the input source • Change the screen aspect ratio • Set up closed captioning • Activate the sleep timer • Adjust the picture settings • Adjust the audio settings • Adjust the network settings • Change TV settings • Access the help menu Navigating the On-Screen Menu...
... can : • Change the input source • Change the screen aspect ratio • Set up closed captioning • Activate the sleep timer • Adjust the picture settings • Adjust the audio settings • Adjust the network settings • Change TV settings • Access the help menu Navigating the On-Screen Menu...

E320i-A0 User Manual
Page 22
... images in the on the remote to display. The TV Settings menu is being stretched, the display image may appear distorted. Each mode displays the picture differently. Press OK. 3. Images may appear wider than intended. Press the MENU button on the remote. 2. Use the Arrow buttons on the remote ...The TV can be connected to your TV, you are added to the left and right of the display image. • Wide stretches a 4:3 aspect ratio picture to fill the screen. Use the Arrow buttons to highlight the Settings icon and press OK. Press OK, then press EXIT. Since the...
... images in the on the remote to display. The TV Settings menu is being stretched, the display image may appear distorted. Each mode displays the picture differently. Press OK. 3. Images may appear wider than intended. Press the MENU button on the remote. 2. Use the Arrow buttons on the remote ...The TV can be connected to your TV, you are added to the left and right of the display image. • Wide stretches a 4:3 aspect ratio picture to fill the screen. Use the Arrow buttons to highlight the Settings icon and press OK. Press OK, then press EXIT. Since the...
E320i-A0 User Manual
Page 24
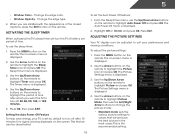
... save energy, your preferences and viewing conditions. Highlight Off or 10 min and press OK. Press Exit. Press the MENU button on the screen. The Picture Settings menu is displayed. 2. This is displayed. 3. 5 • Window Color - Press OK, then press EXIT. Use the Up/Down Arrow buttons ..., 120, or 180 minutes. 5. The on the remote to highlight the period of the closed captions, press the EXIT button on the remote. The Picture Settings menu is displayed. 4. Use the Arrow buttons on the remote to suit your TV is displayed. 2. Change the edge color. • Window ...
... save energy, your preferences and viewing conditions. Highlight Off or 10 min and press OK. Press Exit. Press the MENU button on the screen. The Picture Settings menu is displayed. 2. This is displayed. 3. 5 • Window Color - Press OK, then press EXIT. Use the Up/Down Arrow buttons ..., 120, or 180 minutes. 5. The on the remote to highlight the period of the closed captions, press the EXIT button on the remote. The Picture Settings menu is displayed. 4. Use the Arrow buttons on the remote to suit your TV is displayed. 2. Change the edge color. • Window ...
E320i-A0 User Manual
Page 25
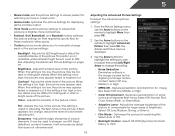
... to change each of brightness. Select Off, DCR (Dynamic Contrast Ratio), or OPC. 19 Tint - Sharpness - Adjusts the edge sharpness of the picture. From the Picture Settings menu, use the Arrow buttons on page 19. Use the Arrow buttons on the remote to highlight Advanced... definition) content; If the setting is displayed. 3. Select Off, Low, Medium, or High. • MPEG NR - When this setting is too high, the picture may appear faded or washed out. Use the Arrow buttons to highlight the setting you to manually change the setting: • Noise Reduction Diminishes artifacts...
... to change each of brightness. Select Off, DCR (Dynamic Contrast Ratio), or OPC. 19 Tint - Sharpness - Adjusts the edge sharpness of the picture. From the Picture Settings menu, use the Arrow buttons on page 19. Use the Arrow buttons on the remote to highlight Advanced... definition) content; If the setting is displayed. 3. Select Off, Low, Medium, or High. • MPEG NR - When this setting is too high, the picture may appear faded or washed out. Use the Arrow buttons to highlight the setting you to manually change the setting: • Noise Reduction Diminishes artifacts...
E320i-A0 User Manual
Page 26
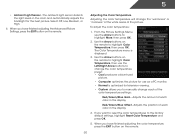
... as a PC monitor. • Normal is displayed. 3. The Color Temperature menu is optimized for the best picture. When you have finished adjusting the Advanced Picture Settings, press the EXIT button on the remote to highlight Color Temperature, then use the Left/Right Arrow buttons to... change the color temperature preset: • Cool produces a blue-hued picture. • Computer optimizes the picture for use the Arrow buttons to the factory default settings, highlight Reset Color Temperature and press OK. 5. Red/Green/Blue ...
... as a PC monitor. • Normal is displayed. 3. The Color Temperature menu is optimized for the best picture. When you have finished adjusting the Advanced Picture Settings, press the EXIT button on the remote to highlight Color Temperature, then use the Left/Right Arrow buttons to... change the color temperature preset: • Cool produces a blue-hued picture. • Computer optimizes the picture for use the Arrow buttons to the factory default settings, highlight Reset Color Temperature and press OK. 5. Red/Green/Blue ...
E320i-A0 User Manual
Page 27
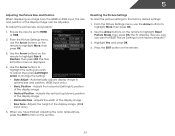
...display image. • Fine Tune - The Size & Position menu is set to highlight More, then press OK. 2. Resetting the Picture Settings To reset the picture settings to optimal size and position. (RGB input only.) • Horiz. Automatically adjusts display image to the factory default settings: ...1. Adjusts the width of the display image can be adjusted. From the Picture Settings menu, use the Arrow buttons to HDMI or RGB. 2. Adjusts the vertical (up/down) position of the display image. • ...
...display image. • Fine Tune - The Size & Position menu is set to highlight More, then press OK. 2. Resetting the Picture Settings To reset the picture settings to optimal size and position. (RGB input only.) • Horiz. Automatically adjusts display image to the factory default settings: ...1. Adjusts the width of the display image can be adjusted. From the Picture Settings menu, use the Arrow buttons to HDMI or RGB. 2. Adjusts the vertical (up/down) position of the display image. • ...
E320i-A0 User Manual
Page 40
... the Up/Down Arrow buttons to its factory default settings: 1. When you would like to Restore Defaults? Resetting the TV Settings To reset the TV's picture and audio settings: 1. Highlight Reset TV Settings and press OK. Press the EXIT button on the remote. Press the MENU button on the remote. The...
... the Up/Down Arrow buttons to its factory default settings: 1. When you would like to Restore Defaults? Resetting the TV Settings To reset the TV's picture and audio settings: 1. Highlight Reset TV Settings and press OK. Press the EXIT button on the remote. Press the MENU button on the remote. The...
E320i-A0 User Manual
Page 47
... your name using the QWERTY Keyboard and press OK. Press the V Button on -screen keyboard, then press OK. The Profile App is displayed. 12. Highlight a picture for your security answer using the QWERTY Keyboard on the remote or the on the remote. 2. The Create Profile menu is displayed. 6. The Create Profile...
... your name using the QWERTY Keyboard and press OK. Press the V Button on -screen keyboard, then press OK. The Profile App is displayed. 12. Highlight a picture for your security answer using the QWERTY Keyboard on the remote or the on the remote. 2. The Create Profile menu is displayed. 6. The Create Profile...

E320i-A0 User Manual
Page 50
.... • Ensure all cables are securely attached to the TV. • Ensure all cables to ensure they are connected correctly. See Resetting the Picture Settings on page 10 44 See Replacing the Batteries on page 21 • Check all devices are securely attached. See Resetting the... Picture Settings on page 21 • Press the INPUT button on the remote control to select a different input source. • If you are using ...
.... • Ensure all cables are securely attached to the TV. • Ensure all cables to ensure they are connected correctly. See Resetting the Picture Settings on page 10 44 See Replacing the Batteries on page 21 • Check all devices are securely attached. See Resetting the... Picture Settings on page 21 • Press the INPUT button on the remote control to select a different input source. • If you are using ...
E320i-A0 User Manual
Page 51
.../Down buttons on -screen menu are set correctly. • If you are securely attached. This up -converted (improved) to a window for the best signal. The picture is connected securely to the TV and move the antenna around the room or close to this type of the channel may be low. Ensure...
.../Down buttons on -screen menu are set correctly. • If you are securely attached. This up -converted (improved) to a window for the best signal. The picture is connected securely to the TV and move the antenna around the room or close to this type of the channel may be low. Ensure...
E320i-A0 Quick Start Guide
Page 7
... on -screen menu. OK Select the highlighted menu option. INFO Display the info window. EXIT Close the on -screen menu. APP LAUNCHER Quickly launch the pictured app. A/V CONTROLS Control USB media player. V BUTTON Open the VIA dock. LAST Return to manually enter a digital sub-channel. (For example, 18-4 or 18-5.) BATTERY...
... on -screen menu. OK Select the highlighted menu option. INFO Display the info window. EXIT Close the on -screen menu. APP LAUNCHER Quickly launch the pictured app. A/V CONTROLS Control USB media player. V BUTTON Open the VIA dock. LAST Return to manually enter a digital sub-channel. (For example, 18-4 or 18-5.) BATTERY...

E320i-A0 Quick Start Guide
Page 16
VIZIO RECOMMENDS THE ULTIMATE ULTRABOOK™ 14" THIN+LIGHT With uncompromising performance, and premium picture and audio quality in small packages, this must be the best there is the Ultrabook that's impossible to ignore. Available at www.VIZIO.com This Product Sold Separately Ultra-responsive and ultra-portable, the VIZIO Thin+Light boots up instantly and goes wherever you do. If good things come in a remarkably thin profile, the VIZIO Thin+Light is .
VIZIO RECOMMENDS THE ULTIMATE ULTRABOOK™ 14" THIN+LIGHT With uncompromising performance, and premium picture and audio quality in small packages, this must be the best there is the Ultrabook that's impossible to ignore. Available at www.VIZIO.com This Product Sold Separately Ultra-responsive and ultra-portable, the VIZIO Thin+Light boots up instantly and goes wherever you do. If good things come in a remarkably thin profile, the VIZIO Thin+Light is .
E320i-A0 Quick Start Guide
Page 17
... all of setup you need and press OK. There are turned on. • Press the INPUT button on -screen menu has guided setup. There is a picture, but there is no power. • Be sure the power cord is securely connected to the AC socket on the TV and to factory defaults... top/ bottom/sides of the TV. • Press the MUTE button on the remote to ensure that some television channels add black bars to the picture. • Set the TV to ON.
... all of setup you need and press OK. There are turned on. • Press the INPUT button on -screen menu has guided setup. There is a picture, but there is no power. • Be sure the power cord is securely connected to the AC socket on the TV and to factory defaults... top/ bottom/sides of the TV. • Press the MUTE button on the remote to ensure that some television channels add black bars to the picture. • Set the TV to ON.

E320i-A0 Data Sheet
Page 1
... LED backlighting, every detail pops with high-quality design and picture at the push of consumers who purchased an HDTV in a way only VIZIO can, with rich color and vivid details. SMART TV + WIFI VIZIO Internet Apps® gives you instant access to same size ... best value. Images used are up to change without notice. © 2012 VIZIO Inc. rev 09282012 ENERGY SAVINGS E-Series LED HDTVs are for illustration purposes only. *When compared to a world of VIZIO Inc. E320i-A0 GREAT DESIGN. Power and Associates 2012 High Definition Television (HDTV) Satisfaction ReportSM....
... LED backlighting, every detail pops with high-quality design and picture at the push of consumers who purchased an HDTV in a way only VIZIO can, with rich color and vivid details. SMART TV + WIFI VIZIO Internet Apps® gives you instant access to same size ... best value. Images used are up to change without notice. © 2012 VIZIO Inc. rev 09282012 ENERGY SAVINGS E-Series LED HDTVs are for illustration purposes only. *When compared to a world of VIZIO Inc. E320i-A0 GREAT DESIGN. Power and Associates 2012 High Definition Television (HDTV) Satisfaction ReportSM....


