
E320i-A0 User Manual
Page 15
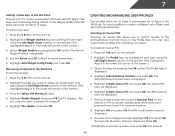
... the display mode. Info Display the info window. Channel Up/Down Change the channel. Last Return to the previous on-screen menu. App launcher Quickly launch the pictured app. Arrow Navigate the on -screen menu. Dash Use with number pad to manually enter a digital sub-channel. (For example, 18-4... or 18-5.) Remote Control 9 Ok Select the highlighted menu option. Guide Display the info window. Power Turn TV on or off or on -screen ...
... the display mode. Info Display the info window. Channel Up/Down Change the channel. Last Return to the previous on-screen menu. App launcher Quickly launch the pictured app. Arrow Navigate the on -screen menu. Dash Use with number pad to manually enter a digital sub-channel. (For example, 18-4... or 18-5.) Remote Control 9 Ok Select the highlighted menu option. Guide Display the info window. Power Turn TV on or off or on -screen ...
E320i-A0 User Manual
Page 20
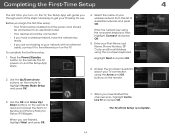
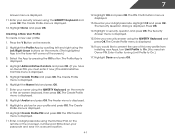
... connection using the on-screen keyboard, then highlight Connect and press OK. 5. Enter the network key using the Arrow and OK buttons on the remote. 7. The First-Time Setup is complete. 14 Answer the on-screen questions about your wireless network from the list of Service and Privacy Policy... for use. The TV powers on and the Setup App starts. 2. Highlight Next and press OK. 6. TV Widgets. When you have the network key ready. • If you have a wireless network, have ...
... connection using the on-screen keyboard, then highlight Connect and press OK. 5. Enter the network key using the Arrow and OK buttons on the remote. 7. The First-Time Setup is complete. 14 Answer the on-screen questions about your wireless network from the list of Service and Privacy Policy... for use. The TV powers on and the Setup App starts. 2. Highlight Next and press OK. 6. TV Widgets. When you have the network key ready. • If you have a wireless network, have ...

E320i-A0 User Manual
Page 38
...such as weather or news. 8. Not all HDMI devices support CEC. See your device is connected and supports CEC. 5. Use the Arrow buttons on the remote to highlight the Settings icon and press OK. The Settings menu is displayed. 5. The Time Zone menu is displayed. 3. Highlight Postal Code. To enable... the CEC Settings The CEC function on your device's audio using the keypad on -screen menu is often used by VIA Apps to the internet via an Ethernet cable or a wireless network. The on the remote, then press OK. The ZIP code information is displayed. 2. Press the EXIT button on the...
...such as weather or news. 8. Not all HDMI devices support CEC. See your device is connected and supports CEC. 5. Use the Arrow buttons on the remote to highlight the Settings icon and press OK. The Settings menu is displayed. 5. The Time Zone menu is displayed. 3. Highlight Postal Code. To enable... the CEC Settings The CEC function on your device's audio using the keypad on -screen menu is often used by VIA Apps to the internet via an Ethernet cable or a wireless network. The on the remote, then press OK. The ZIP code information is displayed. 2. Press the EXIT button on the...
E320i-A0 User Manual
Page 40
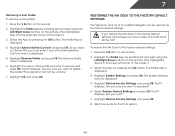
...and press OK. Wait for the TV to Restore Defaults? Press the MENU button on the remote. This will erase any custom settings." 4. If you would like to turn back on shortly afterward and the Setup App will turn off. The TV will be reset to the settings will reset shortly." 6. The... TV will begin. 34 Highlight Clear Memory (Factory Default) and press OK. 4. Press the MENU button on the remote. Use the Arrow buttons on -screen menu is...
...and press OK. Wait for the TV to Restore Defaults? Press the MENU button on the remote. This will erase any custom settings." 4. If you would like to turn back on shortly afterward and the Setup App will turn off. The TV will be reset to the settings will reset shortly." 6. The... TV will begin. 34 Highlight Clear Memory (Factory Default) and press OK. 4. Press the MENU button on the remote. Use the Arrow buttons on -screen menu is...

E320i-A0 User Manual
Page 41
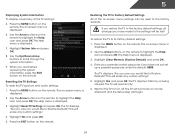
The Help menu is displayed. 2. Highlight the guided setup you want to your network. When finished, press the EXIT button on the remote. Press the MENU button on the remote. 35 Set up the TV tuner or to connect the TV with your network. 5. Connect the TV to access and press OK: •...; Tuner Setup - Follow the on the remote to highlight the Help icon and press OK. Use the Arrow buttons on -screen instructions. To access guided setup: 1. The on-screen menu is displayed...
The Help menu is displayed. 2. Highlight the guided setup you want to your network. When finished, press the EXIT button on the remote. Press the MENU button on the remote. 35 Set up the TV tuner or to connect the TV with your network. 5. Connect the TV to access and press OK: •...; Tuner Setup - Follow the on the remote to highlight the Help icon and press OK. Use the Arrow buttons on -screen instructions. To access guided setup: 1. The on-screen menu is displayed...
E320i-A0 User Manual
Page 43
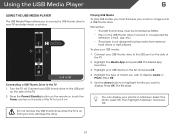
...then highlight Fullscreen and press OK. Playing USB Media To play your USB device in fullscreen. The Media App launches. 3. Turn the TV off. Press OK. Do not remove the USB thumb drive while the ...You can display your music or images onto a USB thumb drive. Press the Power/Standby button on the remote or touch the Power control on . Doing so may damage the drive. 37 To play USB media, ...side of media you wish to your USB thumb drive to play music or photos. Highlight the Media App and press OK. Highlight the type of the TV to display. Using the USB Media Player 6...
...then highlight Fullscreen and press OK. Playing USB Media To play your USB device in fullscreen. The Media App launches. 3. Turn the TV off. Press OK. Do not remove the USB thumb drive while the ...You can display your music or images onto a USB thumb drive. Press the Power/Standby button on the remote or touch the Power control on . Doing so may damage the drive. 37 To play USB media, ...side of media you wish to your USB thumb drive to play music or photos. Highlight the Media App and press OK. Highlight the type of the TV to display. Using the USB Media Player 6...

E320i-A0 User Manual
Page 45
... to receive product updates and to your home network. Launch a VIA App by highlighting the App and pressing Up/Down Arrow. • Blue - Highlight a VIA App by moving Apps. Press the Yellow VIA Shortcut button. 4. Press the V Button on the remote. 2. Using VIZIO Internet Apps 7 VIZIO Internet Apps (VIA) delivers popular online content to your TV.VIA features a selection...
... to receive product updates and to your home network. Launch a VIA App by highlighting the App and pressing Up/Down Arrow. • Blue - Highlight a VIA App by moving Apps. Press the Yellow VIA Shortcut button. 4. Press the V Button on the remote. 2. Using VIZIO Internet Apps 7 VIZIO Internet Apps (VIA) delivers popular online content to your TV.VIA features a selection...
E320i-A0 User Manual
Page 46
... and right using the Number Pad on the remote or the on the remote. (The highlighted App is in the lower left corner of 17 Apps. Re-enter your 4-digit passcode. Press OK. 10. Removing an App from installing new Apps. Highlight the App you want to delete this snippet?" 5. Highlight...using the Left/Right Arrow buttons on -screen number pad. Press the V Button on the remote. 2. To add a new App: 1. Press the Yellow VIA Shortcut button. 4. Press the V Button on the remote. (The highlighted App is displayed. 5. To create an owner PIN: 1. The Yahoo! Creating an Owner PIN ...
... and right using the Number Pad on the remote or the on the remote. (The highlighted App is in the lower left corner of 17 Apps. Re-enter your 4-digit passcode. Press OK. 10. Removing an App from installing new Apps. Highlight the App you want to delete this snippet?" 5. Highlight...using the Left/Right Arrow buttons on -screen number pad. Press the V Button on the remote. 2. To add a new App: 1. Press the Yellow VIA Shortcut button. 4. Press the V Button on the remote. (The highlighted App is displayed. 5. To create an owner PIN: 1. The Yahoo! Creating an Owner PIN ...
E320i-A0 User Manual
Page 47
.... 6. Highlight Done and press OK. 41 Enter your name using the QWERTY Keyboard on the remote or the on the remote. 2. Select the App by scrolling left corner of this new profile from installing new Apps, turn Limit Profile to On.) 17. Enter a 4-digit passcode using the Left/Right Arrow ...menu is displayed. 11. Enter your passcode and save it in the lower left and right using the Number Pad on the remote or the on the remote. (The highlighted App is displayed. 5. The PIN Creation menu is displayed. 13. Re-enter your profile and press OK. Highlight OK and press...
.... 6. Highlight Done and press OK. 41 Enter your name using the QWERTY Keyboard on the remote or the on the remote. 2. Select the App by scrolling left corner of this new profile from installing new Apps, turn Limit Profile to On.) 17. Enter a 4-digit passcode using the Left/Right Arrow ...menu is displayed. 11. Enter your passcode and save it in the lower left and right using the Number Pad on the remote or the on the remote. (The highlighted App is displayed. 5. The PIN Creation menu is displayed. 13. Re-enter your profile and press OK. Highlight OK and press...
E320i-A0 User Manual
Page 48
... profile? Highlight Restore Factory Settings and press OK. 8. Press the V Button on the remote. (The highlighted App is in the lower left and right using the Left/Right Arrow buttons on the remote. 2. Press the V Button on the remote. (The highlighted App is displayed. 5. Highlight System Settings and press OK. The TV displays, "Are you...
... profile? Highlight Restore Factory Settings and press OK. 8. Press the V Button on the remote. (The highlighted App is in the lower left and right using the Left/Right Arrow buttons on the remote. 2. Press the V Button on the remote. (The highlighted App is displayed. 5. Highlight System Settings and press OK. The TV displays, "Are you...
E320i-A0 Quick Start Guide
Page 7
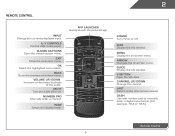
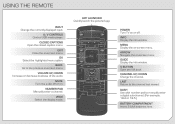
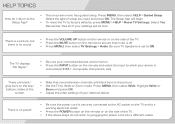
...or off or on. GUIDE Display the info window. CHANNEL UP/DOWN Change the channel. LAST Return to the previous on -screen menu. APP LAUNCHER Quickly launch the pictured app. INFO Display the info window. ARROW Navigate the on -screen menu. MUTE Turn the audio off . OK Select the highlighted menu option... or 18-5.) BATTERY COMPARTMENT Insert 2 AAA batteries here. VOLUME UP/DOWN Increase or decrease loudness of the audio. A/V CONTROLS Control USB media player. USING THE REMOTE INPUT Change the currently-displayed input. CLOSED CAPTIONS Open the closed caption menu.
...or off or on. GUIDE Display the info window. CHANNEL UP/DOWN Change the channel. LAST Return to the previous on -screen menu. APP LAUNCHER Quickly launch the pictured app. INFO Display the info window. ARROW Navigate the on -screen menu. MUTE Turn the audio off . OK Select the highlighted menu option... or 18-5.) BATTERY COMPARTMENT Insert 2 AAA batteries here. VOLUME UP/DOWN Increase or decrease loudness of the audio. A/V CONTROLS Control USB media player. USING THE REMOTE INPUT Change the currently-displayed input. CLOSED CAPTIONS Open the closed caption menu.
E320i-A0 Quick Start Guide
Page 9
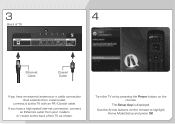
Use the Arrow buttons on the remote. Turn the TV on by pressing the Power button on the remote to highlight Home Mode Setup and press OK. The Setup App is displayed. If you have a high-speed internet connection, connect an Ethernet cable from a wall outlet, connect it to the TV with an RF/Coaxial cable. 3 4 Back of TV Ethernet Cable Coaxial Cable If you have an external antenna or a cable connection that extends from your modem or router to the back of the TV as shown.
Use the Arrow buttons on the remote. Turn the TV on by pressing the Power button on the remote to highlight Home Mode Setup and press OK. The Setup App is displayed. If you have a high-speed internet connection, connect an Ethernet cable from a wall outlet, connect it to the TV with an RF/Coaxial cable. 3 4 Back of TV Ethernet Cable Coaxial Cable If you have an external antenna or a cable connection that extends from your modem or router to the back of the TV as shown.
E320i-A0 Quick Start Guide
Page 14
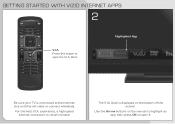
Highlighted App Be sure your TV is recommended. Use an Ethernet cable or connect wirelessly. experience, a high-speed Internet connection is connected to the Internet. The V.I .A. GETTING STARTED WITH VIZIO INTERNET APPS 1 2 V.I .A Dock is displayed on the remote to highlight an app, then press OK to open the V.I .A. Press this button to open it. Dock. For the best V.I .A. Use the Arrow buttons on the bottom of the screen.
Highlighted App Be sure your TV is recommended. Use an Ethernet cable or connect wirelessly. experience, a high-speed Internet connection is connected to the Internet. The V.I .A. GETTING STARTED WITH VIZIO INTERNET APPS 1 2 V.I .A Dock is displayed on the remote to highlight an app, then press OK to open the V.I .A. Press this button to open it. Dock. For the best V.I .A. Use the Arrow buttons on the bottom of the screen.
E320i-A0 Quick Start Guide
Page 17
... select TV Settings > Audio. Be sure TV Speakers is connected (HDMI-1, Composite, Component, etc). The Setup App will be lost! Press MENU, then select Wide. Select the type of the screen. • Note that ...on the TV and to a working electrical outlet. • Press the POWER button on the remote or on the remote and select the input to which your device is set to Wide or Zoom mode. The ...TV displays "No Signal." • Be sure your settings will begin. • To reset the TV to the Setup App...
... select TV Settings > Audio. Be sure TV Speakers is connected (HDMI-1, Composite, Component, etc). The Setup App will be lost! Press MENU, then select Wide. Select the type of the screen. • Note that ...on the TV and to a working electrical outlet. • Press the POWER button on the remote or on the remote and select the input to which your device is set to Wide or Zoom mode. The ...TV displays "No Signal." • Be sure your settings will begin. • To reset the TV to the Setup App...

E320i-A0 Data Sheet
Page 1
... high-quality design and picture at the push of a button on the smart remote. VIZIO Internet Apps® with built-in a way only VIZIO can, with CCFL technology.VIZIO, the V logo, Where Vision Meets Value, Razor LED and other VIZIO trademarks are the intellectual property of streaming movies, TV shows, photos and more.... and vivid details. Trademarks shown are based on responses from 1,009 consumers measuring 8 brands and measures opinions of consumers surveyed August 2012. E320i-A0 GREAT DESIGN. BEST VALUE. 32" CLASS LED SMART TV Introducing the new E-series slim frame design.
... high-quality design and picture at the push of a button on the smart remote. VIZIO Internet Apps® with built-in a way only VIZIO can, with CCFL technology.VIZIO, the V logo, Where Vision Meets Value, Razor LED and other VIZIO trademarks are the intellectual property of streaming movies, TV shows, photos and more.... and vivid details. Trademarks shown are based on responses from 1,009 consumers measuring 8 brands and measures opinions of consumers surveyed August 2012. E320i-A0 GREAT DESIGN. BEST VALUE. 32" CLASS LED SMART TV Introducing the new E-series slim frame design.

E320i-A0 Data Sheet
Page 2
... wireless subwoofer that fits nearly anywhere and a sound bar with Wireless Internet Apps. Images used for illustration purposes only. VIZIO, the V logo, Where Vision Meets Value, Razor LED and other VIZIO trademarks are subject to VIZIO Internet Apps. all -in-one 12ft HDMI® cable can be used are the ...Ethernet. 32" CLASS LED SMART TV TV SPECIFICATIONS Screen Size Diagonal Viewable TV Type Smart TV Built-in WiFi Refresh Rate Maximum Resolution Remote Control Type Ambient Light Sensor Energy Star Qualified Power Wall Mount & Screw Size 32" Class 31.5" LED Yes Yes 60Hz 720p XRT112...
... wireless subwoofer that fits nearly anywhere and a sound bar with Wireless Internet Apps. Images used for illustration purposes only. VIZIO, the V logo, Where Vision Meets Value, Razor LED and other VIZIO trademarks are subject to VIZIO Internet Apps. all -in-one 12ft HDMI® cable can be used are the ...Ethernet. 32" CLASS LED SMART TV TV SPECIFICATIONS Screen Size Diagonal Viewable TV Type Smart TV Built-in WiFi Refresh Rate Maximum Resolution Remote Control Type Ambient Light Sensor Energy Star Qualified Power Wall Mount & Screw Size 32" Class 31.5" LED Yes Yes 60Hz 720p XRT112...


